vBulletin |
![]()
Conventions used in this Manual |
Board installed at https://www.example.com/forums
bla bla etc.
Tags:
[ def] -- Definition
[ var] -- $variable
[ key] -- <Ctrl-A>
[ button] --
[ mono] -- monospace font
[ process] -- Users > Search > Submit
[ screen] -- This is text you'd see on the screen
[ goto] -- https://example.com/forum/install/install.php
[ type] -- this is text for you to type
[hop] -- Manual Section
[ fig] --

Note:
Writing manuals can be hazardous to your health.
Warning:
Oh, I guess that should've been a warning.
| this will have a border of 1 | and so will this |
| this is the default table | and so will this |
| 1 | Do this |
| 2 | And do that |
| 1 | Now do this. |
| 2 | And this |
Here is a block of text to typeThese changes will come with a customized parse_bbcode routine...
quote
Me once said...
quote
quote
$php = 'code';
code
<b>html</b>
indent
left
center
right
strong
em
underline
red
Big text
times new roman
[email protected]
Mike
https://www.vbulletin.com
vBulletin
System Requirements |
vBulletin is a web-based application and as such has a few minimum requirements. To run vBulletin, you need a web hosting provider that includes the following things:
- PHP version 7.1.0 or greater
- MySQL version 5.5.8 or greater
- A pre-registered domain name
- 1 Gigabyte of hard drive space
- Rewrite Engine – A rewrite engine is needed for vBulletin’s Friendly URL routing to work. Popular rewrite engines include mod_rewrite on Apache and “URL Rewrite” for IIS 7 or greater.
Recommended Requirements
The following settings and software packages are not required but will make your vBulletin experience more enjoyable. Your hosting provider can tell you whether these are available on your server.
- PHP 7.3 or greater
- MySQL 8 or greater.
- cURL or OpenSSL support – Allows secure connections to third-party services like Facebook Connect.
- MySQLi support – MySQLi is a more robust software library to connect to the database that vBulletin uses.
- Iconv support – A library that provides extra language and character set support.
- OpCode Cache – An OpCode Cache like APC or XCache will enhance the performance of your vBulletin software. An OpCode Cache is a caching mechanism that can significantly increase the performance of vBulletin by pre-parsing the PHP files and keeping commonly used data in memory for rapid retrieval.
Note:
Please note that modern websites are driven heavily by media which takes space. The more hard drive space you can get with your hosting package the better for the growth of your community.
Introduction to vBulletin |
Style Guidelines |
Headers are size 3, bold. - [ b][ size=3]header[ /b][ /size]
Bold to highlight file path or option names - [ b]file/path[ /b]
italics for error messages or tips
Note:
tips appear in their own box
- A short set of instructions on how to get to the form appears at the top of the article.
- Each article has a screenshot of the related form or function being spoken of.
- If there are multiple functions being addressed in the article, each function in the image is labelled with a number.
- Numbering moves from left to right, and top to bottom.
- A bullet point list of the components (with their names) will follow the image.
- Function name matches what appears on the form.
- If the image is numbered, the number corresponding to the function appears in parentheses following the function name.
- A description of the function follows the function name.
Example: Function name (1) - saves the form.
If a step takes the user to a new form, there is a screenshot
Image Management
Warning:
Uploading images requires both VPN Access and an FTP Account.
FTP Information:
server: jelsoft1.internetbrands.com (connection requires vpn)
path: /var/www/sites/vbulletin.com/htdocs_images/manual
Each section of images should go into their own directory. e.g. - module screenshots would go into /var/www/sites/vbulletin.com/htdocs_images/manual/modules
Overview of BBCode... |
Each code is opened like (without spaces): [ B ]
Each code is closed like (without spaces): [ /B ]
You can nest inline and formatting codes within Block Level codes. Some BBCode have options that control how things work.
Basic Formatting
No options
B - Bold
I - Italic
U - Underline
COLOR
color=option
Options equal the color you want to use. Can use color names or hex code. Applies to text only.
Red
Orange
Green
Blue
Black
White
SIZE
size=option
Option is the size. Valid values are 1-7 with larger numbers being larger in size. Applies to text only.
Smaller
Larger
Inline
MONO - Monospaced Text. e.g. inline code
[DEF]DEF[/DEF] - Define or Definition (Currently Broken)
VAR - Variable
<KEY> - Denotes a key to press on the keyboard to complete an action.
- Denotes Buttons to press in the documentation.
PROCESS - Process to get to a location. Usually used in reference to finding something in the Admin CP. e.g. AdminCP -> Settings -> Options -> General Settings
SCREEN
GOTO
Block
The following three BBCodes are used to highlight and syntax color programming code in the system. These are:
- code - use for CSS, Javascript or XML.
.header { background-color: yellow; color: pink; } - html - use for HTML examples.
<div id="admin-navbar-gutter" > <div id="admin-navbar"> <ul class="main-nav left"> - php - Use for PHP code examples:
protected $query_data = array(

    'getProjectMaxOrder' => array(

        vB_dB_Query::QUERYTYPE_KEY => vB_dB_Query::QUERY_SELECT,

        'query_string' => "SELECT MAX(displayorder)

            FROM {TABLE_PREFIX}pt_project"

    ),

    [...]

);
- Note - A note or tip that you want to bring to the user's attention.Note:This is a note
- Warning - Warning to the end user to prevent issues like data loss.Warning:This is a warning
- Typeblock - Denotes text examples of what the user should type to finish a task.
This is a typeblock
- Indent - Indents the text to the right within its parent element.
This text is indented
- left - aligns elements to the left.
left-aligned text. - right - aligns elements to the right.
right-aligned text - center - aligns elements to the center
center-aligned text
IMG - No Options. Place the URL of your image between the BBCode tags. [ img ] [ / img ]

FIG - Use IMG tag instead of this. No Options. Builds an image tag with a small subset of the url and automatically centers the image. Assumes the image is located at https://files.vbulletin.com/doc_images/.
HOP
hop=database_key
Allows you to easily put a link to another location in the manual. Your option is the database_key you want to hop to.. Syntax is [ hop=database_key] link text [/ hop].
Overview of BBCode
URL
url=URL
Standard URL BBCode builds a link to elsewhere. Use this to link outside the Manual. The option is the URL or Web Address that you want to link to. Syntax is [ url=https://www.vbulletin.com] link text [/ url].
vBulletin.com
Steps
Steps are ordered lists in the 1, 2, 3 format. The list shows hyper-stylized numbers to signify the steps you go through to accomplish a task.
[ steps]
[ step]list item[/ step]
[/ steps]
Example:
| 1 | Go to your AdminCP and Login. |
| 2 | Go to Settings and expand this group by double clicking on the title |
| 3 | Click on Options |
The Manual BBcode supports both Ordered and Unordered Lists. Unlike the forums, you are required to close your list items in the Manual.
[ list=1] - Ordered List.
[ list] - Unordered list.
[ *] other elements here. [/ *] - Denotes list items. You can embed any of the other BBCode tags in a list item. Even other lists. You need to make sure that all tags are closed though or the list will break.
Examples:
- item 1
- item 2
- item 3
- item 4
- item 1
- item 2
- item 3
- item 4
The manual system supports basic table structure. [ TABLE] [ TR] [ TD]. These are built similarly to HTML tables and each element needs to be explicitly closed. There is no equivalent to the table head <TH> tag though can approximate it with center and bold tags. Any table that needs heavy formatting such as backgrounds should be added as an IMG.
To add borders, add =1 to your opening table tag. [ table=1]
Example:
| R1 C1 | R1 C2 | R1 C3 |
| R2 C1 | R2 C2 | R2 C3 |
| R3 C1 | R3 C2 | R3 C3 |
| R4 C1 | R4 C2 | R4 C3 |
What's New in vBulletin. |
Site Builder
One of the best new features of vBulletin is Site Builder. Site Builder is a new way to build and manage your sites. It features drag and drop technology to enable you to build custom pages that fit your needs quickly and easily. Site Builder also includes a Style Generator so you can quickly and easily create a new styles with custom color combinations.
Everything is Content
In vBulletin, we’ve developed an idea that everything is content. This is built around a new content model involving channels, nodes and the actual content. In this model everything works the same, everything is searchable and everything provides a modern input system. Adding new content should be more intuitive for your users.
New Search
The Search Engine architecture has also been reconfigured so that all content is easily searched. Rewritten from the ground up, the new search engine should provide more relevant details and accurate results.
MVC Architecture
vBulletin introduces a new MVC Architecture designed to separate the business logic from the presentation logic more than ever before. This will allow vBulletin to be quickly and easily extended as we bring new features to the software.
Responsive Design
People are using devices of many different sizes these days. These include phones, tablets and ultra-high density monitors. We’ve included a responsive design in vBulletin that scales to the device being used. No more worrying about mobile styles and trying to configure things for multiple devices. vBulletin adjusts to the screen-size of the user’s device automatically.
Expanded API
The API of vBulletin has been expanded. Not only can mobile apps take advantage of the API, the web interface of vBulletin uses it for its own purposes as well. This provides a more structured design and the ability to code everything once regardless of how it is accessed.
Supported Browsers |
Desktop Browsers
The browsers based on the Chromium (Blink), Firefox, and Webkit engines are supported.
- Google Chrome 70+
- Microsoft Edge 80+
- Mozilla Firefox 70+
- Opera Browser 27+
- Apple Safari - Users should be on the latest version. Safari is not supported on Windows or Linux.
Mobile Browsers
- Android Browser
- Chrome for Android
- Safari for iOS
- Chrome for iOS
Note:
Adblockers may interfere with the normal operation of vBulletin due to false positives. If issues occur in a supported browser, then adblockers should be disabled and the issue retried.
Recommended Software |
The manual makes reference to and shows screenshots of various programs that we use outside of the vBulletin software. This section covers software we recommend for use that is tried and tested in working with vBulletin.
Text Editors
There may be times in vBulletin where you’ll be required to edit or make changes to PHP, html or JS files. These editors may be helpful for accomplishing those tasks.
Cross Platform Editor
Sublime Text 2
Sublime Text is a sophisticated text editor for code, markup and prose.
Visual Studio Code
Cross-platform and open source text editor designed for developers.
Atom by Github
Free and open source text editor, brought to you by GitHub
Editors for Microsoft Windows
Microsoft Wordpad
This is the default software included with Microsoft Windows, if you have no other choices, use this. Wordpad can be found in the Accessories folder of your Start Menu.
Notepad++
Notepad++ is a free (as in "free speech" and also as in "free beer") source code editor and Notepad replacement that supports several languages.
Editpad Lite
EditPad Lite is a compact general-purpose text editor. There is also a Pro version
Editors for Apple OS X
TextEdit
This is the default text editor for Apple OS X.
TextWrangler
Is a code editor that is free for use in Apple OS X. It also has a big brother BBEdit
FTP Client
While using vBulletin you’re going to need a way to get files onto your server, for this you will need an FTP Client.
Cross Platform FTP
Filezilla
Filezilla is a full featured FTP client that is capable of running on all modern OS’s. If you do not have a specific FTP client you like already, Filezilla ends up being the best choice for features, functionality, and cost.
How to get help |
Depending on your license type or extra support contracts will enable you to get help in different ways. There are a few ways to receive support and they are as follows:
- The vBulletin.com Support Forums: https://www.vbulletin.com/forum
The support forums found on vBulletin.com provide peer to peer support. Support staff members are also available and respond to issues as soon as they’re available. - The vBulletin.com Ticket system: https://members.vbulletin.com
The support ticket system can be used for urgent and private issues. Your usage of the members area for support issues depends on your license type. If you have questions please feel free to ask - Phone support, is available from 9AM to 5PM (Pacific Standard Time) with a active phone support contract.
You receive one on one support from a member of the Technical Support Staff.
If you're having an issue with a third party modification or customization to the software, you will not be able to receive support from the Official vBulletin support systems. You will need to contact the author of the modification or visit vBulletin.org for peer based assistance.
Getting Started with vBulletin |
System Requirements
Managing Your License
Installing vBulletin
Create a Development Install
Managing your License |
| 1 | In order to edit your license for the first time, access your account here on our web site. |
| 2 | You will need to log in using the email address that you purchased vBulletin with and the password we sent you via email. |
| 3 | Once logged in, please click on the Member's Area link in the top left box. In the next screen it will show information about your license(s). Click on "Edit License" to edit the license you just purchased. |
| 4 | On the next screen you can enter the URL, name of your site and a short description of your site. When finished, submit the form. |
| 5 | To get back to your license and download, click Members in the header of the page. |
Frequently Asked Questions |
To change your username, login to the AdminCP and click on the Users header. In the menu, click on Search for Users. In the new form in the frame to the right, enter your current username in to the User Name field and click the Exact Match button. In the User Form, change the username in the User Name field and click Save.
How do I change my password?
On your Site Home Page, click on the Profile tab. Find the Edit Settings button beneath your user picture and click on it. This will reload the page with the Profile Settings page. Click on the Account tab and scroll down to the Password fields. Enter your current password in the field with the words ‘Enter current password’ and your new password in both the fields below that. Click Save Changes and your password will be set to the new password.
How do I change my logo?
To change the logo of your site, make sure your Site Builder is turned on and click the Header button in the menu. Find the vBulletin logo and click the Edit button in the upper left hand corner. This will open an upload form which you can use to replace the current logo with another of your liking. Once you’ve uploaded the new logo, click on the Save Changes button. The site will reload with the new logo.
How do I change the default style?
To change the default style for a site, login to the AdminCP and click on the Settings header. Then click on Options then select the Styles & Language Settings option from the new form. This will take you to the selected form. From here, find the Default Styles section and select a new default style from the dropdown list. Click the Save button at the bottom of the form and your changes will be saved.
How do I add my own ads?
To add your own ads, turn on the Site Builder option and add the Ad Module to the page you want the ads to appear on. Click on the Edit button for the module and fill out the form before clicking Attach. This will take you to a new form where you can arrange the order in which the ads appear or add new ads.
Once you’re done, click the Save button on the Ad form and confirm the changes on the page by clicking the Save Page button. The ads should now appear where you placed them.
Basic Terminology |
vBulletin Site
This refers to your vBulletin installation including all of its content, pages and users.
Forum Root
This is the directory that you installed vBulletin in. In most cases this with by public_html.
Presentation Layer
A layer of vBulletin that draws the pages for the web interface or what users see when they visit using a Web Browser.
Mobile Layer
Interface that allows the Mobile Apps to retrieve information from the vBulletin installation. This layer is built into the Mobile App and communicates to the Core Layer via APIs.
Core Layer
The core layer of vBulletin. This interface layer talks with the database and API to provide all the data. It is called from the Presentation and Mobile Layers.
What are Channels?
Channels are Nodes that can contain other Nodes. In vBulletin, Channels include: Forums, Blogs, Social Groups, Private Messages, Visitor Messages, User Albums, and Flagged (reported) Content. Additional Channels may be added in the future. Some channels can be maintained with the Channel Management (formerly Forum Management) tools in the Admin CP. Others are hidden from view and maintained by the individual users.
What are Nodes?
Nodes are any content within vBulletin. They can be discussions, photos, links or channels among other content types. Generally speaking you will refer to nodes by their content type.
What is a Channel Owner?
The user that has ownership of a channel. They control what happens in the channel itself. Blogs and Social Groups are examples of channels that can have owners.
What is a Channel Moderator?
A user appointed by the Channel Owner to moderate that channel. Blogs and Social Groups are examples of channels that can have moderators.
What is a Channel User?
Some channels can be made private. A Channel User is an individual that has permission to access a specific channel. Social Groups are an example of channels that have users.
What are Subscribers?
Subscribers are people who want to follow a user, blog or thread.
Installing vBulletin |
The following documents will take you through this process step-by-step.
Note:
Before installing vBulletin you will need to ensure that your webhost or webserver meet the Minimum System Requirements for the software.
Downloading the vBulletin Package |
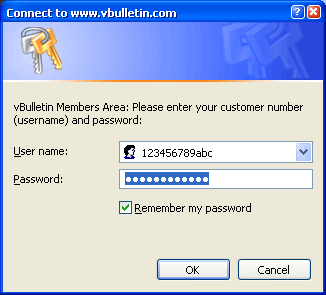
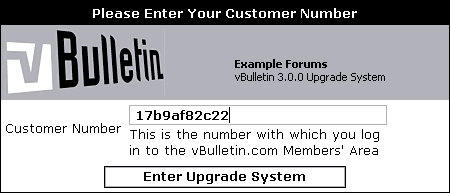
You will need to log-in to the Members' Area using the Customer Number and Customer Password that was emailed to you when you purchased your license.
Once logged in, you will see a list of Current Licenses. For each active license that you own, there will be a Download vBulletin link that you can click.
Click the link for the license you want to use and you will be taken to the download page, where you will be given options for how to download the latest vBulletin package.
By default compression is performed on the JavaScript files included within the clientscript directory in order to reduce the size of the files. YUI Compressor is used to do this but you can choose uncompressed JavaScript files using the option described below.
You can choose from the following options:
- PHP File Extension
As a general rule, web servers will use .php as the extension for PHP scripts, but some servers may use a different extension, or you may simply wish to use a different extension out of your own preference. Various extensions are available here for you to choose.
- Download File Format
This option allows you to choose the compression format of the package you are about to download. Most people will want to download the .zip package as Windows® has in-built support for zip files. However, if you are downloading the package directly to a Linux server you may prefer to use the tarball (.tar.gz) format.
- CGI Shebang
This option will only be of use to you if your server runs PHP as a CGI rather than as a web server module. If your server runs PHP as a CGI and requires a shebang (such as #!/usr/bin/php) then you can enter the required text here and it will automatically be inserted into whichever PHP files in vBulletin require its use.
- Download File
Use this option to control the contents of the package you are about to download. For example, if you have previously installed vBulletin you will probably not need to download the images again, so you can use this control to specify that the package you download does not contain the images directory. You can also download the uncompressed JavaScript package with this option.
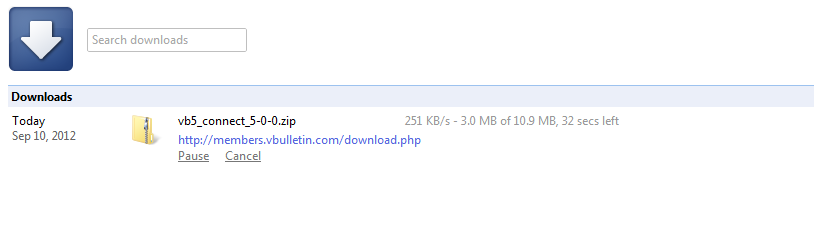
The package will then be downloaded and saved to the location you specified.
Preparing the vBulletin Files for Upload |
upload - This folder contains the vBulletin files that need to be uploaded to your web server.
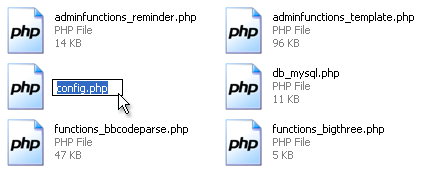
However, before you upload the files you must make some changes to the vBulletin configuration file. This file is located in the includes folder (within the upload folder) and is called config.php.new.
The first thing you must do is to rename this file from config.php.new to config.php (removing the temporary .new extension).
- searchshell.php - This file will allow you to rebuild the search index.
- vb_backup.sh - This file will allow you to run a database backup via SSH/Telnet or a scheduled backup through cron.
- tools.php - This file must be uploaded to the admincp folder and allows you to perform certain tasks should your board go down or you accidentally lock yourself out of the Admin Control Panel. This file must be deleted immediately after use or it will cause a SEVERE security problem.
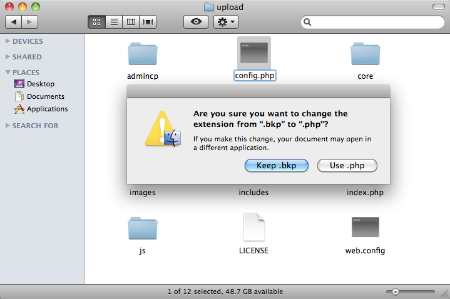
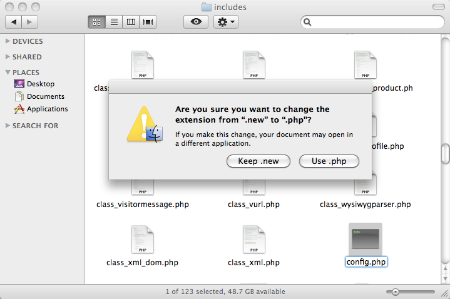
Preparing the vBulletin Files for Upload (Apple OS X) |

When the extraction complete, you will find that inside of the new folder there are two other folders called upload and another called do_not_upload.
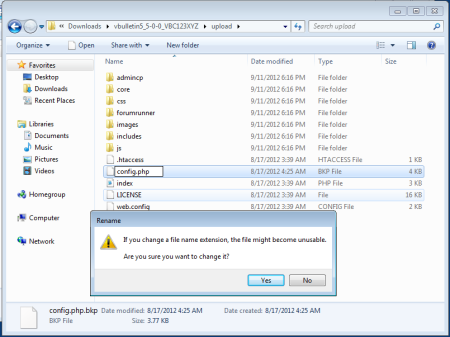
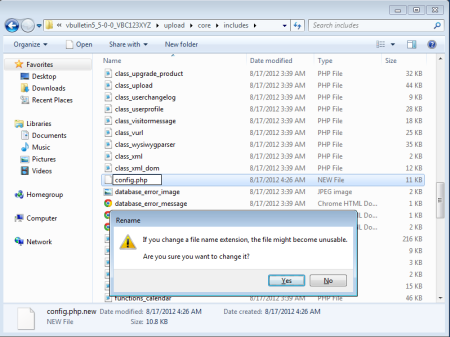
upload - This folder contains the vBulletin files that need to be uploaded to your web server.
However, before you upload the files you must make some changes to the vBulletin configuration files. The first file is located in the upload folder itself and is called config.php.bkp. The second file is located in the core/includes folder (within the upload folder) and is called config.php.new.
You will need to rename both files, so vBulletin will be able to use them.
First you must do is to rename this file from /config.php.bkp to /config.php (removing the temporary .bkp extension).
Second you must do is to rename this file from /core/includes/config.php.new to /core/includes/config.php (removing the temporary .new extension).
Note:
vBulletin uses URL rewrites throughout the software. This is done using URL Rewrites in an .htaccess file in the root of the vBulletin installation. However, to prevent custom htaccess rules from being overwritten on a server, we don't provide this file directly. Instead, we provide a 'dummy' file called htaccess.txt. If you don't have an existing .htaccess file in the directory that you're installing vBulletin into, rename this file from htaccess.txt to .htaccess (NOTE: The period before htaccess is important - you must name the file as shown)
If you do have an existing .htaccess file in the directory, you will need to copy the contents of the htaccess.txt file into your existing .htaccess file.
If you do have an existing .htaccess file in the directory, you will need to copy the contents of the htaccess.txt file into your existing .htaccess file.
- searchindex.php - This file will allow you to rebuild the default vBulletin search index.
- vb_backup.sh - This file will allow you to run a database backup via SSH/Telnet or a scheduled backup through cron.
- tools.php - This file must be uploaded to the admincp folder and allows you to perform certain tasks should your board go down or you accidentally lock yourself out of the Admin Control Panel. This file must be deleted immediately after use or it will cause a SEVERE security problem.
Preparing the vBulletin Files for Upload (Windows) |
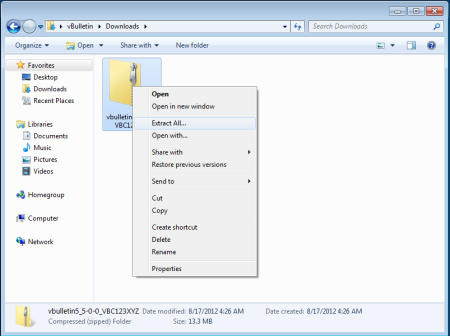
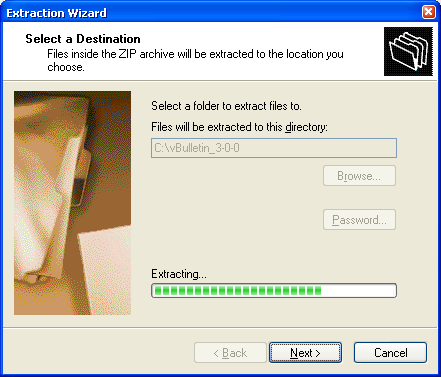
This will open a wizard to guide you through the unzipping progress. Accept the default options suggested and the system will decompress the files from the zip package.
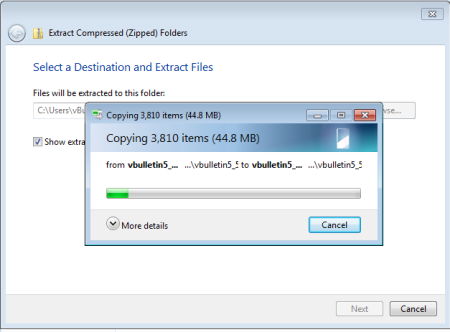
When the unzipping progress is complete, you will find that the process has created a new folder called upload and another called do_not_upload.
upload - This folder contains the vBulletin files that need to be uploaded to your web server.
However, before you upload the files you must make some changes to the vBulletin configuration files. The first file is located in the upload folder itself and is called config.php.bkp. The second file is located in the core/includes folder (within the upload folder) and is called config.php.new.
You will need to rename both files, so vBulletin will be able to use them.
First you must do is to rename this file from config.php.bkp to config.php (removing the temporary .bkp extension).
Second you must do is to rename this file from config.php.new to config.php (removing the temporary .new extension).
Note:
vBulletin uses URL rewrites throughout the software. This is done using URL Rewrites in an .htaccess file in the root of the vBulletin installation. However, to prevent custom htaccess rules from being overwritten on a server, we don't provide this file directly. Instead, we provide a 'dummy' file called htaccess.txt. If you don't have an existing .htaccess file in the directory that you're installing vBulletin into, rename this file from htaccess.txt to .htaccess (NOTE: The period before htaccess is important - you must name the file as shown)
If you do have an existing .htaccess file in the directory, you will need to copy the contents of the htaccess.txt file into your existing .htaccess file.
If you do have an existing .htaccess file in the directory, you will need to copy the contents of the htaccess.txt file into your existing .htaccess file.
- searchindex.php - This file will allow you to rebuild the default vBulletin search index.
- vb_backup.sh - This file will allow you to run a database backup via SSH/Telnet or a scheduled backup through cron.
- tools.php - This file must be uploaded to the admincp folder and allows you to perform certain tasks should your board go down or you accidentally lock yourself out of the Admin Control Panel. This file must be deleted immediately after use or it will cause a SEVERE security problem.
Using vBulletin with NGINX |
server {
        # address and port accepted by the server
        listen   80; ## listen for ipv4
        #listen   [::]:80 default ipv6only=on; ## listen for ipv6

        # server IP to compare against http requests, uncomment and set proper value.
        # Enter the hostname or IP address you use to reach this server. If you run on your dev environment it might be localhost.
        # Note: If your vb install is in a folder inside your domain <mysite>/forum/install/path please change location directives defined below to include the path first. e.G:
        # vbulletin.com/forum
        #
        # css directive would be:
        # location = /forum/css\.php {
        #        rewrite ^ /forum/core/css.php break;
        #}
        #server_name      127.0.0.1;

        # document root for request,  uncomment and set proper value
    # this should reflect the path that your vBulletin is installed in.
    # This is usually /var/www/public_html/forumpath
        #root   /var/www/public_html/forumpath;
        index   index.php index.html index.htm;

    # log files, uncomment and set proper values
        #access_log      /usr/share/nginx/www/vb/logs/access.log;
        #error_log       /usr/share/nginx/www/vb/logs/nginx_error.log;

    # configuration rules
        # legacy css being handled separate for performance
        location = /css\.php {
                rewrite ^ /core/css.php break;
        }

        # make install available from presentation
        location ^~ /install {
                rewrite ^/install/ /core/install/ break;
        }

        # any request to not existing item gets redirected through routestring
        location / {
                if (!-f $request_filename) {
                        rewrite ^/(.*)$ /index.php?routestring=$1 last;
                }
        }

        # make admincp available from presentation
        location ^~ /admincp {
                if (!-f $request_filename) {
                        rewrite ^/admincp/(.*)$ /index.php?routestring=admincp/$1 last;
                }
        }

        # process any php scripts, not found gets redirected through routestring
        location ~ \.php$ {
                # handles legacy scripts
                if (!-f $request_filename) {
                        rewrite ^/(.*)$ /index.php?routestring=$1 break;
                }

                fastcgi_split_path_info ^(.+\.php)(.*)$;
                fastcgi_pass php5;
                fastcgi_index index.php;
                fastcgi_param SCRIPT_FILENAME $document_root$fastcgi_script_name;
                include fastcgi_params;
                fastcgi_param QUERY_STRING $query_string;
                fastcgi_param REQUEST_METHOD $request_method;
                fastcgi_param CONTENT_TYPE $content_type;
                fastcgi_param CONTENT_LENGTH $content_length;
                fastcgi_intercept_errors on;
                fastcgi_ignore_client_abort off;
                fastcgi_connect_timeout 60;
                fastcgi_send_timeout 180;
                fastcgi_read_timeout 180;
                fastcgi_buffers 256 16k;
                fastcgi_buffer_size 32k;
                fastcgi_temp_file_write_size 256k;
        }
}

upstream php5 {
    # address to accept FastCGI requests. Make sure you set the right value under your fast cgi conf.
        # e.g.- Ubuntu 12.10 using php5-fpm Ubuntu /etc/php5/fpm/pool.d/www.conf
    server    unix:/var/run/php5-fpm.sock;
}
Creating your Database |
cPanel
cPanel provides a MySQL Database Wizard and this is the easiest way to create a database. You can find the instructions for this in the cPanel Documentation here:
https://documentation.cpanel.net/display/76Docs/MySQL+Database+Wizard
cPanel also has functionality for general care and maintanence of your database. You can find that documentation here:
https://documentation.cpanel.net/display/76Docs/cPanel+Features+List#DatabasesTab
Plesk
Another popular web hosting control panel, Plesk aims to provide all database management within a GUI style interface. To create a new database you would follow the instructions here:
https://download1.parallels.com/Plesk/PP11/11.0/Doc/en-US/online/plesk-customer-guide/65157.htm
Webmin
A third popular hosting control panel is Webmin. You can find basic instructions here:
https://linuxconsultant.info/tutorials/webmin-tutorial/webmin.html#mysql
GoDaddy
GoDaddy is a popular hosting service and they have their own unique control panel system. The current instructions on how to create a database on your website is located here:
https://support.godaddy.com/help/article/36/creating-mysql-or-sql-server-databases-for-your-hosting-account
Warning:
GoDaddy servers do not meet the minimum requirements for vBulletin at this time. Also we recommend not using GoDaddy's Windows servers with vBulletin.
Editing the vBulletin Configuration Files |
To edit the config.php file, you will need to open the file in a text editor such as Windows® WordPad. (Note that we do not recommend that you use Windows® Notepad to edit config.php, as Notepad has problems displaying the line breaks in some file types.)
Of the settings in this file, only a few need to be edited in order to create a working vBulletin configuration file. These settings are:
| $config['Database']['dbname'] | This value should be altered to state the name of the database that will contain your vBulletin installation on the database server. |
| $config['Database']['technicalemail'] | An email address should be entered here. All database error messages will be forwarded to the email address provided. |
| $config['MasterServer']['servername'] | This sets the address of your database server. On most installations the database server is located on the same computer as the web server, in which case the address should be set to 'localhost', otherwise use the address of the database server as supplied by your web host. |
| $config['MasterServer']['username'] | This variable contains the username provided to you by your host for connecting to your database server. |
| $config['MasterServer']['password'] | The password that accompanies the database username should be entered here. |
Note:
Please note that Jelsoft / vBulletin Support can not provide the values you require for $config['Database']['dbname'], $config['MasterServer']['servername'], $config['MasterServer']['username'], and $config['MasterServer']['password']. These variables are only available from the web host providing your web/database server.
If you need to create a new database for vBulletin to use, instructions for doing so in a variety of systems are available here.
Also note that you only edit the info to the right of the equal sign. Do NOT edit the names in the brackets to the left of the equal sign. For instance in this line:
$config['MasterServer']['username'] = 'root';
You change 'root' to the appropriate database username and leave everything else as is.
This is correct:
$config['MasterServer']['username'] = 'your_dbusername';
This is NOT correct:
$config['MasterServer']['your_dbusename'] = 'root';
Never edit anything to the left of the equal sign.
On Yahoo Small Business Server, $config['MasterServer']['servername'] should be set to 'mysql'.
| $config['Database']['dbtype'] | If you are using PHP5 in combination with MySQL 4.1.x you may want to change this variable to 'mysqli' to take advantage of the MySQL Improved engine |
| $config['Database']['tableprefix'] | In order to easily identify the tables related to vBulletin in your database, you may prefix the names of all tables with a few letters or a word. For example, if you specify the $config['Database']['tableprefix'] as 'vb_' then all tables will be prefixed with vb_, making vb_forum, vb_user etc. If you choose to change your $config['Database']['tableprefix'] at some point after you have installed your vBulletin, tools are provided to do this. |
| $config['Database']['force_sql_mode'] | New versions of MySQL (4.1+) have introduced some behaviors that are incompatible with vBulletin. These behaviors are enabled by default with MySQL 5. Setting this value to "true" disables those behaviors. You only need to modify this value if vBulletin recommends it. |
| $config['MasterServer']['usepconnect'] | Setting this variable to 1 will cause PHP to use persistent connections to the MySQL server. For very large vBulletin installations, using persistent connections may result in a slight performance boost but in most cases leaving it set to 0 (off) is the best option. If you are unsure, leave it set to 0 |
| Slave Database Configuration | These variables only apply if you have a Slave Database configured. If you are not sure, you should leave these variables alone. This is an advanced setting! |
| $config['Misc']['admincpdir'] | By default, vBulletin will install the files for the Administrators' Control Panel into a folder called admincp, but you may wish to rename this folder this for security purposes. If you rename the folder, enter the new name here. Note that you can only rename the folder, if you move the folder to a new location the system will be unable to function. |
| $config['Misc']['modcpdir'] | This variable is similar to the $admincpdir setting, with the exception that $modcpdir refers to the Moderators' Control Panel rather than the Administrators' Control Panel. |
| $config['Misc']['cookieprefix'] | When vBulletin sets cookies on users' computers they will all be prefixed with a few characters in order to be easily identified as cookies set by vBulletin. By default this prefix is bb but you can change it to be whatever you like. This option is particularly useful if you have many vBulletin installations running on the same domain. |
| $config['Misc']['forumpath'] | Some systems may require a full path to the forum files. If vBulletin does not tell you that you need this, leave this blank. |
| $config['SpecialUsers']['canviewadminlog'] | All actions performed in the vBulletin Administrators' Control Panel are logged in the database. This variable controls the permissions for which users are allowed to view this log. The variable takes the form of a list of user IDs separated by commas. For example, if you would like the users with user IDs 1, 15 and 16 to be able to view the Admin Log, this variable would be set like this: $config['SpecialUsers']['canviewadminlog'] = '1,15,16'; |
| $config['SpecialUsers']['canpruneadminlog'] | In the same way as $config['SpecialUsers']['canviewadminlog'] controls which users can view the Admin Log, $config['SpecialUsers']['canpruneadminlog'] controls which users are permitted to prune (delete items from) the Admin Log. Use the same user IDs separated with commas system as with the $config['SpecialUsers']['canviewadminlog'] setting. |
| $config['SpecialUsers']['canrunqueries'] | The vBulletin Administrators' Control Panel contains a simple interface for running queries directly on the database. This variable contains the IDs of the users with permission to do this. For security reasons you may wish to leave this list totally empty. |
| $config['SpecialUsers']['undeletableusers'] | If your vBulletin installation is going to have multiple users with administrative privileges, you may wish to protect certain users from accidental (or even malicious) deletion or editing. Any user IDs entered into this list will not be editable or deletable from the Administrators' Control Panel by anybody. |
| $config['SpecialUsers']['superadministrators'] | Any users whose user IDs are specified within the $config['SpecialUsers']['superadministrators'] setting will be automatically granted full access to all vBulletin features, including the ability to set the permission levels of other administrators. |
| $config['Mysqli']['charset'] | If you need to set the default connection charset because your database is using a charset other than latin1, you can set the charset here. If you don't set the charset to be the same as your database, you may receive collation errors. Ignore this setting unless you are sure you need to use it. |
| $config['Mysqli']['ini_file'] | PHP can be instructed to set connection parameters by reading from the file named in 'ini_file'. Please use a full path to the file. This is generally used to set the connection's default character set. This setting should also be ignored unless you are sure you need to use it. |
Note:
The variables $config['SpecialUsers']['canviewadminlog'], $config['SpecialUsers']['canpruneadminlog'], $config['SpecialUsers']['canrunqueries'], $config['SpecialUsers']['undeletableusers'] and $config['SpecialUsers']['superadministrators'] should all contain a single userid number, a comma-separated list of user id numbers, or nothing at all. For example:
$config['SpecialUsers']['canviewadminlog'] = '1,15,16';

$config['SpecialUsers']['canpruneadminlog'] = '1';

$config['SpecialUsers']['canrunqueries'] = '';

$config['SpecialUsers']['undeletableusers'] = '1,15';

$config['SpecialUsers']['superadministrators'] = '1';
Note:
Later versions of vBulletin may not have the ?> at the end. This is to help prevent this kind of error from happening.
config.php |
<?php

/*======================================================================*\

|| #################################################################### ||

|| # vBulletin 3.6.6 - Licence Number 1a2b3c4

|| # ---------------------------------------------------------------- # ||

|| # All PHP code in this file is ©2000-2007 Jelsoft Enterprises Ltd. # ||

|| # This file may not be redistributed in whole or significant part. # ||

|| # ---------------- VBULLETIN IS NOT FREE SOFTWARE ---------------- # ||

|| # https://www.vbulletin.com | https://www.vbulletin.com/license.html # ||

|| #################################################################### ||

\*======================================================================*/


/*-------------------------------------------------------*\

| ****** NOTE REGARDING THE VARIABLES IN THIS FILE ****** |

+---------------------------------------------------------+

| If you get any errors while attempting to connect to    |

| MySQL, you will need to email your webhost because we   |

| cannot tell you the correct values for the variables    |

| in this file.                                           |

\*-------------------------------------------------------*/


    //    ****** DATABASE TYPE ******

    //    This is the type of the database server on which your vBulletin database will be located.

    //    Valid options are mysql and mysqli, for slave support add _slave.  Try to use mysqli if you are using PHP 5 and MySQL 4.1+

    // for slave options just append _slave to your preferred database type.

$config['Database']['dbtype'] = 'mysql';


    //    ****** DATABASE NAME ******

    //    This is the name of the database where your vBulletin will be located.

    //    This must be created by your webhost.

$config['Database']['dbname'] = 'forum';


    //    ****** TABLE PREFIX ******

    //    Prefix that your vBulletin tables have in the database.

$config['Database']['tableprefix'] = '';


    //    ****** TECHNICAL EMAIL ADDRESS ******

    //    If any database errors occur, they will be emailed to the address specified here.

    //    Leave this blank to not send any emails when there is a database error.

$config['Database']['technicalemail'] = '[email protected]';


    //    ****** FORCE EMPTY SQL MODE ******

    // New versions of MySQL (4.1+) have introduced some behaviors that are

    // incompatible with vBulletin. Setting this value to "true" disables those

    // behaviors. You only need to modify this value if vBulletin recommends it.

$config['Database']['force_sql_mode'] = false;


    //    ****** MASTER DATABASE SERVER NAME AND PORT ******

    //    This is the hostname or IP address and port of the database server.

    //    If you are unsure of what to put here, leave the default values.

$config['MasterServer']['servername'] = 'localhost';

$config['MasterServer']['port'] = 3306;


    //    ****** MASTER DATABASE USERNAME & PASSWORD ******

    //    This is the username and password you use to access MySQL.

    //    These must be obtained through your webhost.

$config['MasterServer']['username'] = 'root';

$config['MasterServer']['password'] = '';


    //    ****** MASTER DATABASE PERSISTENT CONNECTIONS ******

    //    This option allows you to turn persistent connections to MySQL on or off.

    //    The difference in performance is negligible for all but the largest boards.

    //    If you are unsure what this should be, leave it off. (0 = off; 1 = on)

$config['MasterServer']['usepconnect'] = 0;


    //    ****** SLAVE DATABASE CONFIGURATION ******

    //    If you have multiple database backends, this is the information for your slave

    //    server. If you are not 100% sure you need to fill in this information,

    //    do not change any of the values here.

$config['SlaveServer']['servername'] = '';

$config['SlaveServer']['port'] = 3306;

$config['SlaveServer']['username'] = '';

$config['SlaveServer']['password'] = '';

$config['SlaveServer']['usepconnect'] = 0;


    //    ****** PATH TO ADMIN & MODERATOR CONTROL PANELS ******

    //    This setting allows you to change the name of the folders that the admin and

    //    moderator control panels reside in. You may wish to do this for security purposes.

    //    Please note that if you change the name of the directory here, you will still need

    //    to manually change the name of the directory on the server.

$config['Misc']['admincpdir'] = 'admincp';

$config['Misc']['modcpdir'] = 'modcp';


    //    Prefix that all vBulletin cookies will have

    //    Keep this short and only use numbers and letters, i.e. 1-9 and a-Z

$config['Misc']['cookieprefix'] = 'bb';


    //    ******** FULL PATH TO FORUMS DIRECTORY ******

    //    On a few systems it may be necessary to input the full path to your forums directory

    //    for vBulletin to function normally. You can ignore this setting unless vBulletin

    //    tells you to fill this in. Do not include a trailing slash!

    //    Example Unix:

    //      $config['Misc']['forumpath'] = '/home/users/public_html/forums';

    //    Example Win32:

    //      $config['Misc']['forumpath'] = 'c:\program files\apache group\apache\htdocs\vb3';

$config['Misc']['forumpath'] = '';


    //    ****** USERS WITH ADMIN LOG VIEWING PERMISSIONS ******

    //    The users specified here will be allowed to view the admin log in the control panel.

    //    Users must be specified by *ID number* here. To obtain a user's ID number,

    //    view their profile via the control panel. If this is a new installation, leave

    //    the first user created will have a user ID of 1. Seperate each userid with a comma.

$config['SpecialUsers']['canviewadminlog'] = '1';


    //    ****** USERS WITH ADMIN LOG PRUNING PERMISSIONS ******

    //    The users specified here will be allowed to remove ("prune") entries from the admin

    //    log. See the above entry for more information on the format.

$config['SpecialUsers']['canpruneadminlog'] = '1';


    //    ****** USERS WITH QUERY RUNNING PERMISSIONS ******

    //    The users specified here will be allowed to run queries from the control panel.

    //    See the above entries for more information on the format.

    //    Please note that the ability to run queries is quite powerful. You may wish

    //    to remove all user IDs from this list for security reasons.

$config['SpecialUsers']['canrunqueries'] = '';


    //    ****** UNDELETABLE / UNALTERABLE USERS ******

    //    The users specified here will not be deletable or alterable from the control panel by any users.

    //    To specify more than one user, separate userids with commas.

$config['SpecialUsers']['undeletableusers'] = '';


    //    ****** SUPER ADMINISTRATORS ******

    //    The users specified below will have permission to access the administrator permissions

    //    page, which controls the permissions of other administrators

$config['SpecialUsers']['superadministrators'] = '1';


    // ****** DATASTORE CACHE CONFIGURATION *****

    // Here you can configure different methods for caching datastore items.

    // vB_Datastore_Filecache  - for using a cache file

// $config['Datastore']['class'] = 'vB_Datastore_Filecache';

    // vB_Datastore_Memcached - for using a Memcache server

    // It is also necessary to specify the hostname or IP address and the port the server is listening on

/*

$config['Datastore']['class'] = 'vB_Datastore_Memcached';

$i = 0;

// First Server

$i++;

$config['Misc']['memcacheserver'][$i]        = '127.0.0.1';

$config['Misc']['memcacheport'][$i]            = 11211;

$config['Misc']['memcachepersistent'][$i]    = true;

$config['Misc']['memcacheweight'][$i]        = 1;

$config['Misc']['memcachetimeout'][$i]        = 1;

$config['Misc']['memcacheretry_interval'][$i] = 15;

*/

// ****** The following options are only needed in special cases ******


    //    ****** MySQLI OPTIONS *****

    // When using MySQL 4.1+, MySQLi should be used to connect to the database.

    // If you need to set the default connection charset because your database

    // is using a charset other than latin1, you can set the charset here.

    // If you don't set the charset to be the same as your database, you

    // may receive collation errors.  Ignore this setting unless you

    // are sure you need to use it.

// $config['Mysqli']['charset'] = 'utf8';


    //    Optionally, PHP can be instructed to set connection parameters by reading from the

    //    file named in 'ini_file'. Please use a full path to the file.

    //    Example:

    //    $config['Mysqli']['ini_file'] = 'c:\program files\MySQL\MySQL Server 4.1\my.ini';

$config['Mysqli']['ini_file'] = '';


// Image Processing Options

    // Images that exceed either dimension below will not be resized by vBulletin. If you need to resize larger images, alter these settings.

$config['Misc']['maxwidth'] = 2592;

$config['Misc']['maxheight'] = 1944;


/*======================================================================*\

|| ####################################################################

|| # Downloaded: 12:00, Sun Nov 26th 2007

|| # CVS: $RCSfile$ - $Revision$

|| ####################################################################

\*======================================================================*/
Editing the Presentation config.php File |
It is named config.php.bkp. Rename this file to config.php by removing the .bkp extension.
This file no longer needs to be edited to perform an installation. It is there for support purposes only.
Example Presentation Config.php |
Note:
If you turn collapsed mode off, the system enters the other mode where the API and Core can be in a different location or even on a different server. Currently this mode is not supported.
<?php
/*======================================================================*\
|| #################################################################### ||
|| # vBulletin Presentation Configuration                           # ||
|| # ---------------------------------------------------------------- # ||
|| # All PHP code in this file is ©2000-2012 vBulletin Solutions Inc. # ||
|| # This file may not be redistributed in whole or significant part. # ||
|| # ---------------- VBULLETIN IS NOT FREE SOFTWARE ---------------- # ||
|| # https://www.vbulletin.com | https://www.vbulletin.com/license.html # ||
|| #################################################################### ||
\*======================================================================*/

/*-------------------------------------------------------*\
| ****** NOTE REGARDING THE VARIABLES IN THIS FILE ****** |
+---------------------------------------------------------+
| When making changes to the file, the edit should always |
| be to the right of the = sign between the single quotes |
| Default: $config['admincpdir'] = 'admincp';             |
| Example: $config['admincpdir'] = 'myadmin';  GOOD!      |
| Example: $config['myadmin'] = 'admincp'; BAD!           |
\*-------------------------------------------------------*/


    //    ****** Base URLs ******
    // The following settings all deal with the url of your forum.
    // If set incorrectly your site/software will not function correctly.
    // These urls should NOT include a trailing slash
    // This is the url and web path of your root vBulletin directory
$config['baseurl'] = 'https://www.yourdomain.com/folder';


// This will only be used if you wish to require https logins
// You will not need to change this setting most of the time.
$config['baseurl_login'] = $config['baseurl'];

    // If you do wish to use https for login, uncomment this line
    // Then fill in your https url.
//$config['baseurl_login'] = 'https://www.yourdomain.com/folder';


    //    ****** System Paths ******

    // This setting allows you to change the name of the admin folder
$config['admincpdir'] = 'admincp';

    //    ****** Cookie Settings ******
    // These are cookie related settings.
    // This Setting allows you to change the cookie prefix
$config['cookie_prefix'] = 'bb';


//    ****** Special Settings ******
// These settings are only used in some circumstances
// Please do not edit if you are not sure what they do.

// You can ignore this setting for right now.
$config['cookie_enabled'] = true;

$config['report_all_php_errors'] = false;
$config['no_template_notices'] = true;

// This setting should never be used on a live site
$config['no_js_bundles'] = false;

// This setting enables debug mode, it should NEVER be used on a live site
$config['debug'] = false;

// Assumes default location of core.
// These are the system paths and folders for your vBulletin files
// This setting is for where your vbulletin core folder is
$config['core_path'] = realpath(dirname(__FILE__)) . '/core';

    // This is the url and web based path to your core directory
$config['baseurl_core'] = $config['baseurl']  .  '/core';


/*======================================================================*\
|| ####################################################################
|| # Downloaded:
|| # CVS: $RCSfile$ -
|| ####################################################################
\*======================================================================*/
Editing the Core config.php File |
Note:
When editing a config.php file, make sure there is no whitespace or extra lines either before the <?php. If there are any extra lines or space, you will see an 'Unable to add headers' error when accessing your forums.
You are only required to edit a few of the the settings in this file to create a working vBulletin configuration file. These settings are:
Variable Name | Description |
| $config['Database']['dbname'] | This value should be altered to state the name of the database that will contain your vBulletin installation on the database server. |
| $config['Database']['technicalemail'] | An email address should be entered here. All database error messages will be forwarded to the email address provided. It is important to fill in this variable for support purposes. It should be a valid email that you receive emails at regularly. It should not be your personal email address. |
| $config['MasterServer']['servername'] | This sets the address of your database server. On most installations the database server is located on the same computer as the web server, in which case the address should be set to 'localhost', otherwise use the address of the database server as supplied by your web host. |
| $config['MasterServer']['username'] | This variable contains the username provided to you by your host for connecting to your database server. |
| $config['MasterServer']['password'] | The password that accompanies the database username should be entered here. |
Note:
Please note that the vBulletin Support Team can not provide the values you require for $config['Database']['dbname'], $config['MasterServer']['servername'], $config['MasterServer']['username'], and $config['MasterServer']['password']. These variables are only available from the web host providing your web/database server.
Note:
Please note, these are organized by function, not their actual location in the file. They are included here for completeness
Variable Name | Description |
| $config['Database']['tableprefix'] | In order to easily identify the tables related to vBulletin in your database, you may prefix the names of all tables with a few letters or a word. For example, if you specify the $config['Database']['tableprefix'] as 'vb_' then all tables will be prefixed with vb_, making vb_forum, vb_user etc. If you choose to change your $config['Database']['tableprefix'] at some point after you have installed your vBulletin, tools are provided to do this. |
| $config['MasterServer']['usepconnect'] | Setting this variable to 1 will cause PHP to use persistent connections to the MySQL server. For very large vBulletin installations, using persistent connections may result in a slight performance boost but in most cases leaving it set to 0 (off) is the best option. If you are unsure, leave it set to 0 |
| $config['Mysqli']['charset'] | If you need to set the default connection charset because your database is using a charset other than latin1, you can set the charset here. If you don't set the charset to be the same as your database, you may receive collation errors. Ignore this setting unless you are sure you need to use it. |
| $config['Mysqli']['ini_file'] | PHP can be instructed to set connection parameters by reading from the file named in 'ini_file'. Please use a full path to the file. This is generally used to set the connection's default character set. This setting should also be ignored unless you are sure you need to use it. |
These variables only apply if you have a Slave Database configured. If you are not sure, you should leave these variables alone. This is an advanced setting!
Security Related Options
Variable Name | Description |
| $config['SpecialUsers']['canviewadminlog'] | All actions performed in the vBulletin Administrators' Control Panel are logged in the database. This variable controls the permissions for which users are allowed to view this log. The variable takes the form of a list of user IDs separated by commas. For example, if you would like the users with user IDs 1, 15 and 16 to be able to view the Admin Log, this variable would be set like this: $config['SpecialUsers']['canviewadminlog'] = '1,15,16'; |
| $config['SpecialUsers']['canpruneadminlog'] | In the same way as $config['SpecialUsers']['canviewadminlog'] controls which users can view the Admin Log, $config['SpecialUsers']['canpruneadminlog'] controls which users are permitted to prune (delete items from) the Admin Log. Use the same user IDs separated with commas system as with the $config['SpecialUsers']['canviewadminlog'] setting. |
| $config['SpecialUsers']['canrunqueries'] | The vBulletin Administrators' Control Panel contains a simple interface for running queries directly on the database. This variable contains the IDs of the users with permission to do this. For security reasons you may wish to leave this list totally empty. |
| $config['SpecialUsers']['undeletableusers'] | If your vBulletin installation is going to have multiple users with administrative privileges, you may wish to protect certain users from accidental (or even malicious) deletion or editing. Any user IDs entered into this list will not be editable or deletable from the Administrators' Control Panel by anybody. |
| $config['SpecialUsers']['superadmins'] | Any users whose user IDs are specified within the $config['SpecialUsers']['superadmins'] setting will be automatically granted full access to all vBulletin features, including the ability to set the permission levels of other administrators. |
Note:
The variables $config['SpecialUsers']['canviewadminlog'], $config['SpecialUsers']['canpruneadminlog'], $config['SpecialUsers']['canrunqueries'], $config['SpecialUsers']['undeletableusers'] and $config['SpecialUsers']['superadmins'] should all contain a single userid number, a comma-separated list of user id numbers, or nothing at all. For example:
$config['SpecialUsers']['canviewadminlog'] = '1,15,16';
$config['SpecialUsers']['canpruneadminlog'] = '1';
$config['SpecialUsers']['canrunqueries'] = '';
$config['SpecialUsers']['undeletableusers'] = '1,15';
$config['SpecialUsers']['superadmins'] = '1';
$config['SpecialUsers']['canviewadminlog'] = '1,15,16';
$config['SpecialUsers']['canpruneadminlog'] = '1';
$config['SpecialUsers']['canrunqueries'] = '';
$config['SpecialUsers']['undeletableusers'] = '1,15';
$config['SpecialUsers']['superadmins'] = '1';
Variable Name | Description |
| $config['Misc']['modcpdir'] | This variable is similar to the $admincpdir setting, with the exception that $modcpdir refers to the Moderators' Control Panel rather than the Administrators' Control Panel. |
| $config['Misc']['cookieprefix'] | When vBulletin sets cookies on users' computers they will all be prefixed with a few characters in order to be easily identified as cookies set by vBulletin. By default this prefix is bb but you can change it to be whatever you like. This option is particularly useful if you have many vBulletin installations running on the same domain. This must match the value set in the presentation config.php file. |
| $config['Misc']['forumpath'] | Some systems may require a full path to the forum files. If vBulletin does not tell you that you need this, leave this blank. |
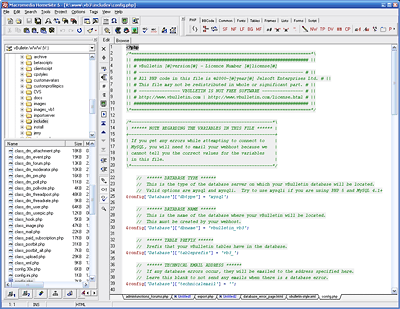
Example Core Config.php |
<?php

/*======================================================================*\

|| #################################################################### ||

|| # vBulletin 5.0.0

|| # ---------------------------------------------------------------- # ||

|| # All PHP code in this file is ?2000-2012 vBulletin Solutions Inc.# ||

|| # This file may not be redistributed in whole or significant part. # ||

|| # ---------------- VBULLETIN IS NOT FREE SOFTWARE ---------------- # ||

|| # https://www.vbulletin.com | https://www.vbulletin.com/license.html # ||

|| #################################################################### ||

\*======================================================================*/


/*----------------------------------------------------------------------*\

|        ****** NOTE REGARDING THE VARIABLES IN THIS FILE ******         |

+------------------------------------------------------------------------+

| If you get any errors while attempting to connect to MySQL, you will   |

| need to email your webhost because we cannot tell you the correct      |

| values for the variables in this file.                                 |

|                                                                        |

| When making changes to the file, the edit should always be to the      |

| right of the = sign between the single quotes                          |

| Default: $config['admincpdir'] = 'admincp';                            |

| Example: $config['admincpdir'] = 'myadmin';  GOOD!                     |

| Example: $config['myadmin'] = 'admincp'; BAD!                          |

\*----------------------------------------------------------------------*/


    //    ****** DATABASE TYPE ******

    //    This is the type of the database server on which your vBulletin database

    //    will be located. Valid options are mysql and mysqli, for slave support add

    //     _slave to the end of the database class.

    //    Try to use mysqli if you are using PHP 5 and MySQL 4.1+

$config['Database']['dbtype'] = 'mysql';


    //    ****** DATABASE NAME ******

    //    This is the name of the database where your vBulletin will be located.

    //    This must be created by your webhost.

$config['Database']['dbname'] = 'forum';


    //    ****** TABLE PREFIX ******

    //    Prefix that your vBulletin tables have in the database.

$config['Database']['tableprefix'] = '';


    //    ****** TECHNICAL EMAIL ADDRESS ******

    //    If any database errors occur, they will be emailed to the address specified here.

    //    Leave this blank to not send any emails when there is a database error.

$config['Database']['technicalemail'] = '[email protected]';


    //    ****** MASTER DATABASE SERVER NAME AND PORT ******

    //    This is the hostname or IP address and port of the database server.

    //    If you are unsure of what to put here, leave the default values.

    //

    //    Note: If you are using IIS 7+ and MySQL is on the same machine, you

    //    need to use 127.0.0.1 instead of localhost

$config['MasterServer']['servername'] = 'localhost';

$config['MasterServer']['port'] = 3306;


    //    ****** MASTER DATABASE USERNAME & PASSWORD ******

    //    This is the username and password you use to access MySQL.

    //    These must be obtained through your webhost.

$config['MasterServer']['username'] = 'root';

$config['MasterServer']['password'] = '';


    //    ****** MASTER DATABASE PERSISTENT CONNECTIONS ******

    //    This option allows you to turn persistent connections to MySQL on or off.

    //    The difference in performance is negligible for all but the largest boards.

    //    If you are unsure what this should be, leave it off. (0 = off; 1 = on)

$config['MasterServer']['usepconnect'] = 0;


    //    ****** SLAVE DATABASE CONFIGURATION ******

    //    If you have multiple database backends, this is the information for your slave

    //    server. If you are not 100% sure you need to fill in this information,

    //    do not change any of the values here.

$config['SlaveServer']['servername'] = '';

$config['SlaveServer']['port'] = 3306;

$config['SlaveServer']['username'] = '';

$config['SlaveServer']['password'] = '';

$config['SlaveServer']['usepconnect'] = 0;


    //    ****** PATH TO ADMIN & MODERATOR CONTROL PANELS ******

    //    This setting allows you to change the name of the folders that the admin and

    //    moderator control panels reside in. You may wish to do this for security purposes.

    //    Please note that if you change the name of the directory here, you will still need

    //    to manually change the name of the directory on the server.

$config['Misc']['admincpdir'] = 'admincp';

$config['Misc']['modcpdir'] = 'modcp';


    //    Prefix that all vBulletin cookies will have

    //    Keep this short and only use numbers and letters, i.e. 1-9 and a-Z

$config['Misc']['cookieprefix'] = 'bb';


    //    ******** FULL PATH TO FORUMS DIRECTORY ******

    //    On a few systems it may be necessary to input the full path to your forums directory

    //    for vBulletin to function normally. You can ignore this setting unless vBulletin

    //    tells you to fill this in. Do not include a trailing slash!

    //    Example Unix:

    //      $config['Misc']['forumpath'] = '/home/users/public_html/forums';

    //    Example Win32:

    //      $config['Misc']['forumpath'] = 'c:\program files\apache group\apache\htdocs\vb3';

$config['Misc']['forumpath'] = '';


    //    ****** USERS WITH ADMIN LOG VIEWING PERMISSIONS ******

    //    The users specified here will be allowed to view the admin log in the control panel.

    //    Users must be specified by *ID number* here. To obtain a user's ID number,

    //    view their profile via the control panel. If this is a new installation, leave

    //    the first user created will have a user ID of 1. Seperate each userid with a comma.

$config['SpecialUsers']['canviewadminlog'] = '1';


    //    ****** USERS WITH ADMIN LOG PRUNING PERMISSIONS ******

    //    The users specified here will be allowed to remove ("prune") entries from the admin

    //    log. See the above entry for more information on the format.

$config['SpecialUsers']['canpruneadminlog'] = '1';


    //    ****** USERS WITH QUERY RUNNING PERMISSIONS ******

    //    The users specified here will be allowed to run queries from the control panel.

    //    See the above entries for more information on the format.

    //    Please note that the ability to run queries is quite powerful. You may wish

    //    to remove all user IDs from this list for security reasons.

$config['SpecialUsers']['canrunqueries'] = '';


    //    ****** UNDELETABLE / UNALTERABLE USERS ******

    //    The users specified here will not be deletable or alterable from the control panel by any users.

    //    To specify more than one user, separate userids with commas.

$config['SpecialUsers']['undeletableusers'] = '';


    //    ****** SUPER ADMINISTRATORS ******

    //    The users specified below will have permission to access the administrator permissions

    //    page, which controls the permissions of other administrators

$config['SpecialUsers']['superadministrators'] = '1';


    // ****** CACHE CONFIGURATION *****

    // Here you can configure different methods for caching items.

    // The following are the cacheing classes that can be used.

    // vB_Cache_Db - This setting stores the data in the database

    // vB_Cache_Memcache - This stores the data in memcache

    // vB_Cache_Memory - This setting uses php's memory while a page is being generated.

    // Each cache area can use its own cache type.

$config['Cache']['class'][0] = 'vB_Cache_Db'; //regular cache

$config['Cache']['class'][1] = 'vB_Cache_Memory'; //fastest cache

$config['Cache']['class'][2] = 'vB_Cache_Db'; //largest cache and longest life.


    // ****** DATASTORE CACHE CONFIGURATION *****

    // Here you can configure different methods for caching datastore items.

    // vB_Datastore_Filecache  - to use includes/datastore/datastore_cache.php

    // vB_Datastore_APC - to use APC

    // vB_Datastore_XCache - to use XCache

    // vB_Datastore_Memcached - to use a Memcache server, more configuration below

// $config['Datastore']['class'] = 'vB_Datastore_Filecache';


    // ******** DATASTORE PREFIX ******

    // If you are using a PHP Caching system (APC, XCache, eAccelerator) with more

    // than one set of forums installed on your host, you *may* need to use a prefix

    // so that they do not try to use the same variable within the cache.

    // This works in a similar manner to the database table prefix.

// $config['Datastore']['prefix'] = '';


    // It is also necessary to specify the hostname or IP address and the port the server is listening on

/*

$config['Datastore']['class'] = 'vB_Datastore_Memcached';

$i = 0;

// First Server

$i++;

$config['Misc']['memcacheserver'][$i]        = '127.0.0.1';

$config['Misc']['memcacheport'][$i]            = 11211;

$config['Misc']['memcachepersistent'][$i]    = true;

$config['Misc']['memcacheweight'][$i]        = 1;

$config['Misc']['memcachetimeout'][$i]        = 1;

$config['Misc']['memcacheretry_interval'][$i] = 15;

*/


// ****** The following options are only needed in special cases ******


    //    ****** MySQLI OPTIONS *****

    // When using MySQL 4.1+, MySQLi should be used to connect to the database.

    // If you need to set the default connection charset because your database

    // is using a charset other than latin1, you can set the charset here.

    // If you don't set the charset to be the same as your database, you

    // may receive collation errors.  Ignore this setting unless you

    // are sure you need to use it.

// $config['Mysqli']['charset'] = 'utf8';


    //    Optionally, PHP can be instructed to set connection parameters by

    //  reading from the file named in 'ini_file'. Please use a full path to

    //    the file.

    //    Example:

    //    $config['Mysqli']['ini_file'] = 'c:\program files\MySQL\MySQL Server 4.1\my.ini';

$config['Mysqli']['ini_file'] = '';


    // ******** IMAGE PROCESSING OPTIONS ********

    // Images that exceed either dimension below will not be resized by vBulletin.

    // If you need to resize larger images, alter these settings.

$config['Misc']['maxwidth'] = 2592;

$config['Misc']['maxheight'] = 1944;


    //  ******** SPECIAL SETTINGS ********

    //    The following are settings/permissions that are not normally used but

    //    are here for reference. Please be careful using them. Do not enable or

    //    uncomment without understanding what they do first.


    //    This allows you to disable modifications and extensions to the software.

    //    If your site is not functioning well after installing or using a third

    //    party modification, please enable this.

// define(“DISABLE_HOOKS”, true);


    //    This allows you to shut down all mail that is being sent by vBulletin.

    //    This is useful for test environments

// define(“DISABLE_MAIL”, true);


    //  This allows you to enter debug mode, which is for support or development

    //    to help understand how pages are built. This should NEVER be enabled in

    //    a live environment.

//$config['Misc']['debug'] = true;


/*======================================================================*\

|| ####################################################################

|| # Downloaded: 00:00, Thur Oct 15th 2015

|| # CVS: $RCSfile$ - $Revision: 88 $

|| ####################################################################

\*======================================================================*/
MySQLi |
To enable MySQLi, view Editing the Core config.php File.
The Core config.php contains two advanced settings that you may need when MySQLi is in use. These settings are to be ignored as long as you are not having issues of the following type:
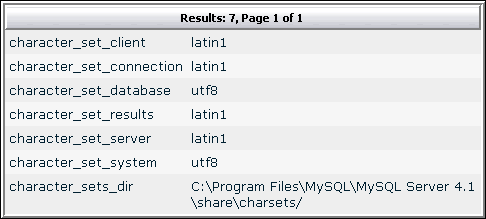
MySQL Error : Illegal mix of collations (latin1_swedish_ci,COERCIBLE) and (utf8_general_ci,IMPLICIT) for operation
From the Administrator Control Panel, go to Admin CP->Maintenance->Execute SQL Query. If you receive a no permissions message, please refer back to Editing the vBulletin Configuration File on how to grant the appropriate permissions so that you may execute queries.
Enter the following query in the Manual Query input box and press
SHOW VARIABLES LIKE 'char%'
Note:
If the values are the same, then your problem will not be solved by this solution. Please contact vBulletin Support in this case. You may have tables in your database that are configured to use a different character set than your database is. All of your tables will need to be updated to use the same character set. This condition can be caused by changing the character set of your database after vBulletin has been installed. Upgrades may create tables that are in your new character set, which will cause problems.
Create a new file in your forums include directory named mysqli.ini. Inside of this file place:
[client]
default-character-set=utf8
Edit the vBulletin Configuration File file by following the instructions in the previous section.
Uncomment the following line by removing the two slashes from the beginning
// $config['Mysqli']['ini_file'] = 'c:\program files\MySQL\MySQL Server 4.1\my.ini';
$config['Mysqli']['ini_file'] = 'c:\program files\apache group\apache\htdocs\forums\includes\mysqli.ini';
Uploading vBulletin Scripts to Your Web Server |
The uploading process should be familiar to anyone who has published pages to a web site before, but a brief description of the process is given here.
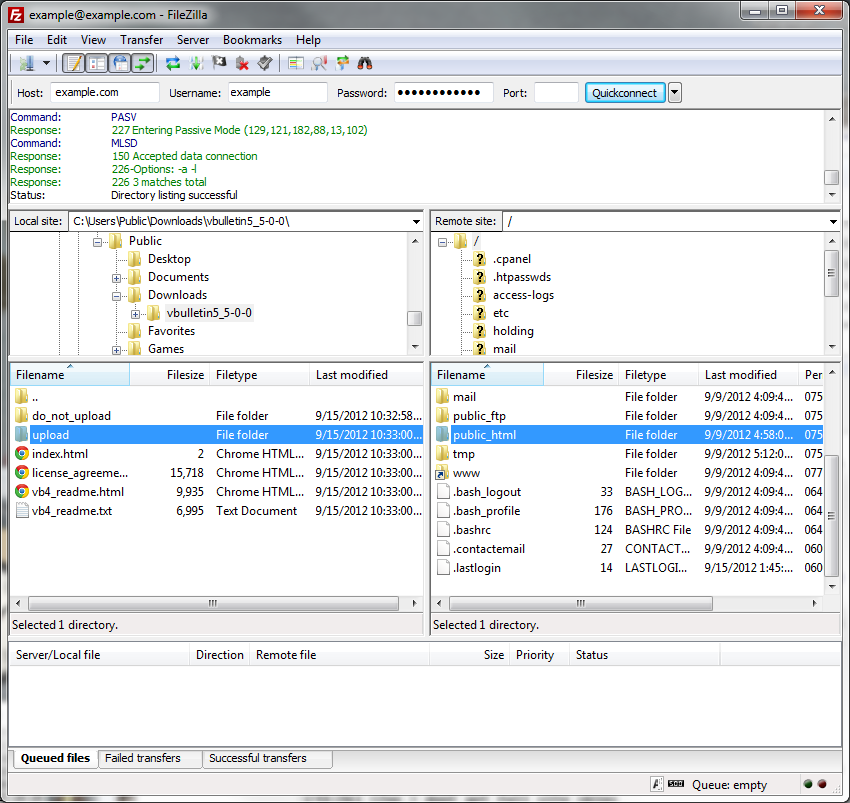
Although there are several methods available to transfer the vBulletin files from your computer to your web server, by far the most common method in use is transfer via FTP. Most operating systems have built-in tools for opening FTP connections although they are often limited in their usefulness and many people opt to use a third party FTP client application. For this example we will use FileZilla.
Note:
We do not recommend using the built-in file transfer features in WYSIWYG editors such as Adobe Dreamweaver® or Microsoft Expression Studio®. These programs often add information to vBulletin's files or do not maintain their structure properly which will cause problems while installing or upgrading the software. We also do not recommend using any web-based file managers that your hosting service may provide as a solution. For best performance and reliability you are recommended to use a stand alone FTP client like Smart FTP or Filezilla.
The easiest way to transfer the files is to upload the entire upload folder to the server. Using FileZilla we do this by dragging the upload folder from its location on your computer's hard disk to the web publishing folder on the server.
Most FTP client applications will handle the file transfers automatically, but if for some reason your application does not, you should make a note of the following:
- All text files to be transferred in ASCII mode
All files containing plain text from the vBulletin package should be transferred in ASCII mode.
Text file types you will find in vBulletin are: .html, .php, .js, .xml, .css. - All non-text files to be transferred in Binary mode
The remaining files, which are mostly images, should be transferred to your web server in binary mode.
Binary file types used in vBulletin are: .gif, .png, .jpg, .ico.
Note:
The web publishing folder is usually called public_html, www or htdocs and is located within your home directory. If you are unsure of where to find your own web publishing folder, your host will be able to help you.
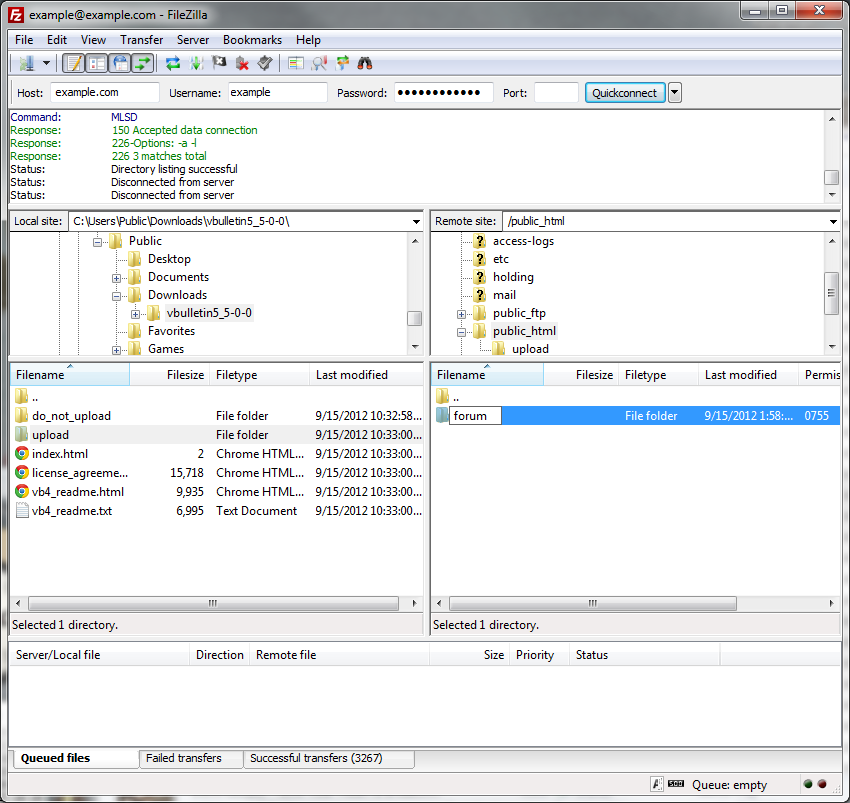
When all the files have been uploaded successfully you should rename the upload folder on the web server to the name you want to use for your forums directory. We will be calling it forums for the purposes of this manual.
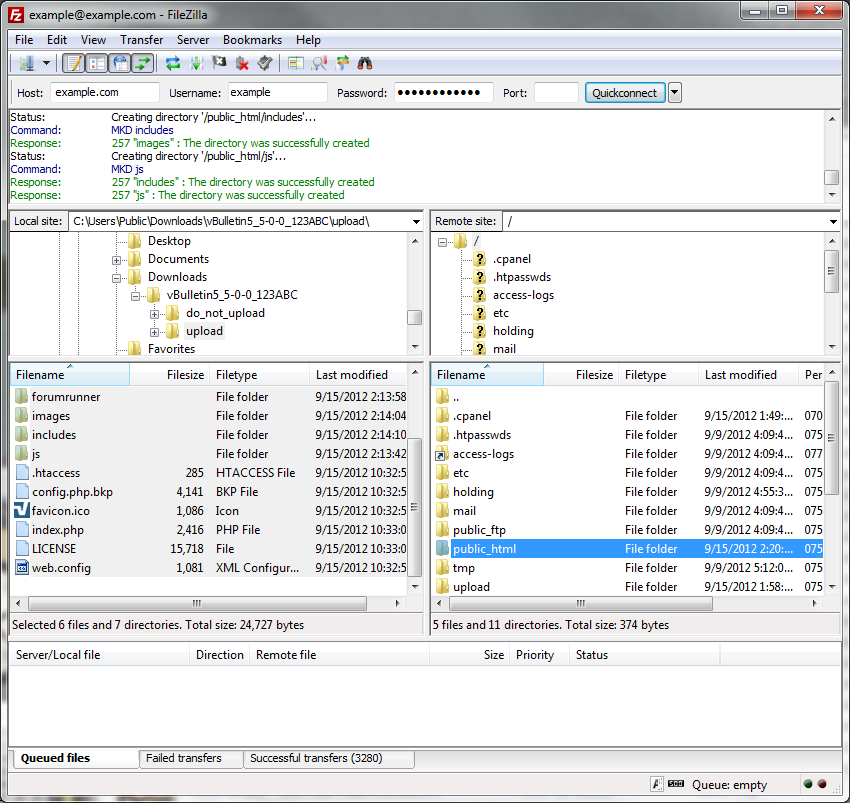
Installing at the Domain Root
Alternately, if you’d rather have the installation at the root level of your site, you can upload all the files contained in the upload folder directly into the web publishing folder on the server. This will bring your visitors directly to the vBulletin site when they visit your website.
Using FileZilla we do this by dragging the contents of the upload folder from its location on your computer's hard disk to the web publishing folder on the server.
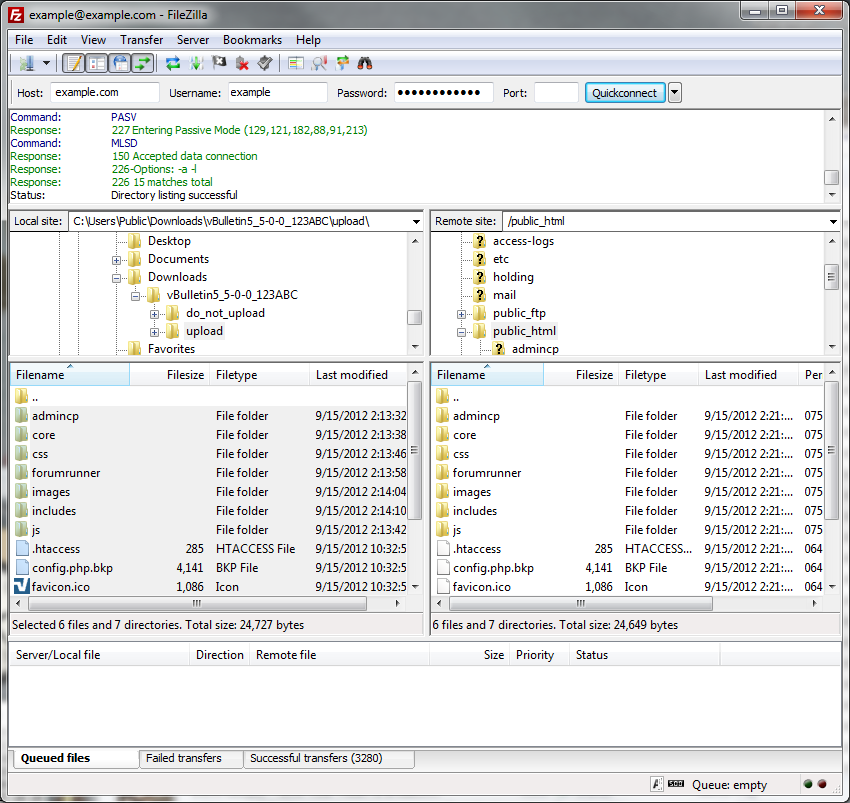
Most FTP client applications will handle the file transfers automatically, but if for some reason your application does not, you should make a note of the following:
- All text files to be transferred in ASCII mode
All files containing plain text from the vBulletin package should be transferred in ASCII mode.
Text file types you will find in vBulletin are: .html, .php, .js, .xml, .css. - All non-text files to be transferred in Binary mode
The remaining files, which are mostly images, should be transferred to your web server in binary mode.
Binary file types used in vBulletin are: .gif, .png, .jpg, .ico.
Note:
The web publishing folder is usually called public_html, www or htdocs and is located within your home directory. If you are unsure of where to find your own web publishing folder, your host will be able to help you.
If all has gone well, you are now ready to run the installation script to prepare your database to run vBulletin.
Running the vBulletin Install Script |
Once all the vBulletin files have been successfully uploaded to your web server, you will need to run the vBulletin Installation Script in order to populate your database.
The Installer runs as a PHP script using your web browser. To start the installation process, open your browser and type the HTTP address of your forums directory, followed by /install/install.php, then hit the <Enter> key or press the [Go] button to open the script. For example, if you will have your forums in the root of your domain, the URL will be:
https://www.your-domain.com/install/install.php
If you will be running vBulletin in a sub-directory, for example ‘forums’, the path to the installation script will be:
https://www.your-domain.com/forums/install/install.php
The first thing you will see from the install script is a login prompt, asking you to enter your Customer Number. This is done to prevent other users from accidentally stumbling across your install script and running it. Only you should know your Customer Number.
Note:
Your Customer Number is the string of numbers and letters used as the login user name for the vBulletin Members' Area and is supplied via email following your purchase. If you have deleted this email and need to recover your Customer Number, please visit this link:
https://members.vbulletin.com/lostpw.php?do=lostcustomerid
You should type your customer number carefully to avoid errors. Note that your customer number is not the same as your vBulletin license number.
https://members.vbulletin.com/lostpw.php?do=lostcustomerid
You should type your customer number carefully to avoid errors. Note that your customer number is not the same as your vBulletin license number.
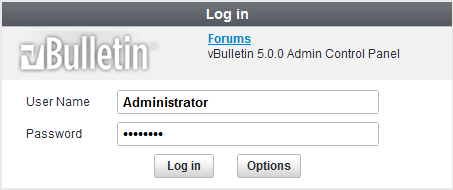
When you have entered your Customer Number, hit the [Enter Install System] button and you should be taken to the first step of the install script. If after hitting the [Enter Install System] button you are brought back to the Customer Number entry dialog, there was an error verifying your Customer Number. The only reasons the customer number won't work are:
- You are not using the correct number (Make sure that you are not using your license number.)
- You are not using the correct files for the license under that account.
- You are blocking cookies.
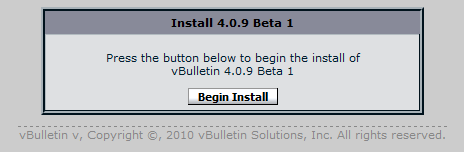
The installer from this point is mostly automatic. You will see the progress bar progress as it goes through the steps.
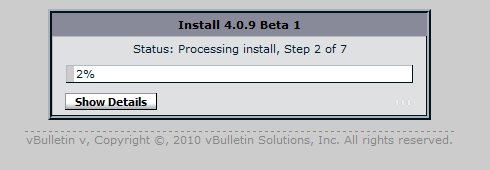
During the install process, the install script will require some user input. When this information is required, the installer will pause and present you with a dialog box for you to input the required information. It will ask for information up to four times. The first dialog box looks like the image below:
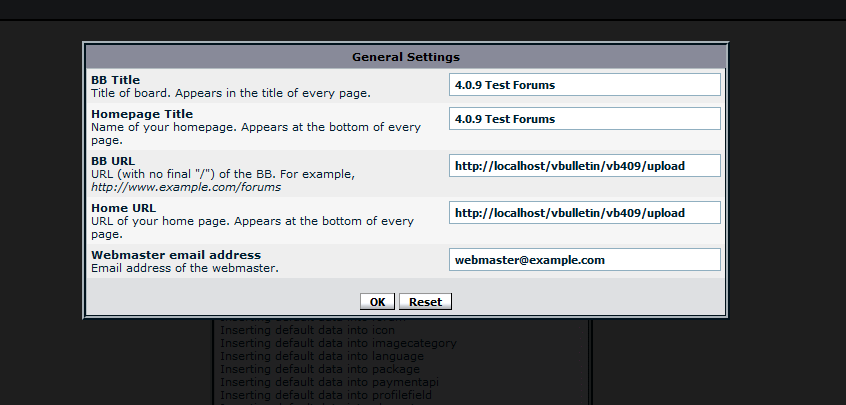
The first dialog box will ask you information about your forums. This includes the name of the forums, the name of your homepage and the URLs that you would like to use. It will also ask for the webmaster email address. The system will try to pre-fill some of this information for you based on the location of the script and the domain name it is accessed from.
The second dialog box will ask for your cookie path and cookie domain. These are advanced installation parameters. If you do not know what to enter here, leave them as the default suggestions and continue.
The third dialog box will ask for your administrator username, password, and email address. It’s important that you pick information that you will:
- easily remember but
- not be guessable by others
Administrator access in the wrong hands can have serious consequences for your forums so it’s vital that you pick a good, strong password that only you will know and remember.
During the installation process, you may opt to have a more detailed output view. You can view each step as it processes by clicking the "Show Details" button while the install wizard is running. It will present you with a view like this:
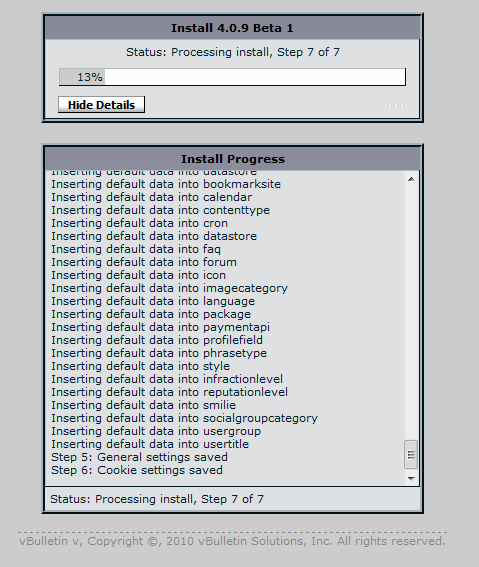
Cleaning up after the Install |
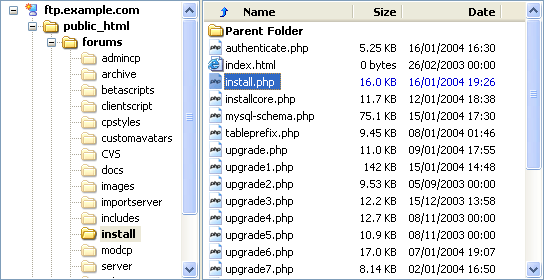
Enabling SSL Logins in vBulletin |
[*] SSL Certificate sold by a trusted authority.
[*] Copy of the vBulletin files in your SSL directory.
To turn on this feature, you would do so in your presentation config.php file. This is located in your forum root directly (along with index.php and .htaccess). In this file look for the following code:
// If you do wish to use https for login, uncomment this line
// Then fill in your https url.
//$config['baseurl_login'] = 'https://www.yourdomain.com/folder';
For most purposes, you would uncomment this line and add your base url using the https protocol. For example:
If your base url is: https://www.example.com
Then your login url would be: https://www.example.com
Frequently Asked Questions
Can I use a self-signed certificate?
While nothing is stopping you from doing this, it is not recommended. Self-Signed Certificates are often flagged as untrusted by modern web browsers and the user is warned against accessing sites without trusted certificates
Aren't SSL Certificates expensive?
That depends on your definition of expensive. If you're not selling items with SSL and don't need the anti-fraud insurance, you can purchase a certificate for under $15.00 (US).
Can I use a Wildcard Certificate?
As long it is valid for your domain name, then yes.
How do I install a Certificate?
Your hosting provider can assist you with installing your SSL certificate.
What is my SSL Directory?
On modern web hosting platforms, this is usually the same as your standard public_html or htdocs directory. Contact your hosting provider for more information on this.
Can vBulletin Solutions install my security certificate?
This is not a service we offer at this time.
I purchased a new installation and would like this implemented. Can you do this?
With the purchase of the installation service, we can set up SSL logins provided the certificate is already installed. State you want this done in the customer comments field of your installation worksheet.
Common Installation Issues |
A. Make sure that you're accessing the AdminCP from site/admincp and not site/core/admincp. Also make sure that the Site URL setting under Settings -> Options -> Site Name / URL / Contact Details has /core at the end of it.
None of the links work when I click on them on the front end.
Make sure that you have mod_rewrite (Apache) or URL Rewrite (IIS) enabled on your site. Upload the corresponding .htaccess or web.config file found in your upload directory.
If that do not resolve the problem, make sure there are no spaces or hidden characters in your /config.php. These can cause PHP errors that confuse the vBulletin Routers and prevent redirects from happening correctly.
My vBulletin is installed in a sub-directory and the .htaccess doesn't work properly. However it does work in the parent directory.
You will need to add a RewriteBase Directive to your .htaccess file. In the .htaccess file find the line that says RewriteEngine On. After it place the following line:
RewriteBase /pathtovbulletin/
pathtovbulletin should be the path from your website root or /.
My hosting provider will not allow mod_rewrite or URL Rewrite to be installed.
Unfortunately, you will need to find a new hosting provider to continue to use vBulletin.
What do I do with the old vBulletin 4.X files?
They should be deleted so they do not provide conflicts with the new system. You will want to maintain the directories for your attachments or custom user uploads.
What if I use a web server other than Apache or IIS?
We do not currently support other webservers. Please view the community forums as there may be community supplied solutions to other web server configurations.
When I click the Site Home Page in the Admincp, it leads me to a blank page
You need to access your vBulletin forums from forumroot and forumroot/admincp. It should not be accessed via the forumroot/core directory except for the installation and upgrade wizards.
My host requires using mod_fcgid or phpSUExec on my server and vBulletin does not work.
You can try updating your .htaccess file with the following change:
Find -
RewriteRule ^(.*)$ index.php/$1 [L]
Change To -
RewriteRule ^(.*)$ index.php?/$1 [L]
I have Javascript turned off and vBulletin does not work.
Javascript is required to use vBulletin.
I can't access Site Builder on my phone.
This is by design.
Upgrading vBulletin |
You can upgrade to the latest version of vBulletin from the following vBulletin versions:
- Any version of vBulletin
- Any version of vBulletin 4, from version 4.0.0 Beta 1 to the latest version.
- Any version of vBulletin 3 from version 3.6.0 and newer. If your vBulletin version is older than 3.8.0, it is recommended that you upgrade to at least vBulletin 3.8.0 before you can upgrade to vBulletin.
When upgrading, the first step is always the same, in that you must log in to the vBulletin Members' Area and download the latest vBulletin package available, as described in the installation instructions.
Warning:
We strongly recommend that you back up your database prior to any upgrade. This will allow you to restore your data should anything happen during the upgrade. The chance of a catastrophic failure is very remote but it can happen.
A document detailing how to back up your database is available in the Technical Documents section of the vBulletin Manual's Appendices, here.
A document detailing how to back up your database is available in the Technical Documents section of the vBulletin Manual's Appendices, here.
What to know before you upgrade to vBulletin |
Upgrading any major software platform should be carefully thought through beforehand; for many of you, vBulletin is the heart of your site. Here are some things to consider when upgrading:
1. Do you rely heavily on the Calendar feature? If so, these will not be included in vBulletin at initial launch but are planned to be added soon after. If you rely on these areas of functionality then don’t upgrade at this time - unless you’re happy that these will not be available to you and your users in the short term.
2. Have you installed any plugins or products? If so, the first thing you’ll need to decide is - “Is this critical to my site?” If the answer is yes, you will first need to check that a vB5 compatible version of the modification is available, either at www.vbulletin.org or via the author’s own site.
If the answer is no, then you need take no action as vBulletin’s new API system means that any existing plugins and products won’t work - however after you upgrade, it would be good practice to make sure you remove any files required by these.
3. vBulletin’s template code has been rewritten from scratch so existing themes/styles from vB4 will not work with it. As with plugins and products, if you’re looking to retain a similar look and feel to your site or simply don’t wish to use the default style after upgrading, you will need to do one of three things:
- Contact the style designer to see if they’ve already created a vB5 compatible version of the style
- Download and install a new vB5 compatible style from www.vbulletin.org or another supplier or
- Create a test installation of vB5 and create your own unique style from scratch
7. Do you use a custom .htaccess file on your site? As vBulletin comes with URL Rewrites as standard, it includes an .htaccess by default. Uploading the files for the upgrade will see your custom .htaccess file overwritten losing any custom code that you had within the file (URL Rewrites, specific filetype caching). Make sure you have a backup of your .htaccess file before proceeding with the upgrade then you can look to merge the contents of your custom file and the vBulletin default file after upgrading.
Creating a Test/Development Installation |
Step 1 - Update URLs and Backup your database!
An all important step in any upgrade but without it, you'll never be able to test an upgrade - period! As you're going to be moving your database to be read by software on a different URL, you need to make sure you update the database to reflect this. There are two ways to do this:
1. Update the URLs before backing up the database or
2. Update manually in the database after backing up (NOT RECOMMENDED)
To update the URLs before backing up, follow these simple steps:
- Close your site via AdminCP > Settings > Options > Turn Your vBulletin On and Off
- Update the URLs at AdminCP > Settings > Options > Site Name / URL / Contact DetailsWarning:***DO NOT CLOSE YOUR BROWSER AFTER THE ABOVE STEP***
- Backup your database (see below)
- Update the URLs at AdminCP > Settings > Options > Site Name / URL / Contact Details back to your live URLs
- Reopen your site via AdminCP > Settings > Options > Turn Your vBulletin On and Off
There are a number of ways to backup your database. The most reliable method of backing up and restoring a database is with shell access via ssh. This is because backing up with a PHP script like phpMyAdmin can result in PHP timeouts errors and an incomplete backup file. For more information on how to do this, please see the instructions here:
Backup:
https://www.vbulletin.com/docs/html/maintenance_ssh_backup
If you don't have shell access, some people have also reported success with these scripts:
MySQLDumper:
https://www.mysqldumper.de/en/index.php
MySQLHotcopy:
https://www.vbulletin.com/forum/showthread.php?t=134821&highlight=mysqlhotcopy
Bigdump:
https://www.ozerov.de/bigdump.php
Once you have your backup, you need to actually restore it to be able to test against it.
Step 2 - Restore your database
There's two options here depending on the hosting package you have:
- Create a new database and restore to it or
- Restore into your live database
Option 1 - Create a new database and restore to it
This is the safest way to go. From your server's control panel, create a new database then restore your freshly backed up database into this new database. As this is a completely separate database to your live one (different database name and hopefully different login details), there will be no need to manipulate the database prior to using it.
Option 2 - Restore into your live database
While this is NOT recommended, there are a number of users who will simply have to go down this route due to the lack of features with the hosting package they have (or can afford). Before doing this, make sure you read these steps BEFORE attempting to do the restore.
To do these, you will need to have a text editor installed. Windows users will have Notepad and Wordpad, Mac users may have TextEdit. I've used Wordpad without issue - and it's Find and Replace tool will be needed for the following steps as you will need these to manipulate the database backup before restoring it but don't worry - it's not complicated as you'll see...
a. Table prefixes
Whether you have prefixes or not, you are going to need to create a prefix to distinguish your test database from your live one. The following shows a table with no prefix then one with a prefix of 'vb_' - the rest of this entry will assume that prefix is currently used:
No Prefix:
DROP TABLE IF EXISTS `access`;
CREATE TABLE `access` (
`userid` int(10) unsigned NOT NULL default '0',
`forumid` smallint(5) unsigned NOT NULL default '0',
`accessmask` smallint(5) unsigned NOT NULL default '0',
PRIMARY KEY (`userid`,`forumid`)
) ENGINE=MyISAM DEFAULT CHARSET=latin1;
DROP TABLE IF EXISTS `vb_access`;
CREATE TABLE `vb_access` (
`userid` int(10) unsigned NOT NULL default '0',
`forumid` smallint(5) unsigned NOT NULL default '0',
`accessmask` smallint(5) unsigned NOT NULL default '0',
PRIMARY KEY (`userid`,`forumid`)
) ENGINE=MyISAM DEFAULT CHARSET=latin1;
Once, you hit OK/Replace All or whatever command your editor has, this will go through and add/replace prefixes on all tables. Now save this file under a different name on your local machine.
Now that you have your edited database, upload this to your server then restore it. For more instructions on using ssh, see this section of the manual:
https://www.vbulletin.com/docs/html/maintenance_ssh_restore
This will create a new set of duplicate database tables within their own 'group' thanks to the amended prefix.
Step 3 - Files
So, you've got your database in place so all we need is to upload the files - right? Nearly! Yes, you will need to have an actual installation of vBulletin on your server to use these but it's not just a case of uploading the files and away you go - so read on and follow...
First thing's first, create a new empty directory on your server called 'testvb'. You will need to protect this directory from the general public. The most common way to do this is by a combination of .htaccess and .htpasswd files. For more on these and assistance in setting these up, go to:
https://www.htaccesstools.com/htpasswd-generator/
Some Windows Server users may find that this doesn't work for them in which case you should use the permissions tools available on the server
Next, you need to decide what you're doing. Are you testing some changes to the templates etc. without upgrading or are you testing an upgrade?
1. Testing changes
If you're only testing some changes you want to make to the site (new styles, template changes) then either copy your live site's files to the 'testvb' directory or download a copy of your live site and then upload them into the 'testvb' directory.
2. Testing an upgrade
If you're testing an upgrade, then there's no need to copy your live site's files as you're only going to be overwriting them with the newer ones anyway! In this instance, simply download the new files from the Members Area and upload these to your 'testvb' directory.
3. config.php
VERY IMPORTANT STEP! I highlight this as without this step, you'll be doing whatever you do to your live database!
Open config.php in your normal web editor. Again, this will vary slightly depending on whether you're using a different database or whether you're having to use different prefixed tables in the same one.
a. Imported Database to a new database
If you've got the luxury of using a completely separate database, then you will need to edit the following details to ensure you're pointing to the correct one:
- Database Name
- Database Username
- Database Password
- Cookie Prefix
This is even more important in this scenario. You need to edit the following areas:
- Database Table Prefix
- Cookie Prefix
Regardless of which method of database import you've had to do, you should add the following to the top of the config.php file, right under <?php:
define('DISABLE_MAIL', 1);
Step 4 - AdminCP
Almost there! There are a couple of small changes that you will need to make to ensure that things run smoothly! Firstly, we need to make sure all links point to the right directory. So, login to the AdminCP in your testing directory and go to:
Settings > Options > Site Name / URL / Contact Details
and make sure the Forum URL is pointing to your 'testvb' directory. Also, under the following section, ensure that the 'Path to Save Cookies' setting is set to /testvb/:
Settings > Options > Cookies and HTTP Header Options
And finally, you can also (optionally!) turn off Scheduled Tasks but given that you've disabled the mail system via the config.php file, it would provide benefit to leave this enabled.
Preparing the vBulletin Files for Upload |
The first thing to do is to decompress the package into its constituent files. If you downloaded the .zip package and your computer is running a recent version of Windows® all the tools you need to do this are available as part of Windows®. This section will assume that you have downloaded the .zip package and that your computer is running Windows XP.
To extract the files from the package, open the folder on your computer where you saved the vBulletin package and right-click on its icon, then choose Extract All from the pop-up menu.
upload - This folder contains the vBulletin files that need to be uploaded to your web server.
You should now rename the 'upload' folder to match whatever name you gave to the directory containing your vBulletin files on your web server. In this example, the folder containing the vBulletin files is called 'forums'.
NOTE: If you have changed the names of the 'admincp' and 'modcp' directories in your config.php file, be sure to make the same change to these subdirectories prior to uploading.
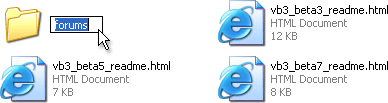
- searchshell.php - This file will allow you to rebuild the search index.
- vb_backup.sh - This file will allow you to run a database backup via SSH/Telnet or a scheduled backup through cron.
- tools.php - This file must be uploaded to the admincp folder and allows you to perform certain tasks should your board go down or you accidentally lock yourself out of the Admin Control Panel. This file must be deleted immediately after use or it will cause a SEVERE security problem.
Note:
As you already have a vBulletin installation running on your web server, you should delete the install.php file in the install directory before you proceed to upload the files.
Note:
These instructions are for 3.5.0 and higher. If you are upgrading from vBulletin 3.0.x to 3.5.0, you will also need to recreate your includes/config.php file based on the new version of includes/config.php.new. Please see this page in the installation section on how to edit the config file. This step is not necessary for individual upgrades within the 3.0.x or 3.5.x series.
If you are upgrading from vBulletin 3.5.x to vBulletin 3.6.x or newer you do not need to edit the config.php file.
If you are upgrading from vBulletin 3.5.x to vBulletin 3.6.x or newer you do not need to edit the config.php file.
Updating the vBulletin Scripts on Your Web Server |
For uploading there are two ways that this can be done.
The first method involves overwriting all the files that were previously uploaded to your web server, while the second method involves deleting all the old files and directories, and then uploading the new scripts. In this tutorial we will use the overwrite method.
Having renamed the upload folder as specified in the previous step, you should load up your FTP client of choice. In this example we will use Smart FTP.
Connect to your FTP server and with the new vBulletin files in the local pane and the existing old files in the remote pane, drag the forums directory into the parent directory of your remote vBulletin installation as shown here:
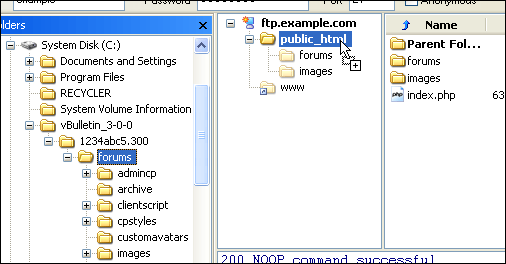
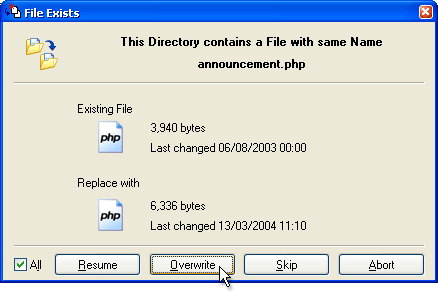
- All text files to be transferred in ASCII mode
All files containing plain text from the vBulletin package should be transferred in ASCII mode.
Text file types you will find in vBulletin are: .html, .php, .js, .xml, .css. - All non-text files to be transferred in Binary mode
The remaining files, which are mostly images, should be transferred to your web server in Binary mode.
Binary file types used in vBulletin include: .gif, .png, .jpg, .ico.
Warning:
It is extremely important that you upload all the files from the latest vBulletin package, including the entire contents of the install directory.
Failure to upload all the files may result in the upgrade script being unable to successfully complete the upgrade process.
Failure to upload all the files may result in the upgrade script being unable to successfully complete the upgrade process.
Upgrading from vBulletin 2 |
Note:
This page applies soley to upgrades from vBulletin 2 to vBulletin 3. If you are already running a version of vBulletin 3 you may skip this section.
There will now be a little maintenance to be done on the files stored on your web server in order to clean up vBulletin 2 files and directories that are no longer used in vBulletin 3.
With the remote forums directory showing in your FTP client, you should delete the following files and directories:
- The admin directory
- The mod directory
- The avatar.php file
- The cp.css file
- The member2.php file
- The vbcode.js file
- The vbcode_language.js file
- All .gif files from root of the the images directory
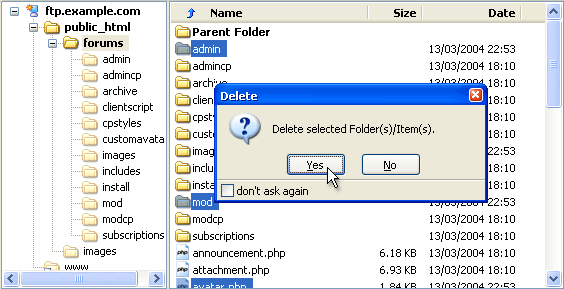
Please note that depending upon the size of your existing database and the speed of your web server, running the initial phase of the upgrade process to convert your vBulletin 2 database to be compatible with vBulletin 3 may take a long time. A million-post database may take several hours to upgrade.
Running the vBulletin Upgrade Script |
When you have entered your customer number, hit the [Enter Upgrade System] button and you should be taken to the first step of the install script. If after hitting the [Enter Upgrade System] button you are brought back to the customer number entry dialog, there was an error verifying your customer number. Please check for mistakes and try again.
Note:
Your Customer Number is the string of numbers and letters used as the login user name for the vBulletin Members' Area and is supplied via email following your purchase. If you have deleted this email and need to recover your Customer Number, please visit this link:
https://members.vbulletin.com/lostpw.php?do=lostcustomerid
You should type your customer number carefully to avoid errors. Note that your customer number is not the same as your vBulletin license number.
https://members.vbulletin.com/lostpw.php?do=lostcustomerid
You should type your customer number carefully to avoid errors. Note that your customer number is not the same as your vBulletin license number.
- You are not using the correct number (don't use the license number.)
- You are not using the correct files for the license under that account.
- You are blocking cookies.
The upgrader from this point is automatic. You will see the progress bar progress as it goes through the steps.
If the upgrade script needs to retrieve any information from you, it will stop and show a dialog box requesting the information. To proceed, simply follow the instructions on the screen.
During the upgrade process, you may opt to have a more detailed output view. You can view each step as it processes by clicking the "Show Details" button while the upgrade wizard is running. It will present you with a view like this:
Once the upgrade process is complete, you will be presented with a link to your Admin Control Panel.
Enter the Admin Control Panel to verify that your settings, content and other details are still correct.
Using the Command Line Upgrade |
To run this interface, go to your install directory (https://www.yourdomain.com/pathtoforums/core/install/upgrade.php) using the ‘cd’ command and execute:
php -f upgrade.php
sudo -u <user> php -f upgrade.php
Your CLI version of PHP may not have been compiled with or configured to use the same modules as your web version. If you encounter problems in command line mode, switching to the web mode should be able to process through them. You can see your command line configuration by typing:
php -i > phpinfo.txt
Common Issues While Upgrading. |
A. Your CLI version of PHP may not have been compiled with the same modules as your web version. If you are missing mysqli and have set your config.php to use mysqli, you will receive an immediate error. Either add mysqli support to your CLI php or switch to mysql in config.php. You can switch back to mysqli after the upgrade process.
Q. When running the upgrade wizard from the command line, it will not import the standard XML files for the style and languages. What do I do?
A. Your version of PHP may have the default XML support disabled for some reason. Run the upgrade wizard in your browser. It will skip to the XML import steps and import your files for you and complete the upgrade.
Q. I have a lot of posts and rebuilding the search index takes forever. Is there a faster way?
It is recommended that large community sites use our Sphinx Search to index and search their content. This is a fast and robust search solution. If for some reason, you cannot use this search option, you can rebuild your search index from the command line using the searchindex.php in your Do Not Upload folder. You would run the searchindex.php file from the command line using this command:
php searchindex.php
Q. What is the Query Status button that appears in Browser Mode?
A. The "Query Status" button is something that appears after a step has taken more than 20 seconds. Its purpose it to send a query back to the server and retrieve the status of the executing query. It provides a method for the admin to see what is going on with big queries.
Q. I receive an error similar to the following how do I fix it?
Warning: chdir(): SAFE MODE Restriction in effect. The script whose uid is 0 is not allowed to access ./../ owned by uid 10001 in /var/www/vhosts/domain.com/httpdocs/vb/40c/install/upgrade.php on line 16
A. This can appear if the command line configuration of PHP is using safemode. Either disable safemod or run the upgrade wizard in browser mode.
Q. I previously used the Command Line Upgrade and now I receive an error when I try to save my CSS as files. What is wrong?
The permissions on your clientscript/vbulletin_css folder are incorrect. They may be set to 0755 and should be set to 0777. Recursively update the permissions to 0777 using your FTP client or chmod.
Cleaning up after your Upgrade |
You should delete the entire core/install directory. Doing so will not impact vBulletin's operation on your site. Once you have deleted this directory, you can return to the installer script and click the link to enter the Administrator Control Panel of your freshly installed vBulletin!
Checking for Updated Templates |
When a new version of vBulletin is released, it is common for some of the default templates to have been updated to accommodate new features or fix bugs.
If you have not customized any of your templates, this need not concern you, but if you have customized some of the default templates there are a few steps you will need to follow after you have finished running all the appropriate upgrade scripts.
Note:
When running vBulletin upgrade scripts, one of the final steps imports the newest version of the default style.
Any templates that you have not customized will automatically be updated to use the newest versions.
However, any templates that you have customized will not be altered or overwritten by importing the latest style, hence the need for the following steps.
Any templates that you have not customized will automatically be updated to use the newest versions.
However, any templates that you have customized will not be altered or overwritten by importing the latest style, hence the need for the following steps.
| 1 | Firstly, you should visit the Styles & Templates > Find Updated Templates page to find out which (if any) of your customized templates may have updated default versions.
|
| 2 | If you find that some of your customized templates do have updated default versions, you have three choices. You can either
|
This list will often tell you whether or not the changes made to each template were purely cosmetic, in which case you will have no need to perform the steps above for that template, or if the changes require you to revert or manually edit your customized templates to maintain full working order.
vBulletin Template Diff/Merge System |
Whenever you upgrade, we will automatically look for templates that have changed and see if you customized those templates. If you have, we will automatically try to merge the changes in. If this succeeds, you won't have anything else to do (in most cases). If it fails, your customized template won't be updated--like in vBulletin 3--and you'll have to apply the changes yourself. However, that process is improved as well. More on that later.
Roughly, the merging process goes like this:
[*]Find the differences between the old default and the new default. ("old-new")
[*]Find the differences between the old default and your customized version. ("old-custom")
[*]Start walking through the template. If we find a changed spot in old-new but it's not changed in old-custom, use the old-new version. If we find a change in old-custom but not old-new, use the old-custom version. If neither changed, use either. If both changed, that's a conflict and we can't do the merge.
Most of this happens behind the scenes. However, you'll see some changes to the "Find Update Templates" screen:
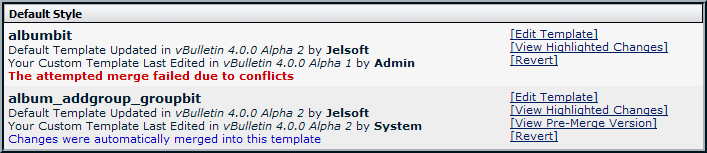
The "View Highlighted Changes" link will take you to this page:
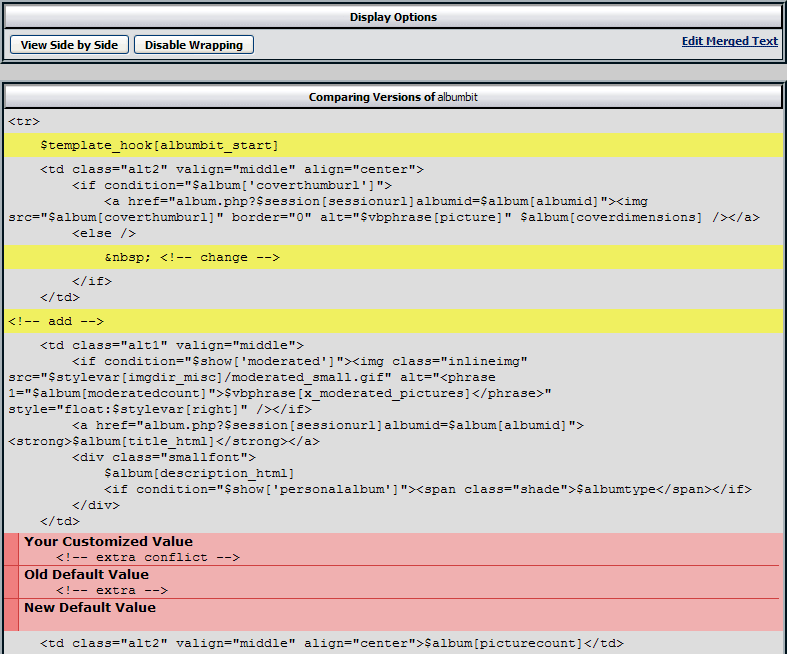
This lets you view the 3-way merge results visually. The yellow lines indicate areas changed by merging, while the red blocks indicate conflicts. The conflicting areas show you the values in all 3 versions of the template (old, new, customized) to let you choose how to resolve it.
Of course, trying to do the edit from this page would be a challenge, so if you click the "Edit Merged Text" link, you'll be taken to a normal looking template editor:

However, the text that you're editing is slightly different from the norm. Any unchanged or merged areas are as you'd expect, but the output from a conflict is very different. All 3 possible values for a conflict will be shown, so you can resolve it correct. And don't worry, if you try to save it while there's still a conflict, it will warn you.
It should be noted that the automatic merging is pretty conservative. "Adjacent updates" (when a customized version adds a line immediately after a line that was changed) will trigger a conflict. In some cases, it'd be ok for this merge to go through, but there are other situations where things would break if the change were applied. Regardless, the new conflict management system should allow you to resolve the problem more quickly.
Checking for Updated Phrases |
If you have not customized any of your phrases, this need not concern you, but if you have customized some of the default phrases, there are a few steps you will need to follow after you have finished running all the appropriate upgrade scripts.
Note:
When running vBulletin upgrade scripts, one of the final steps imports the newest version of the default phrases.
Any phrases that you have not customized will automatically be updated to use the newest versions.
However, any phrases that you have customized will not be altered or overwritten by importing the latest phrases, hence the need for the following steps.
Any phrases that you have not customized will automatically be updated to use the newest versions.
However, any phrases that you have customized will not be altered or overwritten by importing the latest phrases, hence the need for the following steps.
| 1 | Firstly, you should visit the Languages & Phrases > Find Updated Phrases page to find out which (if any) of your customized phrases may have updated default versions.
|
| 2 | If you find that some of your customized phrases do have updated default versions, you can either:
|
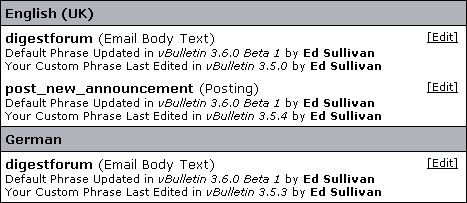
How to Patch Your Site |
A patch level release contains fixes for only the most critical issues in the previous release. In most cases, these are released to address a security issue. However they can be released for data integrity issues as well.
A patch level is designed to be installed directly over top of your existing installation, with no other action. You do not need to run any upgrade scripts.
Download The Patch
A Patch Level release doesn't come as a full set of files. As such, it doesn't appear in the normal download location. To access the Patch Release, first login to the vBulletin Members Area. In the left hand navigation within the 'Support Services' section, click on the Patches/Security Patches link and you will see a screen showing all Patch Level releases for your Licenses.
Patch Packages are cumulative so you only need the latest one available for your version. You cannot use a Patch to upgrade your site.
Simply click on the Patch for the version you're currently running and you will be taken to the download page, where you will be given options for how to download the Patch. The following options are available via the 'More Download Options' radio button should you need to change these before downloading the ZIP file (in the majority of cases, these will not need to be altered):
- PHP File Extension - As a general rule, web servers will use .php as the extension for PHP scripts, but some servers may use a different extension, or you may simply wish to use a different extension out of your own preference. Various extensions are available here for you to choose.
- Download File Format - This option allows you to choose the compression format of the package you are about to download. Most people will want to download the .zip package as Windows® has built-in support for zip files. However, if you are downloading the package directly to a Linux server you may prefer to use the tarball (.tar.gz) format.
- CGI Shebang - This option will only be of use to you if your server runs PHP as a CGI rather than as a web server module. If your server runs PHP as a CGI and requires a shebang (such as #!/usr/bin/php) then you can enter the required text here and it will automatically be inserted into whichever PHP files in vBulletin require its use.
Updating Files On Your Server
With Patch Level releases, the preparation work is very small - simply extract the ZIP package to your local machine! Once you've done this, you will notice that there is no upload folder. A Patch Level release only contains the files that are being fixed so will not see a complete installation package
Before you do this you should close your forums. This will help eliminate any potential db errors as people attempt to access your forums before the upgrade is complete.
It will also be a good idea at this point to take a backup of your site and database. While the database won't be updated with a Patch Level release, it's useful to have an up-to-date backup in any case. For more information on backing up your database, please see this section of the Online Manual.
Connect to your FTP server using your FTP client of choice. Select the Patch Level files in the local pane and open the existing old files in the remote pane, then drag the new folders/files to the remote window.
You will most likely be prompted by the FTP client at this point to ask if you want to overwrite the existing files. You should confirm this prompt, telling the FTP client that yes, you do want to overwrite the existing files. If the prompt gives you the option to overwrite all existing files without prompting again, use this option.
Once the files are uploaded, that's your installation patched! There are no scripts to run and you can re-open your forums to users again.
This is not a full upgrade. You do not need to run any upgrade scripts to complete the upgrade.
Note:
Patch Level Releases are only supported for their targeted version. If you are using a previous version, you will need to perform a complete upgrade for full functionality and support. Patch Levels will only be released for the latest version in an active vBulletin series.
Administrators |
This section only deals with the administrator’s administrative capabilities and options. It does not deal with moderator or user options.
Site Builder |
What is the Difference Between AdminCP and Site Builder? |
The Site Builder allows an admin to add various functionalities, dictate what they do, and where they’re placed on the site. It can control how your navigation bar is organized as well as which HTML ads appear in your header, and what the site logo is.
For a more detailed information on what Site Builder does do, go here.
To see a list of available modules that you can use see the Module List.
Everything else is controlled and administered using the AdminCP.
What is Site Builder |
We’ll show you how.
The first step in customizing pages on your site is to turn Site Builder on. To do that, just click the Off button in the top-right corner of your forum. This reveals a new menu bar at the top of the page, like this:
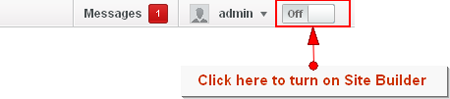
There are five buttons in the new menu bar, New Page, Edit Page, Header, Navigation Bar, and Footer. Each option controls and edits a different part of your site. Clicking on a button will open and reveal the related forms.

Why don’t we start with the New Page?
Go ahead and click the button. You’ll notice three tabs in the form. Each tab controls a different aspect of Page Creation. <Add Modules> lets you drag and drop new modules onto a page. Once you’ve added a module to a page, you can change the placement of the module by dragging and dropping it where you want, edit the functionality, and even remove the module.
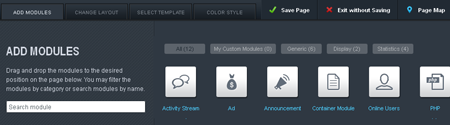
Click here for a list of modules and what they do.
The <Change Layout> tab, on the other hand, controls how many columns your page has and the width of each column.
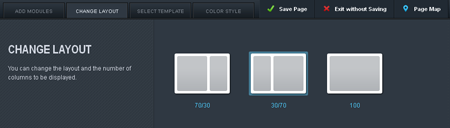
The <Select Template> tab allows you to create a page quickly from a saved template. A template is an existing page that has all the modules, with the options you selected for them, and the layout you made for them that you can use to make your new page. This is especially handy when you’re creating a number of similar pages with only small differences.
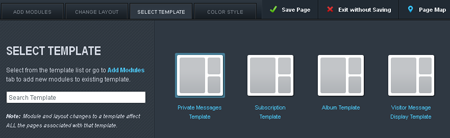
Finally, the <Color Style> tab allows you to control the colors for the page you're creating. You can use the color wheel as well as the My Color Palette tool to adjust and change the color scheme.
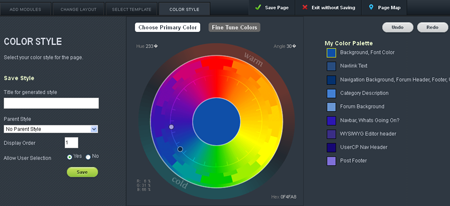
Now that you’re familiar with the overall function of each tab in the New Page form, you can either try to make a page yourself or continue with the tour.
Check out the Page Creation Tutorial
We’re going to skip the Edit Page Button and move straight to the Header button. The Edit page has the same functionality as the New Page form except that it’s for editing the page that you are currently viewing rather than creating a new one.

The button controls the header of every page and is divided into two parts. The Site Logo allows you to edit the header image for your site. You can upload any image into the space as long as it’s either a .png, .jpg, or .bmp. The Header Ad HTML module allows you to add HTML to the header of your site. You’ll usually be using this to place ads at the top of your page. For a more complete tutorial on how to do this, click here.
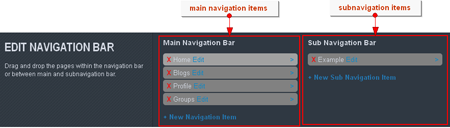
The next button we’re going to look at is the button. Once clicked, you will see a tool that has two columns, the first controls the main navigation bar. Anything created in this column will show up as tabs on your site. You can change the positions of the tabs by dragging and dropping the items to the order you desire.
The second column is for sub-navigation items. This means that these navigation items will only show up when you have selected the tab that contains them. Like the main navigation items, you can change the position of the sub-navigation item in the tab by dragging and dropping it. However, you can’t move a sub-navigation item from one tab to another. If you need to have the same sub-navigation on a new tab, you will need to recreate it for each tab you want to view it on.
For more details on how to use this form, click here.
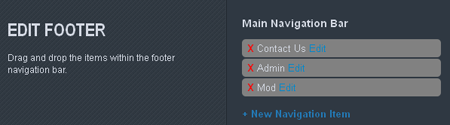
The final button we’ll cover is the button. It’s very similar to the Navigation Bar tool except that all the links will appear at the bottom of your page. Unlike the Navigation Bar tool you are not allowed to create sub-navigation items.
For more specifics about how to create footer items, click here.
Channel Manager |
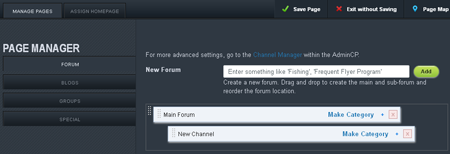
The Page Manager controls the creation and organization of forums, blogs, groups and other special items as well as allowing you to set a specific page as the home page of your site. The following functionality is not currently available: blogs, groups, special items and assign home page.
You can reach the Page Manager by clicking turning on the Site Builder function and clicking on the Page Manager button.
Note:
Prior to vBulletin.1.4, this was called Page Manager
Add Forum |
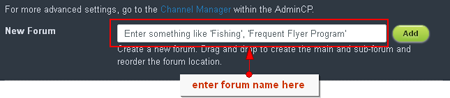
From the Page Manager, enter the name of the of forum you want to create in the New Forum text box and click Add. It will appear beneath the pre-generated Main Forum. You can change it’s position by clicking on the dotted strip to the left of the forum name and dragging it to its new location.
Creating a Category |
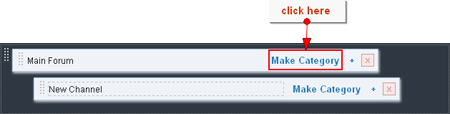
A category is a container for forums and largely used to organize the forums into, well, different categories. To make a category, click on the Make Category link to the right of the forum you wish to be a category. It will be instantly changed to a category. If you want to change it back, just click the [/b]Make Forum[/b] link that has taken it’s place. It’s that simple.
Removing a Forum |
If you want to delete a forum or subforum, login to the Site Builder and click on the Page Manager button. Find the forum or subforum you want to remove and click the red x icon to the right of the plus symbol. A confirmation popup will appear. Clicking Yes will complete the deletion.

Be careful of which forums you delete, since any threads, posts, and replies in that forum will be removed along with its parent
Organizing Forums |
Using the Page Manager, you can re-organize your forums simply by dragging them and dropping them where you wish them to appear. To do this, grab the forum's handle on the far left (the dotted texture) and then drag the forum where you want it to appear. When you have it arranged how you want it, simply let go of the mouse to drop the forum in position.
How to set up your Header |
How to Change the Site Logo
Alright, so now that you have your first page set up, you might want to change the site logo. You no longer have to login to the AdminCP in order to do that. You can change the site logo directly through the Site Builder. When you have it turned on, click on the “Header” button. You’ll see a form similar to the one below pop up:
The next thing you want to do is click on the “Edit” button beside the site logo. It will open an upload page. Use this form to upload your new site logo to the site. A preview of the image will appear like so:
Please note that this is just a preview and the changes have not been saved. If you navigate away from the page or click the “Exit without Saving” button, the site logo you uploaded will not replace the default logo. Only after you click “Save Changes” and confirm the change will the new logo display on your main site.
Note:
The maximum width of your site logo is set at 320 pixels.
You can add any HTML Ad directly into the header of your site. All you need is the HTML for the ad and to turn on the Site Builder function for your vBulletin. Click on the “Header” button in the Site Builder menu. This will open a form like this:

In the Header Form, click on the “Edit” button to the right of the “Header Add HTML Module” title. Once the Custom HTML Module appears, enter a title and then copy and paste your Ad's HTML into the text box provided. You can use the conditions provided to choose when the Ad will show and to whom. When you are finished configuring your Ad, click “Attach”.

The Header form will return you to a preview of the page so you can see how the Ad looks. When you’re satisfied with how it looks, click on the “Save Changes” button to complete the addition of your ad. The Header form allows you to choose between having one or two ads show in the header.
How to set up your Navigation Bar |
Navigation items are the tabs and links found beneath the site logo of your vBulletin. A navigation item can act as either a tab or a link. Sub-navigation items appear beneath a tab and along the top of the page. Sub-navigation items are always links.
How to Add Navigation Items
To add a navigation item to your site, make sure the “Edit Site” function is turned on by clicking on the “Off” portion of the button to the left of your username. Once the Edit Site menu appears, click on the “Navigation Bar” button.
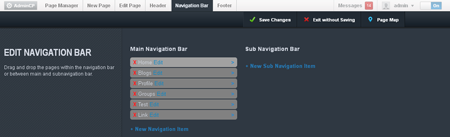
A form will open beneath the Edit Site. In the form, click the “New Navigation Item” link. A popup will appear where you can enter the name of the Navigation Item and the location you want it to point to.
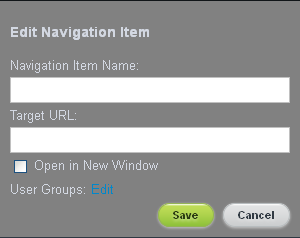
How to Remove Navigation Items
To remove a navigation item from your site, make sure the ‘Edit Site’ function is turned on by clicking on the “Off” portion of the button to the left of your username. A menu bar will appear along the top of your page.
Click on the ‘Navigation Bar’ button. This will open form beneath the menu bar. From here, click on the x beside the navigation item you want to remove. Once you’re done, click the ‘Save Changes’ button.
How to Edit Navigation Items
The ‘Edit Site’ function allows you to edit and change navigation items whenever you want. If you ever need to change the name of the navigation item, where it points, or even in what order it’s displayed, turn on the ‘Edit Site’ function and click on the ‘Navigation Bar’ button that appears in the menu bar.
Find the navigation item you want to edit and click the ‘Edit’ link to the right of its name. This opens a popup that allows you to change the name and URL of a navigation item. When you’re done making your changes, click the ‘Save’ button.
If you want to change the order of the navigation item, simply click and drag the items into their new positions. Once the Navigation Bar has been changed to your liking, click the ‘Save Changes’ button. The page will reload with the changes you’ve made.
How to Add Sub Navigation Items
Navigation items are tabs, while sub navigation items are links beneath their parent item. In order to add a sub-navigation item to a menu, you start by turning on the ‘Edit Site’ function. When the menu bar appears, click on the ‘Navigation Bar’ button.
In the form that opens, click the right parenthesis to the far right of the navigation item you want to add the sub navigation item to. When you have the navigation item selected, click on the ‘+ New Sub Navigation Item’ link.
Once the navigation item form is open, create your sub navigation item as usual and click ‘Save’. This returns you to the previous form. Add as many sub navigation items as you want and click ‘Save Changes’ when you’re finished.
How to set up your Footer |
The footer is the navigation strip that appears at the bottom of the site. With the Site Builder, you’re able to add links to this strip that can take your users anywhere you want them to go. Like the Navigation Bar, these items are called navigation items.
How to Add a Footer Item
As always, we begin by logging in to the site and turning on Site Builder. From here, click on the Footer button.
This opens a form beneath the Site Builder bar. In the form, click the “New Navigation Item” link. A popup will appear where you can enter the name of the Navigation Item and the location you want it to point to. Once you’re done adding items, click the “Save Changes” link and your page will reload with the changes.
How to Remove a Footer Item
To remove a navigation item from your site, make sure the ‘Edit Site’ function is turned on by clicking on the “Off” portion of the button to the left of your username. A menu bar will appear along the top of your page.
Click on the ‘Footer’ button. This will open form beneath the menu bar. From here, click on the x beside the navigation item you want to remove. Once you’re done, click the ‘Save Changes’ button.
How to Edit a Footer Item
You can change the name of your footer items at any time as well as changing the location they point to. To do this, login to your account and turn on ‘Site Builder’. When the Site Builder bar appears at the top of your site, click on the ‘Footer’ button.
Find the navigation item you want to edit and click the ‘Edit’ link to the right of its name. This opens a popup that allows you to change the name and URL of a navigation item. When you’re done making your changes, click the ‘Save’ button.
Introduction to Pages |
As you’ve looked through vBulletin, you’ve probably noticed several mentions of Pages and wondered what we were talking about. In this article, we’ll try to shed some light on what Pages are in vBulletin and how you can use them.
It’s pretty easy. In fact, you already know the basics of what a Page is. You’re on one right now. At its simplest, a Page is just like the pages you find in any other webpage. The only difference with vBulletin is that you can add and edit the content of the page directly without having to upload HTML or CSS files to your webhost. (That is, you can if you have admin permissions.)
The new vBulletin interface allows you to add new pages in addition to changing the content on each individual page.
So, now that you know what a Page is, why don’t we show you how to make and then edit one?
How to Create a Page |

In order to create a page, you need to turn on the function. You do that by clicking the “Off” button to the right of the Edit Site button. This will reveal a menu along the top of your webpage. From here, you want to click on the button.

This opens a form with three tabs. For the moment, let’s stick to the <Add Module> tab in the form. vBulletin comes with a variety of basic pages created when you first install or upgrade to it. However you may wish to add custom pages for a variety of reasons. We will walk through an example of making a front page for your site. You can make this the first page that your users see when they arrive on your site. We’ll start with an Announcement module, an Activity Stream module, and an Online Users module
Note:
You don’t have to build your front page with these modules if you don’t want to. In fact, you can build it with a totally different set of modules depending on what you want to use your vBulletin for. Remember, this is just a tutorial to show you how to do things and not a hard guide. Have fun!
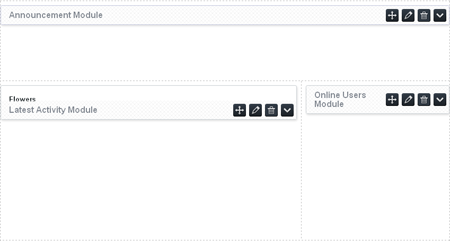
Ok, so, now that we have the page organized like we want, we’re going to play with the options for each one. Although each module has different options, the options can be accessed in the same way. Just click on the “Edit” button and a form will pop up with a choice of options.
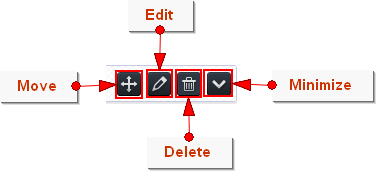
In this tutorial, we’ll work with the Activity Stream module and just let the others go as their defaults. So, to continue, click on the “Edit” button. In the new form, change the “Show Filter” to “All” and then click the button.
Go ahead and change the options for your other modules. Once you’re done, click the button.
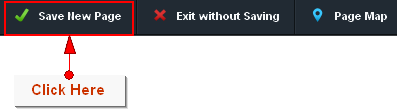
This opens a new form like the one above. On this form, enter a name for the page into the Page Name field. The URL for your page will automatically fill out with the name you entered for the page. If you want to change it, feel free to right now. The last thing you want to do before saving is to name the new template that the save will generate along with your page. This saves the layout, order, and settings of the page so you can reuse it at a later time if you need to make another page likes this one.
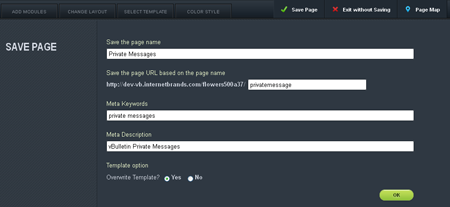
Finally, click on the button and that’s it.
Note:
Color Styles
The Color Styles tab is used to change the color layout of the page you are creating. For the tutorial, click here.
The Color Styles tab is used to change the color layout of the page you are creating. For the tutorial, click here.
How to Edit a Page |
When the menu bar appears along the top of your webpage, click on the button. A form, very similar to the New Page form, will open. At this point, you can change the settings, move things around, or even remove modules. Once you’re done making the changes you want to make, click on the button. It will take you to a confirmation screen.
From here, you can choose to save the changes as a new template or save over the existing template. If you chose to save over the existing template, it will also change any other page that was using the template as well.
The form, will by default, overwrite the existing template with the changes you made. In order to keep this from happening, you need to select the “No” radio button to the right of the Overwrite Template? question. When you do that, a field asking for a template name will appear. Now, name your template!
Regardless of which choice you make, click to confirm the changes.
How to Change the Layout |
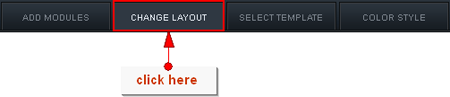
VB5 provides three different layouts for you to use in organizing your modules. The first two provide a two column layout, with the last one providing a one column layout. You will notice that when you click on the “Change Layout” tab in either the Edit or New Page form, that there’s a number beneath each column. This indicates how much, in percentiles, of the screen width that each column will take.

To change the overall layout of our page, make sure to turn on the edit site function. If you are creating a new page, click on the “New Page” button. If you are editing an existing page, click on the “Edit Page” button. Regardless of which you choose, click on the “Change Layout” tab in the form that opens. Choose which layout you want to use and then click on the “Save Page” button.
This will take you to the confirmation page and you can finish up the process through either the page creation instructions or the page edit instructions.
How to Create a Template |
How to Create a Template
You can create a template in one of two places: the New Page form or the edit page form. The steps to create a template is integrated into the process of creating and editing a page. There is nothing special you need to do because vBulletin automatically does it for you. Let’s go over the steps again for each form. Please note that we will be going into less detail about how to create and edit a page. If you need a refresher on how that works, you can go here for new pages and here for editing existing pages.
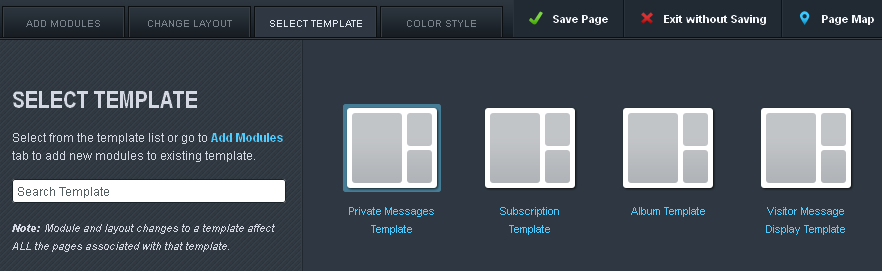
New Page Form
Turn on the “Edit Site” button. Click on the New Page button. After adding, moving, and editing the settings of the modules you want, click on the “Save Page” button. Enter the information in for the new page, including (most importantly) a name for the template. When you have the confirmation form filled out, click the “Ok” button at the bottom of the form.
Edit Page Form.
Turn on the “Edit Site” button. Click on the Edit Page button. After making the changes you want to the page, click on the “Save Page” button. This will open a confirmation page. To create a new template (rather than saving over the old template), select the “No” radio button to the right of the Overwrite Template? question. When you do that, a field asking for a template name will appear. Name your new template and click “Ok” at the bottom of the form. This will save your template with the name you gave it.
How to Use a Template
You can use the template in two forms, the New Page Form and the Edit Page Form. Unlike creating the template, there is no difference in how to access and use the template. As always, make sure the “Edit Site” function is turned on. Click on the “New Page” button if you want to use an existing template to create a new page. If you want to modify an existing page using an existing template, navigate to the page you want to change and click the “Edit Page” button.
When your chosen form has opened, click on the “Select Template” tab. The tab will load with all existing templates in the system. Now, find the one you want to use by either searching for its name or by using the scroll bar at the bottom of the form. Clicking on the template will select it and create a preview of the layout beneath the form you’re using.
From here, you can make more changes. If you do not intend to make further changes or are done making changes, just click the “Save Page” button and follow the instructions to save the template.
How to use the Color Style Form |
In vBulletin you can change the look of a page (the colors of the font, background and links) with the use of Styles. The Color Style Form makes it simple to create a Style for a page at the same time that you’re creating the page itself. To get to the Color Style Form in the Site Builder, make sure the option has been turned on.
Depending on whether you’re editing or creating a new page, click on either the New Page or Edit Page button.

Once the form drops down from the menu, click on the Color Style tab. This will open a form with a color wheel and a preview of the page with your chosen colors beneath the form. There are several different ways to use the form. Rather than walking you through an example of how to Style your page, we’ll go through the options and give you a detailed outline of what each does.
<<Image here of form w/ color wheel and numbered options. Numbers must be added to the corresponding options>>
The color wheel is a quick way to change the colors of the page. The color palette is a preview of the colored elements on the page.
Color Wheel
There are two dots (1a and 1ab) on the Color Wheel. They control the color palette. 1a controls the primary color of your palette while 1b controls the secondary colors of your palette. The further apart they are, the more contrast your palette will have. The closer together they are, the more complementary the colors. To change the color palette, click and drag either dot around the color wheel.
Hue
Clicking on Hue opens a pop up form with a text field. Entering a number between 0 and 360 selects the primary color (dot 1a) for your color palette.
Angle
Clicking on Angle opens a pop up form with a text field. Entering a number between 0 and 360 selects the secondary color (dot 1b) and changes the palette.
Hex
Clicking on Hex opens a pop up form with a text field. Entering a hexadecimal code changes the primary color (dot 1a) for your color palette.
<<Image here of form w/ My Color Palette and numbered options. Numbers must be added to the corresponding options>>
Undo
The Undo button undoes the last action taken.
Redo
The Redo button redoes the last action that was undone.
My Color Palette
My Color Palette previews the colors for specific elements of the page. The preview of the color is followed by a list of elements it affects. Clicking on the preview opens the ‘Fine Tune Colors’ menu to the right for the selected element.
<<Image here of form w/ Fine Tune Colors and numbered options. Numbers must be added to the corresponding options>>
Fine Tune Colors
This controls the shade of the individual element. Use the selector to the right of the preview square to choose the desired color. To change the selected element, click on the name of the element to be changed.
Fine Tune Colors also has four different templates to select from. These templates change the defaults for the overall look of the page and eliminate the possibility of customizing certain elements. Here’s a complete list of those options:
- Color - template that uses the selected colors
- White - template that makes everything white except for the following elements: Background, Font Color, Navigation Background, and Navlink Text
- Grey - template that makes everything grey except for the following elements: Background,Category Description
- Dark - template that makes everything black except for the following elements: Background,Category Description
Save Style
This part of the form saves the Style created in the Color Style tab.
Title for generated style
This controls the name of the style.
Display Order
This controls the display order in the AdminCP.
Parent Style
The selected option becomes the parent style of the style being created.
Allow User Selection (Yes / No)
This determines whether or not another user can use the style.
Save
This saves the style, but does not apply it to the page. To apply the style to the page, click on the Save Page option at the top.
Introduction to Modules |
How to add a module to a page |
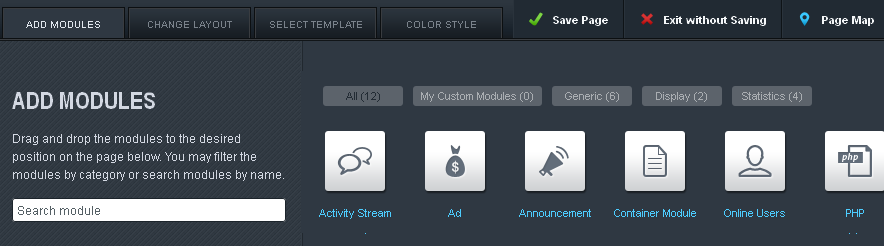
After adjusting the settings for the module and placing it where you want, click on the button to save your changes. That’s it; it’s that simple.
How to remove a module from a page |
To remove the module from the page, click on the little garbage can icon to the right of the edit icon.
The module will be removed from the page, however the changes will not be saved until you click and complete the process.
How to edit a module |
After making the adjustments you want to the module, click the button at the bottom of the form that appears. Different modules will show different forms. Please note that the changes you’ve made will not be permanent until you’ve clicked the again at the top of the page.
How to change the positioning of modules |
Once the Edit Page Form has opened, use the directional icons to move the modules to its new location. When you’re finished adjusting the positioning of the modules, click on the button. This will save any change you’ve made return you to the page you edited.
Module List - Documentation and Customization |
The following is a list of modules available in vBulletin. Each article includes information of what you can customize.
Modules |
Display
- About Author: Used on Article display pages to show the content of the author's biography profile field.
- Ad: Used to display advertising on your site.
- Annoucement: Displays Announcements created in the AdminCP. Announcements have been deprecated in favor of the Notices feature.
- Calendar: Shows a calendar view of event topics provided via search.
- Channel Description: Shows the current channel's description on the page. You can set descriptions in the AdminCP under Channel Management -> Channel Manager.
- Page Title: Shows the current page's title. If you're in a channel, this is the channel title.
- Video: Allows you to embed a video into a page. Supports both third-party sites and videos uploaded to your site as attachments.
- Channel Navigation: Allows you to build a list/menu of channels on your site. You can choose any channel as the starting point.
- Display Template: Allows you to display custom templates within the module system. This is used for the Privacy Policy and Terms of Service pages.
- Forum Home: The forum activity stream module. Displays a list of forum channels and has tabs for activity stream and subscriptions.
- Static HTML: Similar to the Ad Module and allows you to display custom HTML on your pages.
- Tabbed Container: Allows you to build tabbed pages on your site. An example is the default Calendar page.
- Tag Navigation: Allows you to build menus based on your tags. Tags can also be shown as a tag cloud so this supersedes that module. Used on the Articles page.
- Content Slider: A customized search module to show featured articles in a carousel. The first attached image would be used as the backgound image.
- Friends: Shows your current friends. Used on the provided Community Home Page.
- Search: Generic Search module. Allows you to build custom searches to highlight what is important to your site.
- Trending: A specialized search to show trending topics. THis is new than a standard new posts search as it is based on how many people interact with a topic in the last 24 hours.
- Upcoming Events: A specialized search to show a list of Event topics that are pending.
- Statistics: Shows your site statistics. Topics, Posts, Total Members.
- Tag Cloud: Shows your tags for the channel.
- Today's Birthday: Shows users with birthdays today.
- Top Active Users: A list of most active users currently online.
- What's Going On: Shows the users currently browsing the site or specific channel.
Activity Stream |
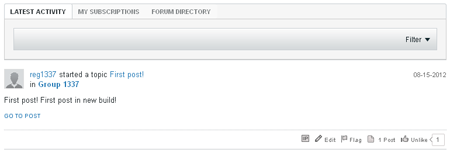
The Activity Stream module controls both the display for the Activity Stream and the channel list. The Activity Stream module has twelve different options:
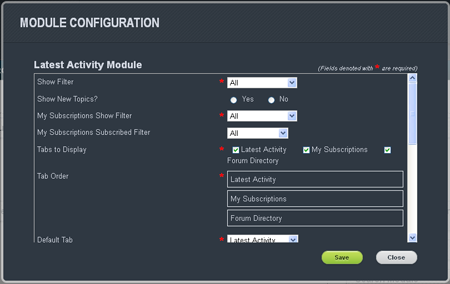
Show Filter
This controls the type of items filtered into the Activity Stream. The options include: all, discussions only, photos only, videos only, links only, or polls only.
Show New Topics?
Selecting ‘Yes’ will display new topics in the Activity Stream. Selecting ‘No’ will disable the display of new topics in the Activity Stream.
My Subscriptions Show Filter
This controls the type of items filtered in to the Subscription tab of the Activity Stream. The options include: all, discussions only, photos only, videos only, links only, or polls only.
My Subscriptions Show Filter
This controls the type of items filtered in to the Subscription tab of the Activity Stream. The options include: all, discussions only, photos only, videos only, links only, or polls only.
My Subscriptions Subscribed Filter
Tabs to Display
This controls which tabs to display in the activity stream. The options include: Forum Directory, Latest Activity, and My Subscriptions.
Tabs Order
This controls the order in which the selected tabs will display. The tabs closest to the top will display first to the left on the page. To change the order, click and drag a tab to the desired location.
Default Tab
This controls which tab is displayed when a user loads the page containing the Activity Stream. The admin can choose between:
- Latest Activities - tab displaying the latest activities on your site
- What’s Hot - tab displaying the most popular activities on your site
- My Subscriptions -tab displaying activities a user has subscribed to
- Forum Directory - tab containing a directory of created forums
This controls how many results per page appear in the Latest Activity tab.
Latest Activity Max Pages
This controls the maximum number of pages the Latest Activity tab will display for its results.
Latest Activity Date Range
This option controls how far back the Activity Stream will go to get items to display.
My Subscriptions Results per Page
This controls how many results appear per page in the ‘My Subscriptions’ tab.
My Subscriptions Max Pages
This controls the maximum number of pages the ‘My Subscriptions’ tab will display for its results.
My Subscriptions Date Range
This option controls how far back the Activity Stream will go to get items to display for the My Subscriptions tab.
Ad |
Search
This searches the existing ads for an ad that matches the term entered.
Title
Displays the title of the ad created.
Active?
An ad with the Active? checkbox checked is active. If the checkbox is not checked, the ad is not a part of the ad rotation.
Display Order
This controls which ads are displayed first. Every ad receives a number. The number entered in the textbox determines the order in which the ad appears.
Action
- Edit - clicking on this opens the Edit Form for the selected ad.
- Delete - clicking on this will delete the selected ad.
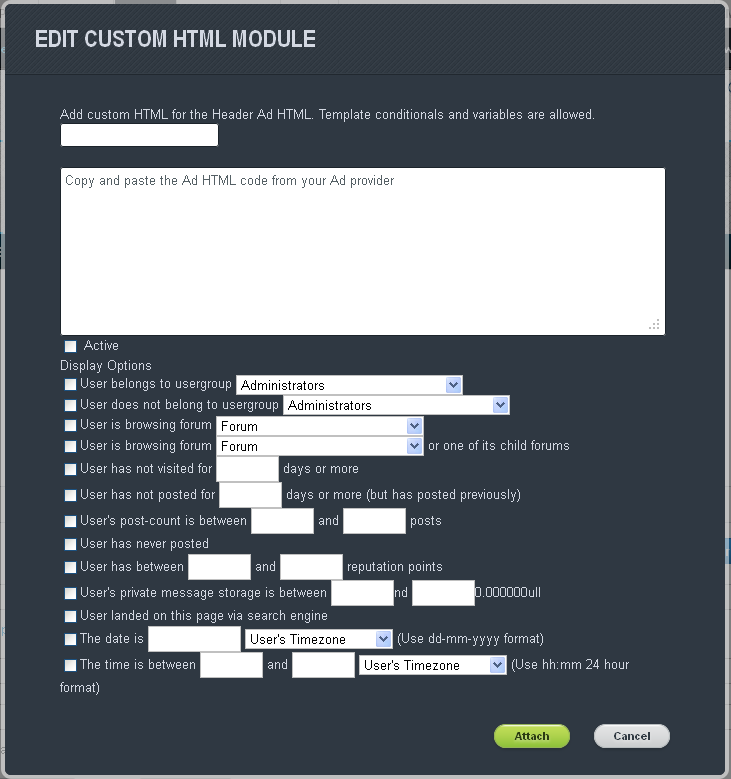
Ad title
This is the text field provided for the name of ad.
Ad HTML Code
This is the text field provided for the HTML code that goes with each individual ad.
Active
This checkbox puts the ad into rotation.
Display Options
Display options control who sees the ad, where they see it, when they see it, and for how long.
- User belongs to group
- User does not belong to usergroup
- User is browsing forum
- User is browsing forum or one of its child forums
- User has not visited for x days
- User has not posted in x days
- Users post is between
- User has never posted
- User has between x and y reputation points
- User’s private message storage is between x and y
- User landed on this page via search engine
- The date is
- The time is between
Announcement |
The Announcement module is used to display any announcements the admin has created in the Announcements area of the AdminCP. It is in the module category Display.
There are no options for this module, it simply is used if you want to display announcements on the current page.

Online Users |
The Online Users module is used to display a list of users that are either on the site or on that particular page. It is in the module category Statistics.
The Online Users module has three different options:
Display Avatars?
This decides whether the users avatar is displayed in the list (Yes) or whether the username is displayed in the list (No).
Max online users to show
This is the maximum number of users that should be listed in the list. If there are more users, then they will just not be shown.
Show Users For This Page Only?
You may set this to only show the users viewing this page (Yes) or to show all the users on the site (No).
PHP |

The PHP module has two different options:
Title
This is the title that will show above the PHP module on the page.
PHP Code
This is where you would input your valid PHP for the module. Please make sure you use valid PHP or you could possibly break your page.
Some examples of valid PHP to use in this module:
echo “Hello World!”;
Hello World
echo "Hello ". vB5_User::get('username') .", how are you doing today?";
Hello <username>, how are you doing today?
Search |
The Search Widget is a module that displays the search results for a pre-configured search created by the administrator. You can use it to highlight particular discussions, images, videos and attachments.
Widget Title
This is the title of the search results widget that appears at the top of the search on the page.
Number of Results
This is the number of results the search widget will display on the page.
Keywords
These are the search terms used to find the results for the search widget. You can enter more than one keyword, separated by a space.
- Title Only
Checking this box restricts the search to the titles of the available items.
This limits the search results to the listed members in the text field. If you create the search using User A, only posts that User A will show up in the Search Widget. You can enter more than one username, separated by a comma.
Tags
This narrows the search to posts that contain the tags you’ve selected. You can either enter tags in the text box provided or select them from the list of available.
Date Range
This limits the number of days the search will go back in order to find results. The count starts from the current day back.
- Last Visit
This sets the start date back to the last time the user visited.
This controls how the search results are sorted. The results can be sorted by the following categories:
- Relevance - sorts the results by the relevance of the results to the search you’ve entered
- Title - sorts of the results alphabetically by the title of the item
- Members - sorts the results alphabetically by the member that created it
- Date - started post - sorts the results by the date of the item was created and not by the latest post mase
- Date - last update - sorts the results by the last reply made to the item
- Replies - sorts the results by the most replies made to the original item
- Order - the order in which the results appear (descending and ascending)
This restricts the type of items the search result will display.
Search Options
This restricts the search to the following options:
- Search in featured content only - search results will only come from the featured content section
- Search in my following only - search results will only come from the members, topics and forums the user is following
This dictates which forums the search will use to find keyword matches.

Advanced Search Editor
This text box allows you to enter the search terms using JSON.
Static HTML |
The Static HTML module has two different required text fields:
Title
This is the title that will show above the HTML module on the page.
HTML
This is where you would input your valid HTML for the module. Please make sure all tags are closed properly or you could possibly break your page. There are several great sites on the web to either get help with writing proper HTML, such as w3schools.com, or to help you validate your HTML, such as The W3C Markup Validation Service.
An example of proper HTML would be:
<p>Hello World!</p>
Tag Cloud |
The Tag Cloud module displays all tags being used in the your installation with links to the items using the tag. You can name the widget using the Widget Title field.
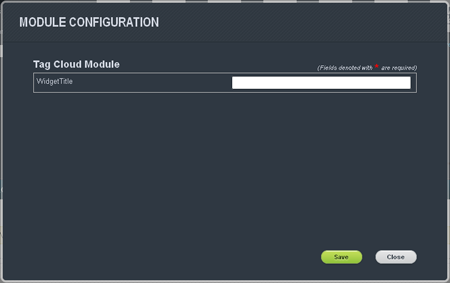
Today's Birthdays |
The Today's Birthdays module is used to display any users who have birthdays on the current day. It is in the module category Statistics.
There are no options for this module, it simply is used if you want to display a list of users whose birthday occurs today on the current page.
Top Active Users |

The Top Active Users module is used to display the most active users on the site. It is in the module category Statistics.
There is one option for this module:
Max top online users to show:
This is the maximum number of users you wish to show in this list.
Video |
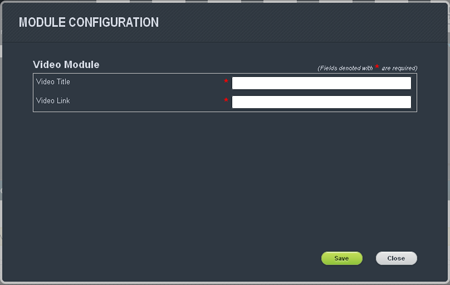
The Video module is used to display a video on a page. This module currently supports from YouTube, Vimeo, DailyMotion, MetaCafe videos. It is in the module category Generic.
The Video module has two different options:
Video Title
This is the title that will show above the video on the page.
Video Link
This is the full link to the youtube video you wish to have embedded on the page.
Administrator Control Panel |
Logging in to the Control Panel |
The first thing you will see when you access the Control Panel is a prompt to log in. You will be presented with this login prompt even if you are already logged into the public area of the board. This is an additional level of security.
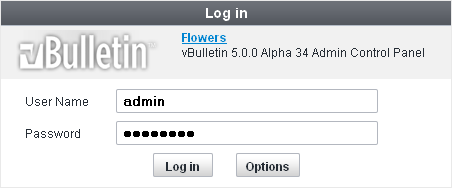
To log in, simply enter the username and password of a user account with administrator privileges, such as the one you created towards the end of the installation script process.
There are a couple of extra options that can be set on the login form. To see them, click the [Options] button to expand the form to its full size.
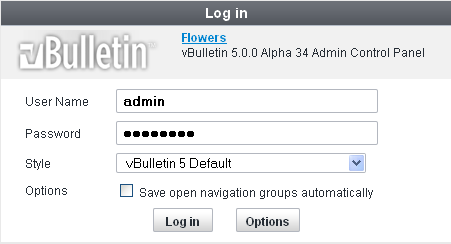
The two options you can set from the login form are:
- Style Choice
vBulletin comes with a selection of styles in which you can view the control panel. Try them out and see which one you like best, or if you are feeling adventurous, create your own! - Save Open Groups Automatically
This option allows you to have the system automatically save your preferences for which options in the Admin CP navigation panel are opened and which are collapsed by default, without you having to manually save the preferences.
Note:
If you changed the value of $admincpdir in the config.php file and have renamed the admincp directory, the location at which you access the control panel will have changed accordingly.
Getting around the Admin Control Panel |
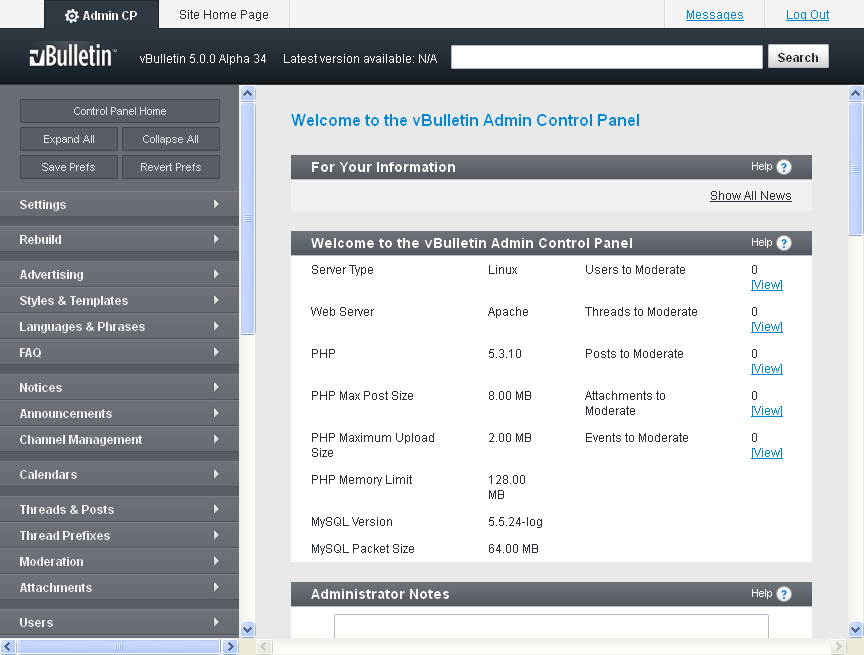
You will notice that the Admin Control Panel is divided into three distinct areas. The first and most obvious of these is the main panel, which currently shows the home page. This area (the main panel) is where the majority of your attention will be focused when administering your board.
At the top of the page is a tab bar with a link to the Site Home Page (the starting point of the public area of the board). To the right of the tab bar is a link to the messages page for your admin user and a link allowing you to log out of the control panel. Directly below the open Admin CP tab is a narrow strip that contains information about the vBulletin version you are currently running and the latest version available to download. To the right of the strip is a search box allowing you to search the forums.
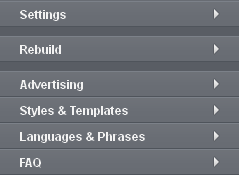
To the left of the page is the navigation panel. This long, thin area is the key to getting around the Admin CP.
When you first visit the Admin CP, you will notice that all the sections of this panel are in a collapsed state.
You can click the gadget on each section to expand it and show its contents, and click the gadget again to collapse that section again. Double-clicking a section's title will also toggle its state and either expand or contract it.
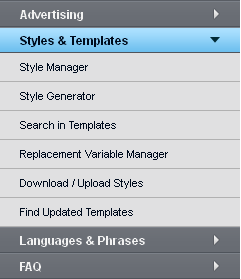
You can expand and collapse any sections at any time. You are not limited to having just a single group expanded at any one time.
When you have a section or sections expanded, hovering your mouse over the included links will highlight that link. You can then click to open the corresponding page in the main panel.
You can use the expanding and contracting sections to build a customized control panel layout for yourself. For example, you may find that you regularly use the 'Styles & Templates' tools, but very infrequently use the FAQ manager.
When you have established a set of expanded and collapsed sections that suits your way of working, you can save the state of the sections by clicking the [Save Prefs] button.
When you reload the Admin CP, you will find that the sections in the left navigation panel will have automatically expanded and collapsed in the manner that they were when you clicked the [Save Prefs] button.
You can expand and collapse any section in your administration session, and at any time you can click the [Revert Prefs] button, which will revert the expanded/collapsed state of all the sections to how they were when you saved your preferences.
If at any time you want to return to the home page of the Admin CP, clicking the [Control Panel Home] button at the top of the navigation panel will do this.
Settings |
Options |
Turn Your vBulletin On and Off |
The most common reason for inactivating a forum is to do forum or database maintenance.
While your site is inactive, only users in the Administrator usergroup can access the site. Other site visitors are shown an informational message that you provide.
Remember to reactivate the forum after you have finished your maintenance tasks.
Note:
You must click Save for changes to take effect.
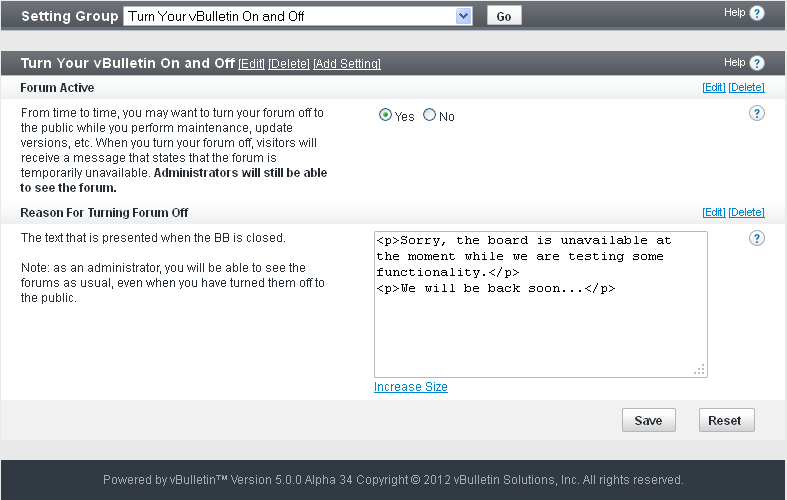
Forum Active (Yes/No)
Select Yes to set the forum to Active for the general public.
Select No to set the forum to Inactive for the general public but leave it set to Active for administrators.
Administrators accessing the forum when it is set to Inactive see a notice displayed in the header and footer of each page stating that the forum is inactive.
Reason for Turning Forum Off
Enter the message you want to display to users trying to access the forum while it is set to Inactive. Your text message can contain HTML code but not BBCode.
Example: The forum_name forum has temporarily been inactivated for site maintenance. We expect to be back online by 3:00am GMT. Sorry for the inconvenience.
Site Name / URL / Contact Details |
After a fresh installation or upgrade, or a server or site move, be sure to check the following options and reset them if necessary.
Note:
You must click Save for changes to take effect.
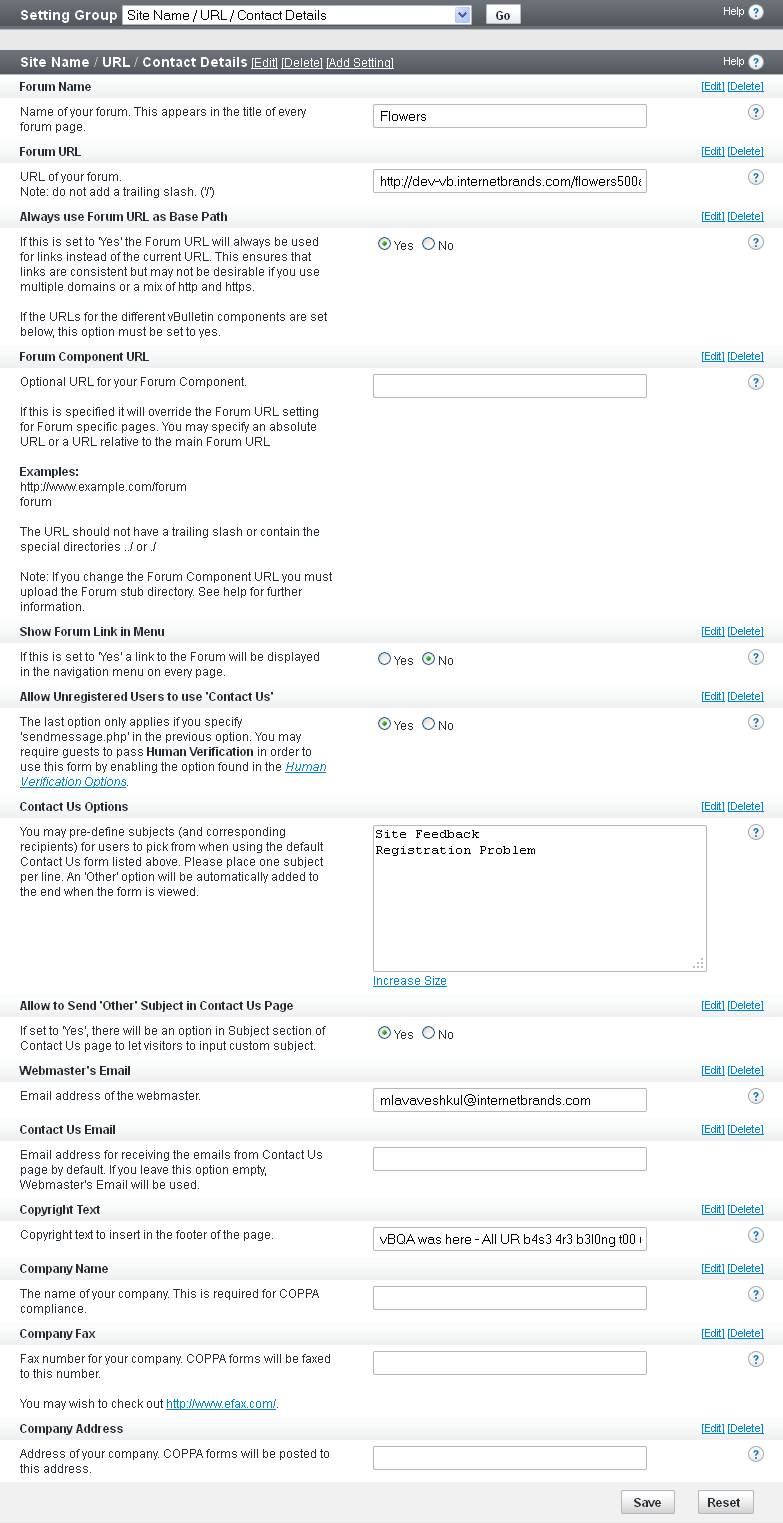
Forum Name
Name of your forum site, which appears in the title of every page.
Forum URL
URL of your forum site. Do not add a trailing slash (/) in the name.
Homepage Name
Name of your home page, which appears at the bottom of every page.
Homepage URL
URL of your home page.
Contact Us Link
Link for contacting the site administrator, which appears at the bottom of every page. To use the built-in email form, specify sendmessage.php; otherwise use something like mailto:[email protected] or your own custom form.
Allow Unregistered Users to use 'Contact Us' (Yes/No)
This option applies only if you specify sendmessage.php in the Contact Us Link option. To require guests to pass Human Verification in order to use this form, enable the option found in the Human Verification Options.
Contact Us Options
You can predefine subjects (and corresponding recipients) for users to pick from when using the default Contact Us form. Include one subject per line. An Other option is automatically added to the end when the form is viewed.
Each subject must be placed one per line, meaning that you need to enter a carriage return between subject (press <Enter>). If you wish to direct the email from a subject to a particular user, you can either specify the user's userid on the forum or their email address. You do this by placing the item in brackets at the start of the subject.
Example:
{1} Site Feedback
{[email protected]} Help
Registration
Feedback sent to the first option "Site Feedback" would be directed to the email address of Userid #1. Feedback sent to the second option "Help" would be directed to the email address "[email protected]". Feedback sent to the third option "Registration" would be directed to the Webmaster's email address.
Webmaster's Email
Email address of the webmaster. This can be different than the technical contact listed in the includes/config.php. The webmaster receives all emails from vBulletin itself except for database errors.
Contact Us Email
Default email address for emails sent from the Contact Us page. If you leave this option empty, the webmaster's email is used.
Copyright Text
Copyright text to insert in the footer of the page.
Company Name
The name of your company. This is required for COPPA (Children's Online Privacy Protection Act) compliance.
Company Fax
The fax number for your company. COPPA forms are faxed to this number.
Company Address
The address of your company. COPPA forms are posted to this address.
General Settings |
These options allow you to set meta tags and descriptions, set options for Quick Navigation, enable access masks, and other similar functions.
Note:
You must click Save for changes to take effect.
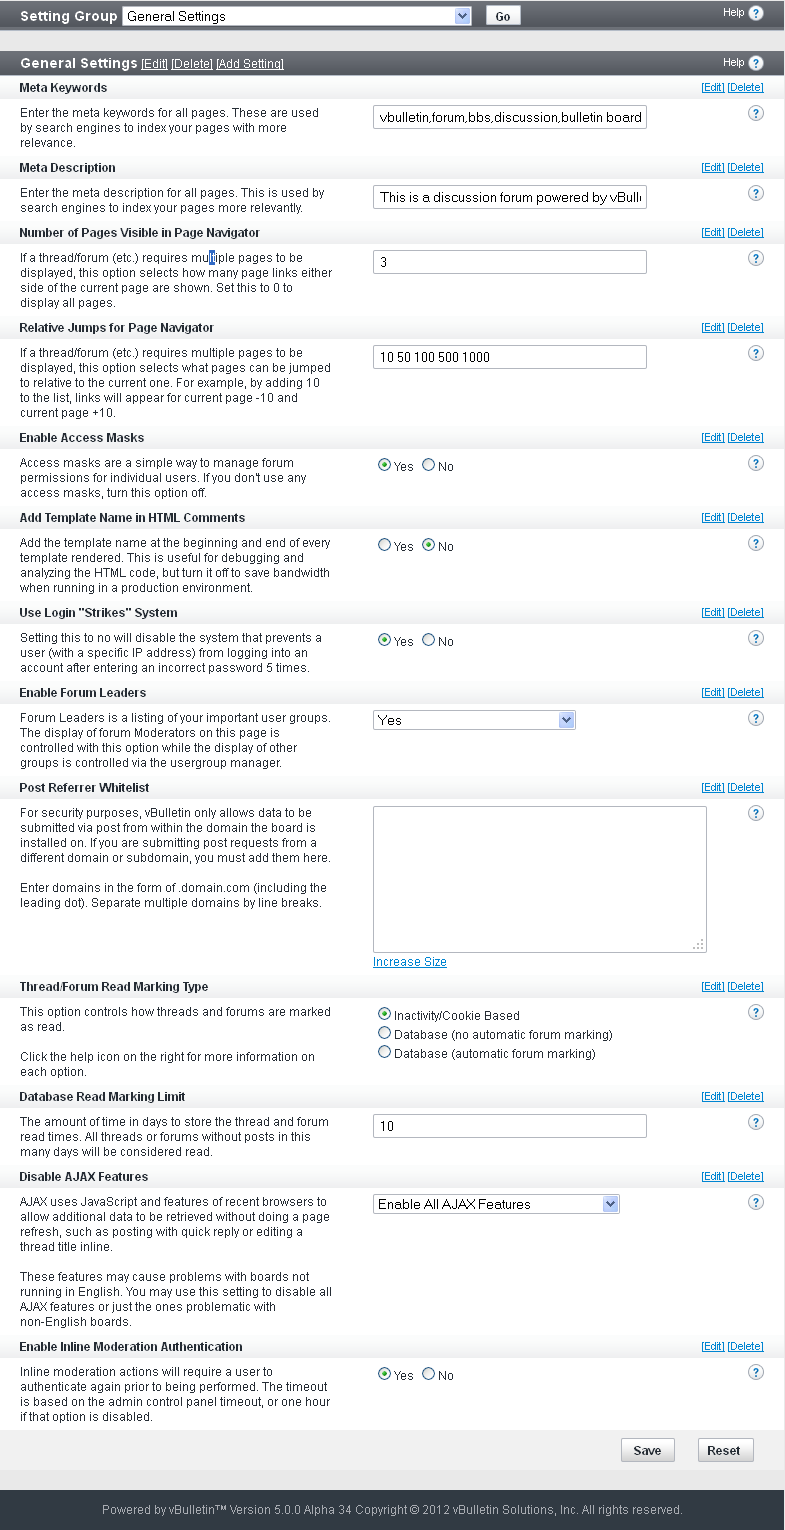
Meta Keywords
Enter the meta keywords for all pages. These keywords are used by some search engines to index your pages with more relevance. Other search engines such as Google do not take keywords into account.
All keywords you enter here will be put in the keywords meta tag in the header of every page. Separate keywords or phrases with a single comma and no space.
Example: vbulletin,forum,bbs,discussion,jelsoft,bulletin board
Meta Description
Enter the meta description for all pages. These keywords are used by some search engines to index your pages more with more relevance. Other search engines such as Google do not take descriptions into account.
The short description of your site that you enter here is placed in the meta description tag in the header of every page. Most search engines accept a maximum of 255 characters for the description.
Example: This is a discussion forum powered by vBulletin. To find out about vBulletin, go to https://www.vbulletin.com/.
Use Quick Navigation Menu
The Quick Navigation menu appears by default on most pages and provides a quick jump to any of the forums on your site as well as to several other places on your site (for example, search and private messaging). While it can have a marginal impact on performance, typically you will only want to disable this if you have an extremely large number of forums, in which case a large amount of HTML will be generated that will increase the size of pages and bandwidth usage.
Number of Pages Visible in Page Navigator
On thread and forum pages, as well as private messaging lists and some other places, if there are multiple page number links to be displayed, this setting determines how many are shown on either side of the page currently being viewed.
Setting this to 0 causes all page links to be displayed.
Example: 3
Relative Jumps for Page Navigator
If a thread or forum requires multiple pages to be displayed, this option selects what pages can be jumped to relative to the current one. For example, by adding 10 to the list, links will appear for current page -10 and current page +10.
Example: 10 50 100 500 1000
Enable Access Masks
Access masks allow you to enable or disable access to a particular forum for individual user(s). To use access masks, enable this option. This option also affects whether or not users will be able to see forums they do not have access to on forumhome and forumdisplay.
If this functionality is off, users see users they are prevented from accessing forum listings but not be able to enter them. If this functionality is on, users will not see those forums at all.)
Add Template Name in HTML Comments
Setting this to Yes adds the template name at the beginning and end of every template rendered on any page. This is useful for debugging and analyzing the HTML code, but it should be turned it off to save bandwidth when running in a production environment.
When you are modifying templates, it is often helpful to have this setting enabled so you can view the source of a page to determine which template(s) control it. In the course of normal usage, however, you will usually want this disabled because it increases your page sizes and therefore bandwidth usage.
Use Login "Strikes" System
Setting this to No disables the system that prevents a user (with a specific IP address) from logging in to an account after entering an incorrect password 5 times.
After the first failed login attempt, the user receives the following message:
You have used 1 out of 5 login attempts. After all 5 have been used, you will be unable to log in for 15 minutes.
After the fifth failed login attempt, the user receives the following message:
Wrong username or password. You have used up your failed login quota! Please wait 15 minutes before trying again. Don't forget that the password is case sensitive.
After the fifth failed attempt, the user is locked out for fifteen minutes and and email will be sent to the email address associated with the account alerting them about the login failure.
Enable Forum Leaders
Forum Leaders is a listing of your important user groups. The display of forum Moderators on this page is controlled with this option; the display of other groups is controlled via the usergroup manager.
Post Referrer Whitelist
For security purposes, vBulletin allows data to be submitted via post only from within the site’s domain. If you are submitting post requests from a different domain or subdomain, you must add them here.
For example, if you have multiple sites that tie into this site or if you have vB-integrated hacks that POST data externally, then you may want to put those referrers on the whitelist.
Enter domains in the form of ‘.domain.com’ (including the leading dot). Separate multiple domains with line breaks.
Thread/Forum Read Marking Type
This option controls how threads and forums are marked as read.
- Inactivity/Cookie Based.
Once a user has been inactive for a certain amount of time (the value of the Session Timeout option) all threads and forums are considered read. Individual threads are marked as read within a session using cookies.
- Database (no automatic forum marking).
This option uses the database to store thread and forum read times. This allows accurate read markers to be kept indefinitely. However, in order for a forum to be marked read when all threads are read, the user must view the list of threads for that forum.
This option is more space- and processor-intensive than inactivity-based marking.
- Database (automatic forum marking).
This option is the same as a previous one, but forums are automatically marked as read when the last new thread is read.
This is the most usable option for end users, but the most processor intensive.
The amount of time in days to store the thread and forum read times. All threads or forums without posts in this many days are considered read.
With Database Read Marking, the unread markers on threads and forums are persistent across forum sessions. If a user does not read a thread that is marked as unread, then that thread will remain unread every time the user visits the forum.
This setting allows you to force unread markers to switch to "read" after so many days (for example, 10). This would be the amount of time after which the user probably has no interest in reading that thread and therefore does not need to know that it contains unread posts.
Disable AJAX Features
AJAX uses JavaScript and other browser functionality to allow additional data to be retrieved without doing a page refresh, such as posting with quick reply or editing a thread title inline.
Due to the nature of AJAX, some functions may not work fully with non-Latin languages without additional modules, such as IconV. For example, AJAX-based quick reply may work correctly on your site, but thread subscription emails do not display correctly. If something like this occurs for you, you should select "Disable Problematic AJAX Features".
Enable Inline Moderation Authentication
Inline moderation actions require a user to re-authenticate prior to being performed. The timeout is based on the admin control panel timeout, or one hour if that option is disabled.
Facebook Options |
vBulletin supports Facebook Connect, a function that allows people to register and log in to your website using their Facebook credentials.
For Facebook Connect to work in vBulletin, you need to set the options (below), as well as set up a new application on the Facebook site and enable Facebook Connect on your vBulletin site. For instructions on how to do the latter two steps in the process, see Enabling Facebook Options.
Following are the vBulletin Facebook options.
Note:
You must click Save for changes to take effect.
Whether or not to allow users to connect their vBulletin account with their Facebook account.
Enabling this option populates your site with Open Graph metadata.
Note:
Users must have Javascript enabled and your server must support TLS/SSL communication for this feature to work.
Application ID for your application (see https://www.facebook.com/developers for more information).
Facebook Secret
Facebook Secret for your application (see https://www.facebook.com/developers for more information).
Facebook Usergroup (default: None)
Secondary usergroup for Facebook users.
All users who connect with Facebook from this point on will be members of this usergroup. This will not be applied retroactively to users who have previously connected to Facebook.
Enable Auto-Register (Yes/No)
Whether or not to enable Auto-Register, which skips the registration form and registers through a simplified two-click process.
Using this feature disables Forum Rules Agreement, COPPA registration, email verification, and any custom required fields from the registration form.
Image URL
URL to an image that you want to represent your site.
The image appears next to published content in a user's news feed, and is used to represent your site in the Open Graph schema.
Leave this blank if you do not want to have an image.
Publish to Facebook - New Thread (Yes/No)
Whether or not to allow users to publish a notification to their Facebook wall when they start a new thread.
Publish to Facebook - Post Reply (Yes/No)
Whether or not to allow users to publish a notification to their Facebook wall when they reply to a thread.
Publish to Facebook - Blog Entry (Yes/No)
Whether or not to allow users to publish a notification to their Facebook wall when they post a new blog entry.
Publish to Facebook - Blog Comment (Yes/No)
Whether or not to allow users to publish a notification to their Facebook wall when they comment on a blog post.
Publish to Facebook - New Article (Yes/No)
Whether or not to allow users to publish a notification to their Facebook wall when they publish a CMS article.
Publish to Facebook - Article Comment (Yes/No)
Whether or not to allow users to publish a notification to their Facebook wall when they comment on a CMS article.
Like Button - Threads (Yes/No)
Whether or not to have a "Like" button appear on all threads, which allows users to "Like" individual threads.
Users do not have to have Facebook linked accounts to use this feature.
Like Button - Blog Entries (Yes/No)
Whether or not to have a "Like" button appear on all blog entries, which allows users to "Like" individual blog posts.
Users do not have to have Facebook linked accounts to use this feature.
Like Button - CMS Articles (Yes/No)
Whether or not to have a "Like" button appear on all CMS Articles, which allows users to "Like" individual CMS Articles.
Users do not have to have Facebook linked accounts to use this feature.
Import Facebook Data - Biography
User Profile Field into which you want to import Facebook biography data when users connect their accounts to Facebook.
Import Facebook Data - Location
User Profile Field into which you want to import Facebook location data when users connect their accounts to Facebook.
Import Facebook Data - Interests
User Profile Field into which you want to import Facebook interests data when users connect their accounts to Facebook.
Import Facebook Data - Occupation
User Profile Field into which you want to import Facebook occupation data when users connect their accounts to Facebook.
Enabling Facebook |
To create new application on facebook.com (Required for each vBulletin installation)
- Goto: https://developers.facebook.com/apps, and log in.
- Click Create New App (top-right).
- Enter an appropriate App Name, and click Continue.
- Do the Facebook Security Check, and click Submit.
- On the page that opens, click Web Site from the list on the bottom.
- In the Site URL input, enter the URL of the root for your vBulletin installation. This must be exactly the same as your Forum URL setting in AdminCP > Settings > Options > Site Name / URL / Contact Details > Forum URL.
- Click Save Changes.
- Make a note of the Application ID and Application Secret; you will need these to do the following procedure.
- Goto your vBulletin site, and log in to the Admin CP.
- Goto Settings > Options > Facebook Options, and click Edit Settings. For more information about the Facebook Options in vBulletin, see Facebook Options.
- Check Yes for Enable Facebook Connect.
- Enter the Application ID and Facebook Secret from the Facebook Developer page.
- Make whatever other option changes you want to.
- Click Save.
Image Settings |
The Image Settings group allows you to control how vBulletin processes images for uploading and handles image verification.
Note:
You must click Save for changes to take effect.
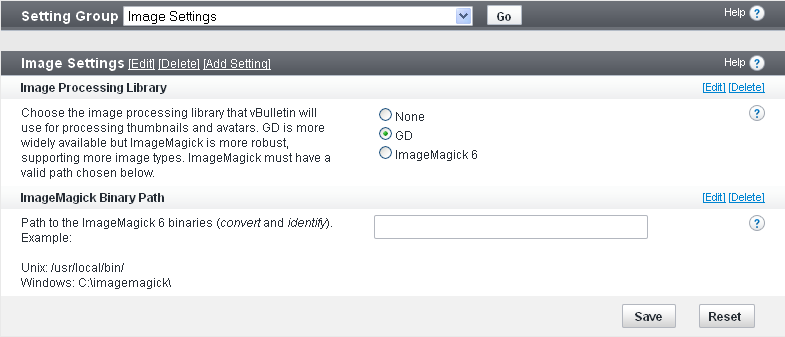
Image Processing Library (default: GD)
vBulletin provides two options for manipulating attachment thumbnails, custom avatars, and profile pictures.
The first is GD, which is bundled with PHP 4.3.0 and later, and is often available with earlier releases. The GD v2+ library is preferable to the v1+ library, so always choose v2 if you're given the opportunity by your host. GD supports the following file types: GIF, JPEG, and PNG.
Note:
The GD Libraries might have to be manually activated when using PHP installed on Windows.
ImageMagick Binary Path
Path to the ImageMagick 6 binaries (convert and identify).
Example:
Unix:
/usr/local/bin/
C:\imagemagick\
Human Verification Options |
This setting group controls where human verification is required on your site.
Note:
You must click Save for changes to take effect.
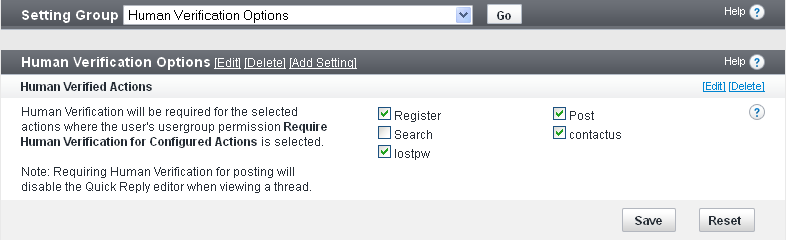
Verify at Registration
Require users to pass the Human Verification test during registration.
Verify Guest Posts
Require guest posters to pass the Human Verification test before their messages are posted.
Verify Guest Searches
Require searches by guests to pass the Human Verification test before the they are executed.
Verify Guest Contact Us
Require guests to pass the Human Verification test before they can leave feedback.
This applies only if sendmessage.php is being used as the Contact Us link and Guests are allowed to use the Contact Us for described in the Site Name / URL / Contact Details article.
Date and Time Options |
Date and Time formats in vBulletin follow standard PHP formatting rules. For more information see the PHP reference manual.
Note:
You must click Save for changes to take effect.
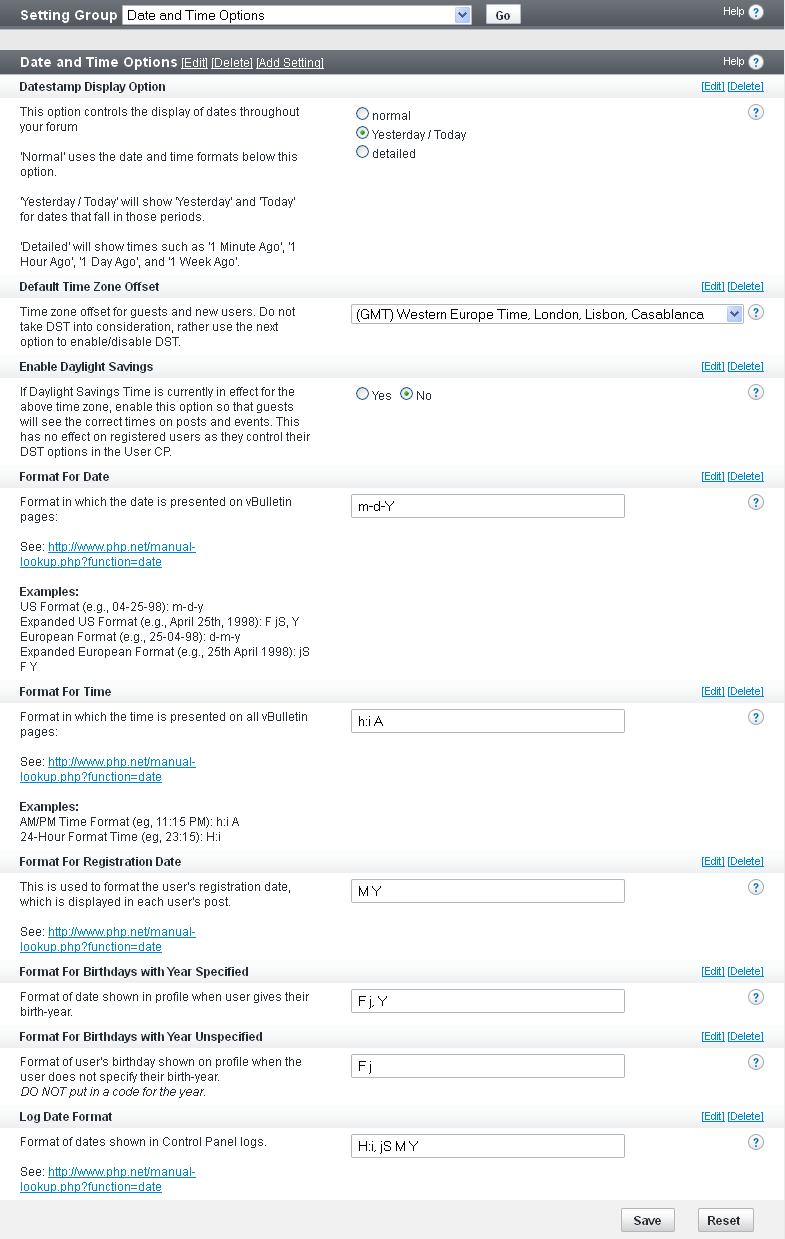
Datestamp Display Option (default: Yesterday / Today)
Controls the display of dates throughout the site.
'Normal' uses the date and time formats below this option.
'Yesterday / Today' shows 'Yesterday' and 'Today' for dates that fall in those periods.
'Detailed' shows times such as '1 Minute Ago', '1 Hour Ago', '1 Day Ago', and '1 Week Ago'.
Default Time Zone Offset
Time zone offset for guests and new users. When using this setting, do not take DST (Daylight Savings Time) into consideration; instead, use the Enable Daylight Savings option to enable or disable DST.
Enable Daylight Savings
If DST is currently in effect for the time zone, enable this option so guests see the correct times on posts and events. (This setting has no effect on registered users, because they control their DST options in the User Control Panel.)
This setting is not automatic and needs to be changed with the standard/daylight switch twice a year.
Format for Date (default: m-d-Y)
Format for dates shown on vBulletin pages.
Examples:
US Format (e.g., 04-25-98): m-d-y
Expanded US Format (e.g., April 25th, 1998): F jS, Y
European Format (e.g., 25-04-98): d-m-y
Expanded European Format (e.g., 25th April 1998): jS F Y
Format for Time (default: h:i A)
Format for times shown on vBulletin pages.
Examples:
AM/PM Time Format (eg, 11:15 PM): h:i A
24-Hour Format Time (eg, 23:15): H:i
Format for Registration Date (default: M Y)
The user registration date shown in the upper left-hand column of users’ posts.
Format for Birthdays with Year Specified (default: F j, Y)
Date format in cases where the birth year is specified in the user profile.
Format for Birthdays with Year Unspecified (default: F j)
Date format in cases where the birth year is unspecified in the user profile.
Log Date Format (default: H:i, jS M Y)
Format of dates shown in Control Panel logs.
Cookie and HTTP Header Options |
These options allow you to control cookie settings, gzip compression, HTTP headers, and to redirect messages.
Note:
You must click Save for changes to take effect.

Session Timeout (default: 900)
The time in seconds that a user must remain inactive before any unread posts are marked read. This setting also controls how long a user will remain on Who's Online after their last activity.
Path to Save Cookies (default: /)
The path to which the cookie is saved. If you run more than one forum on the same domain, it will be necessary to set this to the individual directories of the forums. Otherwise, just leave it as / .
Note:
Your path should always end in a forward-slash; for example, /forums/ or /vbulletin/.
Warning:
Entering an invalid setting can leave you unable to log in to your forum. Change this setting only if you absolutely need to do so.
This option sets the domain on which the cookie is active. The most common reason to change this setting is that you have two different urls to your forum, i.e. example.com and forums.example.com. To allow users to stay logged into the forum if they visit via either url, you would set this to .example.com (note the domain begins with a dot.
Warning:
We recommend that you leave this setting blank. Entering an invalid setting can leave you unable to log in to your site.
Selecting Yes allows vBulletin to GZIP compress the HTML output of pages, thus reducing bandwidth requirements. This will be used only on clients that support it, and are HTTP 1.1 compliant. There will be a small performance overhead.
This feature requires the ZLIB library.
If you are already using mod_gzip on your server, do not enable this option.
GZIP Compression Level (range: 0-9; default 1; recommended: 1)
Set the level of GZIP compression you want to use on the output.
Add Standard HTTP Headers (Yes/No)
If enabled, vBulletin will send 200 OK HTTP headers.
Because this option does not work with some combinations of web servers, it is off by default. Some IIS setups might need it turned on.
Add No-Cache HTTP Headers (Yes/No)
Selecting Yes will cause vBulletin to add no-cache HTTP headers. These are very effective, so adding them may cause server load to increase due to an increase in page requests.
Remove Redirection Message Pages (Yes/No)
Enabling this option will remove the update pages that are displayed after a user makes a post, starts a search, etc. These pages provide assurance to users that their information has been processed by the site. Disabling these pages will save you bandwidth and may lessen the load of the site on your server.
Note:
Some pages will still use the use the redirection page when cookies are involved to prevent some potential problems.
You can disable the IE7 compatibility mode of Internet Explorer 8 with this option. This will force the IE8 browser to render all pages in IE8 mode.
Server Settings and Optimization Options |
Note:
You must click Save for changes to take effect.
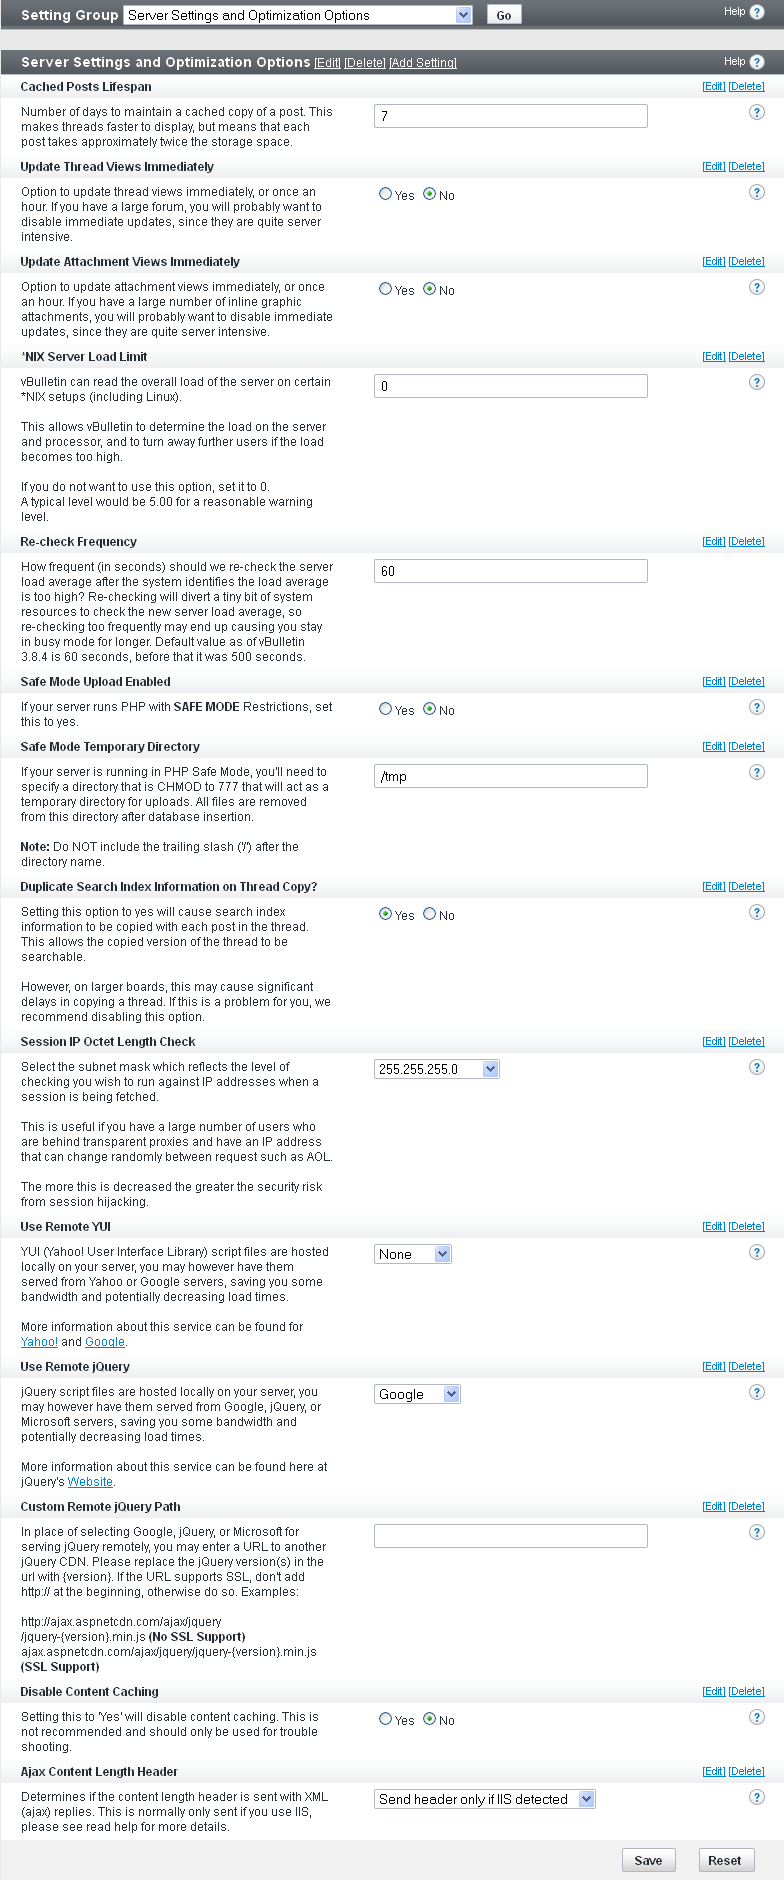
Public phpinfo() Display Enabled (Yes/No)
If you enable this option, anyone can view your phpinfo() page by adding ‘&do=phpinfo’ to a forum URL. vBulletin Support might ask you to temporarily enable this to help diagnose problems if you request technical support. Otherwise, we recommend turning it off.
Cached Posts Lifespan (default: 7)
Posts are normally stored with bbcode tags in the same form the user posted them with so the code can be edited later, and then parsed at display time. If they are cached, they are parsed at post time (instead of display time) into the HTML they will be displayed in and stored separately from the pre-parsed posts. This results in a faster display on topics, since the posts do not have to be parsed at display time.
This option determines how long posts are stored. While a post is cached, it takes approximately twice as much storage space since it is essentially being stored twice. If you have a busy site, and topics typically don't last very long, you can probably set this to a lower value such as 10 days. If you have a slower site, and topics typically last longer, 20 to 30 days might be a better choice. If you have available disk space, you can set this to a higher value for better performance.
Update Thread Views Immediately (Yes/No)
If you enable this option, the thread view counter for a thread is updated in real time as threads are viewed. Otherwise, they are stored and updated every hour (by default) as a group. We recommend disabling this option for larger or busier forums, because updating them in real time can have a performance impact.
Update Attachment Views Immediately (Yes/No)
If you enable this option, the attachment view counter for an attachment is updated in real time as attachments are viewed. Otherwise, they are stored and updated every hour (by default) as a group. We recommend disabling this option for larger or busier forums, because updating them in real time can have a performance impact.
*NIX Server Load Limit (default: 0)
vBulletin can read the overall load of the server on certain *NIX setups (including Linux).
This allows vBulletin to determine the load on the server and processor, and to turn away further users if the load becomes too high. If you do not want to use this option, set it to 0. A typical level would be 5.00 for a reasonable warning level.
Re-check Frequency (default: 60)
The specified frequency to re-check the server load average after the system determines that the load average is too high. Re-checking diverts a tiny bit of system resource to check the new server load average, so re-checking too frequently might end up causing you to stay in busy mode for longer.
Safe Mode Upload Enabled (Yes/No)
If your server has Safe Mode enabled, set this to Yes. You can determine if Safe Mode is enabled by viewing your ‘phpinfo’ page and searching for Safe Mode.
Safe Mode Temporary Directory
If your server is running in PHP Safe Mode, specify a directory that is CHMOD to 777 that will act as a temporary directory for uploads. All files are removed from this directory after database insertion.
Note:
Do NOT include the trailing slash (‘/’ after the directory name.
It is not strictly necessary to index a copied topic since the original topic is already indexed. However, you might want to index copied topics for the sake of completeness. Setting this option to Yes causes search index information to be copied with each post in the topic. This allows the copied version of the topic to be searchable, as well. However, on larger sites, this mibht cause significant delays in copying a topic. If this is a problem for you, we recommend disabling this option.
Session IP Octet Length Check
Select the subnet mask that reflects the level of checking you want to run against IP addresses when a session is being fetched.
This is useful if you have a large number of users who are behind transparent proxies (for example, AOL) and have an IP address that can change randomly between requests.
The more the level is decreased the greater the security risk from session hijacking.
Use Remote YUI (Yes/No)
YUI (Yahoo! User Interface Library) script files are hosted locally on your server; however, you can have them served from Yahoo or Google, saving you some bandwidth and potentially decreasing load times.
Disable Content Caching (Yes/No)
Setting this to Yes disables content caching. We do not recommend doing this except for troubleshooting purposes.
Style & Language Settings |
You set style and language options in the Style & Language Settings screen of vBulletin Options.
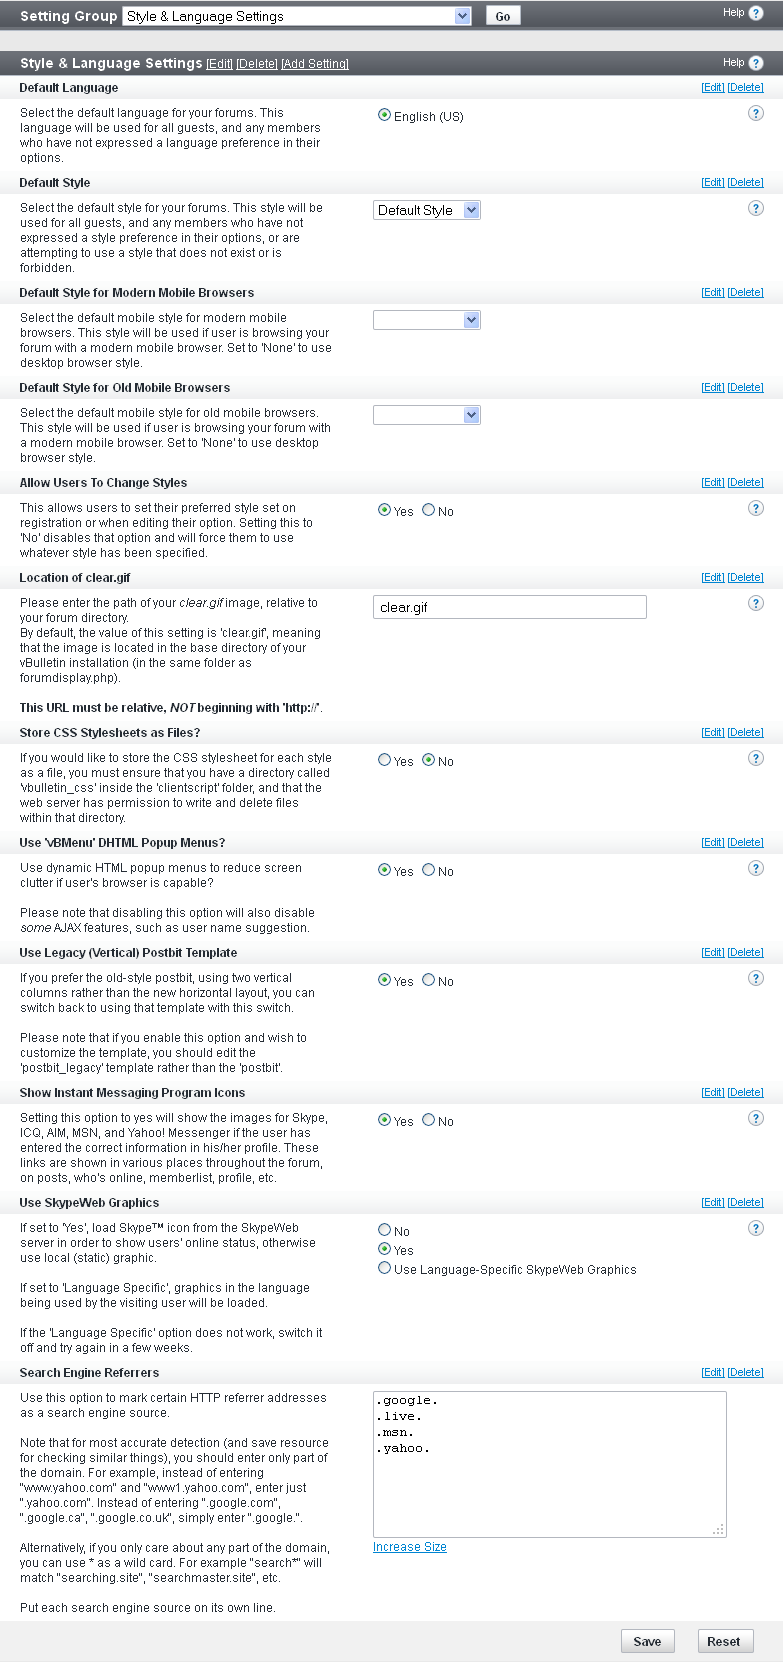
Following are the Style and Language settings.
Note:
You must click Save for changes to take effect.
Select the default language for your site. This language is used for all guests, and any members who have not expressed a language preference in their options.
Default Style
Select the default style for your site. This style will be used for all guests, and any members who have not expressed a style preference in their options, or are attempting to use a style that does not exist or is forbidden.
Default Style for Mobile Browsers
Select the default mobile style for modern mobile browsers. This style is used if a user is browsing your site with a modern mobile browser. Set to None to use a desktop browser style.
Default Style for Old Mobile Browsers
Select the default mobile style for old mobile browsers. This style is used if a user is browsing your site with a modern mobile browser. Set to None to use a desktop browser style.
Allow Users to Change Styles (Yes/No)
Whether or not users can set their preferred style when they register or when editing their user options. Setting this to No forces users to use whatever style has been specified for the site.
Location of clear.gif (default: clear.gif)
Enter the path of your clear.gif image, relative to your site base directory.
By default, the value of this setting is clear.gif, meaning that the image is located in the base directory of your vBulletin installation (in the same folder as forumdisplay.php).
The URL must be relative, NOT beginning with https://.
Store CSS Stylesheets as Files? (Yes/No)
If you want to store the CSS stylesheet for each style as a file, you must ensure that you have a directory called vbulletin_css inside the clientscript folder, and that the web server has permission to write and delete files in that directory.
Use 'vBMenu' DHTML Popup Menus? (Yes/No)
Whether or not to use dynamic HTML popup menus to reduce screen clutter if the user's browser allows it.
Disabling this option will also disable some AJAX features, such as user name suggestion.
Use Legacy (Vertical) Postbit Template (Yes/No)
If you prefer the postbit style that uses two vertical columns rather than the horizontal layout, you can revert to using that template with this switch.
If you enable this option and want to customize the template, edit the postbit_legacy template rather than the postbit.
Show Instant Messaging Program Icons (Yes/No)
Whether or not to show the images for Skype, ICQ, AIM, MSN, and Yahoo! Messenger if the user has entered the correct information in his/her profile. These links are shown in various places throughout the site, for example on posts, who's online, memberlist, and profile.
Use SkypeWeb Graphics (Yes/No/Use Language-Specific SkypeWeb Graphics)
If set to Yes, the Skype™ icon from the SkypeWeb server is used to show users' online status.
If set to No, the local (static) graphic is used.
If set to “Language Specific”, graphics in the language being used by the visiting user are loaded. If the Language Specific option does not work, switch it off and try again in a few weeks.
Search Engine Referrers
Enter one or more HTTP referrer addresses as a search engine source. Enter multiple referrer names on separate lines.
For the most accurate detection, enter only the essential part of the domain. For example, instead of entering "www.yahoo.com" and "www1.yahoo.com", enter ".yahoo.com", or, better yet, “yahoo.”. Instead of entering ".google.com", ".google.ca", ".google.co.uk", enter ".google.".
Alternatively, if you are interested in only part of the domain, you can use an asterisk (*) as a wild card. For example "search*" will match "searching.site", "searchmaster.site", etc.
Censorship Options |
These options allow you to censor certain words or other string on your site. Strings designated as censored are replaced with one or more characters (for example, an asterisk). Strings that can be censored include all message titles and messages.
To apply censoring to existing posts, see Rebuild Post Cache
Note:
You must click Save for changes to take effect.
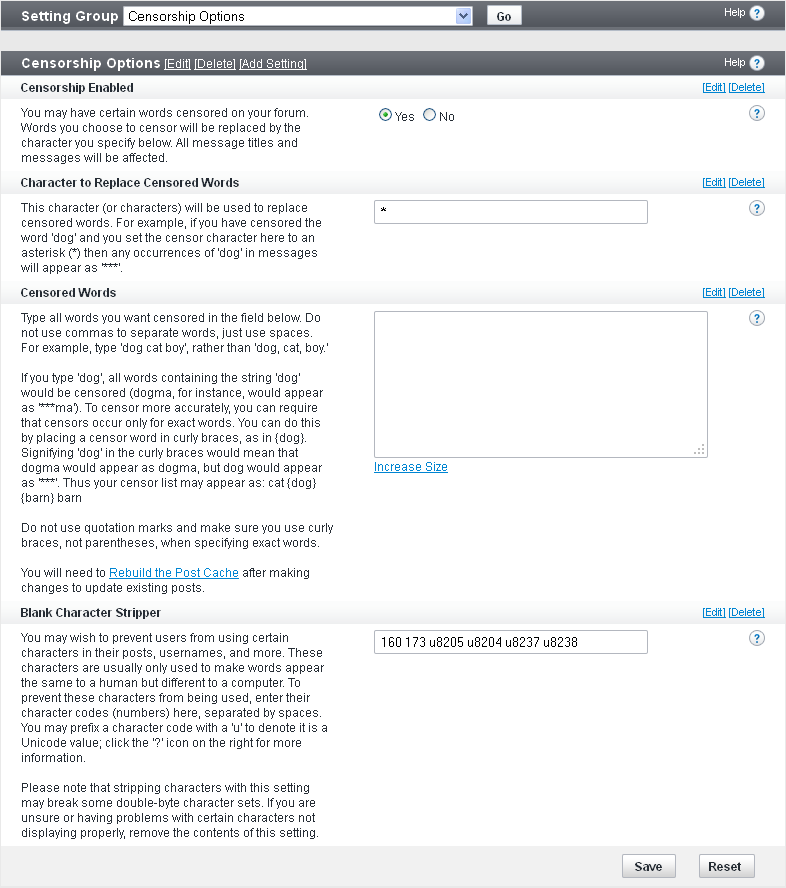
Censorship Enabled (Yes/No)
Choose Yes to enable censorship and No to disable it.
Character to Replace Censored Words (default: *)
Enter the character that you want to replace a censored word or other string.
For example, if you have censored the word ‘dog’ and you set the censor character to an asterisk (*), all occurrences of ‘dog’ in message titles and messages appear as ‘***’.
Censored Words
Enter all words you want censored in the provided field. Use spaces (NOT commas) to separate words. Do not use quotation marks around your censor list.
Correct:
dog cat boy
dog, cat, boy
Blank Character Stripper (default: 160 173 u8205 u8204 u8237 u8238)
You can prevent users from including certain characters in posts or other strings like usernames (for example, non-breaking spaces (code 160) or soft hyphens (code 173)).
Enter the codes you want to prevent in the provided field. Use spaces to separate codes and do not use quotation marks. Prefix Unicode values with a ‘u’.
Example:
160 173 u8205 u8204 u8237 u8238
Note:
Stripping characters with this setting might break some double-byte character sets. If you are having problems with certain characters not displaying properly, try removing the contents of this setting.
Email Options |
Use the Email options to set up the behavior of the email features throughout your site.
Relying on the PHP internal mail function has always caused problems with a few configurations. The PHP internal mail function is simply a wrapper for the system’s own mail program such as sendmail or procmail. The problems occur when certain configurations have extra authentication settings or confusing line endings. This has been resolved by the introduction of our mail class to correct any problems that may occur with the internal mail function and also to allow the use of SMTP which will completely bypass PHP's own internal mail function.
You can enable the SMTP server options here.
Note:
You must click Save for changes to take effect.
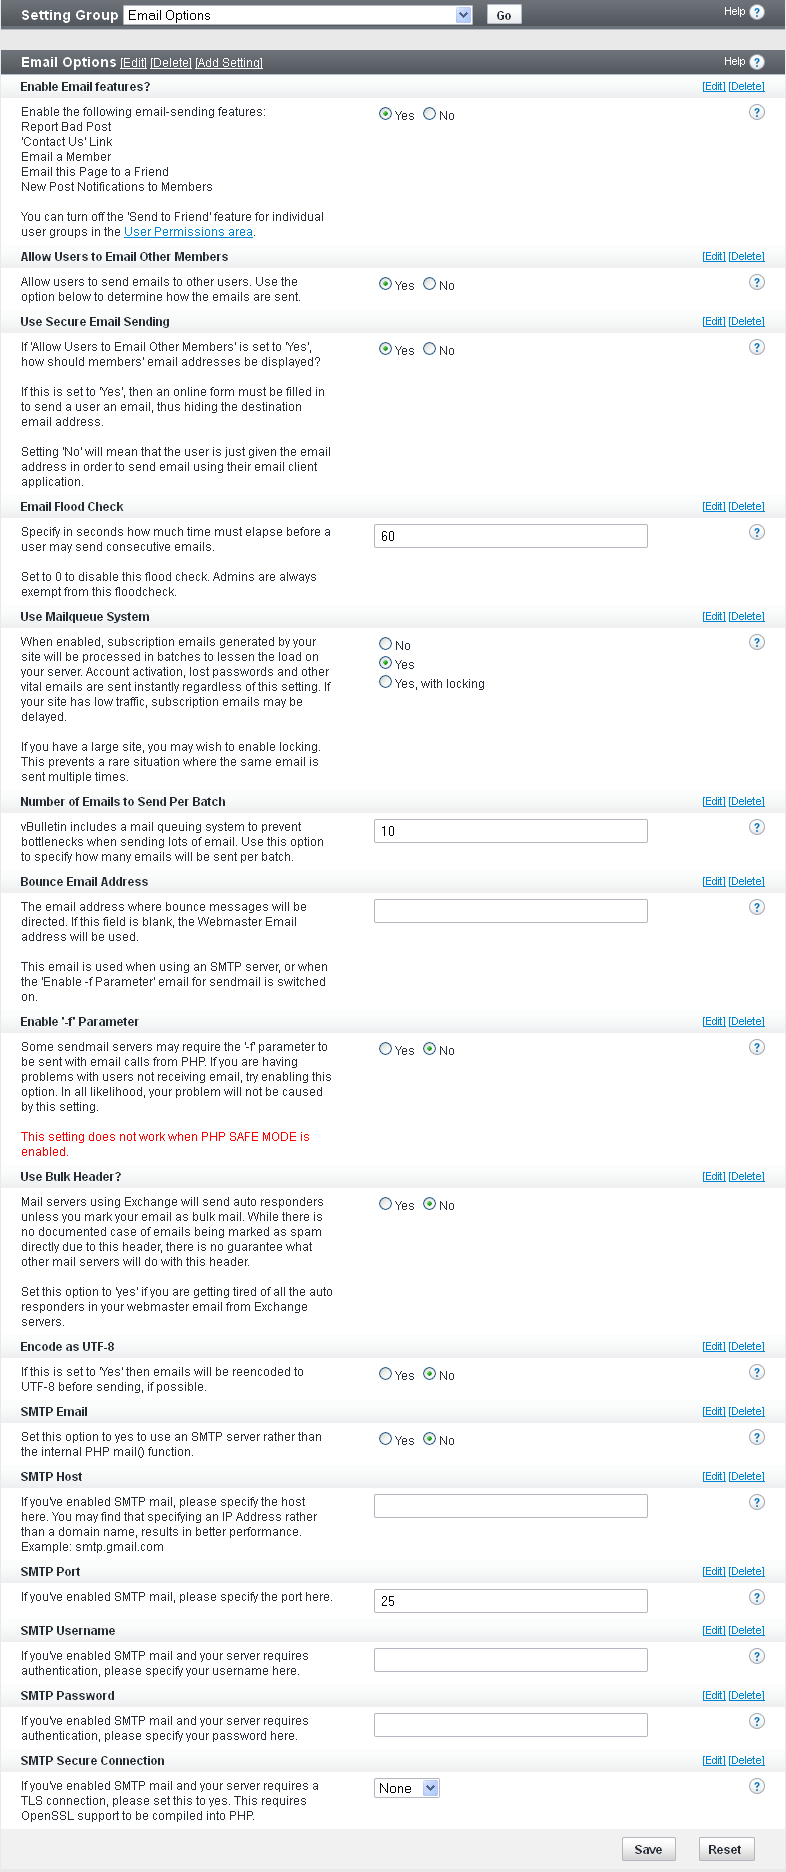
Enable Email features? (Yes/No)
Enable the following email-sending features:
Report Bad Post
’Contact Us’ Link
Email a Member
Email this Page to a Friend
New Post Notifications to Members
You can turn off the Send to Friend feature for individual user groups in the Usergroup Manager.
Allow Users to Email Other Members (Yes/No)
Set this option to Yes to allow users to send emails to other users.
Note:
Use the Use Secure Email Sending option to determine how the emails are sent.
If Allow Users to Email Other Members is set to Yes, this option specifies how members’ email addresses should be displayed.
If this option is set to Yes, an online forum must be filled in to send a user an email, which hides the destination email address.
If this option is set to No, the user is simply given the email address to send email using his or her email client application.
Email Flood Check
Specify in seconds how much time must elapse before a user can send consecutive emails.
Setting ‘0’ disables this flood check.
Note:
Administrators are always exempt from this floodcheck.
When enabled, subscription emails generated by your site are processed in batches to lessen the load on your server. Account activation, lost passwords and other vital emails are sent instantly regardless of this setting. If your site has low traffic, subscription emails might be delayed.
If you have a large site, consider enabling locking. This prevents a rare situation where the same email is sent multiple times.
Number of Emails to Send Per Batch (default: 10)
vBulletin includes a mail queuing system to prevent bottlenecks when sending large volumes of email. Use this option to specify how many emails are sent per batch.
Bounce Email Address
The email address to which bounce messages are directed. If this field is blank, the webmaster email address is used.
This email is used with an SMTP server or when the Enable ‘-f’ Parameter email for sendmail is switched on.
Enable ‘-f’ Parameter
Some sendmail servers might require the ‘-f’ parameter to be sent with email calls from PHP. If you are having problems with users not receiving email, try enabling this option; however, in all likelihood, your problem is not being caused by this setting.
Note:
This setting does not work when PHP SAFE MODE is enabled.
Mail servers using Exchange send auto-responders unless you mark your email as bulk mail. While there is no documented case of emails being marked as spam directly due to this header, what other mail servers do with this header is unpredictable.
Set this option to Yes if you want to reduce number the auto-responders in your webmaster email from Exchange servers.
Encode as UTF-8 (Yes/No)
If you set this option to Yes, emails are re-encoded to UTF-8 before sending, if possible.
SMTP Email
Set this option to Yes to use an SMTP server rather than the internal PHP mail() function.
SMTP Host
If you have enabled SMTP mail, specify the host here. You might find that specifying an IP address rather than a domain name results in better performance.
Example: smtp.gmail.com
SMTP Port
If you have enabled SMTP mail, specify the port here.
SMTP Username
If you have enabled SMTP mail and your server requires authentication, specify your username here.
SMTP Password
If you have enabled SMTP mail and your server requires authentication, specify your password here.
SMTP Secure Connection (default: none)
If you have enabled SMTP mail and your server requires a TLS connection, set this to Yes.
Note:
This option requires OpenSSL support to be compiled into PHP.
User Registration Options |
The User Registration options allow you to control how new user registrations are handled on your site.
You can activate the COPPA (Children’s Online Privacy Protection Act) registration system to comply with COPPA laws that require children under the age of 13 to get parental consent before they can post.
Note:
You must click Save for changes to take effect.
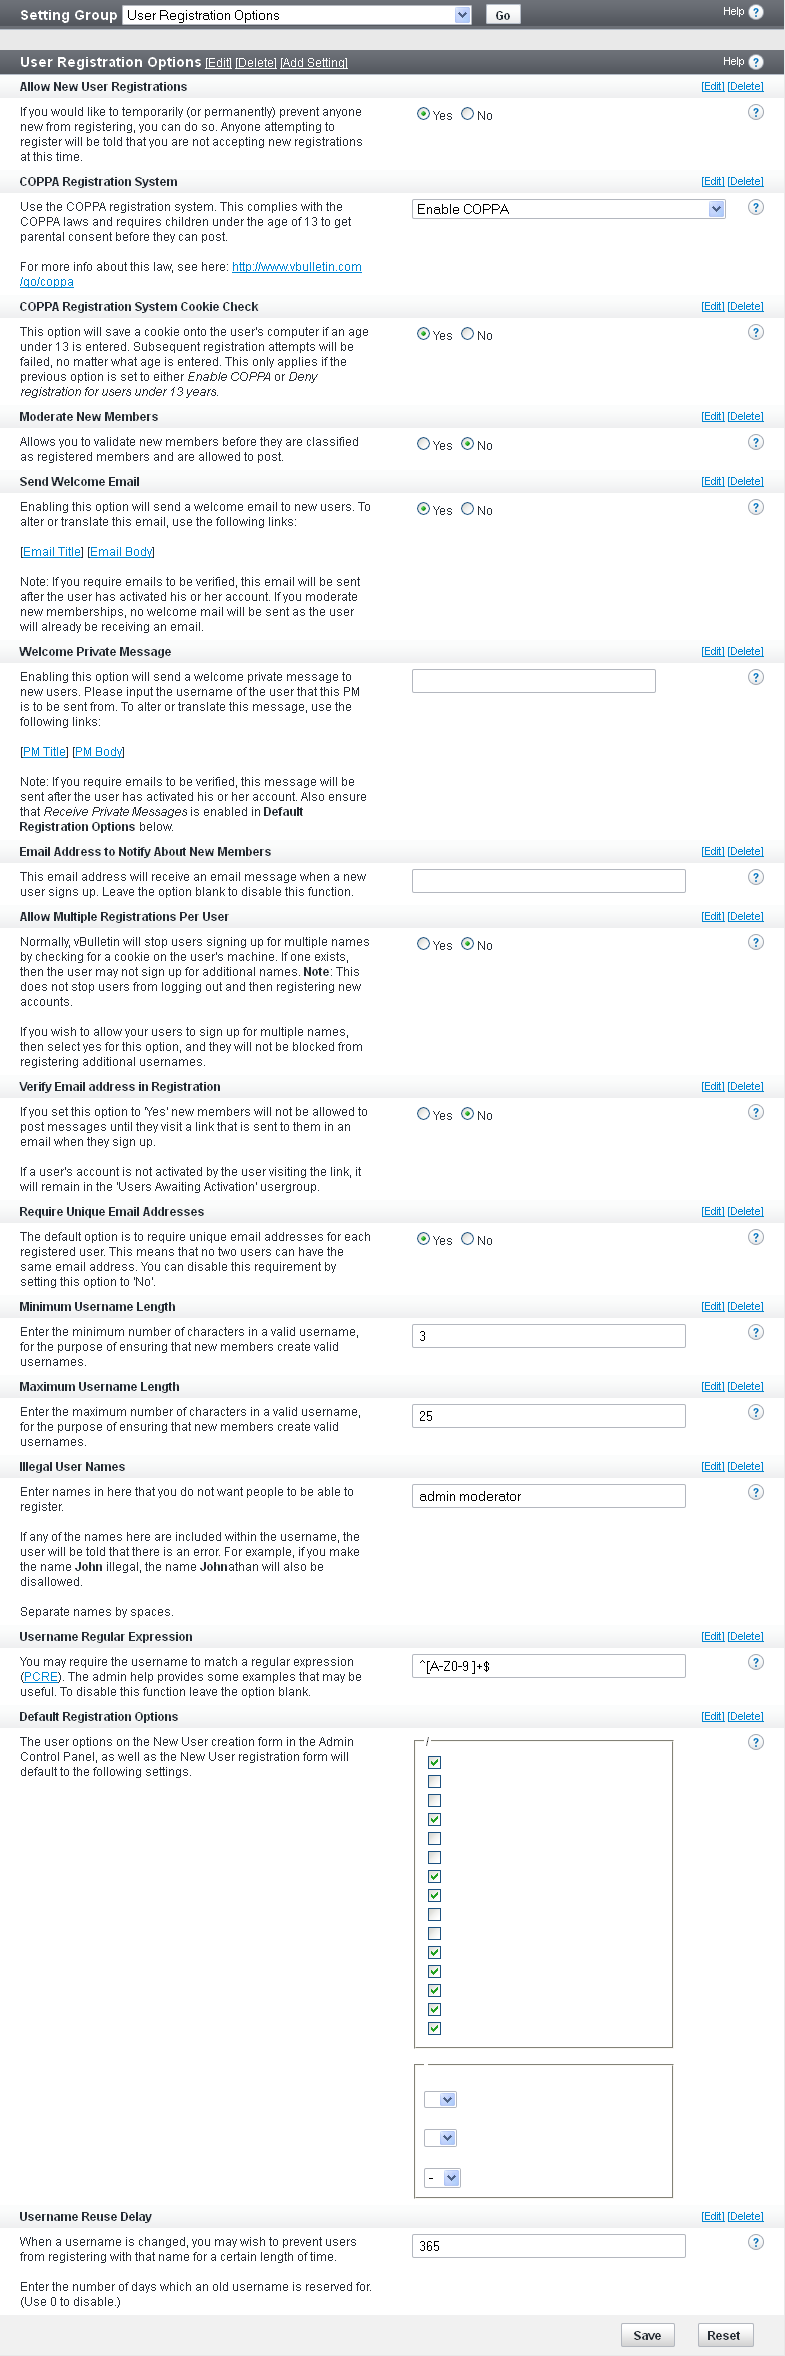
Allow New User Registrations (Yes/No)
Temporarily (or permanently) allow or prevent anyone new from registering.
If you set this option to No, anyone attempting to register is told that you are not accepting new registrations at this time.
Use COPPA Registration System (default: Enable COPPA)
Use the COPPA registration system, which complies with COPPA laws and requires children under the age of 13 to get parental consent before they can post.
For more info about this law, go to https://business.ftc.gov/documents/bus45-how-comply-childrens-online-privacy-protection-rule.
COPPA Registration System Cookie Check (Yes/No)
If you select Yes, the vBulletin system saves a cookie to the user's computer if an age under 13 is entered. Subsequent registration attempts will fail, no matter what age is entered. This applies only if the previous option is set to either ‘Enable COPPA’ or ‘Deny registration for users under 13 years’.
Moderate New Members (Yes/No)
Allows you to validate new members before they are classified as registered members and are allowed to post.
Send Welcome Email (Yes/No)
If you select Yes, a welcome email that uses the email body/subject phrases for 'welcomemail' is sent to new users.
Note:
If you require emails to be verified, this email is sent after the user has activated his or her account. If you moderate new memberships, no welcome mail is sent since the user is already receiving an email as part of the moderation mechanism.
If you select Yes, a welcome private message (PM) is sent to new users. Input the username of the user from which this PM is to be sent. To alter or translate this message, use the email body/subject phrases for 'welcomepm'.
Note:
If you require emails to be verified, this message is sent after the user has activated his or her account. You must also ensure that Receive Private Messages is enabled in the Default Registration Options.
The email address you enter receives an email message when a new user signs up. Leave the option blank to disable this function.
Allow Multiple Registrations Per User (Yes/No)
By default, vBulletin stops users from signing up for multiple names by checking for a cookie on the user's machine. If one exists, the user cannot not sign up for additional names. However, this does not stop users from logging out and then registering new accounts.
If you want to allow users to sign up for multiple names, select Yes for this option, so they are not be blocked from registering additional usernames.
Verify Email Address in Registration
If you set this option to Yes, new members are not allowed to post messages until they go to a link that is sent to them in an email when they sign up.
If a user's account is not activated by the user visiting the link, it will remain in the Users Awaiting Activation usergroup.
Require Unique Email Addresses (Yes/No)
The default for this option is to require unique email addresses for each registered user. This means that no two users can have the same email address.
You can disable this requirement by setting this option to No.
Minimum Username Length (default: 3)
Enter the minimum number of characters in a valid username.
Maximum Username Length (default: 25)
Enter the maximum number of characters in a valid username.
Illegal User Names
Enter names that you do not want people to be able to register. If any of the strings are included within the username, the user is given an error message.
For example, if you make the name John illegal, the name Johnathan is also be disallowed.
Separate names with spaces.
Username Regular Expression
Use this option to require that the username match a regular expression (PCRE).
To disable this function leave the option blank.
Examples:
^[A-Z]+$ - Characters from A-Z only
^[A-Z ]+$ - Characters from A-Z including space
^[A-Z0-9 ]+$ - Alphanumeric characters including space
^((?!&#\d+;)[\x20-\x7E])+$ - ASCII characters from 32-127
User Referrer (Yes/No)
If you enable the User Referrer system, a user who visits your site through a link that contains referrerid=xxx gives referral credit to the owner of the referrerid when they register (where xxx is the userid of the referring user).
Default Registration Options
The user options on the New User creation form in the Admin control panel, as well as the New User registration form default to the settings you specify here, which include:
Receive Admin Emails
Invisible Mode
Display Email
Receive Private Messages
Send Notification Email When a Private Message is Received
Pop up a Notification Box When a Private Message is Received
Enable Visitor Messaging
Limit usage of Visitor Messages to Contacts and Moderators
Allow vCard Download
Display Signatures
Display Avatars
Display Images
Display Reputation
Automatic Thread Subscription Mode
Message Editor Interface
Thread Display Mode
Require Birthday
Username Reuse Delay (default: 365)
When a username is changed, you can prevent users from registering with that original name for a certain length of time.
Use this setting to determine the time before a deleted or previous username can be reused, or set it to 0 to disable this function.
User Infractions & Post Reporting Options |
User Infraction Discussion Channel (default: Select Channel)
Channel to contain a discussion topic for the infraction so moderators can discuss it further.
If you do not want a discussion topic for this user infraction, set to “Select Channel”.
Note:
The topic is updated if the infraction is reversed.
Whether or not to require that the user reporting an infraction include a private message (PM) or email, depending on your site settings.
If this option is disabled, the user may choose to not include a message with their infraction. The recipient of the infraction will still receive a generic PM or email in regards to their infraction.
Post Reporting Email (default: Email Moderators)
Usergroups to whom emails are to be sent when a post is reported.
The choices are “No Email”; “Email Moderators”; and “Email Moderators, Super Moderators, and Administrators”.
User Profile Options |
Settings > Options > User Profile Options
Enabled User Profile Features
Use this option to globally enable or disable the various user profile-related features. Additional options are available for each feature in their respective sections. The available options are:
- Groups - Enables or disables the Groups feature across the board
- enable_albums - Enables or disables the User Albums feature across the board
- Friends - Enables or disables the Friends feature across the board. This does not disable either contacts or the ignore list feature.
- Visitor Tracking - Enables or disables Visitor Tracking for user profiles only.
- Enable visitor Messaging - Enables or disables the Visitor Messaging option for a user profile.
- Profile Styling - Enables or disables a user’s ability to style their profile.
This requires the users to provide a valid date of birth (1902 to current year).
Note:
When this is set to Yes users cannot edit their date of birth once it has been set.
This is the maximum number of characters allowed for a user's custom title.
Censored Words for Usertitle
Type all words you want censored in the Usertitle in the field below. Do not use commas to separate words, just use spaces. For example, type "dog cat boy", rather than "dog, cat, boy."
If you type "dog", all words containing the string "dog" would be censored (dogma, for instance, would appear as "***ma"). To censor more accurately, you can require that censors occur only for exact words. You can do this by placing a censored word in curly braces, as in {dog}. Signifying "dog" in the curly braces would mean that dogma would appear as dogma, but dog would appear as "***". Thus your censor list may appear as: cat {dog} boy.
Do not use quotation marks and make sure you use curly braces, not parentheses, when specifying exact words.
Exempt Moderators From Censor (Yes/No)
Do you want to exempt your forum Moderators from the censor words? You will want to set this to yes if you censor anything that is part of a moderator's title like 'moderator' as they have custom titles by default and will get censored.
Number of friends to display in the small friends block
The maximum number of friends to display in the Small Friends Block on the User Profile Page.
Friends Per Page on Full Friends List
The maximum number of friends to show "per page" on the large friends list.
Maximum Visitors to Show on Profile Page
Set an upper limit for the number of recent visitors to display. Recent visitor records are cleaned out on a regular basis, so keep this to a reasonably small number. Somewhere between 5 to 30 is ideal.
Show Last Post on Profile Page (Yes/No)
When enabled, this option displays a user’s last post on their profile.
This can increase table locking due to large table scans. It may also increase load times on your site as well as the load of your server. This option should only be enabled for smaller forums.
Allow Users to Edit Profile Privacy (Yes/No)
This allows users to configure their profile page so that blocks and categories are shown or hidden to specific visitors.
Signature Soft-Linebreak Character Limit
When counting the number of lines in a signature, this setting controls the number of characters that can be displayed before text wraps in the browser and is displayed as multiple lines. Once this value is surpassed, the run of text will be counted as multiple lines.
The value in this setting should be based on the number of normal-sized characters. Other sized characters will be scaled appropriately to this setting.
Allow Users to 'Ignore' Moderators (Yes/No)
This allows users to add moderators and administrators to their ignore list.
Allow Signatures (Yes/No)
This allows users to include a signature in their replies.
User Profile: Album Options |
Path to User Profile: Album Options: Settings > Options > User Profile: Album Options.
Note:
You must click Save for changes to take effect.
Controls how many albums are displayed before pagination occurs when multiple albums are listed on a single page.
This number must be at least 1.
Pictures Per Page (default: 25)
Controls how many pictures are displayed before pagination occurs when a user is viewing an album.
This number must be at least 1.
Number of Albums to display in the Users Profile (default: 2)
Maximum number of albums to display on a user’s profile pages.
Picture Moderation (Yes/No)
If set to Yes, all new pictures are placed into moderation.
This option can also be set in usergroup permissions.
Caption Preview Length (default: 150)
The number of characters from a picture's caption that is shown when a user hovers over the picture.
Maximum Pictures per Album (default: 60)
Maximum number of pictures that a user can have in one album.
This option is primarily useful for encouraging your users to have albums for smaller topics, but it also has a minor performance impact.
Setting the option to 0 disables the limit.
The usergroup setting Maximum Number of Album Pictures takes precedence over this setting.
Recent Album Update Days (default: 7)
Number of days that albums are relevant in the Recently Updated Albums list.
Increase this value if picture updates are infrequent, or decrease it if update activity is low.
If user album permissions are changed, you can rebuild the Recently Updated Album list with Rebuild Counters.
If you set this option to 0, the Recently Updated Albums list is disabled.
Enable Picture Comments (Yes/No)
Set this option to Yes if you want to enable commenting on album and group pictures.
Comments are associated with the picture, so they are shown anywhere the picture is shown.
Moderate Picture Comments (Yes/No)
When set to Yes, all new picture comments are placed into moderation.
This option can also be enabled in usergroup permissions.
Default Picture Comments Per-Page (default: 10)
Default number of picture comments displayed per page with a picture.
This number must be at least 1.
Maximum Picture Comments Per-Page (default: 50)
Maximum number of picture comments displayed per page with a picture.
This number must be at least 1.
Allowed BB Code Tags in Picture Comments
A set of checkboxes allows you to enable and disable the use of various BB codes in picture comments.
Changes you make affect only messages posted (or edited) after the changes have been implemented.
Options include Link BB Code, Image BB Code, Font BB Code, and HTML Code.
User Profile: Visitor Messaging Options |
You can control the visitor messaging user profile settings with the following options.
Note:
You must click Save for changes to take effect.
Maximum number of characters to allow in a visitor message.
Set this to 0 for no limit.
Default Visitor Messages Per-Page (default: 10)
Specifies the default number of messages displayed per page in the user profiles.
Note:
This number must be at least 1.
Limits the number of messages displayed per page in the user profiles.
Note:
This number must be at least 1.
When set to Yes, all new visitor messages are placed into moderation. This can also be enabled in usergroup permissions.
Allowed BB Code Tags in Visitor Messages
This option is a set of checkboxes you can use to specify which BB codes your visitors may use when composing visitor messages.
By default, Basic (B, I, U), Color, Image and Link (URL, EMAIL, THREAD, POST) tags are enabled.
Note:
Any changes you make will affect only messages posted (or edited) after you click Save.
Message Searching Options |
<<insert image of form>>
Search Engine Enabled (Yes/No)
Whether or not to allow searching for posts and threads within the channels.
This is a server-intensive process so you might want to disable it if you start to have performance problems.
Queue Search Updates (Yes/No)
Whether or not to queue updates for search.
When this option is set to Yes, changes to searchable content is not immediately reflected in search results. This can improve the response time for users making edits on larger sites.
Minimum Time Between Searches (default: 0)
Minimum time (in seconds) that must expire before the user can do a new search.
Set this to 0 to allow users to search as frequently as they want.
Search Results Posts Per Page (default: 25)
Number of successful search results to display per page.
This number must be at least 1.
Maximum Search Results to Return (default: 500)
Maximum results to be returned.
Any results over this amount are discarded.
Search Index Minimum Word Length (default: 4)
Minimum string length to be searched.
The smaller this number is, the larger the site search index and database will be.
Search Index Maximum Word Length (default: 20)
Maximum string length to be searched.
For example, if this is set to 15, users cannot search for 16-letter words.
When using full-text search, this option limits the size of words that can be searched. Smaller words take longer to search because they are more common. MySQL Fulltext has its own minimum word length as well, that must be changed at the server level.
Words to be excluded from search
If there are special words that are very common for your site, this option prevents their being searched.
Separate each word to be excluded with a space.
Searching for very common words on a large site can be server intensive.
Error Handling & Logging |
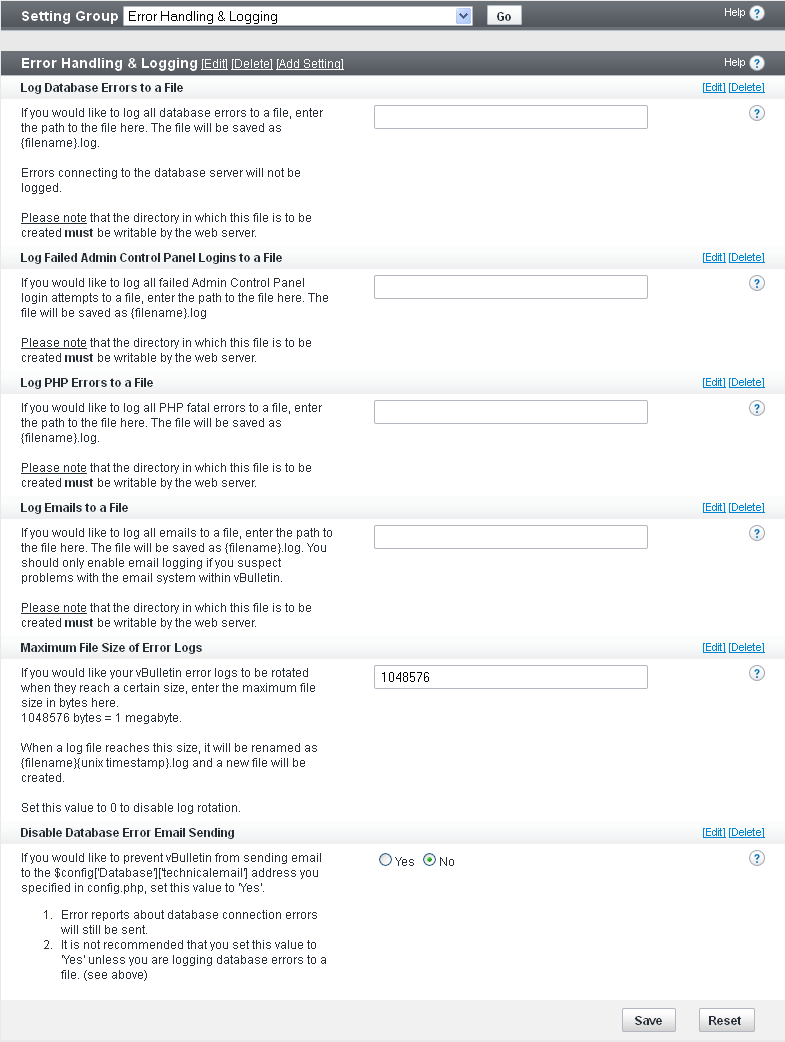
Log Database Errors to a File
To log all database errors to a file, enter the path to the file. The file will be saved as {filename}.log.
Note:
The directory in which this file is to be created must be writeable (chmod 777) by the web server.
To log all failed Admin Control Panel login attempts to a file, enter the path to the file. The file will be saved as {filename}.log.
.
Note:
The directory in which this file is to be created must be writeable (chmod 777) by the web server.
To log all PHP fatal errors to a file, enter the path to the file. The file will be saved as {filename}.log.
Note:
The directory in which this file is to be created must be writeable (chmod 777) by the web server.
To log all emails to a file, enter the path to the file here. The file will be saved as {filename}.log.
You should enable email logging only if you suspect problems with the email system within vBulletin.
Note:
The directory in which this file is to be created must be writeable (chmod 777) by the web server.
Note:
1048576 bytes = 1 megabyte
When a log file reaches this size, it will be renamed as {filename}{unix timestamp}.log and a new file will be created.
Set this value to 0 to disable log rotation.
Disable Database Error Email Sending (yes/no)
To prevent vBulletin from sending email to the $config['Database']['technicalemail'] address you specified in config.php, set this value to Yes.
Error reports about database connection errors will still be sent.
We do not recommend that you set this value to Yes unless you are logging database errors to a file.
External Data Provider |
The External Data Provider syndicates vBulletin content to external sites using one or more of the following protocols:
- Javascript
- RSS
- XML
Note:
You must click Save for changes to take effect.
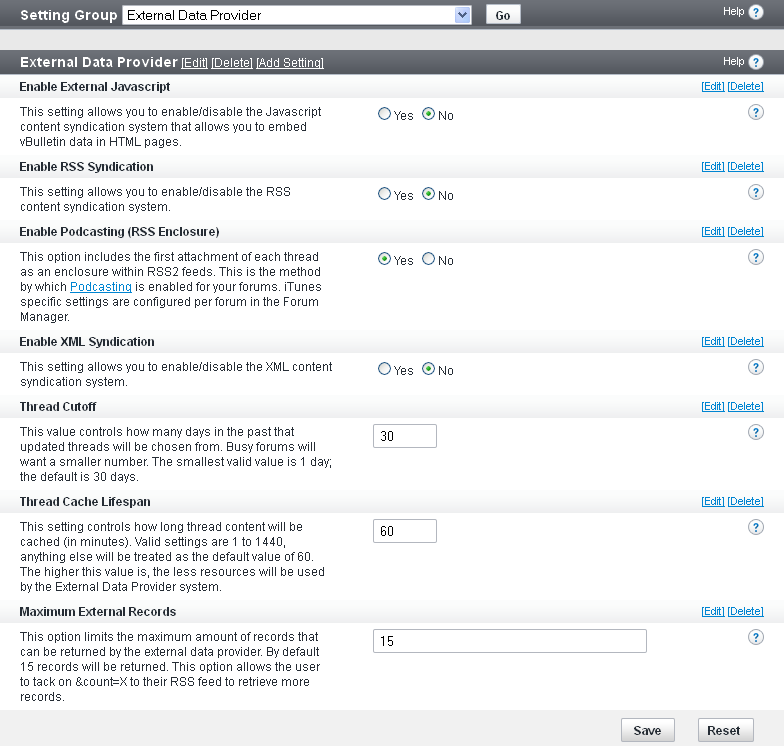
Enable External Javascript (Yes/No)
Enables Javascript-syndicated content to be displayed.
Sample call to check for new Javascript-syndicated content:
<<<Link: https://www.example.com/forum/external?type=js>>>
Enable RSS Syndication (Yes/No)
Enables RSS-syndicated content to be displayed. For example, a Trillian news plugin is being used to pick up content.
Sample call to check for new RSS-syndicated content:
<<<Link: https://www.example.com/forum/external?type=rss2>>>
Enable XML Syndication (Yes/No)
Enables XML-syndicated content to be displayed.
Sample call to check for new XML-syndicated content:
<<<Link: https://www.example.com/forum/external?type=xml>>>
Thread Cutoff (smallest value: 1; default: 30)
Number of days within which threads are selected.
If you have a busy site, choose a smaller number.
Thread Cache Lifespan (valid values: 1-1440; default: 60)
Time in minutes that thread content is cached.
The higher the value, the fewer resources are used.
Maximum External Records (default: 15)
Maximum number of records provided.
Note:
Users can add &count=X to their RSS feed request to retrieve more records.
Paid Subscriptions |
Note:
You must click Save for changes to take effect.
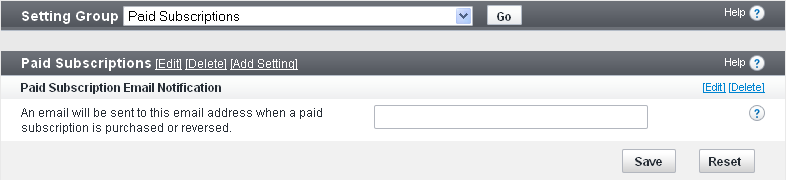
Paid Subscription Email Notification
To enable Paid Scription Email Notification, enter an email address.
An email will be sent to this email address when a paid subscription is purchased or reversed.
BB Code Options |
<<<Screenshot of BB Code Settings panel>>>
Note:
You must click Save for changes to take effect.
- Enabled Built-in BB Code Tags
This setting allows you to enable and disable any of the built-in BB codes in vBulletin.
Disabling a BB code will prevent it from working anywhere on the forum, including signatures, private messages, user notes etc.
The BB Code that can be enabled or disabled here are:- Basic BB Code (i.e. [B], [I])
- Font BB Code
- Link BB Code
- HTML BB Code
- Color BB Code
- Alignment BB Code
- Code BB Code
- Size BB Code
- List BB Code
- PHP BB Code
- Maximum [CODE] Lines Default: 30
Code (such as [CODE], [PHP] or [HTML]) is displayed as pre-formatted text which does not wrap when it reaches the edges of the table. By placing the code within a scroll box we avoid the situation where the pre-formatted text stretches the forum layout. This setting allows you to specify the maximum number of lines of text the scroll box will display before a scroll bar is used. - Allow BB Code in Non Forum Specific Areas Default: Yes
If you enable this option, users will be allowed to use BB code tags (such as [b], [i], etc.) in non forum specific areas. This setting is not used anywhere in vBulletin itself, but may be used by addons/plugins. - Allow Smilies in Non Forum Specific Areas Default: Yes
If you enable this setting, users can type such text as :) and :( and they will be converted into smilie images in non forum specific areas. Otherwise, the text will be displayed as text. This setting is not used anywhere in vBulletin itself, but may be used by addons/plugins. - Allow [IMG] Code in Non Forum Specific Areas Default: No
If you enable this, users will be able to use the [IMG] tag to show images in non forum specific areas. This setting is not used anywhere in vBulletin itself, but may be used by addons/plugins. - Allow HTML in Non Forum Specific Areas Default: No
If you enable this, users will be able to use HTML code in non forum specific areas. This setting is not used anywhere in vBulletin itself, but may be used by addons/plugins.Warning:Since this setting can be used maliciously, it is strongly recommended that you do not enable this setting. - Add nofollow attribute to URL BB Code Default: No
If enabled rel="nofollow" will be added to the any anchor tags for an external resource outputted from the URL BB Code. This instructs search engines that a hyperlink should not influence the link target's ranking in the search engine's index. It is intended to reduce the effectiveness of certain types of search engine spam. - URL nofollow domain Whitelist
This setting specifies the domains which will be exempt from the nofollow attribute being added to outgoing links (if the above option is enabled). Place each domain on a new line without the https:// - Allow remote [video] retrieval Default: 3
The display of certain provider's video using the [video] tag requires a remote request to be sent to the video service in order to retrieve the video page. Though this is only performed when the video is submitted with a post, you may wish to disable this ability. This option determines how many remote retrievals will be allowed with a single post submission. Set this option to '0' to disable remote retrieval.
Message Attachment Options |
Following are the vBulletin options related to message attachments.
Note:
You must click Save for changes to take effect.
Maximum disk space (in bytes) that all attachments can occupy.
Set the option to ‘0’ for no space limit.
Attachments Per Reply (default: 5)
Number of files that can be attached to a single reply.
Set the option to ‘0’ for no attachment limit.
Attachment Upload Inputs (default: 1)
Number of attachment upload input boxes to be displayed on the upload form.
Attachment URL Inputs (default: 1)
Number of attachment URL input boxes to be displayed on the upload form.
Allow Deletion of Attachments Beyond Edit Time Limit (Yes/No)
Whether or not users can delete attachments, even if the reply edit time limit has been exceeded.
If you have attachment quotas enabled then you need to enable this option to allow users to delete attachments once they reach their quota. Users still need permission to edit replies in the channel for this to apply.
Allow Deletion of Attachments in Closed Topics (Yes/No)
Whether or not users can delete attachments from topics that are closed.
If you have attachment quotas enabled then you might need to enable this option to allow users to delete attachments once they reach their quota. Users still need permission to edit replies in the channel for this to apply.
If Allow Deletion of Attachments Beyond Edit Time Limit (above) is set to ‘No’, then this option applies only up to the edit time limit setting.
Allow Duplicate Attached Images (Yes/No)
Checks for attachments posted by the user who is making the reply.
Resize Images (Yes/No)
Authorizes the system to try to resize images that are larger than your maximum allowed dimensions or filesize.
The resize attempt might fail if the image is too large to be successfully processed or if the image type is not supported for resizing.
When this option is enabled, limit the Attachment Input options above to one; otherwise the uploading of multiple large images by one user could overburden your server resources.
View Attached Images Inline (default: Yes, display thumbnails)
Other choices are ‘No’; ‘Yes, full size’; and ‘Yes, full size, but only if the reply has only one attachment’.
If this option is set to any variant of ‘Yes’, you also need to set the Thumbnail Creation option (below) to a variant of ‘Yes’.
Set this to ‘No’ if you want to preserve bandwidth or server processor resources.
Thumbnail Creation (default: Yes)
Whether or not to all thumbnail creation.
Other choices are ‘No’; ‘Yes, with border’; ‘Yes, with dimensions’; and ‘Yes, with border and dimensions’.
If your version of PHP supports image functions, setting this option to ‘Yes’ enables the creation of thumbnails for images. This is the “master switch” to enable/disable thumbnail display.
Go to Attachments > Attachment Manager > Edit > Display to choose the image types to be thumbnailed.
Note:
You must rebuild the attachment thumbnails via Maintenance > Update Counters > Rebuild Attachment Thumbnails after changing this setting.
Number representing the maximum height and width (in pixels) of the thumbnail.
The image will be resized so that the longest side is no larger than this setting.
If you are changing this value and have existing image attachments on your channels, you need to rebuild your thumbnails to update the existing attachments.
Thumbnail Quality (default: 75)
Number representing the quality of thumbnails of filetype JPG.
We recommend trying first 75. Other choices are ‘65’, ‘85’, and ‘95’.
Thumbnails Per Row (default: 5)
Number of thumbnails per line that you want to display on a user's reply, assuming you allow more than one attachment per reply.
This is an approximate number, depending on thumbnail size and browser width. It will only display as many thumbnails as possible without causing a horizontal slidebar.
Thumbnail Color (default: #000000)
Standard web color code for the border and label of the thumbnail.
Use Image Lightbox (default: Yes, Click)
Whether or not to use an image lightbox, and the action that will display the lightbox.
Other choices are ‘No’; ‘Yes, Hover’; and ‘Yes, Click or Hover’.
Use the lightbox for quick display of attached image thumbnails rather than instantly loading the full size image on a new page.
Asset Manager - Enable (default: Yes, Flash Upload by Default)
Whether or not to enable the vBulletin Asset Manager.
Other choices are ‘No’; and ‘Yes, Ajax Upload by Default’.
The asset manager is an enhanced interface for uploading files. It allows users to reuse their existing attachments. Some older browsers might have problems using the interface.
Users can also choose to disable the asset manager from within their profiles.
Asset Manager - Assets Per Page (default: 20)
Maximum number of assets to display before displaying page navigation.
This number must be at least ‘1’.
Advanced Insert Image Popup - Enable (Yes/No)
Whether or not to turn on the Advanced Insert Image dialog, which allows users to insert images from their computer or retrieve images referenced from a URL and store them locally.
Disabling this option displays the legacy URL attachment dialog.
Message Posting and Editing Options |
Following are the Message Posting and Editing Options.
Note:
You must click Save for changes to take effect.
<<insert screenshot of form>>
Multi-Quote Enabled (Yes/No)
Whether or not Multi-Quote is enabled.
If this option is enabled, an additional button appears on replies. Users can click as many of these buttons as they want. Once they click a reply button, the content of each of the selected replies is quoted and shown in the reply window.
Multi-Quote Quote Limit (default: 0)
Enter a value to limit the number of quotes that can be created with Multi-Quote. Once this limit is reached the user cannot add any more quotes.
Note:
The Quote BB code can still be entered manually: this is not a limit on the number of quotes in a reply post.
If this number is set to a value greater than 0, users must enter at least that number of characters in each new reply post.
Note:
Setting this to 0 will not completely disable the minimum characters per reply check. Users must always enter at least 1 character.
Replies that contain more characters than the value specified here will be rejected with a message telling the user to shorten the post.
Set the value to 0 to disable this function.
Maximum Characters Per Thread/Post Title (default: 85)
Maximum number of characters in topic and reply titles.
Enter a value larger than 0 and less than 251.
Ignore Words in [QUOTE] Tags For Min Chars Check (Yes/No)
Setting this option to Yes causes the system to not count words in quote tags towards the total number of characters posted.
If you enable this option, all text within quote tags in a reply will be ignored when determining how many characters that post has. Some users like to quote large replies and add a smiley or some other small bit of text as a response, and this prevents that.
Users can specify their own title if they want to do so.
Maximum Images/Videos Per Post (default: 3)
Maximum number of images or videos per reply..
Set the value to 0 to disable this function.
Prevent 'SHOUTING' (default: 3)
Prevents users from using all uppercase letters in their topic titles or message text by changing all-uppercase text with at least the number of characters specified from all caps to camelcase (initial caps only).
Set the value to 0 to disable this function.
Note:
Disable this for some international forums with non-English character sets, as this may cause problems.
Minimum number of seconds between replies from a single user.
This option enables a floodcheck, which disallows users from posting another reply within the timespan specified.
For example, if you specify a timespan of 30 seconds, a user cannot reply again within 30 seconds of the last reply.
Note:
Administrators and moderators are exempt from any floodcheck.
Time Limit on Editing of Thread Title (default: 5)
Time limit in minutes within which the topic title can be edited by the user who started the topic.
Time Limit on Adding a Poll to a Thread (default: 0)
Number of minutes after which a user cannot a poll to a topic he or she just created.
Administrators and moderators with the “caneditpoll” permission can always add a poll to a topic after thetopic is created.
Time Limit on Editing of Posts (default: 0)
Number of minutes after which a user cannot continue to edit a given message.
After this time limit only moderators are able edit or delete the message.
Note:
1 day is 1440 minutes.
Time to Wait Before Starting to Display 'Last Edited by...' (default: 2)
Number of minutes after which a "Last edited by..." message appears at the bottom of the edited reply.
Log IP Addresses
- Do not log IP
- Display, but require administrator or moderator
- Display publicly
Post Edit History (Yes/No)
Whether or not to log the previous versions of replies when they are edited.
Edits are be logged if an “edited by” notice is not displayed or updated. This occurs in the following situations:
- The editing user is in a usergroup that does not show “edited by” notices and no reason for editing is specified.
- The post is edited quickly enough after being posted to trigger the Time to Wait Before Starting to Display 'Last Edited by...' option.
Note:This increases the amount of disk space used by vBulletin for database storage.
Poll and Topic Rating Options |
Maximum Poll Options
This is the maximum number of options a user can select for the poll. Setting this option to 0 to allow any number of options.
Poll Option Length
Maximum characters that a poll option can be.
Update Thread Last Post on Poll Vote (Yes/No)
If you set this option to 'Yes' the thread's last post time will be updated when a vote is placed, thereby returning it to the top of its parent forum listing.
Note:
This option can cause confusion. The last post time of a thread will be changed with no visible post.
Thread ratings are relatively inaccurate with just a few votes. This setting can be used to delay the results until enough votes have been cast to give a more accurate rating. This option specifies the number of thread rating votes that must be cast of a particular thread before the current rating is displayed on forumdisplay.php and showthread.php.
Allow Thread Rating Vote Changes (Yes/No)
This allows users to change their original rating of a thread.
Spam Management |
Note:
You must click Save for changes to take effect.
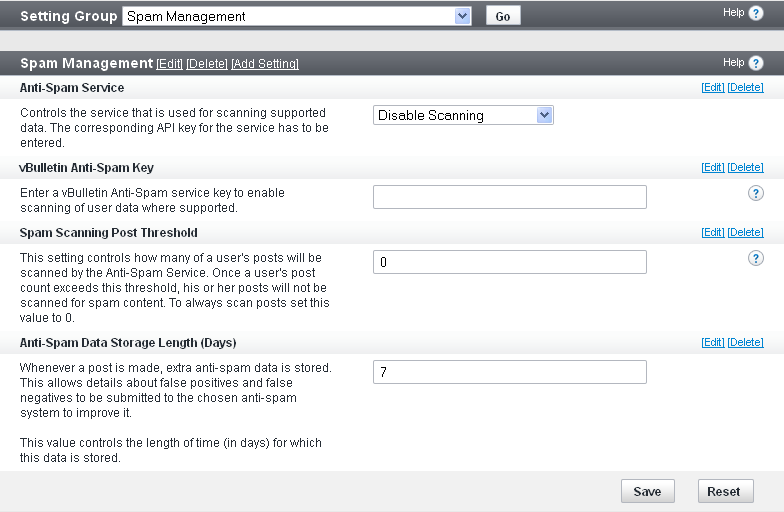
Anti-Spam Service (default: Disable Scanning)
Controls the service that is used for scanning supported data. You must enter the corresponding API key for the service (either Akismet or Typepad Anti-spam).
vBulletin Anti-Spam Key
Enter a vBulletin Anti-Spam service key (which you obtain from the service selected in the Anti-Spam Service option) to enable scanning of user data where supported.
Spam Scanning Post Threshold (default: 0)
This setting controls how many of a user's posts are scanned by the Anti-Spam Service. Once a user's post count exceeds this threshold, his or her posts are not scanned for spam content.
To always scan posts set this value to 0.
Anti-Spam Data Storage Length (Days) (default: 7)
Whenever a post is made, extra anti-spam data is stored. This allows details about false positives and false negatives to be submitted to the chosen anti-spam system to improve it.
This value specifies the length of time (in days) for which this data is stored.
XML Sitemap |
vBulletin allows you to create and submit an XML sitemap to search engines and website management tools. The sitemap can facilitate tasks like indexing of your site and troubleshooting problems with your site content.
Note:
You must click Save for changes to take effect.
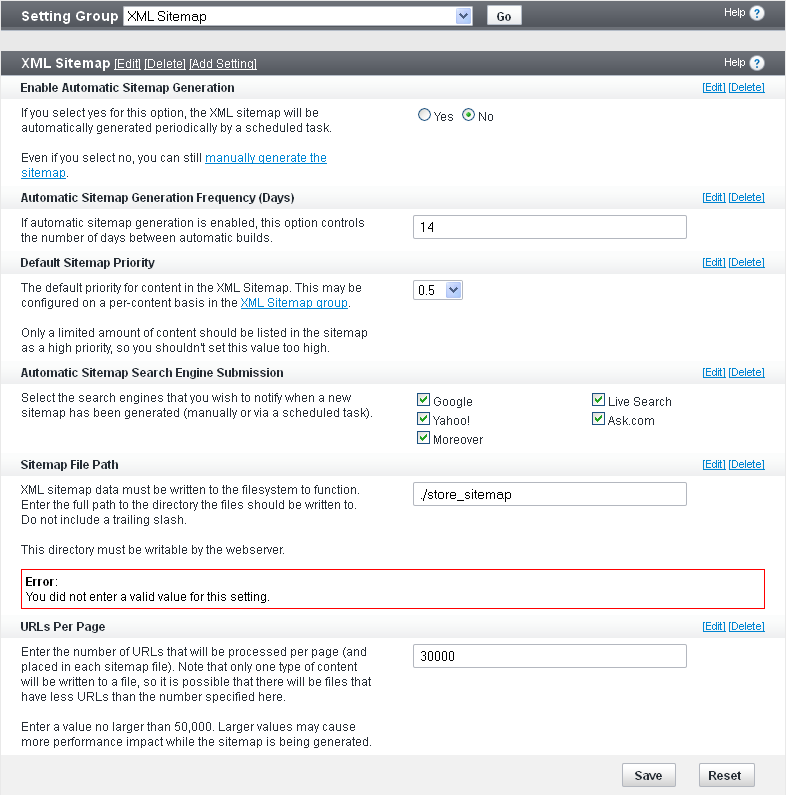
Enable Automatic Sitemap Generation[b] (Yes/No)
If you set this option to Yes, vBulletin generates sitemaps automatically using the Scheduled Task Manager.
If you have a large site, you might want to leave this disabled, because it can be a time-consuming task.
Even if automatic sitemap generation is enabled, you can always generate your sitemap files manually by clicking on Rebuild Sitemap.
[b]Automatic Sitemap Generation Frequency (Days)[b] (default: 14)
If automatic sitemap generation is enabled, this option controls the number of days between automatic builds.
[b]Default Sitemap Priority (default: 0.5)
The default priority for content in the XML sitemap.
For performance reasons, only a limited amount of content should be listed in the sitemap as high priority, so don’t set this value too high.
You can configure the priority on a per-content basis in:
<<<Internal link: XML Sitemap>>>.
Automatic Sitemap Search Engine Submission
Allows you to select one or more search engines to which to submit your sitemap.
Possible selections include Google, Yahoo!, Bing!/Live Search, Ask.com, and Moreover.
Sitemap File Path
XML sitemap data must be written to the filesystem to function. Enter the full path to the directory to which the files should be written.
Do not include a trailing slash. This directory must be writable by the webserver. It also must be accessible via a web browser.
URLs Per Page (maximum: 50000; default: 30000)
Enter the number of URLs to be processed per page (and placed in each sitemap file).
Only one type of content is written to a file, so there might be files with fewer URLs than the number specified here.
Search Type |
In a new installation of vBulletin.0.4 and higher, there two search engines installed. The default is called "DB Search" and is an indexed implementation stored in a number of tables within your database. This will allow you to search all content types marked as "Searchable" when they are created/installed in your system.
The second search implementation uses Sphinx Search. Sphinx is an open source full text search server, designed from the ground up with performance, relevance (aka search quality), and integration simplicity in mind. It's written in C++ and works on Linux (RedHat, Ubuntu, etc), Windows, MacOS, Solaris, FreeBSD, and a few other systems. To use this search engine, please see the instructions on Installing Sphinx.
You may be able to find alternative search engines from third-party vendors or possibly at https://www.vbulletin.org.
Note:
Changing search implementations will require you to rebuild the search index before the search function will return results. For the DB Search this can be done via Maintenance > Update Counters. Reindex can take a long time for large boards. Some high performance search engines may provide a faster alternate method of doing a full reindex, consult the documentation provided with your search type. Consult the documentation for your search type to learn how to rebuild the search index for it.
Installing Sphinx |
Warning:
Sphinx is designed for Advanced Users only. Knowledge of configuring and maintaining Server Platforms is a requirement.
Installing Sphinx on Linux/Unix/Mac OS |
Note:
You may need to make some adjustments depending on the flavor of your unix system.
| 1 | Login as root |
| 2 | Download Sphinx. Sphinx is available through its official Web site at https://sphinxsearch.com/downloads (Our minimum required version is 2.1.1-beta) |
| 3 | unpack the package |
| 4 | cd sphinx-<version> |
| 5 | ./configure --enable-id64 --prefix=/usr/local/sphinx |
| 6 | make |
| 7 | Did you get Error 127 during step 5? Install gcc-c++ using the following command and then repeat step 5.
|
| 8 | make install |
| 9 | Did you get dependency errors with steps 5 or 7? Install mysql-devel using the following command and then repeat steps 5 and 7.
|
| 10 | Create the following directories in your sphinx install (/usr/local/sphinx/): log & data
|
| 1 | Upload the contents of the upload folder to the vbulletin root directory. |
| 2 | At the end of your vBulletin core/includes/config.php file, add the following:/* * Sphinx configuration parameters */ $config['Misc']['sphinx_host'] = '127.0.0.1'; $config['Misc']['sphinx_port'] = '9306'; $config['Misc']['sphinx_path'] = '/usr/local/sphinx'; //no trailing slash $config['Misc']['sphinx_config'] = $config['Misc']['sphinx_path'] . '/etc/vbulletin-sphinx.php'; |
| 3 | Upload vbulletin-sphinx.php to /usr/local/sphinx/etc/ . |
| 4 | Update the first line in vbulletin-sphinx.php to match your php installation path |
| 5 | Change $myforumroot in vbulletin-sphinx.php to the exact forum root (Example: /home/vbulletin/public_html). |
| 6 | Set vbulletin-sphinx.php file to executable using: chmod +x /usr/local/sphinx/etc/vbulletin-sphinx.php |
| 7 | Change directory to your sphinx folder using: cd /usr/local/sphinx |
| 8 | Start the daemon using: /usr/local/sphinx/bin/searchd --config /usr/local/sphinx/etc/vbulletin-sphinx.php |
| 9 | Ignore the worning about 'vbulletin_disk' index, it will be created once you ran the indexer. |
| 10 | To verify your Sphinx is working you can enter: ps ax | grep search[d] |
| 11 | If the above returned something such as: /usr/local/sphinx/bin/searchd --config... the daemon is running. |
| 12 | Go to your AdminCP->Options->Search Type. In the drop down, select Sphinx Search, then hit go. |
Note:
Note: Do not upload your vbulletin-sphinx.php to a web accessible URL. Doing so would give away your database details. If you follow these exact instructions, it will not be in a web accessible URL.
Warning:
If you adjust any of your config.php credentials you will need to restart your Sphinx daemon.
Installing Sphinx on Windows |
Warning:
Important: Sphinx is mainly used on UNIX based systems. We are providing instructions for Windows for development and testing purposes. We cannot guarantee that it will work in a live environment.
| 1 | Sphinx is available through its official Web site at https://sphinxsearch.com/ |
| 2 | Download the sphinx package (minimum version is 2.1.1-beta), extract the content and follow the instructions in the doc/sphinx.txt Note: Note the installation folder and replace below with it where it says <shpinx_root>. Do not add the trailing slash. |
| 3 | Do not install the service yet! |
| 4 | If you installed the service, run the following commands from the Command line: net stop SphinxSearch <shpinx_root>\bin\searchd --delete --servicename SphinxSearch |
| 5 | Make sure the following directories are created in your sphinx install (<shpinx_root>): log & data. Using the command line: mkdir <shpinx_root>\log mkdir <shpinx_root>\data |
| 1 | Upload the contents of the upload folder to the vbulletin root directory. |
| 2 | At the end of your vBulletin core/includes/config.php file, add the following:/* * Sphinx configuration parameters */ $config['Misc']['sphinx_host'] = '127.0.0.1'; $config['Misc']['sphinx_port'] = '9306'; $config['Misc']['sphinx_path'] = '<shpinx_root>'; //no trailing slash $config['Misc']['sphinx_config'] = $config['Misc']['sphinx_path'] . '/etc/vbulletin_sphinx.conf'; |
| 3 | Upload vbulletin-sphinx.php to <shpinx_root>/etc/ |
| 4 | Edit <shpinx_root>/etc/vbulletin-sphinx.php and update the path in the $myforumroot variable to your vbulletin root |
| 5 | Run the following command in a console (cmd) to generate a sphinx config file based on your board: php <shpinx_root>\etc\vbulletin-sphinx.php > <shpinx_root>\etc\vbulletin_sphinx.conf |
| 6 | Install the service by running this in a command line as administrator: <shpinx_root>\bin\searchd --install --config <shpinx_root>etc\vbulletin_sphinx.conf --servicename SphinxSearch |
| 7 | Start the service by running: net start SphinxSearch |
| 8 | Go to your AdminCP->Options->Search Type. In the drop down, select Sphinx Search, then hit go. |
Note:
Note: Do not upload your vbulletin-sphinx.php to a web accessible URL. Doing so would give away your database details. If you follow these exact instructions, it will not be in a web accessible URL.
Warning:
If you adjust any of your config.php credentials you will need to restart your Sphinx daemon.
Human Verification Manager |
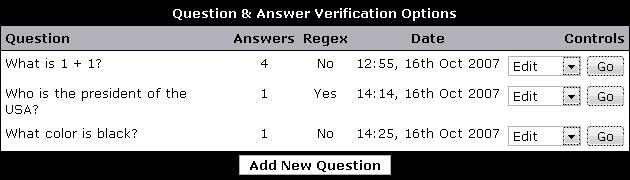
An unlimited amount of questions may be specified and each question may have an unspecified amount of answers.
To add a new question, select the button. Existing questions may be deleted, modified or have answers modified by selecting the controls on the right of the question.
CMS |
Content List |
The checkbox to the left of each article name is used to select an article. You can use this to apply a single action to multiple articles at the same time. The actions are chosen at the top of the page. To save a change to different articles, you would select the articles, chose the action at the top of the screeen and then click on the <APPLY> button.
Publishing an article will make it viewable to users. To publish an article, select the checkbox beside the article and click the <Published> button.
Un-publishing an article will make it invisible to users. To un-publish an article, select the checkbox beside the article and click the <Un-publish> button.
To delete an article, select the checkbox beside the article you want to delete and click the <Delete> button. A popup confirmation appears. Click the <Ok> button.
To edit an article and its contents, click on the <Edit> button to the right of the article. This opens the article form where you can make and save your changes to the article.
To change the order that articles appear in on the main page, fill in the display order box and click the <Save Display Order Button>
You can filter articles by a number of different options including category, content type, author, published status, tags and more. This is done at the top of the page. First you would select a filter and then you can select any options in the second dropdown. After you've made your selections click the <Filter> button.
Category List |
If you want to apply an action such as publishing or unpublishing a Category, check its box on the left and choose the action from the drop down at the top of the page. You can apply actions to multiple Categories at a time.
To edit the Display Order of the Categories, edit the display order values on the screen and click the <Save Display Order> button.
To add new categories, click the <+ Category> button. This will take you to a screen to add your new category.
Tag List |
Styles |
The following topics include information about the style and language settings in vBulletin, as well as a complete style reference covering templates, CSS, and style variables.
Note:
To modify the look and feel of your vBulletin forums, you must have a basic understanding of XHTML 1.0 and CSS 1.0. You can learn the basics of these markup languages on W3schools.com. You can get many of your specific questions answered on the vBulletin community forums.
vBulletin Style Reference |
A variety of controls are available for your use, allowing you to make both minor changes, such as the font used for the interface, right through to changing the underlying HTML used to generate the board's individual pages.
The look of your board can be altered to your own custom preferences through a simple-to-use interface that allows you to change fonts, colors and images etc. If you want to get down and dirty with the underlying HTML of the board, you can also do this by editing individual templates via the Style Manager.
A vBulletin style comprises several elements that work together to create a complete look for your board.
Those components are as follows:
Templates |
How do Templates Work |
A simple example template might look like this:
<table class="tborder">
<tr>
    <td class="tcat" colspan="2">My Table</td>
</tr>
$tablebits
</table>
For example, we might have another template that looks like this:
<tr>
    <td class="alt1">$username</td>
    <td class="alt2">$message</td>
</tr>
<tr>
    <td class="alt1">Mister User</td>
    <td class="alt2">This is my message</td>
</tr>
<table class="tborder">
<tr>
    <td class="tcat" colspan="2">My Table</td>
</tr>
<tr>
    <td class="alt1">Mister User</td>
    <td class="alt2">This is my message</td>
</tr>
<tr>
    <td class="alt1">Another Person</td>
    <td class="alt2">This message is in reply to that posted above.</td>
</tr>
<tr>
    <td class="alt1">Mister User</td>
    <td class="alt2">Hey, thanks for responding to my message!</td>
</tr>
</table>
Here is the vBulletin header template. It shows how a typical template is built in vBulletin.
<div class="above_body"> <!-- closing tag is in template navbar -->
<div id="header" class="floatcontainer doc_header">
<vb:if condition="$stylevar['titleimage']"><div><a name="top" href="{vb:link forumhome}" class="logo-image"><img src="{vb:stylevar titleimage}" alt="{vb:rawphrase x_powered_by_vbulletin, {vb:raw vboptions.bbtitle}}" /></a></div></vb:if>
<div id="toplinks" class="toplinks">
<vb:if condition="$show['member']">
<ul class="isuser">
<li><a href="login.php?{vb:raw session.sessionurl}do=logout&logouthash={vb:raw bbuserinfo.logouthash}" onclick="return log_out('{vb:rawphrase sure_you_want_to_log_out}')">{vb:rawphrase log_out}</a></li>
<vb:if condition="$show['registerbutton']">
<li><a href="register.php{vb:raw session.sessionurl_q}" rel="nofollow">{vb:rawphrase register}</a></li>
</vb:if>
<li><a href="usercp.php{vb:raw session.sessionurl_q}">{vb:rawphrase user_control_panel}</a></li>
<li><a href="{vb:link member, {vb:raw bbuserinfo}}">{vb:rawphrase your_profile}</a></li>
<vb:if condition="$notifications_total">
<li class="popupmenu notifications" id="notifications">
<a class="popupctrl" href="usercp.php{vb:raw session.sessionurl_q}">{vb:rawphrase your_notifications}: <span class="notifications-number"><strong>{vb:raw notifications_total}</strong></span></a>
<ul class="popupbody popuphover">
{vb:raw notifications_menubits}
</ul>
</li>
<vb:else />
<li class="popupmenu nonotifications" id="nonotifications">
<a class="popupctrl" href="usercp.php{vb:raw session.sessionurl_q}">{vb:rawphrase your_notifications}</a>
<ul class="popupbody popuphover">
<li>{vb:rawphrase no_new_messages}</li>
<vb:if condition="$show['pmmainlink']"><li><a href="private.php{vb:raw session.sessionurl_q}">{vb:rawphrase inbox}</a></li></vb:if>
</ul>
</li>
</vb:if>
<li class="welcomelink">{vb:rawphrase welcome_x_link_y, {vb:raw bbuserinfo.username}, {vb:link member, {vb:raw bbuserinfo}}}</li>
<vb:if condition="$vboptions['enablefacebookconnect']">
{vb:raw facebook_header}
</vb:if>
</ul>
{vb:raw template_hook.header_userinfo}
<vb:comment><p>{vb:rawphrase last_visited_x_at_y, {vb:raw pmbox.lastvisitdate}, {vb:raw pmbox.lastvisittime}}</p></vb:comment>
<vb:else />
<ul class="nouser">
<vb:if condition="$show['registerbutton']">
<li><a href="register.php{vb:raw session.sessionurl_q}" rel="nofollow">{vb:rawphrase register}</a></li>
</vb:if>
<li><a rel="help" href="faq.php{vb:raw session.sessionurl_q}">{vb:rawphrase help}</a></li>
<li>
<script type="text/javascript" src="clientscript/vbulletin_md5.js?v={vb:raw vboptions.simpleversion}"></script>
<form id="navbar_loginform" action="login.php?{vb:raw session.sessionurl}do=login" method="post" onsubmit="md5hash(vb_login_password, vb_login_md5password, vb_login_md5password_utf, {vb:raw show.nopasswordempty})">
<fieldset id="logindetails" class="logindetails">
<div>
<div>
<input type="text" class="textbox<vb:if condition="!$username"> default-value</vb:if>" name="vb_login_username" id="navbar_username" size="10" accesskey="u" tabindex="101" value="<vb:if condition="$username">{vb:raw username}<vb:else />{vb:rawphrase username}</vb:if>" />
<input type="password" class="textbox" tabindex="102" name="vb_login_password" id="navbar_password" size="10" />
<input type="text" class="textbox default-value" tabindex="102" name="vb_login_password_hint" id="navbar_password_hint" size="10" value="{vb:rawphrase password}" style="display:none;" />
<input type="submit" class="loginbutton" tabindex="104" value="{vb:rawphrase log_in}" title="{vb:rawphrase enter_username_to_login_or_register}" accesskey="s" />
</div>
</div>
</fieldset>
<div id="remember" class="remember">
<label for="cb_cookieuser_navbar"><input type="checkbox" name="cookieuser" value="1" id="cb_cookieuser_navbar" class="cb_cookieuser_navbar" accesskey="c" tabindex="103" /> {vb:rawphrase remember_me}</label>
</div>
<input type="hidden" name="s" value="{vb:raw session.sessionhash}" />
<input type="hidden" name="securitytoken" value="{vb:raw bbuserinfo.securitytoken}" />
<input type="hidden" name="do" value="login" />
<input type="hidden" name="vb_login_md5password" />
<input type="hidden" name="vb_login_md5password_utf" />
</form>
<script type="text/javascript">
YAHOO.util.Dom.setStyle('navbar_password_hint', "display", "inline");
YAHOO.util.Dom.setStyle('navbar_password', "display", "none");
vB_XHTML_Ready.subscribe(function()
{
//
YAHOO.util.Event.on('navbar_username', "focus", navbar_username_focus);
YAHOO.util.Event.on('navbar_username', "blur", navbar_username_blur);
YAHOO.util.Event.on('navbar_password_hint', "focus", navbar_password_hint);
YAHOO.util.Event.on('navbar_password', "blur", navbar_password);
});
function navbar_username_focus(e)
{
//
var textbox = YAHOO.util.Event.getTarget(e);
if (textbox.value == '<vb:if condition="$username">{vb:raw username}<vb:else />{vb:rawphrase username}</vb:if>')
{
//
textbox.value='';
textbox.style.color='{vb:stylevar input_color}';
}
}
function navbar_username_blur(e)
{
//
var textbox = YAHOO.util.Event.getTarget(e);
if (textbox.value == '')
{
//
textbox.value='<vb:if condition="$username">{vb:raw username}<vb:else />{vb:rawphrase username}</vb:if>';
textbox.style.color='{vb:stylevar shade_color}';
}
}
function navbar_password_hint(e)
{
//
var textbox = YAHOO.util.Event.getTarget(e);
YAHOO.util.Dom.setStyle('navbar_password_hint', "display", "none");
YAHOO.util.Dom.setStyle('navbar_password', "display", "inline");
YAHOO.util.Dom.get('navbar_password').focus();
}
function navbar_password(e)
{
//
var textbox = YAHOO.util.Event.getTarget(e);
if (textbox.value == '')
{
YAHOO.util.Dom.setStyle('navbar_password_hint', "display", "inline");
YAHOO.util.Dom.setStyle('navbar_password', "display", "none");
}
}
</script>
</li>
<vb:if condition="$vboptions['enablefacebookconnect']">
{vb:raw facebook_header}
</vb:if>
</ul>
</vb:if>
</div>
<div class="ad_global_header">
{vb:raw ad_location.global_header1}
{vb:raw ad_location.global_header2}
</div>
<hr />
</div>
Template Syntax |
Variable Access
Wherever possible, reference variables in templates using the following syntax:
{vb:var variable}
To access array elements, use a dot operator rather than standard PHP square brackets:
{vb:var variable.foo} // accesses htmlspecialchars($variable['foo'])
{vb:var variable.$varkey} // accesses htmlspecialchars($variable[$varkey])
To access variables in versions of vBulletin prior to V4, use the following syntax:
{vb:raw variable}
Curly-Brace Syntax
The general curly-brace syntax is the following:
{vb:method arg1[, arg2...]}
{vb:method {variable}} // unneccessary extra braces
{vb:method variable}
phrase
The code {vb:phrase phrase_name[, arguments for phrase...]} inserts the specified phrase. If arguments are provided, they will be run through htmlspecialchars.
Example:
{vb:phrase welcome}
The code {vb:rawphrase phrase_name[, arguments for phrase...]} works like phrase, although arguments bypass htmlspecialchars.
Example:
{vb:rawphrase message_by_x_on_y_at_z, {vb:link member, {vb:raw postinfo}}, {vb:raw postinfo.username}, {vb:raw postinfo.postdate}, {vb:raw postinfo.posttime}}
The code {vb:date timestamp[, format]} formats a UNIX timestamp using the default date format for the active language. A format may also be explicitly specified. The timezone will be corrected for the viewing user.
time
The code {vb:time timestamp[, format]} works like date, although
it uses the default time format instead of date format.
number
The code {vb:number number[, decimals]} outputs a number having run through vb_number_format for the correct locale formatting. The number of decimal places to display can be optionally specified.
raw
The code {vb:raw variable} outputs the variable raw, without any formatting or escaping.
escapejs
The code {vb:escapejs variable} returns the variable prepared for use as a Javascript single-quoted string instead of running htmlspecialchars.
urlencode
The code {vb:urlencode variable} escapes the variable using urlencode.
if
The code {vb:if condition, true[, false]} can be used in instances where the full <vb:if>[\var] tag cannot be used, such as within HTML tags.
Example:
<div class="{vb:if $forumid==1, forum1, forum}">...</div>
The code [var]{vb:link type, info[, extra-info]} is used to build a hyperlink URL of the specified type and into the correct “friendly” format.
For more information, see <<<Insert doc link: Link Syntax>>>.
math
The code {vb:math expression} is primarily used within CSS to evaluate the result of the mathematical expression specified.
stylevar
The code {vb:stylevar name[.sub-part]} is used to output a style variable from the style system. No escaping is performed.
Tags
All tags make use of the vb namespace for ease of identification and parsing.
The following tags are available.
literal
The code inside <vb:literal>misc code</vb:literal> is treated as plain HTML. No curly-brace syntax or vb:tag markup is evaluated.
if
If the condition specified in <vb:if condition="condition">true result</vb:if> is true, the contents of the vb:if tags will be output, otherwise nothing will be output.
The following code is used in conjunction with vb:if.
elseif
<vb:elseif condition="condition" />true result
else
<vb:else />true result
comment
The code <vb:comment>a comment</vb:comment> is used where a comment is necessary but the usual <!-- comment → syntax is undesirable. The vb:comment tag allows its contents to be completely removed upon compiling, so they will not be delivered to the browser. This is useful for internal commenting.
each
The code <vb:each from="array" key="key" value="value"></vb:each>
will iterate through an existing array, in a similar manner to foreach.
The following are example uses of <vb:each>.
Array:
// We have an array of users available in PHP.
// It looks like this:
// $users = array(
//    1 => array('username' => 'Adam', 'email' => '[email protected]'),
//    2 => array('username' => 'Ben', 'email' => '[email protected]'),
//    3 => array('username' => 'Chris', 'email' => '[email protected]')
// );
[code]


Template:

[code]
<!-- our template code... -->
<vb:each from="users" key="userid" value="userinfo">
    <li><a href="member.php?u={vb:var userid}">{vb:var userinfo.username}</a></li>
</vb:each>
<!-- will output... -->
    <li><a href="member.php?u=1">Adam</a></li>
    <li><a href="member.php?u=2">Ben</a></li>
    <li><a href="member.php?u=3">Chris</a></li>
CSS |
vBulletin uses CSS to style the pages of a site and invludes a user-friendly interface in which you can enter values to control the styling. The vBulletin Style Manager creates CSS for you so you don’t have to know the details of CSS in order to style your site.
The next few topics provide an introduction to CSS and how vBulletin uses it.
CSS Templates |
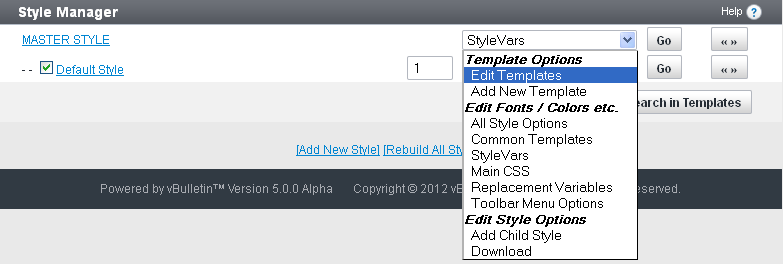
To get to the templates follow this process: Styles & Templates > Style Manager then select the Edit Templates option under the StyleVars dropdown list. In the template list, you can select any CSS template and click the to edit the template. Or, simply double-click the name of the template in the template list.
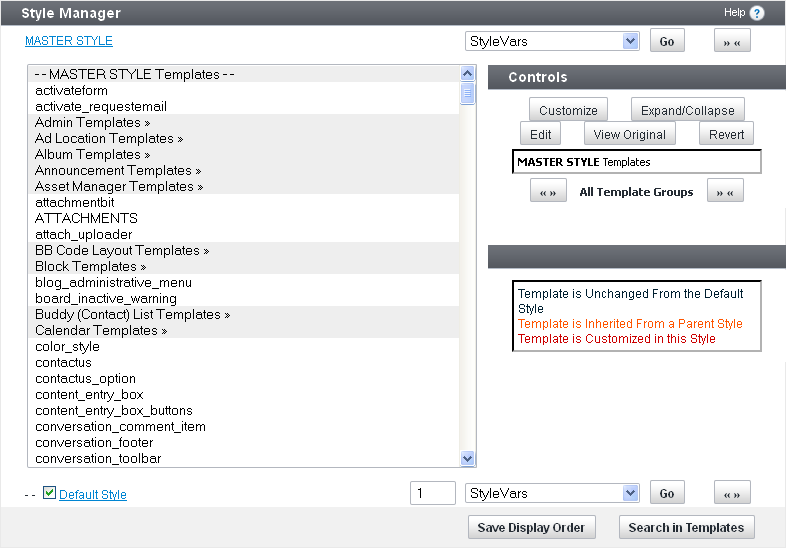
css_additional.css Template |
The css_additional.css file will not be overwritten or merged on subsequent product upgrades.
Style Variables |
StyleVars are incorporated into CSS and Templates using the {stylevar} syntax. While Stylevars are primarily used within CSS in vBulletin, they can be used in XHTML templates as well.
How Style Variables Interact with CSS |
Here is a sample of code in a CSS template:
.postbit, .postbitlegacy, .eventbit {
    margin-bottom: {vb:stylevar padding};
    display:block;
    width: 100%;
    clear:both;
    position: relative;
    float: {vb:stylevar left};
    color: {vb:stylevar body_color};
    border: {vb:stylevar postbit_border};
}
CSS Math Tag
It is possible to use style variables in mathematical expressions with the {vb:math} tag.
This is used to evaluate the result of the mathematical expression specified. The syntax is:
{vb:math expression}
height:{vb:math 8px + {vb:math {vb:stylevar font.fontSize}-1}};
Style Variable List |
| Bbcode [code] Background | bbcode_code_background | Controls the background color and image for the Bbcode [code] display. | Bbcode | background |
| Bbcode [code] Border | bbcode_code_border | Controls the border width, style, and color for the Bbcode [code] display. | Bbcode | border |
| BBCode [code] Font Size | bbcode_code_fontsize | This stylevar controls the size of BBCode [code] font. | Bbcode | size |
| BBCode [code] Line Height | bbcode_code_line_height | Controls the line height for bbcode [code] blocks. This needs to be set as a pixel line height (set units to px) for the block height calculation to work correctly. | Bbcode | size |
| Bbcode [quote] Background | bbcode_quote_background | Controls the background color and image for the Bbcode [quote] display. | Bbcode | background |
| Button Arrow Background | button_arrow_background | Controls the background color and image for the small arrow buttons, for example the pagination buttons for comments. | Buttons | background |
| Button Arrow Border | button_arrow_border | Controls the border width, style, and color for the small arrow buttons, for example the comment pagination buttons. | Buttons | border |
| Button Disabled Background | button_disabled_background | Controls the background color and image for disabled buttons. | Buttons | background |
| Button Disabled Border | button_disabled_border | Controls the border width, style, and color for disabled buttons. | Buttons | border |
| Button Disabled Text Color | button_disabled_text_color | Controls the text color for disabled buttons. | Buttons | color |
| Button Primary Background | button_primary_background | Controls the background color and image for primary buttons. | Buttons | background |
| Button Primary Background Hover | button_primary_background_hover | Controls the background color and image for primary buttons when the mouse is over them. | Buttons | background |
| Button Primary Border | button_primary_border | Controls the border width, style, and color for primary buttons. | Buttons | border |
| Button Primary Border Hover | button_primary_border_hover | Controls the border width, style, and color for primary buttons when the mouse is over them. | Buttons | border |
| Button Primary Light Background | button_primary_light_background | Controls the background color and image for primary light buttons. | Buttons | background |
| Button Primary Light Border | button_primary_light_border | Controls the border width, style, and color for primary light buttons. | Buttons | border |
| Button Primary Light Border Hover | button_primary_light_border_hover | Controls the border width, style, and color for primary light buttons when the mouse is over them. | Buttons | border |
| Button Primary Light Text Color | button_primary_light_text_color | Controls the text color for primary light buttons. | Buttons | color |
| Button Primary Text Color | button_primary_text_color | Controls the text color for primary buttons. | Buttons | color |
| Button Primary Text Color Hover | button_primary_text_color_hover | Controls the text color for primary buttons when the mouse is over them. | Buttons | color |
| Button Secondary Background | button_secondary_background | Controls the background color and image for secondary buttons. | Buttons | background |
| Button Secondary Border | button_secondary_border | Controls the border width, style, and color for secondary buttons. | Buttons | border |
| Button Secondary Border Hover | button_secondary_border_hover | Controls the border width, style, and color for secondary buttons when the mouse is over them. | Buttons | border |
| Button Secondary Text Color | button_secondary_text_color | Controls the text color for secondary buttons. | Buttons | color |
| Button Special Background | button_special_background | Controls the background color and image for special buttons. | Buttons | background |
| Button Special Border | button_special_border | Controls the border width, style, and color for special buttons. | Buttons | border |
| Button Special Border Hover | button_special_border_hover | Controls the border width, style, and color for special buttons when the mouse is over them. | Buttons | border |
| Button Special Text Color | button_special_text_color | Controls the text color for special buttons. | Buttons | color |
| Content Entry Auto Save Notice Background | contententry_autosave_background | Color of the background of the Auto Save notice popup | ContentEntry | background |
| Content Entry Auto Save Notice Text Color | contententry_autosave_text_color | Color of the Text of the Auto Save notice popup | ContentEntry | color |
| Content Entry Panel Background | contententry_panel_background | Controls the background color and image for the panels in the content entry interface. | ContentEntry | background |
| Content Entry Panel Section Background | contententry_panel_section_background | Controls the background color and image for the content entry panel sections. | ContentEntry | background |
| Content Entry Panel Section Title Background | contententry_panel_section_title_background | Controls the background color and image for the content entry panel section titles. | ContentEntry | background |
| Content Entry Toolbar Background | contententry_toolbar_background | Control the background color for the content entry toolbar. | ContentEntry | background |
| Content Entry Toolbar Button Secondary Background Active | contententry_toolbar_button_secondary_background_active | Controls the background color and image for the secondary content entry toolbar buttons when active. | ContentEntry | background |
| Content Entry Toolbar Button Secondary Background | contententry_toolbar_button_secondary_background | Controls the background color and image for the secondary content entry toolbar buttons. | ContentEntry | background |
| Content Entry Toolbar Button Secondary Border | contententry_toolbar_button_secondary_border | Controls the border color style and width for the secondary content entry toolbar buttons. | ContentEntry | border |
| Footer Bar Background | footer_background | Controls the background color and image for the footer bar. | Footer | background |
| Footer Copyright Text Color | footer_copyright_text_color | Controls the text color for the footer copyright text. | Footer | color |
| Footer Font Style | footer_font_style | Controls the font family, size, and style for the footer. | Footer | font |
| Footer List Item Color | footer_list_item_color | Controls the text color for the footer links. | Footer | color |
| Footer List Item Divider Color | footer_list_item_divider_color | Controls the divider color between footer links. | Footer | color |
| Form Background | form_background | Controls the background color and image for forms. | FormElements | background |
| Form Border | form_border | Controls the border width, style, and color for forms. | FormElements | border |
| Form Dropdown Background | form_dropdown_background | Controls the background color and image Controls the border width, style, and color for the dropdown (select) elements in forms. | FormElements | background |
| Form Dropdown Background Hover | form_dropdown_background_hover | Controls the background color and image for the dropdown (select) elements in forms when the mouse is over them. | FormElements | background |
| Form Dropdown Border | form_dropdown_border | Controls the border width, style, and color for the dropdown (select) elements in forms. | FormElements | border |
| Form Dropdown Text Color | form_dropdown_text_color | Controls the text color for the dropdown (select) elements in forms. | FormElements | color |
| Form Dropdown Text Color Hover | form_dropdown_text_color_hover | Controls the text color for the dropdown (select) elements in forms when the mouse is over them. | FormElements | color |
| Form Field Background | form_field_background | Controls the background color and image for form fields. | FormElements | background |
| Filter Field Border | form_field_border | Controls the border width, style, and color for the input fields in forms. | FormElements | border |
| Form Field Text Color | form_field_text_color | Controls the text color in form fields. | FormElements | color |
| Announcement Background | announcement_background | Controls the background color and image of announcements within the topic list on forum display. | Global | background |
| Announcement Border | announcement_border | Controls the border color, style, and width of announcements within the topic list on forum display. | Global | border |
| Announcement Text Color | announcement_text_color | Controls the text color for announcements within the topic list on forum display. | Global | color |
| Autosuggest Background | autosuggest_background | Controls the background color and image for the global autosuggest dropdown menu. | Global | background |
| Body Background | body_background | Controls the background color and image of the content frame's background. | Global | background |
| Body Font | body_font | Controls the base font family, style, and line height for text. | Global | font |
| Body Line Height | body_line_height | Controls the base line height for text. | Global | size |
| Body Link Color | body_link_color | Controls the text color for links. | Global | color |
| Body Link Color Hover | body_link_color_hover | Controls the text color for links when the mouse is over them. | Global | color |
| Body Link Decoration | body_link_decoration | Controls the text decoration for links. | Global | textdecoration |
| Body Link Decoration Hover | body_link_decoration_hover | Controls the text decoration for links when the mouse is over them. | Global | textdecoration |
| Body Text Color | body_text_color | Controls the general default text color for the site. | Global | color |
| Content Entry box header text color | content_entry_box_header_text_color | Controls the text color of the content entry box header | Global | color |
| Notice Background | notice_background | Controls the background color and image for notices. | Global | background |
| Notice Border | notice_border | Controls the border width, style, and color for notices. | Global | border |
| Notice Text Color | notice_text_color | Controls the text color for notices. | Global | color |
| "Previous" button border color | pagination_nextprev_divider_left_color | Controls the border color for "previous" navigation button | Global | color |
| "Next" button border color | pagination_nextprev_divider_right_color | Controls the border color for "next" navigation button | Global | color |
| Placeholder Text Color | placeholder_text_color | Controls the text color for the placeholder text in form inputs and text areas. | Global | color |
| Wrapper Background | wrapper_background | Controls the background color and image for the content wrapper (everything between the header and the footer). | Global | background |
| Wrapper Max Width | wrapper_max_width | Controls the maximum width for the site, including the header and footer. | Global | size |
| Wrapper Min Width | wrapper_min_width | Controls the minimum width for the site, including the header and footer. | Global | size |
| Wrapper Width | wrapper_width | Controls the width for the site, including the header and footer. | Global | size |
| Header Background | header_background | Controls the background color and image for the header area. | Header | background |
| Header Search Button Background | header_search_button_background | Controls the background color and image for the search button in the header. | Header | background |
| Header Search Button Border | header_search_button_border | Controls the border width, style, and color for search button in the header. | Header | border |
| Header Search Button Text Color | header_search_button_text_color | Controls the text color for the search button in the header. | Header | color |
| Header Search Input Background | header_search_input_background | Controls the background color and image for the search box in the header. | Header | background |
| Header Search Input Border | header_search_input_border | Controls the border width, style, and color for search box in the header. | Header | border |
| Header Search Input Text Color | header_search_input_text_color | Controls the text color for the search box in the header. | Header | color |
| Header Search Placeholder Text Color | header_search_placeholder_text_color | Controls the text color for the placeholder text in the search box in the header | Header | color |
| Header Subtabbar Background | header_subtabbar_background | Controls the background color and image for the sub navigation links under the tabs in the header area. | Header | background |
| Header Subtabbar Border | header_subtabbar_border | Controls the border width, style, and color for the sub navigation links under the tabs in the header area. | Header | border |
| Header Subtabbar Text Color | header_subtabbar_text_color | Controls the text color for the links under the tabs in the header area. | Header | color |
| Header Subtabbar Text Color Hover | header_subtabbar_text_color_hover | Controls the text color for the links under the tabs in the header area when the mouse is over them. | Header | color |
| Header Tab Background Active | header_tab_background_active | Controls the background color and image for the navigation tabs in the header area, for the currently selected tab. | Header | background |
| Header Tab Background | header_tab_background | Controls the background color and image for the navigation tabs in the header area. | Header | background |
| Header Tab Background Hover | header_tab_background_hover | Controls the background color for the navigation tabs in the header area when the mouse is over them. | Header | background |
| Header Tab Border Active | header_tab_border_active | Controls the border width, style, and color for the currently selected tab in the navigation tabs in the header. | Header | border |
| Header Tab Text Color Active | header_tab_text_color_active | Controls the text color for a header navigation tab, when it is currently selected. | Header | color |
| Header Tab Text Color | header_tab_text_color | Controls the text color for the navigation tabs in the header area. | Header | color |
| Header Tab Text Color Hover | header_tab_text_color_hover | Controls the text color for header navigation tabs when the mouse is over them. | Header | color |
| Header Tabbar Background | header_tabbar_background | Controls the background color and image for the navigation tabs area in the header. | Header | background |
| Header Tabbar Border | header_tabbar_border | Controls the border width, style, and color for the header tabbar. | Header | border |
| Header Text Color | header_text_color | Controls the text color for any text in the header. | Header | color |
| Favicon File Path | favicon | This stylevar controls the file path of the favicon. The favicon is the small image displayed in the browser address bar and near browser page title. | ImagePaths | url |
| imgdir_attach | ImagePaths | imagedir | ||
| Button Image Directory | imgdir_button | ImagePaths | imagedir | |
| Misc Images Directory | imgdir_misc | ImagePaths | imagedir | |
| Item Status Icon Folder | imgdir_statusicon | ImagePaths | imagedir | |
| Title Image | titleimage | This is your logo or title image. Set to the path of the logo you want to use. | ImagePaths | url |
| Photo Background | photo_background | Controls the background color and image for photos. | Images | background |
| Photo Border | photo_border | Controls the border width, style, and color for photos. | Images | border |
| Photo Border Hover | photo_border_hover | Controls the border width, style, and color for photos when the mouse is over them. | Images | border |
| Photo Preview Background | photo_preview_background | Controls the background color and image for the photo preview area. | Images | background |
| Photo Preview Border | photo_preview_border | Controls the border width, style, and color for the photo preview area. | Images | border |
| slideshow_image_background | Images | background | ||
| Post Editor History Added Text Background | diff_add_background | This stylevar controls the background of added text in the post edit history. | Miscellaneous | background |
| Post Editor History Added Text Color | diff_add_color | This stylevar controls the text color of added text in the post edit history. | Miscellaneous | color |
| Post Editor History Removed Text Background | diff_remove_background | This stylevar controls the background of removed text in the post edit history. | Miscellaneous | background |
| Post Editor History Removed Text Color | diff_remove_color | This stylevar controls the text color of removed text in the post edit history. | Miscellaneous | color |
| List item background | list_item_background | Miscellaneous | background | |
| Sticky topic background color | sticky_topic_background_color | Controls the background color of sticky topics | Miscellaneous | color |
| Tooltip signature background | tooltip_signature_background | Controls the background of the signature tooltip | Miscellaneous | background |
| Tooltip Signature Border | tooltip_signature_border | Controls the border width, style, and color for signature tooltips. | Miscellaneous | border |
| Topic Title Color | topic_title_color | Miscellaneous | color | |
| content_divider_color | Miscellaneous | color | ||
| private_messages_mark_as_unread_background | Miscellaneous | background | ||
| search_result_highlight_color | Miscellaneous | color | ||
| section_divider_color | Miscellaneous | color | ||
| time_stamp_color | Miscellaneous | color | ||
| Module Content Background | module_content_background | Controls the background color and image for module content areas. | Modules | background |
| Module Content Border | module_content_border | Controls the border width, style, and color for the content area of modules. | Modules | border |
| Module Header Background | module_header_background | Controls the background color and image for module headers. | Modules | background |
| Module Header Border | module_header_border | Controls the border width, style, and color for module headers. | Modules | border |
| Module Header Font | module_header_font | Controls the font for module headers. | Modules | font |
| Module Header Text Color | module_header_text_color | Controls the text color for module headers. | Modules | color |
| Search module item border | module_search_list_item_border | Defines the border of the items inside the search module | Modules | border |
| No Content Background | no_content_background | Controls the background color and image for the &quot;no content&quot; message in modules. | Modules | background |
| Primary Module Background | primary_module_background | Controls the background color and image for the primary modules. | Modules | background |
| Primary Module Border | primary_module_border | Controls the border width, style, and color for the primary module. | Modules | border |
| Primary Module Header Background | primary_module_header_background | Controls the background color and image for primary module headers. | Modules | background |
| Primary Module Header Font | primary_module_header_font | Controls the font for primary module headers. | Modules | font |
| Primary Module Header Text Color | primary_module_header_text_color | Controls the text color for primary module headers. | Modules | color |
| Primary Module Subheader Background | primary_module_subheader_background | Controls the background color and image for primary module subheaders. | Modules | background |
| Primary Module Subheader Border | primary_module_subheader_border | Controls the border width, style, and color for primary module subheaders. | Modules | border |
| Primary Module Subheader Text Color | primary_module_subheader_text_color | Controls the text color for primary module subheaders. | Modules | color |
| Module Tab Background Active | module_tab_background_active | Controls the background color and image for the currently selected module tab. | ModuleTabs | background |
| Module Tab Background | module_tab_background | Controls the background color and image for module tabs. | ModuleTabs | background |
| Module Tab Border Active | module_tab_border_active | Controls the border width, style, and color for the currently selected tab in modules. | ModuleTabs | border |
| Module Tab Border | module_tab_border | Controls the border width, style, and color for tabs in modules. | ModuleTabs | border |
| Module Tab Font | module_tab_font | Controls the font family, size, and style for module tabs. | ModuleTabs | font |
| Module Tab Text Color Active | module_tab_text_color_active | Controls the text color for the currently selected module tab. | ModuleTabs | color |
| Module Tab Text Color | module_tab_text_color | Controls the text color for inactive module tabs. | ModuleTabs | color |
| Module Tab Text Color Hover | module_tab_text_color_hover | Controls the text color for inactive module tabs when the mouse is over them. | ModuleTabs | color |
| Poll Result Border | poll_result_border | Controls the border width, style, and color for poll result bars. | Polls | border |
| Poll result percentage background | poll_result_percentage_background | Controls the background of the percentage number in poll results | Polls | background |
| Poll results vote count text | poll_result_vote_count_text | Controls the colour of the text displaying the vote count | Polls | color |
| poll_result_color_01 | Polls | color | ||
| poll_result_color_02 | Polls | color | ||
| poll_result_color_03 | Polls | color | ||
| poll_result_color_04 | Polls | color | ||
| poll_result_color_05 | Polls | color | ||
| poll_result_color_06 | Polls | color | ||
| poll_result_color_07 | Polls | color | ||
| poll_result_color_08 | Polls | color | ||
| poll_result_color_09 | Polls | color | ||
| poll_result_color_10 | Polls | color | ||
| poll_result_color_11 | Polls | color | ||
| poll_result_color_12 | Polls | color | ||
| Popup Background | popup_background | Controls the background color and image for popups. | Popups | background |
| Popup Border | popup_border | Controls the border width, style, and color for popups. | Popups | border |
| Popup Header Background | popup_header_background | Controls the background color and image of popup headers. | Popups | background |
| Popup Header Text Color | popup_header_text_color | Controls the text color of popup headers. | Popups | color |
| Popup Overlay Background | popup_overlay_background | Controls the background color and image for the overlay behind popups. | Popups | background |
| Activity Stream Avatar Border | activity_stream_avatar_border | Controls the border width, style, and color for avatars in the activity stream. | PostsRepliesAndComments | border |
| Comment Background | comment_background | Controls the background color and image for comments. | PostsRepliesAndComments | background |
| Comment Divider Color | comment_divider_color | Controls the color for the divider between comments. | PostsRepliesAndComments | color |
| Post Border | post_border | Controls the border width, style, and color for the content area of posts. | PostsRepliesAndComments | border |
| Post Controls Votes Border | post_controls_votes_border | Controls the border width, style, and color for votes in the post controls area. | PostsRepliesAndComments | border |
| Post Deleted Border | post_deleted_border | Controls the border width, style, and color for the deleted message that shows for deleted posts. | PostsRepliesAndComments | border |
| Postbit Background | postbit_background | Controls the background color and image for the user information area of posts. | PostsRepliesAndComments | background |
| postbit_deleted_background | PostsRepliesAndComments | background | ||
| Postbit Unapproved Background | postbit_unapproved_background | The background color to show for unapproved posts | PostsRepliesAndComments | background |
| Thread View Avatar Border | thread_view_avatar_border | Controls the border width, style, and color for avatars in thread view. | PostsRepliesAndComments | border |
| post_controls_divider_color | PostsRepliesAndComments | color | ||
| post_controls_quote_active_text_color | PostsRepliesAndComments | color | ||
| post_controls_text_color | PostsRepliesAndComments | color | ||
| post_rating_color | PostsRepliesAndComments | color | ||
| post_username_color | PostsRepliesAndComments | color | ||
| post_user_info_color | PostsRepliesAndComments | color | ||
| thread_reply_background | PostsRepliesAndComments | background | ||
| thread_starter_background | PostsRepliesAndComments | background | ||
| profcustom_navbar_background_active | Profiles | background | ||
| profcustom_navbar_background | Profiles | background | ||
| profcustom_navbar_border_active | Profiles | border | ||
| profcustom_navbar_border | Profiles | border | ||
| profcustom_navbar_text_color_active | Profiles | color | ||
| profcustom_navbar_text_color | Profiles | color | ||
| profcustom_navbar_toolbar_text_color | Profiles | color | ||
| Profile Navbar Button Background | profcustom_navbarbutton_background | Profiles | background | |
| Profile Navbar Button Border | profcustom_navbarbutton_border | Profiles | color | |
| Profile Navbar Button Text Color | profcustom_navbarbutton_color | Profiles | color | |
| Profile Navbar Secondary Button Background | profcustom_navbarbuttonsecondary_background | Profiles | background | |
| Profile Navbar Secondary Button Border | profcustom_navbarbuttonsecondary_border | Profiles | color | |
| Profile Navbar Secondary Button Text Color | profcustom_navbarbuttonsecondary_color | Profiles | color | |
| Profile Button Primary Background | profile_button_primary_background | Background for button in profile content area | Profiles | background |
| Profile Secondary Button Background | profile_button_secondary_background | Background for button in profile content area | Profiles | background |
| Profile Content Background | profile_content_background | Profiles | background | |
| Profile Content Border Color | profile_content_border | Profiles | color | |
| Profile Content Link Text Color | profile_content_linktext | Profiles | color | |
| Profile Content Primary Text Color | profile_content_primarytext | Profiles | color | |
| Profile Content Secondary Text Color | profile_content_secondarytext | Profiles | color | |
| Profile section border | profile_section_border | Profiles | border | |
| User settings tab highlight | profile_settings_tab_highlight | Controls the border width, style, and color for the tabs in the user settings. | Profiles | border |
| Profile Userpanel Font | profile_userpanel_font | Controls the font face, size, and style for the profile user panel. | Profiles | font |
| Profile User Panel Text Color | profile_userpanel_textcolor | Profiles | color | |
| Profile Sidebar Button Background | profilesidebar_button_background | Profiles | background | |
| Profile Sidebar Button Border Color | profilesidebar_button_border | Profiles | border | |
| Profile Sidebar Button Text Color | profilesidebar_button_text_color | FFFFFF | Profiles | color |
| Profile Sidebar Count Text Color | profilesidebar_count_text_color | Profiles | color | |
| profile_content_divider_border | Profiles | color | ||
| profile_content_font | Profiles | font | ||
| profile_section_background | Profiles | background | ||
| profile_section_font | Profiles | font | ||
| profile_section_text_color | Profiles | color | ||
| profile_userpanel_linkcolor | Profiles | color | ||
| Side Nav Background Active | side_nav_background_active | Controls the background color and image for the currently selected item in the sidebar navigation area. | SidebarNavigation | background |
| Side Nav Background | side_nav_background | Controls the background color and image for the sidebar navigation area. | SidebarNavigation | background |
| Side Nav Background Hover | side_nav_background_hover | Controls the background color and image for the sidebar navigation area when the mouse is over it. | SidebarNavigation | background |
| Side Nav Border | side_nav_border | Controls the border width, style, and color for the sidebar navigation area. | SidebarNavigation | border |
| Side Nav Item Border Bottom | side_nav_item_border_bottom | Controls the border width, style, and color for the bottom of each sidebar navigation item. | SidebarNavigation | border |
| Side Nav Item Border Top | side_nav_item_border_top | Controls the border width, style, and color for the top of each sidebar navigation item. | SidebarNavigation | border |
| Side Nav Text Color Active | side_nav_text_color_active | Controls the text color for currently selected sidebar navigation items. | SidebarNavigation | color |
| Side Nav Text Color | side_nav_text_color | Controls the text color for sidebar navigation items. | SidebarNavigation | color |
| Side Nav Text Color Hover | side_nav_text_color_hover | Controls the text color for sidebar navigation items when the mouse is over them. | SidebarNavigation | color |
| side_nav_avatar_border | SidebarNavigation | color | ||
| side_nav_number_messages_color | SidebarNavigation | color | ||
| Inline edit button border | inline_edit_button_border | Sitebuilder | border | |
| Inline edit field border | inline_edit_field_border | Sitebuilder | border | |
| inline_edit_module_title_text_color | Sitebuilder | color | ||
| inline_edit_background | Sitebuilder | background | ||
| inline_edit_button_disabled_text_color | Sitebuilder | color | ||
| inline_edit_button_divider_left_color | Sitebuilder | color | ||
| inline_edit_button_divider_right_color | Sitebuilder | color | ||
| inline_edit_button_flat_text_color | Sitebuilder | color | ||
| inline_edit_button_primary_text_color | Sitebuilder | color | ||
| inline_edit_button_secondary_text_color | Sitebuilder | color | ||
| inline_edit_folder_active_color | Sitebuilder | color | ||
| inline_edit_folder_inner_highlight_color | Sitebuilder | color | ||
| inline_edit_folder_text_color_active_hover | Sitebuilder | color | ||
| inline_edit_form_text_color | Sitebuilder | color | ||
| inline_edit_header_body_text_color | Sitebuilder | color | ||
| inline_edit_header_line_bottom_color | Sitebuilder | color | ||
| inline_edit_header_line_top_color | Sitebuilder | color | ||
| inline_edit_popup_comment_line_color | Sitebuilder | color | ||
| inline_edit_search_bar_background | Sitebuilder | background | ||
| inline_edit_search_bar_background_active | Sitebuilder | background | ||
| inline_edit_search_bar_background_hover | Sitebuilder | background | ||
| inline_edit_search_bar_text_color | Sitebuilder | color | ||
| inline_edit_search_text_active_color | Sitebuilder | color | ||
| inline_edit_subheader_text_color | Sitebuilder | color | ||
| Main Navigation Admin Bar Background | main_nav_admin_bar_background | Controls the background color and image for the main navigation admin bar. | SitebuilderNavigation | background |
| Main Navigation Admin Bar Text Color | main_nav_admin_bar_text_color | Controls the text color for the sitebuilder admin navigation bar. | SitebuilderNavigation | color |
| Main Navigation Admin Bar Text Color (Hover) | main_nav_admin_bar_text_color_hover | Controls the text color for the sitebuilder admin navigation bar when mouse pointer is over them. | SitebuilderNavigation | color |
| Main Navigation Admin Bar Text Color (Disabled) | main_nav_admin_bar_text_disabled_color | Controls the text color for the sitebuilder admin navigation bar for disabled elements. | SitebuilderNavigation | color |
| Main Nav Button Border | main_nav_button_border | Controls the border width, style, and color for the buttons in the sitebuilder admin navigation bar. | SitebuilderNavigation | border |
| main_nav_admin_bar_divider_left_color | SitebuilderNavigation | color | ||
| main_nav_admin_bar_divider_right_color | SitebuilderNavigation | color | ||
| main_nav_login_error_field_background | SitebuilderNavigation | background | ||
| main_nav_login_error_text_color | SitebuilderNavigation | color | ||
| Large Margin Helper | spacing_margin_l | Sets margin spacing for large margin helper css class. | Spacing | margin |
| Medium Margin Helper | spacing_margin_m | Sets margin spacing for medium margin helper css class. | Spacing | margin |
| Small Margin Helper | spacing_margin_s | Sets margin spacing for small margin helper css class. | Spacing | margin |
| Extra Large Margin Helper | spacing_margin_xl | Sets margin spacing for extra large margin helper css class. | Spacing | margin |
| Extra Small Margin Helper | spacing_margin_xs | Sets margin spacing for extra small margin helper css class. | Spacing | margin |
| XXL Margin Helper | spacing_margin_xxl | Sets margin spacing for extra extra large margin helper css class. | Spacing | margin |
| Large Padding Helper | spacing_padding_l | Sets padding spacing for large padding helper css class. | Spacing | padding |
| Medium Padding Helper | spacing_padding_m | Sets padding spacing for medium padding helper css class. | Spacing | padding |
| Small Padding Helper | spacing_padding_s | Sets padding spacing for small padding helper css class. | Spacing | padding |
| Extra Large Padding Helper | spacing_padding_xl | Sets padding spacing for extra large padding helper css class. | Spacing | padding |
| Extra Small Padding Helper | spacing_padding_xs | Sets padding spacing for extra small padding helper css class. | Spacing | padding |
| XXL Padding Helper | spacing_padding_xxl | Sets padding spacing for extra extra large padding helper css class. | Spacing | padding |
| Toolbar Background | toolbar_background | Controls the background color and image for toolbars. | Toolbar | background |
| Toolbar Border | toolbar_border | Controls the border width, style, and color for toolbars. | Toolbar | border |
| Toolbar Button Border | toolbar_button_border | Controls the border width, style, and color for the buttons in toolbars. | Toolbar | border |
| Toolbar Dropdown Background Gradient End | toolbar_dropdown_background_gradient_end | Controls the gradient end background color in toolbar dropdown menus. | Toolbar | background |
| Toolbar Dropdown Background Gradient Start | toolbar_dropdown_background_gradient_start | Controls the gradient start background color in toolbar dropdown menus. | Toolbar | background |
| Toolbar Dropdown Border | toolbar_dropdown_border | Controls the border width, style, and color for the dropdown menus in toolbars. | Toolbar | border |
| Toolbar Dropdown Divider Color | toolbar_dropdown_divider_color | Controls the divider color in the dropdown menus in toolbars. | Toolbar | color |
| Toolbar Dropdown Text Color Active | toolbar_dropdown_text_color_active | Controls the text color for text in currently selected menu items in toolbars. | Toolbar | color |
| Toolbar Dropdown Text Color | toolbar_dropdown_text_color | Controls the text color for the dropdown menus in toolbars. | Toolbar | color |
| Toolbar Form Field Background | toolbar_form_field_background | Controls the background color and image for the form fields in toolbars. | Toolbar | background |
| Toolbar Form Field Border | toolbar_form_field_border | Controls the border width, style, and color for the form fields in toolbars. | Toolbar | border |
| Toolbar Form Field Placeholder Text Color | toolbar_form_field_placeholder_text_color | Controls the text color for the placeholder text in the form fields in toolbars. | Toolbar | color |
| Toolbar Text Color | toolbar_text_color | Controls the text color for text in toolbars. | Toolbar | color |
Style Inheritance |
Like so many other systems in vBulletin, the vBulletin Styles system works around the concept of inheritance.
In implementing styles, “inheritance” means that you can create an unlimited number of styles in which your site can be viewed, and customizations made in one style are inherited by all of its child styles.
Topics in this section elaborate on the concept of inheritance with regard to the functionality of the Style Manager.
Inheritance Example |
The concept of inheritance as it applies to styles in vBulletin is best illustrated with an example of a common use for the system: customizing the look and feel of a site. You accomplish this by editing the colors used by vBulletin, and by editing the header and footer templates.
Assume that you want to customize your header and footer templates, but you also want to offer a choice of three possible color schemes to your users: we’ll call these the Red, Green, and Blue schemes.
You could create three new styles (Red, Green, and Blue) and customize the header and footer templates in each style. That is a valid solution, but has one serious disadvantage: if you decide you want to alter the HTML in the customized header template, you will need to edit the template in each of the three styles individually.
<<<Insert a screenshot of the initial page of the Style Manager with Red, Green, and Blue styles checked.>>>
A more manageable solution would involve creating a single new style, called something like “Custom Header / Footer” and setting up the customizations that apply to all three styles in that file.
<<<Insert a screenshot of the initial page of the Style Manager with the Red, Green, and Blue styles removed, and a style called Custom Header / Footer inserted (and checked) in their place.>>>
Then to offer the three color variants, you would create three more styles (Red, Green, and Blue) as child styles of the Custom Header / Footer style.
<<<Insert a screenshot of the initial page of the Style Manager with the Red, Green, and Blue styles re-inserted as child styles of Custom Header / Footer.>>>
Each of these child styles inherits the customized header and footer templates from the Custom Header / Footer parent style, so you do not need to edit that template in the child styles. If you choose to change the HTML of either the header or footer templates at some point in the future, you need only to edit those templates in the parent style: the changes are automatically inherited by the three child styles.
This is a simple example, involving only the site color scheme and the header and footer templates. However, vBulletin allows you to create much more elaborate customizations that individually customize every template and every CSS attribute of a style. Each of those customized attributes can be inherited by all child styles.
Replacement Variables |
Note:
To learn more about Replacement Variables, please read the Replacement Variables Introduction
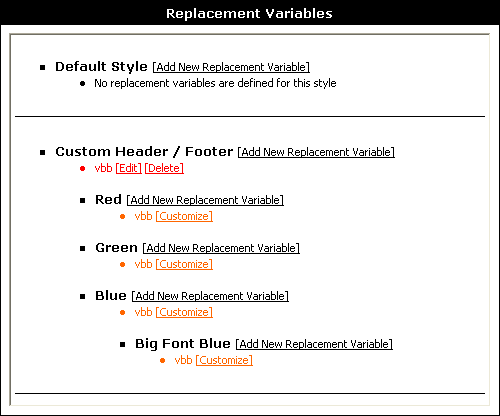
The Style Manager |
The Style Manager is the facility to use to create and edit vBulletin styles, which control the way your vBulletin installation appears to your visitors. Styles include color and font changes, as well as template changes that alter the layout of the site.
To see examples of customized vBulletin sites with modified styles, go to https://www.vBulletin.com/links.php.
To see examples of vBulletin style and template modifications, go to https://www.vBulletin.org/forum/.

Following are a list and descriptions of the various controls (left to right) on the initial screen of the Style Manager.
Allow User Selection Checkbox
Whether or not the style is available for non-administrators to use. If the checkbox for a style is cleared, only administrators are able to use that style.
Style Title Hyperlink
Click to open a new window that shows the public area of your site with the active style applied, even if general users are not able to use that particular style. <<<Because they don’t have the right set of permissions, or their device/monitor don’t support it, or..?>>>
Display Order Text Box
The number in the small text box in the middle of the screen specifies the display order of a style. Higher numbers are displayed later in the listing. The number makes no difference to the content of the style and is used solely for display order convenience.
Style Options Menu
This selection menu contains links to pages where you can make changes to the style, for example to change the style’s title or download the style as a style.xml file.
Expand/Collapse Templates List Button (<< >>)
Click this button to open or close the list of templates for the selected style.
Creating New Styles |
Clicking Add New Style brings up the Add New Style page.

Note:
You must click Save for changes to take effect. After you have saved your new style, you are returned to the home page of the Style Manager, where the name of your new style is shown.
Choose the existing style that will provide the set of attributes that your new style will inherit.
For more information about vBulletin inheritance, see Style Inheritance.
Title
Enter the title of your new style.
Allow User Selection
Whether or not site users can themselves choose to view the site using this style.
Display Order
Enter a whole number to indicate this style’s rank order in lists of styles. Low numbers are displayed further up the list than high numbers.
Creating Child Styles |
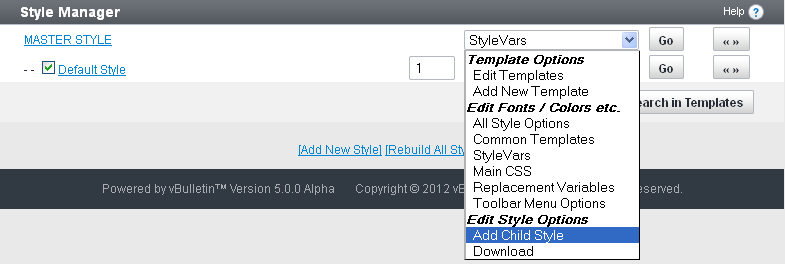
The Add New Style page of the Style Manager opens.
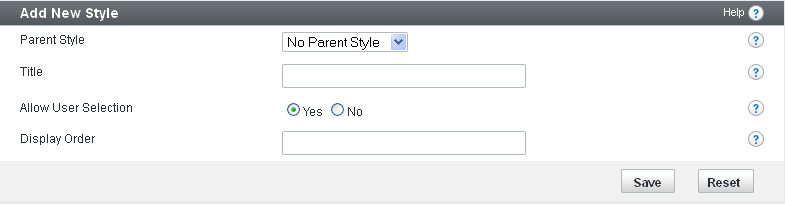
Notice that the correct parent style is already selected in the form.
Fill out the form as described in Creating New Styles.
Note:
You must click Save for changes to take effect.
For more information about style inheritance, see the Style Inheritance article.
Replacement Variables |
One use for replacement variables is to correct common spelling mistakes. For example, on the vBulletin Community Forums a replacement variable exists to replace all instances of the incorrect abbreviation for vBulletin “VBB” with the correct abbreviation “vB”.
Replacement variables can be used to insert commonly-used blocks of HTML.
For example, a replacement variable could be set up to replace <tablestart> with <table class="tborder" cellpadding="6" cellspacing="1" border="0" width="100%" align="center">.
As another example, your templates could contain blocks of code like this:
<tablestart>
<tr>
    <td class="alt1">Cell contents...</td>
</tr>
</table>
<table class="tborder" cellpadding="6" cellspacing="1" border="0" width="100%" align="center">
<tr>
    <td class="alt1">Cell contents...</td>
</tr>
</table>
The replacement variable system is activated in the last stages of page processing before the HTML is delivered to a visitor's browser. The system searches for target text in the completed, parsed templates.
Warning:
Replacement can be useful, but replacement variables can break the functionality of your site if used incorrectly.
Worse still, if you create a replacement variable to turn every instance of the word home into a hyperlink pointing to your home page: <a href="home.html">home</a>.
You might have the situation where the word 'home' is used in locations where creating a hyperlink would cause invalid HTML, such as the following:
<img src="home.gif" alt="" />
...which would end up being delivered to the browser as the following:
<img src="<a href="home.html">home</a>.gif" alt="" />
...which is invalid HTML and will not function correctly.
Replacement Variable Manager |
Note:
To learn more about Replacement Variables, please read the Replacement Variables Introduction
<<<screenshot of Replacement Variable Manager>>>
Refer to the Color Key at the top of the Replacement Variable Manager page to see how colors are used to indicate whether a replacement variable is customized in a particular style, or inherited from a parent style.
Add New Replacement Variable |
On the Add New Replacement Variable page, you will find a form in which you can specify the style to which you want to add a new replacement variable, along with two text fields.
<<< Need Updated Screenshot >>>
The first text field is for the text you want the replacement variable to find, and the second field should contain the text with which to replace the find text.
Note:
The find text is not case sensitive, meaning that dog will match DOG, DoG, dOG etc.
<<need updated Screenshot>>>
Customizing a Replacement Variable |
To customize a replacement variable, simply click the [Customize] link next to any replacement variable on the main page.
This will load the Replacement Variable Customization form, which looks almost identical to the Add New Replacement Variable interface, and works in exactly the same way.
<<need updated Screenshot>>>
After making your changes, the new value will be automatically inherited by any child styles.
Download / Upload Styles |
Downloading styles is handy when you want to make a backup of your templates and options, or share your work with other forum administrators.
Uploading styles is handy to revert to a backup or applying the same style to several boards. You can use this option to import a style that someone has given you.
Make sure you read and understand all the options to avoid incomplete style downloads / uploads.
Note:
When you upload or download a style, the process will not transfer any image files. Your image files should be managed with an FTP client.
Downloading a Style |
Both of these actions are catered for by the Style Download system, which allows you to download all the customized StyleVars, CSS, Replacement Variables and Templates into a single XML file which can be imported to any other site running the same version as it was created in.
Note:
While the style downloaded will be compatible with the version it was created in, it may also work on other versions of vBulletin depending on the level of customisation and changes made to the software between versions. Issues caused by styles created in different versions of vBulletin to that the style is being imported to won’t be officially supported.
The Style Download form is relatively simple, with only a few controls to manipulate.
- Style
Use this menu to pick the style you want to download - Product
Select the vBulletin product for which you want to download. If you have additional products installed via add-ons, you should use this option to download any specific style changes for that add-on. - Title
By default, the downloaded XML file will contain the title of the style as it exists on your web server. If you would like the XML file to store a different name for the style you are downloading, enter it here. - Filename
This field allows you to specify the name of the XML file vBulletin will send to your web browser when you click the [Download] button. Note that most browsers allow you to rename a file as you download it, so you can leave this as it is. - Options
The options give you a choice of two types of style download.
If you choose to Get customizations made only in this style, then the style XML file you download will contain only items that are customized specifically in the style you are downloading. Items that are inherited from parent styles will not be included.
On the other hand, if you choose to Get customizations made in this style and all parent styles, the style XML file will contain not only items customized specifically in the style you are downloading, but also any items that have been customized in a parent style.
Note:
The XML file you download can not contain any image files. If your style includes custom images, you should download these separately using an FTP client.
Uploading a Style |
This system will read an XML file, convert the data inside it into StyleVars, CSS, Replacement Variables and Templates and write the data into your database.
***SCREENSHOT OF UPLOAD OPTIONS PAGE***
The Style Download form is relatively simple, with the following controls:
- Either Upload XML File from your computer
If the XML style file you want to import is located on your own computer, press the ‘Browse’ button and use the popup navigator to find the file and upload it. - Or Import XML file from your server
If the XML style file you want to import is located on your web server, enter the file path to the file here. This should be the path relative to the directory where vBulletin is installed. - Merge Into Style
If you are restoring a style backup, you will probably want to import the XML file over the top of the style of which it is a backup. To do this, select the style you want to merge into from the list provided. If no style is chosen from the list, a new style will be created and the data in the XML file will be imported into this new style. - Ignore Style Version
When a style file is downloaded from vBulletin, the version number of the vBulletin exporting the file is included. If the version number included in the style file you are importing does not match the version number of the vBulletin doing the import a warning will be shown to alert you to possible incompatibilities. If you are confident that no errors will occur as a result of importing a style from a different version of vBulletin, use this control to force vBulletin to accept the file regardless of the stored version number. - Title for Uploaded Style
If you chose to create a new style rather than overwrite an existing style, vBulletin will use the style title included in the XML file as the title for the new style unless you specify an alternative title using this control. - Parent Style
When importing a style as a new style, this allows you to set whether the newly imported style should be a parent style or the child of another style. Select the option you wish from the dropdown. - Display Order
This text box expects you to enter a whole number (0, 15, 99, 1007 etc) to affect the position at which this style will appear in any style lists. It corresponds to the display order text box on the main Style Manager interface. - Title for Uploaded Style
This Yes/No choice corresponds to the checkbox next to each style on the main Style Manager interface, and affects whether or not your visitors will be able to use this style to view the board.
Note:
XML style files can not contain image files, so no images will be imported when using this system. If the style you are importing requires special images, you will need to upload them to your web server using an FTP client.
Languages and Phrases |
This enables you to create (or download) versions of the user interface translated into multiple languages other than US English, so you can globalize and localize your site.
An Introduction to Languages and Phrases |
Each phrase (for example, “password” or “one hour ago”) can have a translation for every language specified in this Language Manager. When a channel page is loaded, vBulletin checks what language the current logged-in user has selected, looks up the phrase variables in that language, and replaces them with the appropriate translated text.
In addition to translated phrases, vBulletin's language system supports translated images (by allowing you to override a style's images folder setting), and language-specific date/time/number formats.
The topics in this section cover what you need to know to localize your vBulletin site.
Languages vs. Phrases |
The 'Master Language' and 'Custom Master Language' |
The Master Language is where all of vBulletin’s untranslated, default phrases exist. It is important to have the original version of all phrases available for reference purposes. You cannot directly edit these language phrases.
The Custom Master Language contains only custom phrases you have created, which can be accessed as if they were part of the Master Language.
Phrase Syntax |
For example, the phrase variable show_all_users is stored as Show All Users, and additional_options is stored as Additional Options.
Sometimes the strings contain substitution variables that are not replaced with specific values until runtime.
For example, the phrase variable showing_avatars_x_to_y_of_z is stored as the following string with substitution variables {1}, {2}, and {3}:
Showing Avatars {1} to {2} of {3}
Showing Avatars 10 to 20 of 24.
Suppose you wanted the output string to look like the following:
24 Avatars Total. Displaying 10 - 20.
You could accomplish that by changing the string to the following:
{3} Avatars Total. Displaying {1} - {2}.
Using Phrases in Templates |
When referencing a phrase in a template, you need to know the following information:
The phrase name (phrase_name)
The phrase name is what uniquely identifies a phrase and how phrases are referenced. Generally, the phrase name reflects the phrase text directly; for example, the phrase with variable name poll_timeout has the text of Poll Timeout.
The phrase group
If the phrase is in a group, you can access it only on pages that load that group.
To use a phrase in a template, you need to use the following constructs.
phrase
{vb:phrase phrase_name[, arguments for phrase...]}Example:
{vb:phrase welcome}{vb:rawphrase phrase_name[, arguments for phrase...]}Example:
{vb:rawphrase message_by_x_on_y_at_z, {vb:link member, {vb:raw postinfo}}, {vb:raw postinfo.username}, {vb:raw postinfo.postdate}, {vb:raw postinfo.posttime}}
Managing Languages |
<<<Insert screenshot of Language Manager screen.>>>
This screen lists all languages you have installed. Next to each language is a link for phrase-editing, as well as links to modify the language settings and download the language as an XML file.
Clicking on Edit / Translate allows you to edit the translation for phrases.
Edit Settings allows you to edit the settings of the language.
Delete removes the language from your vBulletin site.
Download lets you download a language set as an XML file, which consists of all phrases you have translated for that language. You can distribute this to other vBulletin owners.
The Set Default button allows you to set a language as the default for your site. The default language is shown to registered users who did not select a language at registration, and to unregistered users or those who are not logged in.
After the language list section there are links that let you search for phrases, view a language quickref, or rebuild all languages.
At the bottom of the screen are buttons to add a new language and download or upload existing language sets.
Adding and Editing A Language |
<<<Insert screenshot of the add language screen.>>>
The form to add or edit a language contains many settings that are specific to a locale. For example, some people might prefer the mm/dd/yy date format, while others prefer dd/mm/yy.
General Settings
Title
Name of the language. The title is displayed to users when they are selecting a language.
Allow User Selection (Yes/No)
Whether or not users can select the language. If this is set to No, the language is effectively disabled.
Text Direction (default: Left to Right)
Direction of the text in the language. For example, English is left to right, while Hebrew is right to left.
Language Code (default: en)
Two-character, standard abbreviation for the language (for example, fr for French)
This value does not have any effect on the displayed text, but it may be used by programs such as screen readers.
HTML Character Set (default: ISO-8859-1)
This indicates the encoding of the characters that are displayed on the page. Setting this to an incorrect value might prevent some characters from being displayed. If you are unsure what to put here, enter UTF-8, as it will likely contain the characters you need.
Image Folder Override
The path to button images, relative to the main channel directory, that contains translated text. This replaces the button images folder, which defaults to images/buttons. If you want to specify a specific button directory for each style, you can use <#>. At runtime, this replaces the ID number of the style that the user is using.
Date / Time Formatting
Date and time specification.
Settings in this group allow you to override the default date and time formatting with one that is more appropriate for your language. For example, English (US) would use the mm/dd/yy format, while English (UK) would use the dd/mm/yy format. These formats are represented by %m/%d/%y and %d/%m/%y, respectively.
Locale
You can define a locale or just specify the correct date and time formats in the settings below. Since locales are not supported on all systems, it is better to manually specify the correct date and time formats if you can.
Date Format Override
Overrides the date format specified in your vBulletin options. Leave blank to use the format that is set in your vBulletin options.
Time Format Override
Overrides the time format specified in your vBulletin options. Leave blank to use the format that is set in your vBulletin options.
Registration Date Format Override
Overrides the registration date format specified in your vBulletin options. Leave blank to use the format that is set in your vBulletin options.
Birthday Date Format Override (with year)
Overrides the birthday with year format that is specified in your vBulletin options. Leave blank to use the format that is set in your vBulletin options.
Birthday Date Format Override (without year)
This setting will override the birthday without year format that is specified in your vBulletin options. Leave blank to use the format that is set in your vBulletin options.
Log Date Format Override
Overrides the log date format specified in your vBulletin options. Leave blank to use the format that is set in your vBulletin options.
Number Formatting
Decimal Separator
Character that separates the integer and decimal parts of a number.
Use this setting to customize the way floating point (decimal) numbers are displayed for this language.
Thousands Separator
Character that separates and groups thousands in a number.
Use this setting to customize the way the thousands place is separated in large numbers for this language.
Translating a Language |
<<<Insert screenshot of Language manager edit/translate language screen.>>>
The Translate Phrases page contains a list of phrase names and values for the language. It is the first in a series of phrase group pages. The column on the left is the phrase variable name column (Varname), and on the right in the Text column are the default phrase string values (top) and the translated string values (bottom). If a phrase has not been translated yet, both values are the same.
Once you have translated a page, click the button. Any phrases that have changed will be saved and used in this language. To do a complete translation, repeat this process for every phrase group page in the language.
There are various ways you can navigate through the phrase translation pages. You can select phrase types from the pulldown list on the top of the page. You can select a page number from the pulldown list at the top, and on the bottom of each page of phrase translation are buttons that will take you to a particular page in the set of phrase translation pages. You can also use the Prev and Next buttons to move between pages. The View Quickref button displays the currently selected phrase types in a popup window.
Language Quick Reference |
<<<Insert screenshot of the Quickref popup window.>>>
On the left of the Language QuickRef popup window is a list of phrase variable names. Once you click a name, the code to use in a template appears on the right, along with the current phrase text string value.
Using the pulldown lists at the bottom of the screen you can change the language and phrase group being viewed in the window.
Rebuilding All Languages |
This process regenerates all cached language data from the database. Generally this is not necessary. However, if you have edited the language information in the database directly, you need to run this process for your changes to take effect.
Note:
Running this process, even when unnecessary, will not harm your site.
Managing Phrases |
The Phrase Manager provides a way to record and manage the values of language variables.
The values can be in US English (the default natural language) or another natural language (for example, German). As a specific example, the value of the variable 1_day_ago could be One Day Ago, or it could be Vor Einem Tag, which is the German equivalent of One Day Ago.
In the Phrase Manager, variable names are grouped by category (for example, Albums, BB Code Tools, Holidays, and Hooks System).
<<<Insert a level-setting screenshot of the Language Manager with the Holidays option selected.>>>
The default number of phrases to show per page is 15; to show more or fewer per page (for example, 10 or 20), enter the number and click Go.
To see all phrases in a given language in the selected category, click the language name in the top middle section of the screen. All variables for the selected category are shown in a popup window.
<<<Insert a screenshot of the Holidays popup window.>>>
For example, if you select Holidays as the phrase type, click the US English link to open the popup window, and select the easter variable on the left-hand side of the windows, the value of the easter variable displays on the right-hand side of the window as Easter.
Adding or Editing Phrase |
<<<Insert screenshot of phrase manager screen.>>>
To edit an existing phrase, click the Edit button to the right of it.
To delete an existing phrase, click the Delete button to the right of it.
To add a new phrase, click the Add New Phrase button. This takes you to a Phrase Manager screen where you can add the phrase.
Options
Insert into MASTER LANGUAGE (Yes/No)
Whether or not to add the phrase to the Master Language. This is a developer option.
Language
Select the language from this pulldown list.
Phrase Type
Type of this phrase. It will be loaded only by pages that load that type.
Varname
Variable name of the phrase that will be used to identify the phrase in code. You can only use a-z, A-Z, 0-9, and _ in the name.
Text
Default phrase text string. Within the string you can use {1}, {2}, etc to represent substitution variable parts of a phrase.
Note:
When editing an existing phrase, the options listed above may not be available. You must delete and re-add the phrase and translations to change these values.
Note:
To delete a translation, remove the text in the translation box.
Orphan Phrases |
Orphan phrases are phrases that exist in the database but do not have a default value in the Master Language or the Custom Master Language. This is most commonly caused by phrases becoming obsolete and being removed by an upgrade. In most cases, these phrases are no longer used. If you need to edit or delete these phrases, you need to search for orphan phrases as described above.
The Find Orphan Phrases screen looks like the following.
<<<Insert a screenshot of the Find Orphan Phrases screen.>>>
If you have no orphan phrases, you get the following message: No Phrases Matched Your Query.
If you do have orphan phrases they are listed, and you are given the option to Keep or Delete each one individually or or .
Search in Phrases |
The Search in Phrases screen looks like the following.
<<<Insert a level-setting screenshot of the Phrase manager, Search in Phrases form.>>>
Search in Phrases Options
Set the following options and click . Click to reset the options.
Search for Text
Text to look for in the search.
Search in Language
Select All Languages or an individual language by name from the picklist.
Product
Select All Products or an individual by name from the picklist.
Search Translated Phrases Only (Yes/No)
Whether or not to return only translated phrases in the search results.
Phrase Type (default: blank or all categories)
Category of phrase, for example Access Masks, Blogs, or Holidays. Blank indicates all categories.
Search in... (default: Phrase Text Only)
Scope of the search: Phrase Text Only, Phrase Variable Name Only, or Phrase Text and Phrase Variable Name.
Case-Sensitive (Yes/No)
Whether or not to take case into account in the search. For example, if this option is set to Yes, a search of the text One Day Ago returns all instances of One Day Ago but not of one day ago.
Exact Match (Yes/No)
Whether or not to return only text that matches exactly.
Find and Replace in Languages Options
Set the following options and click , which replaces all instances of the original text with the replacement text.
Click to reset the options.
Search in Language
Select the language to search.
Search for Text
Enter the text to look for.
Replace with Text
Enter the text to replace matches (“hits”) found in the search.
Downloading and Uploading Languages |
In vBulletin you can download (export) and upload (import) languages like you do styles. This capability allows you to share your translations with others or use existing translations to save you time.
The download/upload functionality is part of the Language Manager. There are two forms: Download, and Import Language XML File.
Download Options
Note:
Only translated phrases are included in a downloaded language.
Select the language you want to download from the picklist of all languages installed on your vBulletin site.
Product
Select the product from the picklist of available products.
Filename
Name of the language file. We recommend including a string representing the name of the language in the file name (for example, es or Spanish for Spanish).
Your browser will prompt you for the complete path to the location where you want to store the file.
Charset
Character set used in the language file.
Include Custom Phrases (default: Yes/No)
Whether or not to include any custom phrases you have created.
Just fetch phrases (default: Yes/No)
If this option is set to Yes, no language settings are included.
After you have set your options, click the button to download.
To reset the options, click .
Import Language XML File Options
EITHER upload the XML file from your computer
File path to the file on your computer. If you leave this blank, the Language Manager assumes that you want to import the file from your server.
OR import the XML file from your server
Enter a file name complete with a server path that is relative to your main site directory.
For example, if the name of the language file is vbulletin-language.xml and you uploaded it to the install directory inside your main site directory, then the value you would enter is ./install/vbulletin-language.xml.
Overwrite Language
If you want to overwrite an existing language with the file you are uploading, select it from the picklist. Otherwise make sure (Create New Language) is selected.
Title for Uploaded Language
Name of the language as it appears on the site. If you are overwriting a language, that language will be renamed with this title; otherwise, your new language will be named with this title.
Ignore Language Version (default: Yes/No)
Whether or not to use the language even if it was created by a different version of vBulletin.
Warning:
Language data generally changes from version to version. If you are importing a language from an older version, these differences may cause problems.
Whether or not to read the charset setting from the file header. If this option is set to No, ISO-8859-1 is used.
After you have set your options, click the button to upload.
To reset the options, click .
Data Format |
The <phrase> tags here are very different from the <phrase> tags used in templates. An example language XML file looks like the following.
<?xml version="1.0" encoding="ISO-8859-1"?>

<language name="English (US)" vbversion="3.0.0">

   <phrasetype name="GLOBAL">
       <phrase name="1_day_ago"><![CDATA[1 Day Ago]]></phrase>
       <phrase name="1_hour_ago"><![CDATA[1 Hour Ago]]></phrase>
   </phrasetype>

   <phrasetype name="Control Panel Global">
       <phrase name="access"><![CDATA[Access]]></phrase>
       <phrase name="access_masks"><![CDATA[Access Masks]]></phrase>
       <phrase name="add"><![CDATA[Add]]></phrase>
   </phrasetype>

</language>
Find Updated Phrases |
vBulletin's default phrases are sometimes updated during product upgrades. In the Phrase Manager is a screen that shows you a list of customized phrases that might need to be edited or re-translated because the default phrases have changed.
If no no phrases have changed for which you have customized phrases, the following message appears when you go to Find Updated Phrases: All phrases are up-to-date.
If phrases for which you have customized phrases have changed, a screen similar to the following appears.
<<<Insert screenshot of changed phrases that also have custom phrases.>>>
To edit a custom phrase associated with a changed default phrase, click the [Edit] link to the right of the phrase. On the Edit page you can either modify or remove your customized phrase.
Help |
By default, vBulletin populates the Help with various helpful documents to instruct your users in how to use vBulletin, but you can edit these documents or create entirely new content if you wish.
Each entry for a Help-item can be translated into other languages that are installed on your board.
Help Manager |
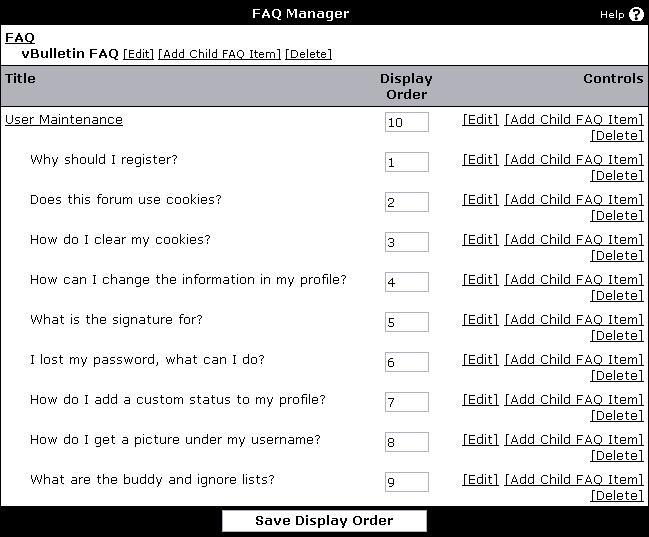
To edit an entry’s text and translations, click [Edit].
To add a child entry with a specific FAQ entry as its parent, click [Add Child FAQ Item].
To delete an entry and any child entries, click [Delete].
Like forums, FAQ entries also have a display order; the lowest display orders within a level are displayed first.
Add or Edit a Help Item |
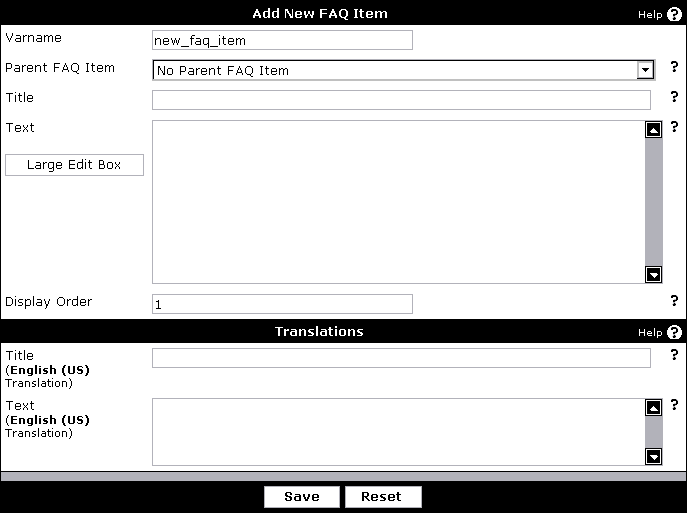
- Varname – the variable name of the Help entry. This is used to uniquely identify an entry and can be linked to directly. You may only use a-z, A-Z, 0-9, and _.
- Parent Help Item – parent Help entry. This item will be displayed under its parent.
- Title – Help title. This is often the question it answers.
- Text – the actual text of the Help entry. You may use HTML and $variables.
- Display Order – controls when an entry is displayed within a level.
Notices |
Notices Manager |
The Notices Manager is the primary page for working with notices. It lists all notices created by administrators for your site, and allows you to see at a glance the active status and display order of all notices defined in your system.
Note:
You must click Save for changes to take effect.
To add a new notice, click Add New Notice, which takes you to the Add New Notice page.
You can toggle the active status of all notices by checking or unchecking the Toggle Active Status for All checkbox.
To edit a notice, click its title or the Edit link associated with it.
To delete a notice, click the Delete link associated with it.
Each notice is displayed with 3 checkboxes and a text box containing a number. These represent the active status, the persistent nature of the notice, whether it is dismissible, and numbers representing the notice's display order.
If a notice is not active, it is never displayed to site visitors.
A notice that is not persistent is displayed only once per browser-session; otherwise, it is displayed throughout the browser session.
A message that is dismissible can be dismissed by the user.
The display order text box controls the order in which the notice is shown, both in the Notices Manager and to visitors. Display order also controls the order in which notices are checked, so it's important for the 'Notice x has not already been displayed' condition. Notices with the lowest numbers are displayed first.
You can make changes to display order rankings with the arrow buttons to the left and right of the display order text boxes.
Adding and Editing Notices |
Path to Edit or Delete an Announcement: Announcements > Announcement Manager and then click either Edit or Delete
The Notices Manager provides controls to create and edit notices for your site, and to set up criteria for when each notice should appear.
The top part of the page deals primarily with the text and HTML tagging, while the bottom of the page sets up the display criteria.
Note:
You must click Save for changes to take effect.
<<<Insert a screenshot of the top half of the Add New Notice page, through the “Dismissible” radio buttons.>>>
Title
The title is an administrative convenience only to help in identifying notices. It is never shown to visiting users. You can add multiple translations of the title text using the Translations link.
Notice HTML
The Notice HTML textbox contains the text and HTML of the notice to be displayed to users when the active criteria are met.
Warning:
vBulletin allows any valid HTML tags here, so be sure not to include any tags that could potentially break your layout or allow site abuse.
Here is a more complex example, making use of the {sessionurl} variable to make links within the site work properly:
Hello, {musername].<br/>
<a href=”member.php?{sessionurl}u={userid}”View Your Profile</a>
The Display Order text box controls the order in which the notices are shown, both in the Notices Manager and to visitors. Display order also controls the order in which notices are checked, so it's important for the 'Notice x has not already been displayed' condition.
Active
If a notice is not active, it is be displayed to visitors under any circumstances. The Active control is useful to use when you want to temporarily disable a notice without actually deleting it completely.
Persistent
A notice that is not persistent is displayed the first time a user visits the site and then disappears until he or she visits again (it is displayed once per browser-session).
Dismissible
A notice that is dismissible can be dismissed by the user after viewing.
Display Criteria
The lower part of the form contains controls to set up display criteria.
<<<Insert a screenshot of the bottom half of the Add New Notice page, starting with “Display this notice if...”>>>
To activate a criterion, check the box next to the criteria text, and then fill in any controls that are part of that criterion.
You can activate as many criteria as you like, but if any of the active criteria are not satisfied, the notice will not show. The following is a list of criteria you can use:
User Belongs to
Any user belonging to the selected usergroup will see the notice.
User does not belong to usegroup
Any user that does not belong to the selected usegroup will see the notice.
User is browsing forum
Any user browsing the selected forum will see the notice.
User is brown browsing forum... or one of its child forums
Any user browsing the selected forum or one of its child forums will see the notice.
User is browsing using style
Any user browsing the site using the selected style will see the notice.
User has not visited for (x) days or more
Any user who has not visited the site for the entered number of days or more will see the notice.
User has not posted for (x) days or more
Any user who has not posted for the entered number of days or more will see the notice.
User’s post count is between (x) and (y) posts
Any user whose post count falls between the two entered numbers will see the notice.
User has never posted
Any user who has never posted will see the notice.
User has between (x) and (y) reputation points
Any user whose reputation points falls between the entered numbers will see the notice.
User has between (x) and (y) infraction points
Any user whose infraction points falls between the entered numbers will see the notice.
Users private message storage is between (x)% and (y)% full
Any user whose message storage falls between the entered numbers will see the notice.
User’s username is
Any user who has a username that either matches or partially matches the entered username will see the notice.
User’s birthday is today
Any user who has a birthday on this day will see the notice.
User landed on this page via search engine
Any user who landed on the page via a search engine will see the notice.
User is in Global Ignore
Any user who is in Global Ignore will see the notice.
The date is (dd-mm-yyyy) (user’s timezone/universal time)
Any user on at the entered date will see the notice.
The time is between (hh:mm) and (hh:mm) (user’s timezone/universal time)
Any user on between the entered times will see the notice.
Criteria for notice ... are not met
If the criteria for the notice are not met, a user will still see the notice.
Channel Management |
An Introduction to Channels and Forums |
Channels are nodes that can contain other nodes. Nodes are any content within vBulletin. They can be discussions, photos, links or channels among other content types.
In vBulletin, channels include: Forums, Blogs, Social Groups, Private Messages, Visitor Messages, User Albums, and Flagged (reported) Content. Additional Channels may be added in the future. Some channels can be maintained with the Channel Management (formerly Forum Management) tools in the Admin CP.
Others are hidden from view and maintained by the individual users. Such as the case with Blogs and Private Messages.
What are forums?
Forums are a type of channel that allow users to talk about various topics by starting discussions and making replies to those discussions. Forums can be sorted under categories with multiple sub-forums within them to further organize the discussions by topics.
Types of Forums and Using Them
Creating a usable forum structure is one of the integral parts of running a successful bulletin board. vBulletin allows you to create an infinite depth of forums and configure numerous settings related to the forum.
Some of the most common ways to setup individual forums include:
- Category – this is a forum that people cannot post in; it is just used for grouping other forums.
- 'Normal' Forum – this is simply a regular forum that people can post in.
- 'Sub' Forum – this is a regular forum that people can post in and is a subset of a 'Normal' Forum.
- Link Forum – this really is not a forum at all. It is just a link to another web page; it could be another forum, or it could be an entirely different site.
- Archive Forum – this forum was once a 'Normal Forum', but is now just used as an archive for old information.
Channel Manager |
The Channel Manager, accessible via Channel Management> Channel Manager, is where you can choose to do a portion of your channel management. This is in addition to the management that you can do through the Site Builder function. Unlike the Site Builder, the Channel Manager gives you an overview of all the Channels in a central location.
When you enter this section, you will be presented with a screen similar to this:
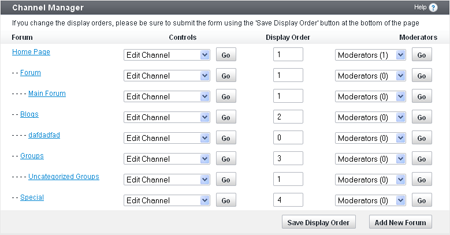
Forum
Each row in the table is a channel in the database. In the first column, Title, you will see the name of the forum; clicking the name will allow you to edit the forum’s information.
Controls
The dropdown list in the next column of the Channel Manager has several options and will take you to other parts of vBulletin. The following is a list of the options and what they do:
- Edit Forum - this takes you to a page where you can edit each of the selected channel’s settings.
- View Forum - this displays the channel on the front end, allowing you to see the information posted to it.
- Delete Forum - this allows you to remove the channel from the database. If this channel has any sub-channels, they will also be removed.
- Add Child Forum - this takes you to the Add New Forum page with this forum automatically selected as the new forum’s parent.
- Add Moderator - this allows you to specify a new moderator for this channel.
- Add Announcement - this allows you to create a new announcement to be displayed at the top of the selected channel.
- View Permissions - this displays the Channel Permissions Manager and scrolls to the selected channel.
This controls the order in which the channels are displayed.
Moderators
The options in this dropdown list allow you to view and add moderators for a channel.
- Moderators (x) – this simply displays the number of moderators for this forum. It is not a clickable link.
- Add Moderators – this opens a form for you to add new moderators to the channel.
Adding or Editing a Channel |
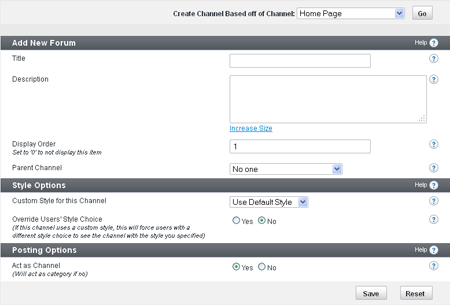
Create Channel Based off of Channel (dropdown list)
Selecting a channel from the dropdown list will copy the layout for the selected channel for the new channel.
Title
This is the name of the channel
Description
This is a description of the channel
Display Order
This is the display order of the channel on the main page of your site
Parent Forum
This is the channel that the channel you’re editing is listed under
Custom Style for this Forum
This is the style that the channel is using
Override Users’ Style Choice (Yes/No)
If activated, this overrides an individual user’s style choice with the style chosen for the channel
Act as Forum (Yes/No)
If activated, this option changes the channel to a category
Adding and Editing Moderators |
Note:
You must click Save for changes to take effect.
<<<Add a screenshot of the Moderator Manager.>>>
Add New Moderator to Channel
Channel this user will moderate. Also applies to sub-channels.
Add one or more moderator usernames. Separate multiple usernames with a semicolon (;).
Usergroup Options
You can change the user’s usergroup when he or she becomes a moderator in the Change Moderator’s Primary Usergroup to. The most common setup is to put all moderators into a Moderators usergroup that then has access to a one or more channels.
If you do not want to move the moderator to a different usergroup but instead want to add that user to one or more groups, making him or her a secondary user in those groups, you can do so in the Make Moderator a Member of option.
Once you are in this panel, you can specify or change the options for a moderator. The options can be set in the following groups:
Change Moderator's Primary Usergroup to
This option allows you to change this user's primary usergroup he or she becomes a moderator. Often it is convenient to have moderators in a specific usergroup to give them special permissions.
Make Moderator a Member of
To add a moderator to one or more usergroups, making him or her a secondary user in those usergroups, select one or more usergroups in the check boxes.
Post / Thread Permissions
Can Edit Posts - (Yes/No)
Determines whether a moderator can edit other users' posts. They will still be able to edit their own posts (if their usergroup permission allows) even if you set this to No.
Can Delete Posts - (Yes/No)
Determines whether a moderator can delete and undelete posts.
Can Physically Delete Posts - (Yes/No)
Determines whether a moderator can delete and undelete posts.
Can Open / Close Threads - (Yes/No)
Determines whether or not this moderator can open and close threads. A closed thread appears with a lock on it and no one can reply to it except administrator and moderators.
Can Edit Threads - (Yes/No)
Determines whether or not this moderator can edit a thread's title and post icon.
Can Manage Threads - (Yes/No)
Whether or not this moderator can edit the rest of the thread permissions (for example, stick, merge, split).
Sticking a thread will make it always appear at the top of the thread listing. Merging allows a moderator to combine the posts of two threads into one thread. Splitting allows a moderator to split the posts from one thread into two threads.
Can Edit Polls - (Yes/No)
Determines whether or not this moderator can edit poll options and results within his or her forum.
Channel Permissions
Can Post Announcements - (Yes/No)
Determines whether or not this moderator can post announcements in this channel.
This permission allows this user to post announcements containing arbitrary HTML, which can be a security concern. Only grant this permission if you trust this person.
Can Moderate Posts - (Yes/No)
If post moderation is enabled in this moderator's channel, this permission allows the moderator to approve posts awaiting moderation. The moderator will also be allowed to send
posts back into moderation.
Can Moderate Attachments - (Yes/No)
If attachment moderation is enabled in this moderator's channel, this permission allows this moderator to approve attachments awaiting moderation.
Can Mass-Move Threads - (Yes/No)
Allows this moderator to mass-move threads out of his or her channel.
Can Mass-Prune Threads - (Yes/No)
Allows this moderator to mass-prune from his or her channel.
Can Set Channel Password - (Yes/No)
If this channel has a password, this permission allows this moderator to change it.
Visitor Message Permissions
Can Edit Posts - (Yes/No)
When this permission is set to Yes, it allows the moderator to edit visitor messages.
Can Delete Posts - (Yes/No)
When this permission is set to Yes, it allows the moderator to delete visitor messages.
Can Physically Delete Posts - (Yes/No)
When this permission is set to Yes, it allows the Moderator to physically remove group messages from the database.
Can Moderate Posts - (Yes/No)
When this permission is set to Yes, it allows the moderator to make visitor messages visible or invisible.
Groups Permissions
Can Edit Groups - (Yes/No)
When this permission is set to Yes, it allows the moderator to edit the title and description of any group.
Can Delete Groups - (Yes/No)
When this permission is set to Yes, it allows the moderator to delete any groups.
Can Transfer Groups - (Yes/No)
Whether or not this moderator can transfer groups.
Can Edit Pictures - (Yes/No)
Whether or not this moderator can edit pictures.
Can Delete Pictures - (Yes/No)
Whether or not this moderator can edit pictures.
Can Moderate Pictures - (Yes/No)
Whether or not this moderator can moderate pictures.
Can Edit Posts - (Yes/No)
Whether or not this moderator can edit posts..
Can Moderate Posts - (Yes/No)
Whether or not this moderator can moderate posts..
Can Delete Posts - (Yes/No)
Whether or not this moderator can delete posts..
Can Physically Delete Posts - (Yes/No)
Whether or not this moderator can remove group messages from the database.
Can Edit Discussions - (Yes/No)
Whether or not this moderator can edit discussions.
Can Moderate Discussions - (Yes/No)
Whether or not this moderator can moderate discussions.
Can Delete Discussions - (Yes/No)
Whether or not this moderator can delete discussions.
Can Physically Delete Discussions - (Yes/No)
Whether or not this moderator can delete discussions from the database.
User Permissions
Can View IP Addresses - (Yes/No)
Every post has an IP address recorded with it. This permission allows the moderator to click the IP address link in a post and view the IP address.
Can View Whole User Profile (but not edit) - (Yes/No)
This permission allows the moderator to view a user's entire profile, as it appears in the Admin CP. It does not give this moderator permission to edit a user's profile.
Can Ban Users - (Yes/No)
This permission allows this moderator to ban users, temporarily or permanently.
Can Restore Banned Users - (Yes/No)
This permission allows the moderator to restore banned users.
Can Edit User Signatures - (Yes/No)
This permission allows the moderator to edit user signatures.
Can Edit User Avatars - (Yes/No)
This permission allows the moderator to edit user avatars.
Can Edit User Profile Pictures - (Yes/No)
This permission allows the moderator to edit user profile pictures.
Can Edit User Reputation Comments - (Yes/No)
This permission allows the moderator to edit user reputation comments.
User Album Permissions
Can Edit Albums/Pictures - (Yes/No)
Whether or not the moderator can edit albums and pictures.
Can Delete Albums/Pictures - (Yes/No)
Whether or not the moderator can delete albums and pictures.
Can Moderate Pictures - (Yes/No)
Whether or not the moderator can moderate pictures.
Can Edit Picture Comments - (Yes/No)
Whether or not this moderator can edit picture comments.
Can Delete Picture Comments - (Yes/No)
Whether or not this moderator can delete picture comments.
Can Physically Delete Picture Comments - (Yes/No)
Whether or not this moderator can remove picture comments from the database.
Can Moderate Picture Comments - (Yes/No)
Whether this moderator can moderate picture comments.
Email Preferences
Receive Email When a New Thread is Created - (Yes/No)
Enabling this option notifies this moderator by email whenever a new thread is created. This is useful for low traffic forums that require close moderation.
Receive Email When a New Post is Created - (Yes/No)
Enabling this option notifies this moderator by email whenever a new post is created. This is useful for low traffic forums that require close moderation.
Channel Permissions |
Moderator Permissions |
Show All Moderators shows a list of moderators and super moderators, as well as when each was last online. On this page you can edit moderator information and permissions, as well as remove moderators, but you cannot add a moderator; you must do that in the Channel Manager.
Note:
You can combine super moderator and moderator permissions for a more granular approach.
Last Online - Color Key
This section explains the color coding used to indicate when the moderators and super moderators were last online (for example, Today is black and Yesterday is green).
<<<Insert a screenshot of the super moderator section.>>>
Super Moderators
Moderators that have super moderator permissions are listed here.
To edit a super moderator, click a username, which takes you to the User Manager.
To edit a super moderator’s permissions click Edit Permissions, which takes you to a permissions page in the Moderator Manager.
<<<Insert a screenshot of the moderator section.>>>
Moderators
Moderators that do not have super moderator permissions, along with the channels for which they are responsible, are listed here.
To edit a moderator, click a username, which takes you to the User Manager.
To remove this person from moderating all channels, click Remove this Moderator from All Channels.
To edit a moderator’s permissions for a specific channel or to delete a moderator from a specific channel, click Edit or Remove next to the appropriate channel.
View Permissions |
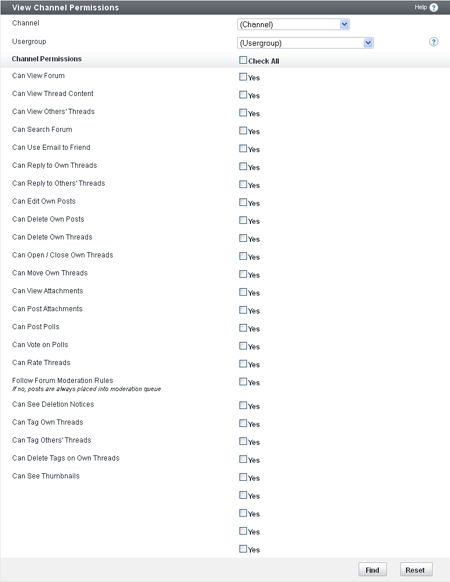
Use the Channel and Usergroup dropdown menus to view the channel and usergroup for which you’d like to view permissions. Next, check the specific permissions you want to view with the search result. If you’re unsure which wants you want to see, check the Check All checkbox to the left of the Forum Permissions header.
When you’re done, scroll to the bottom of the page and click the Find button. This will reload the page with the search results that matches the criteria you searched for.
This displays what each permission you selected is set to. In this example, the Administrators group has full permissions in the Main Forum.
Topic Prefixes |
The Topic Prefix Manager |
The Topic Prefix Manager is where you create new prefixes and prefix sets, and edit existing prefixes and prefix sets. Prefixes and prefix sets are shown in the order they will actually display in your Create Topic form; you can quickly change this order by changing the numbers in the Display Order column and clicking "Save Display Order".
Adding or Editing a Prefix Set |
Before you can create any prefixes, you must create one or more prefix sets. Prefix sets are simply a way of tying together related prefixes. When you select which channels will allow prefixes, you will enable one or more prefix sets for the channel.
The following options are on the page for adding/editing a prefix set:
- Prefix Set ID - This is the unique identifier for this prefix set. Only one set can have this value and the value may only contain A-Z, a-z, 0-9, and _ (underscores) only. Once you pick a prefix set id, you will not have a chance to change it (it will not be editable when editing the prefix set).
- Title - This is the title of this prefix set. You should not use any special HTML markup. It will be shown when administering content prefixes or if a user must choose between prefixes in more than one set.
- Use Prefix Set in These Forums - Prefix sets must be attached to forums before they can be used. Select the forum or forums this prefix set will be available in using this field. Once you do this, when a user creates a new topic in a selected forum, he or she will be able to select a prefix from this set.
- Display Order - The sorting order for sets. Sets with lower values will be shown before sets with higher values. Note that the display order setting for individual prefixes only controls their order within the set.
Adding or Editing a Prefix |
Once you have created a prefix set, you may add any number of prefixes to that set. If a thread has a prefix applied to it, the prefix will show anywhere the thread title shows. For that reason, you must define two versions of the prefix: a plain text version and a rich text version. See below for more information.
The following options are on the page for adding/editing a prefix set:
- Prefix ID - This is the unique identifier for this prefix. Only one prefix can have this value and the value may only contain A-Z, a-z, 0-9, and _ (underscores) only. It will be the id used in the URL to select other threads with this prefixid. Once you pick a prefix set id, you will not have a chance to change it (it will not be editable when editing the prefix set).
- Prefix Set - The set this prefix is to be placed in. This prefix will only be selectable in forums that have this set enabled. If you change this set, topics that can no longer use this prefix will have it removed!
- Title (Plain Text) - This is the title of the prefix, using no special markup. This will be shown in the prefix list menu, when the topic title is shown in the navigation bar, or when the topic title is used in an email. example - For Sale
- Title (Rich Text) - This is also the title of the prefix, but you may use HTML to add additional markup to the title. This version of the prefix will be shown in a list of topics and within the thread itself. example of a red prefix title - <span style=”color: red;”>For Sale</span> - which will display as For Sale
- Display Order - The sort order for this prefix. Lower values will be displayed first within the selected prefix set.
Prefixes will also be placed directly before a thread title, with only a space separating them. For this reason, you will probably want to include something to make the prefix stand out from the title. In the rich text value, this could be color, italics, or an image (For Sale). However, in the plain text version, you may need to include a colon or square brackets ("For Sale:" or "[For Sale]").
Attachments |
vBulletin supports attachments (file uploads associated with vBulletin replies) in a number of file types, including text files, PDF files, and ZIP files.
Attachment-related tasks use the Attachment Manager, which you can reach through the Attachments menu and its submenus.
An Introduction to Attachments |
Key features of the vBulletin attachment functionality include the following:
- Multiple attachments can be associated with a single reply.
- Multiple attachments can be uploaded in a single operation.
- Attachments can have smaller, thumbnail versions.
- Attachments can be moderated.
- You have full administrative control over file type, file size, and image dimension.
- You can search and sort attachments in the Admin CP.
- You can store attachments in either the database or the file system.
- Users can manage their own attachments from their User CP.
You can set attachment permissions at the usergroup level. For example, vBulletin allows you to limit the total size of all of a user's attachments at the usergroup level. This is useful in preventing a single user from taking up too much storage space.
You can store attachments in either the database or the file system attached to your web server. Both methods have advantages and disadvantages. The database is more efficient with storage space and is easier to back up than individual files. However, attachments served up from the database take additional time and resources. Other considerations include how you want to restrict access to attachments and whether you want to use the vBulletin permission system or directory permissions like htaccess.
vBulletin attachment options allow you to specify a maximum filesize for each type of file you allow in your system. This capability is useful in restricting the size of larger files like videos and images.
The vBulletin attachment system supports thumbnails. For example, you can configure vBulletin to generate a miniature version of the image (called a thumbnail) that is linked to the larger version. This capability is useful in preventing large inline image attachments from stretching your site layout.
If you are using the ImageMagick library, you might be able to create thumbnails from additional image types, for example BMP, TIF, PSD, and PDF. Be sure to install the latest version of ImageMagick if you intend to allow thumbnail PDF files.
General Attachment Settings |
Set Message Attachment Options
Go to Settings > Options > Message Attachment Options.
For more information, see the Message Attachment Options article.
Set the Upload Attachments and Can Download Attachments Permissions
Go to Usergroups > Channel Permissions.
For more information, see the Adding and Editing Channel Permissions article.
Do Additional Attachment Management Tasks
Go to the Attachments menu and select the relevant submenus, which enable the following tasks:
- Set attachment permissions
- Search attachments
- Moderate attachments
- Get attachment statistics
- Set the allowed attachment storage type (database or file system)
Attachment Manager |
Using the vBulletin Attachment Manager, you can specify the types of attachments (for example, JPB, GIF, or PDF) you want to allow users to upload to your site, the maximum filesize for a given attachment, the maximum dimensions for an image attachment, and whether or not as well as how thumbnails can be created from full-size images.
When you open the Attachment Manager, you are shown a tabular summary of the currently allowed attachment file types and their characteristics.
<<<Insert a level-setting screenshot of the Attachment Manager home screen.>>>
The form has five columns. Each column displays a piece of information for the extensions. The information is as follows:
- Extension - the name of the extension
- Maximum File-size - the maximum file-sized allowed for the named extension
- Max Width - the maximum width allowed for the named extension if it’s an image
- Max Height - the maximum height allowed for the named extension if it’s an image
- Controls - the options for editing, deleting, or viewing the permissions on the named extensions
- To add a new attachment extension, click the Add New Extensiont button at the bottom of the screen.
- To edit the characteristics of an existing extension, click the Edit link in the picklist to the right of the filetype name.
- To delete
- To specify usergroup permissions for an extension, click the View Permisisons link in the picklist to the right of the filetype name.
Adding Attachment Types |
Following is the Add New Attachment form of the Attachment Manager.
<<<Insert a screenshot of the Add New Attachment form of the Attachment Manager.>>>
The following are the options you can set in the Add New Extension form.
Note:
You must click Save for changes to take effect.
Extension of the allowed file type.
Example: jpg, in lowercase letters without the leading period (.).
Max Filesize (in bytes)
Maximum filesize for individual attached files of this extension.
Take your overall site storage limitations into consideration in deciding what size files to allow. You also need to consider the MySQL and PHP settings that affect the maximum file size you can upload.
Generally one megabyte is a good rule of thumb. If you need larger files and find yourself not able to post them, you'll need to ask for support via our ticket system or on the support forums.
Maximum Width (in pixels)
Maximum width of an uploaded image. This setting applies only to some image types. By default we include all image types that support this option.
This only applies to image files of the extensions: bmp, gif, jpe, jpg, jpeg, png, psd, tif and tiff.
Maximum Height (in pixels)
Maximum height of an uploaded image. This setting applies only to some image types. By default we include all image types that support this option.
This only applies to image files of the extensions: bmp, gif, jpe, jpg, jpeg, png, psd, tif and tiff.
Mime Type
The mime type dictates how the browser handles the files when the attachment is opened. General mime-type lists are available on the Internet.
If you leave this option blank, the user’s browser will probably prompt for save.
Content Type
This section gives you the option of adding the extension to specific parts of the your vBulletin. The columns are as follows:
Product - the name of the product that users can add an attachment with the named extension
Location - the location where that users can add an attachment with the named extension
New Window - whether or not the attachment is opened in a new windows.
Enabled (Yes/No)
Controls whether or not this attachment type is allowed to be uploaded.
Managing Extensions |
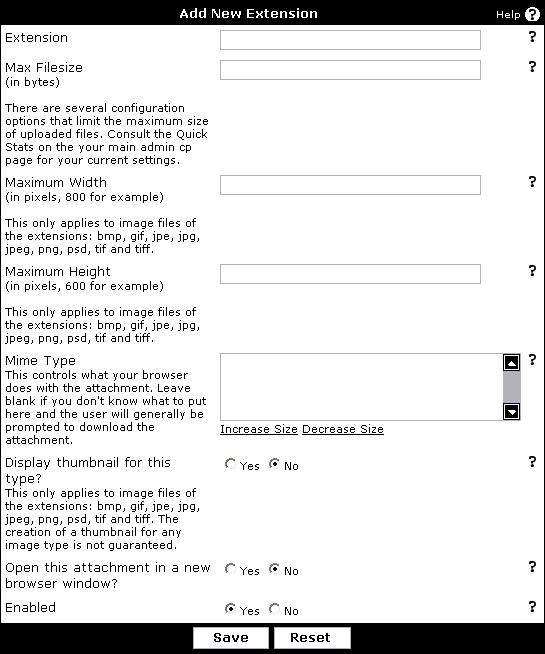
Max File size - This is the maximum file size you wish to allow attached files of this extension to be. Each attachment that is uploaded is going to consume space on your hosting account. You need to take your storage limits into consideration when deciding what size files to allow. There are also several MySQL and PHP settings that affect the maximum file size that you will be able to upload. Generally you will be able to upload files up to a megabyte. If you need larger files and find yourself not able to post them, you'll need to ask for support via our ticket system or on the support forums.
Maximum Width - The maximum width in pixels that an uploaded image can be. This setting only applies for some image types. By default we include all image types that support this option.
Maximum Height - The maximum height in pixels that an uploaded image can be. This setting only applies for some image types. By default we include all image types that support this option.
Mime Type - The mime type dictates how the browser is supposed to handle the files when the attachment is opened. General mime-type lists are available on the Internet but if you choose to leave this option blank, often your browser will simply prompt you to save the attachment.
Display thumbnail for this type - This option generates a thumbnail, a small image, of uploaded images. The thumbnail will be displayed instead of the fullsize image. The fullsize image can be viewed by clicking on the thumbnail. Thumbnails must also be enabled in vBulletin Options -> Message Attachment Options.
Open this attachment in a new browser window - This option will open the attachment in a new window. Some users prefer to have control over how attachments open.
Enabled - Controls whether or not this attachment type is allowed to be uploaded.
Press when you have finalized your new attachment file type.
Attachment Permissions |
Attachments > Attachment Permissions where (in the Attachment Permissions Manager) you can control attachments by file extension (for example, jpg or pdf). For more information, see the Managing Attachment Permissions article.
Settings > Options > Message Attachment Options where you can set general options for message attachments (for example, limit the total space taken up to attachments or allow duplicate attached images). For more information, see the Managing Attachment Permissions article.
Usergroups > Usergroup Manager, where you can control downloading and uploading attachments. For more information, see the Adding and Editing A Usergroup article.
Usergroups > Channel Permissions, where (in the Channel Permissions Manager) you can control downloading and uploading attachments, creating attachments, and moderating attachments. For more information, see the Adding and Editing Channel Permissions article.
Channel Management > Channel Permissions, where (in the Channel Permissions Manager) you can control downloading and uploading attachments, creating attachments, and moderating attachments. For more information, see the Adding and Editing Channel Permissions article.
Managing Attachment Permissions |
You edit attachment permissions (at the attachment type level) in the Attachment Permissions Manager, Attachment Permissions form.
<<<Insert a level-setting screenshot of the Attachment Permissions Manager, Attachment Permissions form.>>>
The Attachment Permissions form displays a list of all allowed attachment extensions on your site with a list under each extension (for example, jpg or pdf) of of the usergroups authorized to use each one.
The display is color coded. Red indicates that a usergroup has a custom attachment permission specified for this channel. If no custom attachment permission has been specified, the usergroup is assigned the default attachment extension permissions.
To the right of each extension name are two links:
- , which automatically deletes any custom permissions set for the extension.
- , which automatically denies every usergroup permission to upload the extension.
The following form opens.
<<<Insert a screenshot of Edit Attachment for Usergroup.>>>
At the top of the screen are radio buttons that allow you to select one of the following choices:
- Use Usergroup Default Permissions for this extension
- Use Custom Permissions
If you choose Use Custom Permissions you can set the permissions in the bottom part of the screen.
Following is the superset of options you can set in the Edit Attachment Permissions for Usergroup form (note that not all options apply to all extension types).
Note:
You must click Save for changes to take effect.
Whether or not the usergroup can upload files with this extension.
Max Filesize (default depends on extension type)
Maximum filesize of the extension, in bytes.
There are multiple vBulletin configuration options that limit the maximum size of uploaded files. Look at the quick stats on the Admin CP home page for the current settings.
Maximum Width (default depends on extension type)
Maximum width of the attachment, in pixels.
This option applies only to files with extensions bmp, gif, jpe, jpg, jpeg, png, psd, tif, and tiff.
Maximum Height (default depends on extension type)
Maximum width of the attachment, in pixels.
This option applies only to files with extensions bmp, gif, jpe, jpg, jpeg, png, psd, tif, and tiff.
Attachment Storage Type |
In vBulletin you have the choice of storing attachments in your site database or file system.
By default vBulletin stores attachments in the database, because every server that supports vBulletin can use this method. However, not every server can store attachments in the file system.
Following are some factors to consider in choosing which storage method to use.
Storing Attachments in the Database
- Pros
- Backing up your database also backs up your attachments
- Does not consume any of your file system storage limits (unless MySQL storage counts)
- Cons
- Can increase server load on large sites
- Pros
- Better performance for large sites
- Easier to back up your database
- Cons
- Does not work if SAFE MODE is enabled on your server
- Need to back up attachments separately from database
- Consumes space on your file system
Users |
User Moderation |
Adding or Editing a User |
Profile
User Name
Name that will identify the user.
Password
Password this user will use to log in.
Note:
If you are editing a user, you will not be able to see this user’s password. Leave this field blank to keep the password as-is.
Email address of the user.
Language (default: User Forum Default)
Language in which the user will view the site.
User Title (Yes, user set / Yes, admin set (HTML allowed) / No
Title displayed under this user’s name in posts.
If you want to set a custom title here, be sure to change the Custom User Title option, as well.
Custom User Title (Yes/No)
Settings in effect for the User Title option. If this is set to No, the user will receive the default title for his or her usergroup; otherwise, the user will receive the title specified above.
Home Page
User’s home page, which will be linked to from his or her profile and posts.
Birthday
User’s birthday.
Privacy (default: Hide Age and Date of Birth)
Controls how the birthday is displayed to others. The options are:
- Hide Age and Date of Birth - no one but the user sees the birthday
- Display Only Age - other users will see the user’s age, calculated by their birthday
- Display Only Day and Month of Birth - other users will only see the day and month of the user’s birthday
- Display Age and Full Date of Birth
User’s signature.
HTML, vBulletin code, and smilies are parsed according to your settings in Settings> Options> User Profile Options
ICQ UIN
User’s ICQ number, if he or she has one.
AIM Screen Name
User’s AIM screen name, if he or she has one.
Yahoo! ID
User’s Yahoo! handle, if he or she has one.
MSN ID
User’s MSN handle, if he or she has one.
Skype Name
User’s Skype name, if he or she has one.
COPPA User (Yes/No)
Whether or not the user is a COPPA user.
If the user is under 13 and you are using the COPPA system, set this option to Yes.
Parent Email Address
If the user is a COPPA user, then this address will receive an email every time this user changes his or her profile.
Referrer
User name that referred this user.
IP Address
User’s IP address at registration.
Post Count
User’s post count.
Image Options
Avatar
Allows you to edit the user avatar.
Profile Picture
Allows you to edit the user profile picture.
Signature Picture
Allows you to edit the user’s signature picture.
Warning:
Choosing one of these options will automatically submit any changes.
Biography
Allows you to edit the user’s biography.
Location
Allows you to edit the user’s location.
Interests
Allows you to edit the user’s interests.
Occupation
Allows you to edit the user’s occupation.
Usergroup Options
Primary Usergroup
The user’s primary usergroup.
See the Usergroup and Permissions section for more information.
Additional Usergroups
The user’s secondary usergroups.
See the Usergroup and Permissions section for more information.
Reputation
Display Reputation (Yes/No)
Whether or not to display the user’s reputation score with his or her posts.
Reputation Level (default: 10)
The user’s actual reputation score. A higher level is better.
Current Reputation Power
The user’s calculated reputation power. You cannot change this directly.
Infractions
Warnings
Number of warnings for this user.
Infractions
Number of infractions for this user.
Infraction Points
Number of infraction points for this user.
Browsing Options
Receive Admin Emails (Yes/No)
Whether or not the user receives emails sent by the administrator through the control panel.
Receive Email from Other Users (Yes/No)
Whether or not the user’s email button is displayed, allowing members to send email to him or her.
Invisible Mode (Yes/No)
Whether or not the user is invisible. This prevents the user’s current activity status from being displayed to other users.
Allow vCard Download (Yes/No)
Whether or not the user can download vCards.
Receive Private Messages (Yes/No)
Whether or not the user has enabled private messaging.
Receive Private Messages only from Contacts and Moderators (Yes/No)
Whether or not the user has enabled private messaging only from contacts and moderators.
Send Notification Email When a Private Message is Received (Yes/No)
Whether or not the user will receive a notification email when he or she receives a new private message.
Pop up a Notification Box When a Private Message is Received (Yes/No)
Whether or not the user receives a popup window when he or she has received a private message.
Save a copy of sent messages in my Sent Items folder by default Yes/No)
Whether or not a copy of sent messages is kept for the user.
Enable Visitor Messaging (Yes/No)
Whether or not visitor messaging will be enabled for this user.
Limit usage of Visitor Messages to Contacts and Moderators (Yes/No)
Whether or not to allow messaging with contacts and moderators.
Display Signatures Inline (Yes/No)
Whether or not the user sees signatures after posts.
Display Avatars (Yes/No)
Whether or not the user sees avatars.
Display Images (Yes/No)
Whether or not the user sees attachments and IMG tags inline.
Show Other Users' Custom Profile Styles (Yes/No)
Whether or not the user will see customized Profile Styles on other users’ profiles.
Receive Friend Request Notification (Yes/No)
Whether or not the user will receive an email notification of new friend requests.
Automatic Thread Subscription Mode (default: Do not subscribe)
Controls the user’s default thread subscription mode. This can vary from no subscription to instant emails to weekly digests.
Thread Display Mode (default: Linear, Oldest First)
Controls how the user views threads by default. The user may select linear along with post ordering, hybrid, or threaded.
Message Editor Interface (default: Show Standard Editor Toolbar)
Controls the type of editor that the user sees. Choices include no toolbar; the standard editor toolbar, which has buttons to include vB code; and the WYSIWYG editor, which will show users what their post will actually look like (e.g., red text will be red in the editor).
Style (default: Use Forum Default)
Controls the default style that this user uses to browse the forums.
Admin Override Options
Keep Custom Avatar (Yes/No)
Whether or not the user keeps his or her custom avatar in the event that he or she loses permission to upload custom avatars.
If the user is moved to an usergroup that doesn't allow custom avatars, the user's avatar will not be visible in posts, their profile, and the member's list unless this option is enabled.
This option does not allow the user to change his or her avatar. Usergroup permission is required to accomplish that task.
If the admin changes or gives an a user a custom avatar when the user doesn't have usergroup permission to have one, this option will be automatically enabled.
Keep Custom Profile Pic (Yes/No)
Whether or not the user keeps his or her profile picture in the event that he or she loses permission to upload profile pictures.
If the user is moved to an usergroup that doesn't allow profile pictures, the user's picture will not be visible in his or her profile or on the members’ list unless this option is enabled.
This option does not allow users to change their pictures. Usergroup permission is required to accomplish that task. If the admin changes or gives an a user a profile picture when the user doesn't have usergroup permission to have one, this option will be automatically enabled.
Time Options
Timezone
Controls how the times will be displayed for this user.
Automatically detect DST settings (Yes/No)
Whether or not automatic daylight savings time (DST) detection is used for the user.
Is DST current in effect
Whether or not DST is currently in effect, essentially changing the user’s time zone by one hour.
Default View Age (default: Show all threads)
Controls the default cutoff date for threads on the forum display page.
Join Date
The day the user registered.
Last Visit
The time of the user’s last visit. This is the time used to determine what posts are new.
Last Activity
The time the user was last active. This is the time the user last loaded a page.
Last Post
The time of the user’s latest post.
External Connections
Facebook Connected
Whether or not there is a connection to a user Facebook account.
Editing Access Masks |
Warning:
Access Masks are not valid in vBulletin. They are maintained to show permissions from older versions
Although membership in multiple groups is a good way to create exceptions to rules set up by usergroup permissions, they might be too powerful for some situations. For cases where you simply want to give a specific user access to a forum that he or she wouldn’t normally have access to, an alternative solution is access masks, which override all forum-level usergroup permissions.
Warning:
Access mask settings have no effect unless you have enabled access masks in vBulletin Options.
Note:
You must click Save for changes to take effect.
To view existing access masks, go to Users > Access Masks.
Access masks work similarly to forum-level usergroup permissions: inheritance to child forums still occurs. However, you do not have as many options as with a forum permission:
- Setting a user’s access mask to Yes for a forum gives him or her the same permissions in that forum as he or she has at the global level, regardless of any forum-level usergroup permissions specified.
- Setting the mask to No denies the user access to the forum completely, as if each individual permission were set to No.
- Default means that no special access mask is specified; forum-level usergroup permissions are used instead.
Quick User Links |
If you are editing a user, the Quick User Links section of the User Manager opens:
<<<Insert Quick User Links screenshot>>>
This allows you to:
Edit Forum Permissions (Access Masks)
Allows you to edit this user’s access masks.
View Forum Permissions
Shows what permissions this user has in each forum.
Send Email to User
Allows you to email this user directly using your default email program.
Email Password Reminder to User
Sends a password change request to this user.
Send Private Message to User
Brings up the form to send a private message to this user (if private messages are enabled).
Private Message Statistics
Displays the number of private messages this user has in each folder.
Delete All User’s Private Messages
Deletes all of this user’s received private messages.
Delete Private Messages Sent by User
Deletes all private messages this user has sent.
Delete Visitor Messages Sent by User
Deletes all visitor messages this user has sent.
Delete Subscriptions
Deletes all of this user’s thread subscriptions.
View IP Addresses
Displays all IP addresses that are logged for this user. Except for the IP logged at registration, IPs are only logged during posting.
View Profile
Displays this user’s public profile on the site front end.
Find Posts by User
Searches for posts made by this user.
View Infractions
View all infractions for this user.
Ban User
Allows you to ban this user from accessing the site for various timeframes.
Delete User
Allows you to remove this user from the database.
View Groups Created by User
Allows you to view groups created by this user.
Search For Users |
You search for users in the User Manager.
<<<Insert a level-setting screenshot of the User Manager, Quick Search section, and also the top of the Advanced Search section.>>>
Quick Search |
<<<Insert a level-setting screenshot of the User Manager, Quick Search section.>>>
At the top of the Search for Users screen, Quick Search provides you with several commonly-used, predefined searches. These options include:
Show All Users
Lists all users in alphabetical order.
List Top Posters
Lists all users, ordered by post count (descending).
List Visitors in the Last 24 Hours
Lists only users who have visited the board in the last 24 hours.
List New Registrations
Lists all users, with those registered most recently at the top of the list.
List Users Awaiting Moderation
Lists all users in the moderation queue.
Note:
This is generally empty unless you have enabled user moderation.
Lists all users waiting to be approved because of COPPA rules.
Advanced Search |
Advanced search allows you to search for users using almost any profile field as search criteria. If you do not enter a value for a field, it is ignored.
Additionally, you may choose to display most fields inline on the search results page.
<<<Insert a level-setting screenshot of the User Manager, Quick Search section and the entire Advanced Search section.>>>
Advanced Search User Profile Fields
When using Advanced Search for users, you can use these fields:
User Name
Name that identifies the user.
Primary Usergroup (default: All Usergroups)
Which usergroups to include in the search.
Additional Usergroups
Additional usergroups to include in the search.
Email address of the user.
Parent Email Address
User parent email address.
COPPA User COPPA User (Yes/No/Either)
Whether or not the user is a COPPA user.
Facebook Connected (Yes/No/Either)
Whether or not there is a connection to a user Facebook account.
ICQ UIN
User’s ICQ number, if he or she has one.
AIM Screen Name
User’s AIM screen name, if he or she has one.
Yahoo! ID
User’s Yahoo! handle, if he or she has one.
MSN ID
User’s MSN handle, if he or she has one.
Skype Name
User’s Skype name, if he or she has one.
Signature
User’s signature.
User Title
Title displayed under this user’s name in posts.
Join Date is After
Users who joined after the entered date will appear in the search results. The format is yyyy-mm-dd.
Join Date is Before
Users who joined before the entered date will appear in the search results. The format is yyyy-mm-dd.
Last Activity is After
Users active after the entered date will appear in the search results. The format is yyyy-mm-ddhh.mm.ss.
Last Activity is Before
Users active before the entered date will appear in the search results. The format is yyyy-mm-dd hh.mm.ss.
Last Post is After
Users active before the entered date will appear in the search results. The format is yyyy-mm-dd hh.mm.ss.
Last Post is Before
Users active before the entered date will appear in the search results. The format is yyyy-mm-dd hh.mm.ss.
Birthday is After
Users with birthdays after the entered day will appear in the search results. The format is yyyy-mm-dd.
Birthday is Before
Users with birthdays before the entered date will appear in the search results. The format is yyyy-mm-dd.
Posts are greater than or equal to
Users with posts greater than or equal to the number entered will appear in the search results.
Posts are less than
Users with posts less than to the number entered will appear in the search results.
Reputation is greater than or equal to
Users with reputations greater than or equal to the number entered will appear in the search results.
Reputation is less than
Users with warnings less than the number entered will appear in the search results.
Infractions are greater than or equal to
Users with infractions greater than or equal to the number entered will appear in the search results.
Infractions are less than
Users with infractions less than the number entered will appear in the search results.
Infraction Points are greater than or equal to
Users with infraction points greater than or equal to the number entered will appear in the search results.
Infraction Points are less than
Users with infraction points less than the number entered will appear in the search results.
User ID is greater than or equal to
Users with User IDs greater than or equal to the number entered will appear in the search results.
User ID is less than
Users with User IDs less than the number entered will appear in the search results.
Registration IP Address
Users with a matching or partial match to the entered number will appear in search results.
Biography
The user’s biography.
Location
The user’s location.
Interests
The user’s interests.
Occupation
The user’s occupation.
Advanced Search Display Options
In addition to specifying user profile fields to search on, you can also specify which fields will be displayed in the search result. The default is to display these fields: User Name, Options, Usergroup, Email, Join Date, Last Activity date and time, and Post Count.
Advanced Search Sorting Options
You can specify the order in which search results are displayed. The default is order by ascending User Name starting at result 1 for up to 50 results.
Search Results |
After you have requested a search for users, the search results page displays the users who match your search criteria. The columns displayed depend on what you chose on the search screen. By default, user name, email, join date, last visit, and post count are displayed.
In the search results, the user name and email fields are links. Clicking on a user name will take you to the User Manager where you can edit the user’s profile. Clicking on the email field lets you send an email to the user.
In addition, the Options column contains links you can use to manage a user, including the following:
View / Edit User
Displays this user’s information.
For more information, see the section on Adding or Editing a User.
Send Password to User
Redirects you to the lost password form, allowing you to send a new password to this user.
Edit Access Masks
Allows you to edit this user’s access masks.
Delete User
Selecting this option opens a confirmation screen asking if you are sure you want to delete the user. This action cannot be undone. Click the to delete the user. All posts made by this user will be set to the username 'Guest'. Click the to return to the search results.
Merge Users |
You can use the Merge Users panel to merge two users’ accounts into one (if, for example, one user registered twice).
<<<Screenshot of Merge Users panel>>>
Enter the username of the source user into the Source Username field. This user's data (as specified below) will be written over to the destination user. Permissions will not be transferred.
Enter the username of the destination user into the Destination Username field. This user will inherit the source user's data. They will not inherit any permissions from the source user.
Posts, threads, calendar events, and private messages of the source user will be changed to appear to have come from the destination user. The source user’s post count, reputation, buddies, and ignored users will be added to the destination user.
Permissions will not be changed and moderator status will not be transferred; these must be re-specified.
After merging the users, the source username will be available to be registered by another user after the time period specified by Username Reuse Delay setting in the User Registration Options panel.
Ban Users |
<<<screenshot of the ban user form>>>
By default, banned users are placed in the “Banned Users” usergroup and inherit the permissions (or lack thereof) of that group. For more information about usergroups and permissions, read the Usergroups and Permissions section of the manual. The “Banned Users” usergroup has all permissions set to ‘no’ by default.
The form has the following fields:
- User Name
Enter the username of the user you would like to ban. - Move User to Usergroup Default: Banned Users
This is the usergroup to which the specified user will be moved.Note:Only usergroups that are specified as banned groups will be displayed here. - Lift Ban After... Default: 7 Days
This is the length of time that the ban will be in effect. Available time periods range from 1 day to 2 years. You can also select a permanent ban. - Reason to show the user
This message will be shown to the user (along with the ban duration set above) every time they visit the site while the ban is in effect.
User Banning Options |
This section of the Admin Control Panel allows you to set the banning options for your forum, including IP bans.
Note:
You must click Save for changes to take effect.
- Enable Banning Options (Yes/No)
Banning allows you to stop certain IP addresses and email addresses from registering and posting to the forum. - Banned IP Addresses
Use this option to prevent certain IP addresses from accessing any part of your board.
If you enter a complete IP address (242.21.11.7), only that IP will be banned.
If you enter a partial IP (243.21.11. or 243.21.11), any IPs that begin with the partial IP will be banned. For example, banning 243.21.11 will prevent 243.21.11.7 from accessing your board. However, 243.21.115.7 would still be able to access your board.
You may also use an '*' as a wildcard for increased flexibility. For example, if you enter 243.21.11*, many IPs will be banned including: 243.21.11.7, 243.21.115.7, 243.21.119.225.Warning:Use this option with caution. Entering an incorrect IP can result in banning yourself or other genuine users from your forums. - Banned Email Addresses
You may ban any email addresses from registering and posting. Type in the complete email address ([email protected]), or use a partial email address (as in @example.com).
Note that partial email addresses are matched from the end of the address unless you enable Aggressive Email Banning (see below). Therefore if you ban '@example.com' you will ban '[email protected]', but if you ban '@example' that user will not be banned. If you enable Aggressive Email Banning, '[email protected]' would be banned by '@example'.
If the email address of a user attempting to register or change their email address matches any of the addresses you specify here will see a no-permission error. For example, if you have banned 'example.com' then a user attempting to use '[email protected]' will be rejected. - Aggressive Email Banning (Yes/No)
If this option is enabled, incomplete addresses are matched anywhere in the email address when checking for banned emails, not just the end.
For example, if this option is enabled 'yahoo' will block any email address with 'yahoo' in it. If this option is disabled, no emails will be banned unless the ban was changed to 'yahoo.com'. - Allow User to Keep Banned Email Addresses (Yes/No)
If you ban an email address and a user already uses that address, a problem will occur. Using this option, you can specify whether the user will have to enter a new email address in their profile when they next modify their email address, or whether the user can just keep the email address which you have banned. - Global Ignore
This option allows you to effectively add a user or users to every member's 'Ignore List'. However, users in this list can still see their own posts and threads.
Enter a list of userid numbers into the textbox, separated by spaces (for example: 4 12 68 102).Note:If you change this option, you need to rebuild thread and then forum information in Maintenance > Update Counters.
View Banned Users |
<<<screenshot of the View Banned Users panel>>>
There are two tables in the View Banned User panel: Temporary Ban and Permanent Ban. Both tables have the following columns:
- User Name
The username of the user who has been banned. Clicking the username will open the Edit User form for that user. For more information on this form, see the Adding or Editing a User article. - Banned By
The username of the user who banned the specified user. Clicking the username will open the Edit User form for this user. For more information on this form, see the Adding or Editing a User article. - Banned On
The date the specified user was banned. - Ban Period
The length of the ban, in days. In the Permanent Ban table, this column displays “Permanent”. - Ban Will Be Lifted On
The date and time the ban will be lifted. In the Permanent Ban table, this column displays “Never”. - Ban Time Remaining
The amount of time the specified user has left on their ban, in days and hours. In the Permanent Ban table, this column displays “Forever”. - Lift Ban
Use this option to lift the ban on the specified user before the end of the ban period. Clicking the link opens a new page asking if you are sure you want to lift the ban for the specified user. Clicking the button will remove the user from the banned usergroup and placed back into the usergroup they were a member of before their banning. They will also be removed from the View Banned Users panel. Clicking the button will cancel the action and return you to the View Banned Users panel. - Ban Reason
This column displays the text entered into the “Reason to show the user” field on the Ban User form. Clicking this link will open a new page with the following fields:
<<<screenshot of the new forml>>>- User Name
The username of the specified banned user. - Reason to show the user
This message will be shown to the user every time they visit the site while the ban is in effect.
- User Name
Prune/Move Users |

- Usergroup – the usergroup matching users must belong to.
- Has not logged on for x days – the number of days since the user has visited the board. Set this to 0 to ignore.
- Join Date is Before – the user must have joined before the date you specify here.
- Posts is less than – the user must have less than this number of posts (based on post count stored with the user).
- Order By – field to order matching users by.
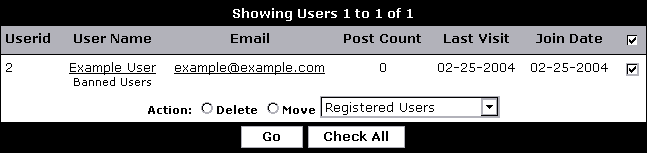
Note:
If you choose to move the selected users, only their primary usergroup will be changed. Secondary usergroups will remain the same.
Referrals |
If you have enabled the referral system, you can see what users have the most referrals over a specific time frame. This form allows you to specify the time frame to search over.
<<<screenshot of Referrals panel>>>
- Start Date
Enter the start date for the report. - End Date
Enter the end date for the report.
<<<screenshot of results>>>
Users with referrals over this time frame will be displayed here. Users with the most referrals will be displayed first. To see detailed information about a user’s referrals, click his or her username.
<<<screenshot of user's referral screen>>>
Search IP Addresses |
This form allows you to search for users with a specific IP address or list what IP address a user has used.
<<<screenshot of Search IP Addresses form>>>
- Find Users by IP Address
If you wish to see what users have posted from a specific IP address, enter the address in this field. You may also enter a partial IP. For example, if you wish to see what users have had 192.168.1.0 to 192.168.1.255, then enter 192.168.1. (Note the period after the final 1.) - Find IP Addresses for user
If you wish to see what IP addresses a specific user has posted with, enter the username in this field. - Depth to Search
A depth setting of 1 will only return the results of the specified search. A depth setting of 2 will return the results of the specified search, as well as running a search on each of the results.
For example, a search on 127.0.0.1 with a depth of 1 returns "Freddie" and "Scott". A search on 127.0.0.1 with a depth setting of 2 returns "Freddie" and "Scott", as well as returning all of the ip addresses used by "Freddie" and "Scott".
Find Users by IP Address Results
If you used the Find Users by IP Address, the results will look like this:
<<<screenshot of results for Find Users by IP field>>>
The first section displays the IP Address and attempts to resolve it. If it cannot be resolved, it will display "Could Not Resolve Hostname". Clicking the IP address link will open a new page displaying the IP Address and the Host Name (if it is able to be resolved).
Under the 'Post IP Addresses' header, click the Find Posts by User link to find all posts made by that user. Clicking the View Other IP Addresses for this User will search for IP addresses used by that user, opening new results as if you used the Find IP Addresses for user field with that user's name.
Under the 'Registration IP Addresses' header, you will find a list of other users that used the same IP to register their accounts. Click on their username to open the User Manager panel for that user. Click the IP address link to attempt to resolve the address. Click the Find Posts by User link to find all posts made by that user. Clicking the View Other IP Addresses for this User will search for IP addresses used by that user, opening new results as if you used the Find IP Addresses for user field with that user's name.
Find IP Addresses for User Results
If you used the Find IP Addresses for user, the results will look like this:
<<<screenshot of results for Find IP for Users field>>>
The first section displays the 'Registration IP Address', the IP with which the user originally registered their username.
Under the 'Post IP Addresses' header, you will find the IP addresses the user has used to post. Click the IP address link to attempt to resolve the address. Clicking the Find More Users with this IP Address link will search for users by IP address, opening new results as if you used the Find Users by IP Address field.
Under the 'Registration IP Addresses' header, you will find a list of other users that used the same IP to register their accounts. Click on their username to open the User Manager panel for that user. Click the IP address link to attempt to resolve the address. Click the Find Posts by User link to find all posts made by that user. Clicking the View Other IP Addresses for this User will search for IP addresses used by that user, opening new results as if you used the Find IP Addresses for user field with that user's name.
User Profile |
Usergroups & Permissions |
Understanding Usergroups and Permissions |
Concepts important in vBulletin usergroups and permissions include the following:
- Channels
- Group membership
- Inheritance
- Join requests
- Permissions
- Promotion
- Users and product functionality available in the Users menu
- Usergroups and product functionality available in the Usergroups menu
What are Users and User Menus |
You can access many screens involving user tasks in the Users menu of the Admin CP.
<<<Insert a screenshot of the Users menu and its submenus.>>>
What are Usergroups and Usergroup Menus |
You can access many screens involving usergroup tasks in the Usergroups menu of the Admin CP.
<<<Insert a screenshot of the Usergroups menu and its submenus.>>>
Membership to Multiple Groups |
For example, you might have a user who belongs to group X, but needs to have access to the few extra options (such as attaching files to posts) given by group Y. You can make X this user’s primary group and make Y a secondary group.
If a user is in multiple usergroups that have conflicting permission settings, the “greater” permission overrides the “lesser.” A Yes always overrides a No, and a larger number overrides a smaller one.
Note:
If 0 represents “unlimited” or “no” restriction, it overrides all other settings.
Warning:
Be careful when you put a user in a secondary group that you also use as a primary group. You might edit the group and inadvertently give the secondary user more permissions than you originally meant to!
What are Channels |
A channel owner is the user that has ownership of a particular channel. Owners control what happens in the channel. Blogs and social groups are examples of channels that can have owners.
A channel moderator is a user appointed by the channel owner to moderate a particular channel. Blogs and social groups are examples of channels that can have moderators.
A channel user is an individual who has permission to access a specific channel. A social group is an example of a channel that has users.
What is Inheritance |
In vBulletin there are two levels at which you can specify usergroup permissions.
Global Permissions
The first is at a the global level, which applies to all channels on the site. To edit global permissions, go to Usergroups > Usergroup Manager > Edit Usergroup.
The permissions you specify at the global level apply everywhere on on your site unless you override them at at a lower level (for example, at the channel level).
Channel-level Permissions
To edit channel-level permissions, go to Usergroups > Forum Permissions. Permissions you specify for a channel are automatically inherited by any child channel, unless overridden for the child channel.
What are Permissions |
vBulletin organizes permissions for various functions with a usergroup system. Default usergroups include Administrators, Super Moderators, Moderators, Registered Users and Guests.
You can use the Usergroup Manager to edit the various permissions for each group, and to add new usergroups to create a permissions system unique to your site.
You can access the Usergroup Manager from various links in the Usergroup menu, for example, Usergroup Manager and Add New Usergroup.
Also accessible from the Usergroups menu is the Administrator Permissions Manager, which allows Super Administrators to limit the powers of their co-administrators.
What are Join Requests |
When a user makes a join request, a message summarizing the request is displayed in the Usergroup Manager.
What are Promotions |
You manage usergroup promotions in the Usergroup Manager.
By default, promotions are checked and executed hourly.
For information about managing promotions, see [HOP]acp_permissions_tools_promotions[/HOP]
Usergroup & Permission Tools |
For more information about the tasks and tools, see the documentation topics following this one.
User Manager |
<<<Insert screenshot of the Users menu and its submenus.>>>
Another Usergroups & Permissions task involving the Users menu is managing access masks. Click Access Masks, which is the last submenu on the Users menu.
<<<Insert a level-setting screenshot of the Access Masks Manager.>>>
For more information about managing access masks, see [HOP]acp_permissions_tools_accessmasks[/HOP].
Usergroup Manager |
<<<Insert a screenshot of the Usergroups menu and its submenus.>>>
Usergroups & Permissions tasks include managing access masks, administrator permissions, channel permissions, join requests, and promotions.
<<<Insert a level-setting screenshot of the Usergroup Manager.>>>
Managing Usergroups |
<<<Insert screenshot of the Usergroups menu and its submenus.>>>
The following submenus under the Usergroups menu take you to the Usergroups Manager:
- Usergroup Manager
- Add New Usergroup
- Join Requests
- Promotions
- Channel Permissions
- Administrator Permissions
Adding and Editing A Usergroup |
Path to Edit Usergroup: Usergroups > Usergroup Manager > Edit Usergroup
Note:
You must click Save for changes to take effect.
You add a new usergroup on the Add New Usergroup page. If you are editing a usergroup, the form is already filled out. The only difference between the add and edit pages is that, when adding a new group, you have the ability to create a usergroup based on an existing usergroup.
Create Usergroup Based Off Of Usergroup
If you want to create the new usergroup based on an existing usergroup, select it from the picklist.
<<<Insert screenshot of the Create Usergroup Based off of Usergroup page>>>
If you use this option, all fields are populated with the values specified for the selected usergroup. Change whatever fields you want to and submit.
Default Channel Permissions
If you use this option, all fields are populated with the values specified for the selected channel. Change whatever fields you want to and submit.
Add New Usergroup
Title
Title of the new usergroup.
Description
Description of the new usergroup.
User Title
Use this to override the default ladder of user titles.
Username HTML Markup
Specify an opening and closing HTML tag with which to display the names of users in this group. This applies to names that appear on Logged-in Users, Who's Online, Users Browsing Channel, Users Browsing Thread, Posts, Member List etc.
The first field is the opening tag. The second field is the closing tag.
Password Expiry
Specify the number of days after which users’ passwords expire and they are required to change them.
Password History
If you specify x days here, users are not allowed to change their password to a string they have used in the past x days.
This setting has no effect if password expiry is set to 0 days
Public Group Settings
Public (Joinable) Custom Usergroups (Yes/No)
If this option is enabled, users are able to request membership to this group from their User CP. Join requests are queued up in the Usergroup Manager where you can handle them all at once.
Can override primary group title/markup (Yes/No)
Enable this option if you use this group as a member (secondary) group and you want group members to have this group's user title and username markup instead of the user title and username markup from their primary group.
Channel Viewing Permissions
Can View Channel (Yes/No)
This controls whether or not the members of this usergroup can view a channel.
Can View Thread Content (Yes/No)
This controls whether or not the members of this usergroup can view the content of threads.
Can View Others' Threads (Yes/No)
This controls whether or not the members of this usergroup can view other user's threads.
Can Use Email to Friend (Yes/No)
This controls whether or not the members of this usergroup can send content in this channel to a friend via email.
Can Download Attachments (Yes/No)
This controls whether or not the members of this usergroup can download attachments.
Can See Deletion Notices (Yes/No)
This controls whether or not the members of this usergroup can see deletion notices.
Can See Thumbnails (Yes/No)
This controls whether or not the members of this usergroup can see thumbnails.
Can Configure Channel (Yes/No)
This controls whether or not the members of this usergroup can configure a channel.
Channel Searching Permissions
Can Search Channels (Yes/No)
This controls whether or not the members of this usergroup can run searches.
Can Use Boolean Search (Yes/No)
This controls whether or not the members of this usergroup can user Boolean option in searches.
Post / Thread Permissions
Can Post Threads (Yes/No)
This controls whether or not the members of this usergroup can post threads.
Can Reply to Own Threads (Yes/No)
This controls whether or not the members of this usergroup can reply to their own threads.
Can Reply to Others' Threads (Yes/No)
This controls whether or not the members of this usergroup can reply to other user's threads.
Can Delete Own Posts (Yes/No)
This controls whether or not the members of this usergroup can delete their own posts.
Can Delete Own Threads (Yes/No)
This controls whether or not the members of this usergroup can deleter their own threads.
Can Open / Close Own Threads (Yes/No)
This controls whether or not the members of this usergroup can open or close threads.
Can Move Own Threads (Yes/No)
This controls whether or not the members of this usergroup can move threads.
Can Rate Threads (Yes/No)
This controls whether or not the members of this usergroup can rate threads.
Follow Channel Moderation Rules (Yes/No)
This controls whether or not the posts members of this usergroup makes are moderated. Selecting Yes will enable the functionality.
Can Tag Own Threads (Yes/No)
This controls whether or not the members of this usergroup can tag their own threads.
Can Tag Others' Threads (Yes/No)
This controls whether or not the members of this usergroup can tag other user's threads.
Can Delete Tags on Own Threads (Yes/No)
This controls whether or not the members of this usergroup can remove tags from their own threads.
Can Use HTML (Yes/No)
This controls whether or not the members of this usergroup can use HTML in their threads and replies.
Can Publish (Yes/No)
This controls whether or not the members of this usergroup can publish article.
Can Create Blog (Yes/No)
This controls whether or not the members of this usergroup can create blogs.
Can Create Tags (Yes/No)
This controls whether or not the members of this usergroup can create tags.
”Can Upload Attachments” Permissions
Can Upload Attachments (Yes/No)
This controls whether or not the members of this usergroup can upload attachments.
Space (in bytes) that a user's total attachment usage may consume (default: 1000000)
Set to 0 to not have a limit.
This controls how many bytes an attachment can have. Users in this usergroup may not have an attachment that exceeds the byte limit entered.
Poll Permissions
Can Can Post Polls (Yes/No)
This controls whether or not the members of this usergroup can create post polls.
Can Vote on Polls (Yes/No)
This controls whether or not the members of this usergroup can vote in polls.
Private Message Permissions
Maximum Stored Messages: (default: 0)
This controls the maximum number of stored messages this usegroup can have.
Can Use Message Tracking (Yes/No)
This controls whether or not the members of this usergroup can request a read receipt for their private messages.
Can Deny Private Message Read Receipt Request (Yes/No)
This controls whether or not the members of this usergroup can deny a private message read receipt.
Can Ignore Quota (Yes/No)
This controls whether or not the members of this usergroup can send PMs to users who have reached their Maximum Stored Messages.
Maximum Recipients to Send PMs at a time: (default: 5)
This controls the maximum number of recipients a user can Private Message.
For performance reasons, do not set this too high.
Set to 0 to allow unlimited recipients.
Message Throttle Quantity
This limits the number of messages the user can send within the Throttle Check Period.
The Throttle Check Period is defined in the global options.
Set this to 0 to disable throttling for this usergroup.
”Can View Calendar” Permissions
Can View Calendar (Yes/No)
This group must also have permission to view a specific calendar in order to view that calendar.
Can Post Events (Yes/No)
This group must also have permission to post events on a specific calendar if they are to post events on it.
Can Edit Own Events (Yes/No)
This group must also have permission to edit their own events on a specific calendar if they are to have permission to do so.
Can Delete Own Events (Yes/No)
This group must also have permission to delete their events on a specific calendar if they are to have permission to do so.
Can View Others' Events (Yes/No)
This group must also have permission to view other people's events on a specific calendar if they are to have permission to do so.
Posted Events are Not Moderated (Yes/No)
Event moderation can be enabled for an entire calendar by editing that calendar's settings. This permission allows you to make an exception for a specific usergroup.
Who’s Online Permissions
Can View Who's Online (Yes/No)
This permission allows members of this group to view the online.php page. This page shows a detailed list of currently active users, their locations, etc. This permission applies only to online.php, not the Currently Active Users list..
Reported locations do take channel permissions into consideration. For example, if a user in the online list is viewing a channel that the current logged in user doesn't have access to, online.php will only report that they are viewing a channel and not give the name of the channel.
Who's online must be enabled in your vBulletin options for this permission to have any effect. There are several Who's online settings on that page in your vBulletin options.
Can View IP Addresses (Yes/No)
This permission allows members of this group to view the IP addresses of currently logged in users on the online.php page.
Who's online must be enabled in your vBulletin options for this permission to have any effect. The Can View Who's Online permission above must also be enabled.
Can View Detailed Location Info for Users (Yes/No)
Allows the user to see detailed information for some channel actions. For example, if the subject is sending a private message, the user will be able to see who it is being sent to. If the subject is viewing the profile of a user, the user will be able to see who it is.
Can View Detailed Location Info of Users Who Visit Bad / No Permission Locations (Yes/No)
With this permission disabled, when a subject visits an unknown location or a location they don't have permission to visit, the user will see the subject as viewing the site home page.
Can view actual location of user (filepath/url). (Yes/No)
If this permission is enabled then members of this group will see a question mark icon next to locations on the online.php page. They can mouse over the image to see the file path of the page each user is visiting.
Who's online must be enabled in your vBulletin options for this permission to have any effect. The Can View Who's Online permission above must also be enabled.
Administrator Permissions
Can Moderate All Channels (is Super Moderator) (Yes/No)
This controls whether or not the members of this usergroup can moderate all channels.
Can Access Control Panel (is Administrator) (Yes/No)
This controls whether or not the members of this usergroup can access the AdminCP.
General Permissions
Can View Member Info (Yes/No)
This controls whether or not the members of this usergroup can view other user's profiles.
Can Edit Own Profile (Yes/No)
This controls whether or not the members of this usergroup can edit their own profile.
Can Set Self to Invisible Mode (Yes/No)
This controls whether or not the members of this usergroup can set themselves to invisible upon logging in.
Can 'See' Users Who Have Chosen to be Invisible While Online (Yes/No)
This controls whether or not the members of this usergroup can see users who have chosen the go into invisible mode upon logging in.
Can Use Custom Title (Yes/No)
This controls whether or not the members of this usergroup can use custom titles.
Can View Others' Profile Pictures (Yes/No)
This controls whether or not the members of this usergroup can view other user's profile pictures.
Can View Private Custom Fields (Yes/No)
This controls whether or not the members of this usergroup can view private custom fields.
Can Email Members (Yes/No)
This controls whether or not the members of this usergroup can email other users.
Can Use Friends List (Yes/No)
This controls whether or not the members of this usergroup can add friends to their account.
Show edited by note on edited messages? (Yes/No)
This controls whether or not an "edited by" note will appear in posts edited by members of this usergroup.
User Note Permissions
Can View User Notes About Others (Yes/No)
This controls whether or not the members of this usergroup can view user notes posted for other users.
Can Manage User Notes About Self (Yes/No)
This controls whether or not the members of this usergroup can manage user notes left for them.
User Notes Can Be Posted About This Group (Yes/No)
This controls whether or not notes can be posted about this usegroup.
Can View User Notes About Self (Yes/No)
This controls whether or not the members of this usergroup can view notes posted about themselves.
Can Manage User Notes About Others (Yes/No)
This controls whether or not the members of this usergroup can manage user notes left for others.
Can Post User Notes About Self (Yes/No)
This controls whether or not the members of this usergroup can post notes about themselves.
Can Post User Notes About Others (Yes/No)
This controls whether or not the members of this usergroup can post user notes about others.
Can Manage Own User Notes (Yes/No)
Notes that this user has posted, for self or others. This overrides the above manage permissions, if enabled.
Picture Uploading Permissions
Can Upload Profile Pictures (Yes/No)
This controls whether or not the members of this usergroup can upload a profile picture.
Can Upload Animated Profile Picture (Yes/No)
This controls whether or not the members of this usergroup can upload an animated profile picture.
Profile Picture Maximum Width (pixels) (default: 100)
This controls the maximum width (in pixels) of this usergroup's profile pictures.
Profile Picture Maximum Height (pixels) (default: 100)
This controls the maximum height (in pixels) of this usegroup's profile pictures.
Profile Picture Maximum File Size (bytes) (default: 25000)
(1KB = 1024 bytes)
This controls the maximum file size of this usegroup's profile pictures.
Can Upload Custom Avatars (Yes/No)
This controls whether or not the members of this usergroup can upload avatars.
Can Upload Animated Avatar (Yes/No)
This controls whether or not the members of this usergroup can upload animated avatars.
Custom Avatar Maximum Width (pixels) (default: 50)
This controls the maximum width (in pixels) of this usergroup's avatars.
Custom Avatar Maximum Height (pixels) (default: 50)
This controls the maximum height (in pixels) of this usergroup's avatars.
Custom Avatar Maximum File Size (bytes) (default: 20000)
(1KB = 1024 bytes)
This controls the maximum file size of this usegroup's avatars.
Can Upload Images for Signature (Yes/No)
This controls whether or not the members of this usergroup can upload images for their signatures.
Can Upload Animated GIF for Signature (Yes/No)
This controls whether or not the members of this usergroup can upload animated gifs for their signatures.
Signature Image Maximum Width (pixels)
Specify 0 for no limit.
This controls the maximum width (in pixels) of a signature image.
Signature Image Maximum Height (pixels)
Specify 0 for no limit.
This controls the maximum height (in pixels) of a signature image.
Signature Image Maximum Filesize (bytes)
(1KB = 1024 bytes)
This controls the maximum file size of a signature image.
Specify 0 for no limit.
Signature Permissions
Can Use Signatures (Yes/No)
This controls whether or not the members of this usergroup can create a signature.
Maximum Characters in Signature Including BB Code Markup
Maximum number of characters that a user in this group may use in his or her signature, including markup code.
Maximum Characters in Signature Excluding BB Code Markup
This controls the maximum number of characters in a signature, excluding BB Code markups.
Maximum Lines in Signature
This is the maximum number of lines users of this group may have in their signatures. Unfortunately, due to browser and style variations, this is not an exact science and should only be used as a rough guide.
Soft linewrapping can cause one contiguous string of text to be counted as multiple lines. The number of characters that are allowed before this text is treated as multiple lines is controlled by the Signature Soft-Linebreak Character Limit option. Text that is not the default size is scaled to count as more or less characters than normal.
Allow BB Code (Yes/No)
This controls whether or not the members of this usergroup can use BBCode in their signatures.
Allow Basic BB Code (Yes/No)
This controls whether or not the members of this usergroup can use basic BBCode in their signatures such as bold, italic and underline.
Allow Color BB Code (Yes/No)
This controls whether or not the members of this usergroup can use color BBCode in their signatures.
Allow Size BB Code (Yes/No)
This controls whether or not the members of this usergroup can use size BBCode in their signatures.
Maximum Value of x for [SIZE=x] BB Code (default: 7)
This controls the maximum font size of the size BBCode in a signature.
Allow Font BB Code (Yes/No)
This controls whether or not the members of this usergroup can use font BBCode in their signatures.
Allow Alignment BB Code (Yes/No)
This controls whether or not the members of this usergroup can use alignment BBCode in their signatures.
Allow List BB Code (Yes/No)
This controls whether or not the members of this usergroup can use list BBCode in their signatures.
Allow Link BB Code (Yes/No)
This controls whether or not the members of this usergroup can use link BBCode in their signatures.
Allow Code BB Code (Yes/No)
This controls whether or not the members of this usergroup can use the code BBCode in their signatures.
Allow PHP BB Code (Yes/No)
This controls whether or not the members of this usergroup can PHP BBCode in their signatures.
Allow HTML BB Code (Yes/No)
This controls whether or not the members of this usergroup can use HTML BBCode in their signatures.
Allow Quote BB Code (Yes/No)
This controls whether or not the members of this usergroup can user quote BBCode in their signatures.
Allow Image BB Code (Yes/No)
This controls whether or not the members of this usergroup can use image BBCode in their signatures.
Maximum Number of Images/Videos in Signature
Maximum number of images and videos that users in this group may use in their signatures. This includes video tags, img tags, sigpic tags (uploaded pictures), and smilies.
Specify 0 for no limit.
Allow Smilies (Yes/No)
This controls whether or not the members of this usergroup can user smilies in their signature.
Allow HTML (Yes/No)
This controls whether or not the members of this usergroup can user HTML in their signatures.
User Reputation Permissions
Can See Who Left User Ratings (Yes/No)
This controls whether or not the members of this usergroup can see who left them user ratings.
Can Use Reputation (Yes/No)
This controls whether or not the members of this usergroup can user reputation.
Can Hide Reputation from Others (Yes/No)
This controls whether or not the members of this usergroup can hide their reputation from other users.
Can Leave Negative Reputation (Yes/No)
This controls whether or not the members of this usergroup can leave negative reputation for other users.
User Infraction Permissions
Can Give Infractions to Others (Yes/No)
This controls whether or not the members of this usergroup can give infractions to other users.
Can See Others' Infraction Level (Yes/No)
This controls whether or not the members of this usergroup can see other user's infraction levels.
Can Give Arbitrary Value Infractions (Yes/No)
This controls whether or not the members of this usergroup can give other users arbitrary value infractions. The user must also have the Can Give Infractions to Others permission.
Can Reverse Infractions (Yes/No)
This controls whether or not the members of this usergroup can reverse infractions.
User Album Permissions
Can Have Album and Upload Pictures (Yes/No)
This controls whether or not the members of this usergroup can have an album and upload pictures.
Can View Albums (Yes/No)
Users without this permission can still see picture in public and profile album if they know the exact URL.
Follow Picture Moderation Rules (Yes/No)
This controls whether or not pictures that members of this usergroup goes in to the moderation queue.
Album Picture Maximum Width (pixels)
This controls the album picture's maximum width in pixels.
Album Picture Maximum Height (pixels)
This controls the album picture's maximum height in pixels.
Maximum Number of Album Pictures
This controls the maximum number of pictures in an album.
Maximum Total File Size of Album Pictures (bytes)
(1KB = 1024 bytes)
This controls the maximum file size for an album picture.
Can Comment on Pictures (Yes/No)
This controls whether or not the members of this usergroup can comment on a picture.
Can Edit Own Picture Comments (Yes/No)
This controls whether or not the members of this usergroup can edit their own comments on pictures.
Can Delete Own Picture Comments (Yes/No)
This controls whether or not the members of this usergroup can delete comments made on their pictures.
Can Manage Comments on Own Pictures (Yes/No)
This controls whether or not the members of this usergroup can manage comments on their own pictures.
Follow Picture Comment Moderation Rules (Yes/No)
This controls whether or not comments left by this usergroup on pictures goes through the moderation queue.
Profile Customization Permissions
Can Edit Font Family (Yes/No)
This controls whether or not the members of this usergroup can edit existing font families.
Can Edit Font Size (Yes/No)
This controls whether or not the members of this usergroup can edit font sizes.
Can Edit Colors (Yes/No)
This controls whether or not the members of this usergroup can edit the colors.
Includes font and background colors.
Can Edit Background Images (Yes/No)
Users must have user album permissions as well.
Can Edit Borders (Yes/No)
Includes border style, color, and width.
Can Edit Profile Privacy (Yes/No)
Whether or not the user can hide blocks on his or her profile page from other users.
Can Customize Profile (Yes/No)
This controls whether or not the members of this usergroup can customize their profile.
”Viewable on Show Groups” Permissions
Viewable on Show Groups (Yes/No)
Whether or not to show members of this group on the View Channel Leaders page.
Birthdays Viewable (Yes/No)
Whether or not the birthdays of users in this group are displayed on the calendar and channel home pages.
Viewable on the Memberlist (Yes/No)
Whether or not users in this group appear on the member list.
Allow Users to have Member Groups (Yes/No)
Whether or not permissions from the user's member (secondary) user group memberships are inherited.
This Usergroup is not a 'Banned' Group (Yes/No)
Setting this to No causes the group to be treated as a banned group, which prevents the sending of email notifications, show a banned error message on the permission error pages, and other unspecified behaviors.
Require Human Verification on Configured Actions (Yes/No)
Users have to pass human verification for the configured Human Verified Actions.
Visitor Message Permissions
Can Post Visitor Messages to Own Profile (Yes/No)
This controls whether or not the members of this usergroup can post visitor messages to their own profile.
Can Post Visitor Messages to Others' Profile (Yes/No)
This controls whether or not the members of this usergroup can post visitor messages to another user's profile.
Can Edit Own Visitor Messages (Yes/No)
This controls whether or not the members of this usergroup can edit visitor messages they've created.
Can Delete Own Visitor Messages (Yes/No)
This controls whether or not the members of this usergroup can delete visitor messages they created.
Can Manage Messages within Own Profile (Yes/No)
This controls whether or not the members of this usergroup can manage messages on their own profiles.
Follow Visitor Message Moderation Rules (Yes/No)
This controls whether or not a visitor message made by a member of this usergroup is put in the moderation queue. If set to No, messages are always placed into the moderation queue.
Groups Permissions
Can Join Groups (Yes/No)
This controls whether or not the members of this usergroup can join groups.
Can Create Groups (Yes/No)
This controls whether or not the members of this usergroup can create groups.
Maximum Created Groups (Yes/No)
Number of groups the user can have at any one time.
Can Manage Own Groups (Yes/No)
This controls whether or not the members of this usergroup can manager their own group.
Can Edit Own Groups (Yes/No)
If the only member of the group is the owner, he or she will be able to edit the group's information regardless of this setting.
Can Delete Own Groups (Yes/No)
This controls whether or not the members of this usergroup can delete a group they own.
Can View Groups (Yes/No)
This controls whether or not the members of this usergroup can view groups.
Can Post Messages in Groups (Yes/No)
This controls whether or not the members of this usergroup can post a message in a group.
Can Always Post Messages (Yes/No)
If enabled, the user will also be able to view private and invite only groups.
Can Manage Own Messages (Yes/No)
This controls whether or not the members of this usergroup can manage a post they make to a group.
Can Create New Discussions in Groups (Yes/No)
This controls whether or not the members of this usergroup can create a new discussion in a group.
Can Always Create Discussions (Yes/No)
This controls whether or not the members of this usergroup can always create discussions. If enabled, the user will also be able to view private and invite only groups.
Can Limit Discussions in Own Groups to the Group Owner (Yes/No)
If enabled, the user can configure his or her groups so only the user can create new discussions.
Can Manage Own Discussions (Yes/No)
This controls whether or not the members of this usergroup can manage their own group permissions.
Follow Group Message Moderation Rules (Yes/No)
If set to No, messages are always placed into the moderation queue.
Can Upload Group Icons (Yes/No)
This controls whether or not the members of this usergroup can upload a group icon.
Can Upload Animated Group Icons (Yes/No)
This controls whether or not the members of this usergroup can upload an animated gif group icon.
Maximum File Size of Group Icons (bytes) (Yes/No)
Group image icons are always limited to 200px by 200px.
Can Upload Pictures (Yes/No)
This controls whether or not the members of this usergroup can upload pictures to the group.
Follow Picture Moderation Rules (Yes/No)
This controls whether or not a picture uploaded by a member in this group is put in the moderation queue.
Adding and Editing Promotions |
You add or edit promotions in the Usergroup Manager. To edit an existing promotion, click its Edit link in the Controls column to get to the Usergroup Manager Promotion form. To add a new promotion, click the Add New Promotion button to get to the Add New Promotion form.
<<<Insert a screenshot of the Add New Promotion form.>>>
Except where otherwise noted, the options are the same whether you are adding or editing the promotion.
Note:
You must click on Save for your changes to take effect.
Select the usergroup to which you want this promotion to apply. A user must be a member of this usergroup if he or she is to be considered for this promotion.
Note:
This option is not available when you are editing an existing promotion. If you need to change a promotion’s source usergroup, create a new promotion and delete the old one.
Reputation is a ranking of your user's benefit to your channel. Users gain and lose reputation based on how their posts are scored by other channel participants.
Days Registered
The number of days a user has been registered.
Posts
User post count.
Promotion Strategy[
Select from the pulldown list which of the conditions must be true for this promotion to be invoked. Conditions inside parentheses are evaluated first.
For example, suppose your promotion settings are the following:
Reputation Comparison Type = Greater or Equal to
Reputation Level = 1000
Days Registered = 30
Posts = 100
Promotion Strategy = Posts and (Reputation or Date)
If a user has a reputation value of 1100, has been registered for 20 days, and has 150 posts, he or she will be promoted.
Promotion Type
Type of promotion the user is to receive if promoted. This can be either a primary usergroup or an additional usergroup.
Which promotion type to select depends on how groups and permissions are configured. If the promotion causes only a few changes to permissions and settings then it is easier to set up a new usergroup that grants the new permissions and settings, and then to have the promotion add membership to that group as an additional usergroup. If the promotion involves many changes then a primary usergroup change might be called for.
Reputation Comparison Type
Choose Greater Than or Equal To or Less Than.
This option applies only to reputation and only when reputation has been selected as part of the promotion strategy above.
Move User to Usergroup
Select the usergroup the user will be moved to when he or she is promoted.
Show All Primary Users |
<<<Insert screenshot of the Default Usergroups form or Custom Usergroups form with Show All Primary Users selected in the Controls column.>>>
The Show All Primary Users control displays a “Showing User” form that lists all users who are primary users in the specified usergroup.
<<<Insert screenshot that shows the beginning of the “Showing User” form.>>>
Showing Users Output
The list has several columns. The columns are:
User Name
If you click on the user name, you will be transferred to the Edit User page for that user.
Clicking the email address allows you to email that user.
Join Date
The date the user joined the usergroup.
Last Activity
The date the user was last active in the usergroup.
Post Count
The post count for this user.
Options
Here you can select from a pulldown list to do one of the following:
- View/Edit User
- Send Password to User
- Edit Access Masks
- Delete User
Show All Additional Users |
Note:
Users can be in multiple usergroups. They can have one primary usergroup and many secondary usergroups. “Additional Users” are those with that usergroup as their secondary usergroup.
The Show All Additional Users control displays a “Showing User” form that lists all users who are Additional users in the specified usergroup.
<<<Insert screenshot that shows the beginning of the “Showing User” form.>>>
Showing Users Output
The list has several columns. The columns are:
User Name
If you click on the user name, you will be transferred to the Edit User page for that user.
Clicking the email address allows you to email that user.
Join Date
The date the user joined the usergroup.
Last Activity
The date the user was last active in the usergroup.
Post Count
The post count for this user.
Options
Here you can select from a pulldown list to do one of the following:
- View/Edit User
- Send Password to User
- Edit Access Masks
- Delete User
View Reputation |
<<<Insert screenshot of the Default Usergroups form or Custom Usergroups form with View Reputation selected in the Controls column.>>>
The View Reputation control displays a “Showing User” form that lists all users in the specified usergroup with his or her post count and reputation value.
<<<Insert screenshot that shows the beginning of the “Showing User” form.>>>
Showing Users Output
The list has several columns. The columns are:
User Name
Clicking the username will open the Edit User page for that user.
Usergroup
The name of the usergroup.
Post Count
The post count for this user.
Reputation
The user’s reputation value.
Options
Here you can select from a dropdown list to do one of the following:
- View/Edit User
- Send Password to User
- Edit Access Masks
- Delete User
Channel Permissions Manager |
<<<Insert a screenshot of the Usergroups menu and its submenus, with the Channel Permissions link highlighted.>>>
The primary tool is View Channel Permissions, available on the home page of the Channel Permissions Manager. Using this facility, you can edit permissions by channel.
<<<Insert a level-setting screenshot of the Channel Permissions Manager, View Channel Permissions section.>>>
Other functions include Permission Duplication Tools, Permissions Quick Editor, and Quick Channel Permission Setup.
<<<Insert a screenshot of the Additional Functions form on the home page of the Channel Permissions Manager.>>>
For detailed information about channel permissions tasks and functions, see the Managing Permissions article.
Managing Permissions |
<<<Insert a screenshot of the Users menu and and its submenus.>>>
<<<Insert a screenshot of the Usergroups menu and its submenus.>>>
In vBulletin you can assign permissions to individual users and to users as a group. You can also assign permissions at the channel level. A special set of permissions is automatically assigned to users who are given administrative privileges.
The following topics explain how to do the most common vBulletin tasks involving permissions.
Adding and Editing Channel Permissions |
Path to viewing and editing channel permissions: Channel Management > Channel Permissions or Usergroups > Channel Permissions.
You view and edit channel permissions in the Edit Channel Permissions form of the Channel Permissions Manager.
<<<Insert a level-setting screenshot of the Channel Permissions Manager home screen.>>>
On this screen, all of your channels are listed. Beneath each channel, all of your usergroups are listed.
The color of each usergroup is significant. If the usergroup text is in white, it is using the default permissions for the usergroup. If the usergroup text is in red, it is using permissions customized for that channel. If it is in yellow, it is using custom permissions from a parent channel. The circle next to each usergroup name is also significant. A hollow circle means the usergroup cannot view the channel, while a full circle means they can.
To edit the permissions for any usergroup, or to revert them to default, click Edit next to the relevant group under the relevant channel.
You can Reset or Deny All usergroups within a channel as a group.
Other Channel Permissions Manager functions are linked from the Additional Functions form at the top of the page. There is detailed documentation for each (linked below).
The Permission Duplicator allows you to quickly duplicate an existing permission set between usergroups or between channels (see the Permission Duplicating Tools article).
You can also access the Permissions Quick Editor from here. The Quick Editor allows you to quickly revert permissions to default (see the Permissions Quick Editor article).
The last link at the top is Quick Channel Permissions Setup. You can use this to mass-apply permissions to multiple usergroups for a particular channel (see the Quick Channel Permission Setup article).
Following is information about viewing, adding and editing channel permissions.
<<<Insert a level-setting screenshot of only the View Channel Permissions form of the Channel Permissions Manager.>>>
All existing channels and their usergroups are listed on the form in a hierarchical format.
To edit the permissions for a given usergroup within a given channel, click the Edit link to the left of the usergroup name.
Note:
You must click Save for changes to take effect.
<<<Insert a level-setting screenshot of a sample “edit” screen.>>>
The exact contents of the edit screen varies depending on which set of permissions is being displayed.
However, the options in the top form (Edit Channel Permissions for Usergroup x in Channel y) are always as follows:
Inherit from parent (this will delete any existing permissions)
To save any changes to this page, you must select "Use custom permissions" (see below). If you already have custom settings and want to set this usergroup back to its default, select "Use usergroup default" and click the button.
Note:
This option is not available unless you have already created custom settings.
Use Custom Permissions
If you intend to make changes to anything on the remainder of the page, click this option.
To set the Yes/No options on the rest of the screen to either all Yes or all No, click the All Yes or All No button.
Edit Channel Permissions Options
Time Limit for Editing Replies (hr) (default: 24)
This limits the amount of time a member of this usergroup has to edit a reply for the selected channel. After the entered time period a reply cannot be changed.
Require Moderation for Replies (Yes/No)
Any reply made by this group to any topic in the selected channel will require a moderator to approve it before it becomes visible to other users.
Maximum number of tags (default: 6)
This limits the number of tags members of the usergroup can apply to a topic in this channel.
Maximum tags for Starter Reply (default: 3)
This limits the number of tags members of the usergroup can apply to the first post of a topic.
Maximum Tags by Other Users (default: 3)
This limits the number of tags members of the usergroup can apply to a topic they did not start.
Maximum Attachments (default: 5)
This limits the number of attachments a topic can have.
Channel Permissions
Can View Channel (Yes/No)
If set to ‘No’, the rest of the settings on this screen are unused, because the user is denied access to the channel.
Can Move Own Topics (Yes/No)
If this is set to ‘Yes’, users can move their own topics between any channels to which they have access. We recommend leaving this set to ‘No’ and having your channel moderators move the topics or doing it yourself.
Can Download Attachments (Yes/No)
If this is set to ‘No’, users cannot download reply attachments from topics in this channel. The attachment link is still visible, but after clicking it users are told that they don't have permission to use it.
Can Upload Attachments (Yes/No)
If this is set to ‘No’, users cannot attach files to their replies. They can, however, still use the BB IMG code to show images if you have turned that on for this channel.
Can Tag Own Topics (Yes/No)
Whether or not members of the usergroup can add tags to their own topics within this channel.
Can Tag Others’ Topics (Yes/No)
Whether or not members of the usergroup can add tags to others' topics within this channel.
Can Delete Tags on Own Topics (Yes/No)
Whether or not members of the usergroup can delete tags from topics they started within this channel.
Can Use HTML (Yes/No)
This determines whether or not members of the usergroup can use HTML in their topics and replies.
Can Publish (Yes/No)
This determines whether or not members of the usergroup can publish articles.
Moderator Permissions
Can Edit Replies (Yes/No)
This allows members of the usergroup to edit replies in this channel.
Can Manage Topics (Yes/No)
This allows members of the usergroup to move, delete, sticky, and unsticky topics in the channel
Can Moderate Replies (Yes/No)
This allows members of the usergroup to moderate replies in the channel.
Can Moderate Attachments (Yes/No)
This allows members of the usergroup to moderate attachments in the channel.
Can Ban Users (Yes/No)
This allows members of the usergroup to ban other users from the channel.
Can remove replies (Yes/No)
This allows members of the usergroup to remove and delete replies from topics in the channel.
Can Set Featured (Yes/No)
This allows members of the usergroup to set articles in the channel as Featured content.
Can Moderate Tags (Yes/No)
This allows members of the usergroup to moderate tags in the channel.
Can add_owners (Yes/No)
This allows members of the usergroup to add a moderator to the social group or blog.
Create Permissions
This allows members of the usergroup to create permissions for other users in the channel.
Can create channel (Yes/No)
This allows members of the usegroup to create subchannels in the channel.
Can create text/reply (Yes/No)
This allows members of the usergroup to make replies to topics in the channel.
Can create report (Yes/No)
This allows members of the usergroup to create reports.
Can create photo gallery (Yes/No)
This allows members of the usergroup to create a photo gallery.
Can poll (Yes/No)
This allows members of the usergroup to post polls in the channel.
Can create attachment (Yes/No)
This allows members of the usergroup to post attachments in the channel.
Can create photo (Yes/No)
This allows members of the usergroup to post photos in the channel.
Can create private message (Yes/No)
This allows members of the usergroup to send private messages.
Can create video (Yes/No)
This allows members of the usergroup to post videos.
Can create link (Yes/No)
This allows members of the usergroup to use links in their posts.
Permission Duplicating Tools |
This page allows you to duplicate existing permissions, either by usergroup or by channel. This expedites setting up a usergroup or channel that is similar to an existing one.
The usergroup-based permission duplicator copies permissions from a usergroup into one or more other usergroups you select. You can limit this to specific channels with the Only Copy Permissions from channel option.
To prevent accidental overwriting, use the Overwrite Duplicate Entries and Overwrite Inherited Entries settings. Overwrite Duplicate Entries prevents you from overwriting an existing permissions set for a channel (the entries are in red) for one of the usergroups you are copying to. Overwrite Inherited Entries is similar, except that it refers to cases where permissions aren’t directly specified for a channel, but rather a parent channel (the entries are in orange).
Click the Go button to execute the permission copy.
Click the Reset button to clear any checkboxes you have checked.
The channel-based permission duplicator works in a similar fashion, except that it copies all permissions in one channel to one or more selected channels. Overwrite Duplicate Entries and Overwrite Inherited Entries behave the same way.
Administrator Permissions Manager |
Managing Administrators |
<<<Insert a screenshot of the Usergroups menu and and its submenus.>>>
In vBulletin there is a special set of permissions pre-assigned to users who have administrative privileges. When you create new users (using the User Manager) you can name them as administrators, thereby giving them all of the existing administrator permissions.
To edit the administrator permissions, use the Administrator Permissions Manager, where you can link to screens that allow you edit the Administrator usergroup, view the control panel log, and edit the administrator permissions.
<<<Insert a screenshot of the initial screen of the Administrator Permissions Manager.>>>
The following topic describes the default administrator permissions and how to edit them.
Adding and Editing Administrator Permissions |
You edit administrator permissions using the Administrator Permissions Manager.
Note:
You must click Save for changes to take effect.
<<<Insert screenshot of the Administrator Permissions form of the Administrator Permissions Manager page>>>
Administrator Yes/No Permissions
Following is a list of the administrator Yes/No permissions, which are all set by default to Yes.
You can toggle back and forth between “All Yes” and “All No” using the All Yes and All No buttons at the top of the form. You can also set any of the options individually.
Can Administer Settings
Whether or not an administrator can access functionality in the Settings > Options menu of the Admin CP.
Can Administer Languages
Whether or not an administrator can access functionality in the Languages & Phrases menu of the Admin CP.
Can Administer Channels
Whether or not an administrator can access functionality in the Channel Management menu of the Admin CP.
>
Can Administer Topics
Whether or not an administrator can access functionality in the Topics & Posts menu of the Admin CP.
Can Administer Calendars
Whether or not an administrator can access functionality in the Calendars menu of the Admin CP.
Can Administer Users
Whether or not an administrator can access functionality in the Users, Usergroups, User Infractions, User Profile Fields, User Ranks, User Reputations, User Titles, and Paid Subscriptions menus of the Admin CP.
Can Administer User Permissions
Whether or not an administrator can access the Usergroups > Channel Permissions and Users > Access Masks submenus of the Admin CP.
Can Administer FAQs
Whether or not an administrator can access functionality in the FAQ menu of the Admin CP.
Can Administer Avatars / Icons / Smilies
Whether an administrator can access functionality in the Avatars, Post Icons, and Smilies menus of the Admin CP.
Can Administer BB Codes
Whether or not an administrator can access functionality in the Custom BB Codes menu of the Admin CP.
Can Administer CRON
Whether or not an administrator can access functionality in the Scheduled Tasks menu of the Admin CP.
Can Run Maintenance Tools
Whether or not an administrator can access functionality in the Maintenance menu of the Admin CP.
Because this permission allows an administrator to run code directly on your site server, ensure that you trust this administrator to do that correctly before setting the permission to Yes.
Can Administer Products
Whether or not an administrator can manage external products used by your site.
Because this permission allows an administrator to run code directly on your site server, ensure that you trust this administrator to do that correctly before setting the permission to Yes.
Can Administer Notices
Whether or not an administrator can access functionality in the Notices menu of the Admin CP.
Can Administer Moderator Log
Whether or not an administrator can view the moderator log available through the Statistics & Logs menu of the Admin CP.
Even if this option is set to Yes, permission to prune moderator logs is still limited by the "users with admin log pruning permissions" setting in includes/config.php.
<<<The online help is missing from the following 5 options. Are my made-up definitions correct? I need text for the rest.>>>
Can Administer XML Sitemap
Whether or not an administrator can access functionality in the XML Sitemap menu of the Admin CP.
Can Administer Ads
Whether or not an administrator can access functionality in the Advertising menu of the Admin CP.
Can Administer Tags
Whether or not an administrator can access functionality in the Tagging menu of the Admin CP.
Can Set Default User Profile Styling
Whether or not an administrator can override a user’s customized profile.
Can Use Sitebuilder
Whether or not an administrator has access to the Sitebuilder functionality in the front page.
Other Administrator Permissions
The other two administrator permissions are the following:
Control Panel Style Choice
The style this adminstrator sees, by default, in the Admin CP.
The administrator can override this setting on the login screen.
Dismissed vBulletin News Item IDs
The comma-separated list of news item IDs that have been dismissed by this administrator.
To reset the list, remove all contents from the field.
Join Requests |
Use the Join Requests page to manage join requests for moderated, public usergroups. If you enter directly (Usergroups > Join Requests), you are prompted to select a usergroup whose requests you want to see. If you enter through Usergroups > Usergroup Manager > View Join Requests link, you are taken directly to the join requests for a group.
Once you have selected a usergroup, you go to a page similar to the following:
<<<Insert a screenshot of the Join Request page>>>
Each outstanding join request is listed on this page. Selecting Accept will add this user to the group; Deny will remove the request, preventing the user from joining the group; and Ignore leaves the request as-is. Additionally, you can click Accept, Deny, and Ignore to select an option for each request.
Promotions |
<<<Insert a screenshot of the “initial promotions” page of the Usergroup Manager.>>>
Any existing promotions are listed. Click a promotion name to edit it.
To add a promotion, click Add New Promotion.
<<<Insert a screenshot of the Add New Promotion page of the Usergroup Manager.>>>
The promotion criteria are listed below.
Note:
You must click Save for changes to take effect.
Select a usergroup from the picklist.
Reputation Level
Enter a number that represents the required reputation level.
Days Registered
Enter the required number of days since registration.
Posts
Enter the required number of posts.
Promotion Strategy
Select from the picklist the promotion strategy (for example, Posts, Join Date, Reputation, or various combinations of criteria).
Promotion Type
Type of promotion that the user is to receive.
Select Primary Usergroup to change the user's main usergroup to this group or select Additional Usergroups to add this group to the user's additional usergroups.
Reputation Comparison Type
Select Greater Than or Equal or Less Than.
This option applies only to reputation and only when reputation has been selected as part of the Promotion Strategy option.
Move User to Usergroup
Select from the picklist the usergroup to which the user will be promoted.
Promotions are evaluated based on the time period defined in the Scheduled Tasks section. The default is every hour.
Promotions: Practical Examples |
There are a number of ways in which the Promotions system can be used within vBulletin. The entries in this section give the more common examples and are not in any way exhaustive.
To help combat spam, many users opt to have new user’s posts moderated until they’ve made a specific number of posts. This allows the Admin/Moderator team to keep potentially malicious posts out of the public eye until a user has effectively passed a ‘probationary period’ as a member of the site.
For this example, we will use the following criteria:
- Moderated Usergroup: Registered Users
- ‘Full Member’ Usergroup: Approved Members
- Number of Posts to Moderate: 10
As all new users go into the Registered Users usergroup by default, simply adjust the permissions for this group to ensure these have all posts and threads moderated. Then, you need to setup the usergroup for your non-Moderated users and adjust the permissions for this usergroup accordingly. To do this, create a new usergroup based off the Registered Users usergroup and set the permissions so that their posts and threads are NOT moderated.
For more information on usergroups and permissions, please see this section of the manual relating to these.
Once you have your usergroups setup to your needs, you should create the appropriate Promotion. Using the criteria above, your Promotions screen should look like this:
<<<Screenshot of Promotions screen with the following criteria>>>
Explanation:
- Usergroup
This is the usergroup that the users are currently a member of, i.e. Registered Users. The Promotion will only apply to these users. - Posts
These are the number of posts that a user should have made before they can be promoted, in this case 10. - Promotion Strategy
As this example will have a user promoted after 10 posts have been made, this should be set to ‘Posts’ - Promotion Type
Set this option to ‘Primary Usergroup’. When the Promotions Scheduled Task runs, the user will then have their Primary Usergroup changed. - Move User to Usergroup
This should be set to the new (non-Moderated) usergroup that was setup earlier, i.e. ‘Approved Members’
Now complete, this Promotion will move active users from the ‘Registered Users’ usergroup to the ‘Approved Members’ usergroup once they have made 10 approved posts in your forum.
As with Example 1, some admins prefer to limit the access that a new user has until they ‘prove’ themselves. This can be used for the following purposes (note these are not exhaustive):
- Avatar size (or ability to have one!)
- Signature usage (ability to have or limit what can be used)
- Ability to use Blogs
- Access to specific Channels
For this example, we will use the following criteria:
- Initial Usergroup: Registered Users
- ‘Full Member’ Usergroup: Full Members
- Number of Posts before Promotion: 10
As all new users go into the Registered Users usergroup by default, simply adjust the permissions for this group to what you wish them to have. Then, you need to setup the usergroup for those members who will have full access. To do this, create a new usergroup based off the Registered Users usergroup and set the permissions to give them the enhanced level of access.
For more information on usergroups and permissions, please see this section of the manual relating to these.
Once you have your usergroups setup to your needs, you should create the appropriate Promotion. Using the criteria above, your Promotions screen should look like this:
<<<Screenshot of Promotions screen with the following criteria>>>
Explanation:
- Usergroup
This is the usergroup that the users are currently a member of, i.e. Registered Users. The Promotion will only apply to these users. - Posts
These are the number of posts that a user should have made before they can be promoted, in this case 10. - Promotion Strategy
As this example will have a user promoted after 10 posts have been made, this should be set to ‘Posts’ - Promotion Type
Set this option to ‘Primary Usergroup’. When the Promotions Scheduled Task runs, the user will then have their Primary Usergroup changed. - Move User to Usergroup
This should be set to the new usergroup that was setup earlier, i.e. Full Members’
Now complete, this Promotion will move active users from the ‘Registered Users’ usergroup to the ‘Approved Members’ usergroup once they have made 10 posts in your forum.
Note:
To promote users using other criteria, simply set the relevant ‘Days Registered’ value, or ‘Reputation Level’ if promoting users after they receive ‘x’ reputation points and set the ‘Promotion Strategy’ to the appropriate option.
Some admins prefer to limit the access that a new user has to their site until they take out a Paid Subscription. The drawback with this is that the new user may not be in a position to decide whether they wish to pay for access until they’ve seen what content is available. As such, a method of allowing a ‘Trial Access’ is required.
For this example, we will use the following criteria:
- Initial Usergroup: Registered Users
- ‘Expired Trial Members’ Usergroup: Expired Trial Members
- Paid Access Usergroup: Premium Members
- Time Trial Access is available: 10
When a new user registers, they automatically go into the Registered Users usergroup. This usergroup can be set with partially restrictive permissions so that new users can see but perhaps not post to the forums unless they take out a Paid Subscription. To set this up, you will need to ensure that the permissions for your Registered Users usergroup are correct for your ‘Trial Members’. You will then need to create a new usergroup, ‘Expired Trial Members’, which should have no access to view your site.
For more information on usergroups and permissions, please see this section of the manual relating to these.
Once you have your usergroups setup to your needs, you should create the appropriate Promotion. Using the criteria above, your Promotions screen should look like this:
<<<Screenshot of Promotions screen with the following criteria>>>
Explanation:
- Usergroup
This is the usergroup that the users are currently a member of, i.e. Registered Users. The Promotion will only apply to these users. - Days Registered
These are the number of days that a user will have access to view your site before they are moved (promoted) to the usergroup that has no access, in this case 10. - Promotion Strategy
As this example will have a user promoted after 10 days have elapsed since registration, this should be set to ‘Join Date’ - Promotion Type
Set this option to ‘Primary Usergroup’. When the Promotions Scheduled Task runs, the user will then have their Primary Usergroup changed. - Move User to Usergroup
This should be set to the new usergroup that was setup earlier, i.e. Expired Trial Members’
Now complete, this Promotion will move active users from the ‘Registered Users’ usergroup to the ‘Expired Trial Members’ usergroup once they have been registered for 10 days in your forum.
Note:
For more information on Paid Subscriptions, please see this section of the manual <<<Needs correct hop after Paid Subscriptions article is written>>>
Some site owners opt to reward users who have been members of their site for a significant time by giving them access to features that newer members don’t. This example deals with how to set this up.
For this example, we will use the following criteria:
- Initial Usergroup: Registered Users
- ‘Enhanced Member’ Usergroup: Enhanced Members
- Length of Time Registered: 730
As all new users go into the Registered Users usergroup by default, simply adjust the permissions for this group to what you wish them to have. Then, you need to setup the usergroup for those members who will have enhanced access. To do this, create a new usergroup based off the Registered Users usergroup and set the permissions to give them the enhanced level of access..
For more information on usergroups and permissions, please see this section of the manual relating to these.
Once you have your usergroups setup to your needs, you should create the appropriate Promotion. Using the criteria above, your Promotions screen should look like this:
<<<Screenshot of Promotions screen with the following criteria>>>
Explanation:
- Usergroup
This is the usergroup that the users are currently a member of, i.e. Registered Users. The Promotion will only apply to these users. - Days Registered
These are the number of days that a user will have access to view your site before they are moved (promoted) to the usergroup that has no access, in this case 730. - Promotion Strategy
As this example will have a user promoted after 730 days (2 years) have elapsed since registration, this should be set to ‘Join Date’ - Promotion Type
Set this option to ‘Primary Usergroup’. When the Promotions Scheduled Task runs, the user will then have their Primary Usergroup changed. - Move User to Usergroup
This should be set to the new usergroup that was setup earlier, i.e. Enhanced Members’
Now complete, this Promotion will move active users from the ‘Registered Users’ usergroup to the ‘Enhanced Members’ usergroup once they have been registered for 730 days in your forum.
User Infractions |
Infractions carry a point total that is assigned to users as infractions occur. When user infraction points reach specified numbers, the users are added to infraction groups. Infraction groups can be set up to restrict the permissions of users.
Note:
There is no method to apply infractions in the vBulletin Front-End at this time.
An Introduction to User Infractions |
The first step in setting up your user infraction system is to create infraction levels. These levels vary based on the content of the site and the scale of the system that you want to create. You can create just a few levels or set up many levels covering a myriad of infractions.
When creating levels, keep in mind the point total at which you want to start penalizing users by taking away permissions. If you envision taking away a certain permission when a user accumulates 10 infraction points, then you need to consider how many points should be given for each infraction and how quickly the user can get to 10 points.
Each infraction level has an expiration time. When the infraction expires, the associated points are removed from the user's point total and the user's infraction groups are recalculated.
Infraction levels can also be allowed to be given as warnings. A warning does not add any infraction points to the user's point total. Warnings serve as a method to remind users of your site's rules and encourage them to be followed without awarding infraction points. Moderators can give an infraction or a warning for those levels that have the warning ability enabled.
When an infraction is given, a message is sent by the moderator to the receiving user that explains why the infraction is being given. This message uses the Private Messaging System if it is enabled. Otherwise, if your site has email enabled, an email is sent. At the same time, a new thread for discussion of the infraction is created in a predetermined channel. This channel is set up in the Settings > Options > User Infractions & Post Reporting Options section. For more information, read the User Infractions & Post Reporting Options article.
The second step in setting up the system is to create infraction groups that penalize users in whatever way you define.
Normal permissions work by combining all of a user's usergroup permissions and granting a permission for any that are set to ‘Yes’. Infraction group permissions work in the reverse: the permissions are combined and any permission set to ‘No’ is taken away from the user.
When you set up your infraction usergroups (in the Usergroup Manager), set all permissions to ‘Yes’, and then change those that need to be removed in case of an infraction to ‘No’.
Any permissions set to ‘No’ affects all channels. If you want to penalize a user only in certain channels, set all permissions to ‘Yes’ and then set up custom permissions at Usergroups > Channel Permissions for the channel in question using the Infraction Group. For more information on channel permissions, read the Channel Permissions article.
A user can be in multiple infraction groups: they will be assigned to all groups that apply to their primary usergroup ID that have a point total less than or equal to their accumulated points.
Navigate to User Infractions > User Infraction Manager to view current Infraction Levels and Infraction Groups. If you don’t have any set up, you can add them from this screen.
<<<Insert screenshot of User Infraction Manager.>>>
To add a new level, navigate to User Infractions > Add New User Infraction Level. For more information, see the Modifying User Infraction Levels article.
To add a new group, navigate to User Infractions > Add New User Infraction Group. For more information, see the Modifying User Infraction Levels article.
The User Infraction Manager |
The User Infraction Manager has three tables: User Infraction Levels, User Infraction Groups and Automatic Ban.
User Infraction Levels
<<<screenshot of the User Infraction Levels table>>>
The User Infraction Levels table has the following columns:
- Title
The title of the user infraction level. - Points
The number of points the specified user infraction level is worth. - Expires
The amount of time that the points stay active for the specified user infraction level. If the points never expire, this column will display "Never". - Warning
Whether or not the infraction level can be given as a warning. - Extend
Whether or not the expiration time period will be extended if the user receives an additional infraction of the same kind within the time period specified in the Expires field. - Controls
The dropdown list has the following options:- Edit
Selecting this option and clicking the button will open the Edit User Infraction Level form for the specified user infraction level. For more information about this form, see the Modifying User Infraction Levels article. - Delete
Selecting this option and clicking the button will open a confirmation dialog asking if you are sure you would like to delete the specified user infraction level. Clicking the will delete the user infraction level and return you to the User Infraction Manager. Clicking the will cancel the operation and return you to the User Infraction Manager.
- Edit
User Infraction Groups
<<<screenshot of the User Infraction Groups table>>>
The User Infraction Groups table has the following columns:
- Primary Usergroup
The usergroup for which this infraction group applies. - Override Usergroup
The usergroup that will be used to override the primary usergroup. See the Modifying User Infraction Groups article for more information about how permissions work in regards to this setting.
Clicking this link opens the Edit Usergroup form. For more information about this form, see the Adding and Editing A Usergroup article. - Override Display
Whether or not the user's username markup and user title will be replaced by the markup and user title from the infraction usergroup. - Points
The number of points that must be accumulated for this infraction group to apply. - Controls
The dropdown list has the following options:- Edit
Selecting this option and clicking the button will open the Edit User Group form for the specified user infraction group. For more information about this form, see the Modifying User Infraction Groups article. - Delete
Selecting this option and clicking the button will open a confirmation dialog asking if you are sure you would like to delete the specified user infraction group. Clicking the will delete the user infraction group and return you to the User Infraction Manager. Clicking the will cancel the operation and return you to the User Infraction Manager.
- Edit
Automatic Ban
<<<screenshot of the Automatic Ban table>>>
The Automatic Ban table has the following columns:
- Primary Usergroup
The usergroup for which this automatic ban applies. - Ban Usergroup
The usergroup the user will be moved to after they are banned. Clicking this link opens the Edit Usergroup form. For more information about this form, see the Adding and Editing A Usergroup article. - Amount
The number of points or infractions that the user must accumulate in order to trigger the automatic ban. - Method
Whether the the automatic ban is triggered via the specified number of "Points" or "Infractions". - Ban Period
The length of time that the user will be banned. - Controls
The dropdown list has the following options:- Edit
Selecting this option and clicking the button will open the Edit Automatic Ban form for the specified user infraction group. For more information about this form, see the Modifying Automatic Bans article. - Delete
Selecting this option and clicking the button will open a confirmation dialog asking if you are sure you would like to delete the specified automatic ban. Clicking the will delete the automatic ban and return you to the User Infraction Manager. Clicking the will cancel the operation and return you to the User Infraction Manager.
- Edit
Modifying User Infraction Groups |
Path to modifying an existing User Infraction Group: User Infractions > User Infraction Manager, then select “Edit” from the dropdown in the Control column for the infraction group you would like to edit.
Path to deleting an existing User Infraction Group: User Infractions > User Infraction Manager, then select “Delete” from the dropdown in the Control column for the infraction group you would like to delete.
<<<Insert screenshot of Add New User Infraction Group.>>>
Note:
You must click Save for changes to take effect.
Points
User's infraction point total at which this infraction group will apply.
Primary Usergroup
This is the usergroup to which this infraction group applies. Setting this to “-- All Usergroups--” applies this infraction group to all users.
Override with Permissions from Usergroup
When sufficient infraction points are accumulated by a user, that user is added to this infraction group.
Infraction groups work in the opposite manner from normal usergroups. When a user is assigned to an infraction usergroup, the user's normal permissions are determined and then the user’s combined infraction groups permissions are determined. If any permission in an infraction usergroup is set to “No”, then the user will lose that permission. “No” permissions override “Yes” permissions.
Override Display (Yes/No)
Whether or not to override the user's username markup and user title with the markup and user title from the infraction usergroup.
Modifying Automatic Bans |
Path to modifying an existing automatic ban: User Infractions > User Infraction Manager, then select “Edit” from the dropdown in the Control column for the automatic ban you would like to edit.
Path to deleting an existing automatic ban: User Infractions > User Infraction Manager, then select “Delete” from the dropdown in the Control column for the automatic ban you would like to delete.
<<<Insert screenshot of Add New Automatic Ban screen.>>>
Options:
Amount
The number of points or the number of infractions or points (see Method option, below) that will trigger this ban. This trigger will happen any time that a user exceeds this number of infractions or points.
Method (default: Points)
The method (infractions or points) by which to automatically ban the user.
The method uses the value specified in the Amount option above as a triggering limit.
Primary Usergroup (default: All Usergroups)
This ban applies only to users who have this usergroup as their primary usergroup.
Selecting “All Usergroups” applies this ban to all users.
Move User to Usergroup (default: Banned Users)
The usergroup where the user will be moved during the ban.
For the ban to be effective, this usergroup should have reduced or no permissions.
Note:
You can only select usergroups that are specified as banned groups.
Length of the ban. This ranges from 1 day to 2 years to permanent.
Viewing User Infractions |
You will be presented with a form, allowing you to search based on criteria such as the user the infraction was left for or by (optional) and a range of dates to search across.
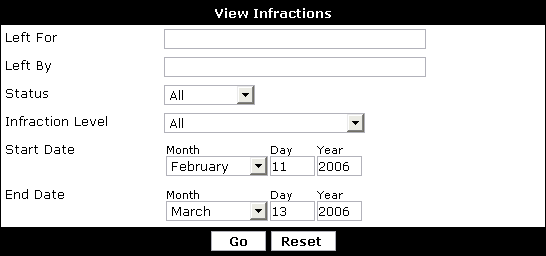
Debug: Error Database error in vBulletin.0.0 Alpha 35: Invalid SQL:. I will mark this impeded.>>>
Once you submit this form you will receive results in a table like this:
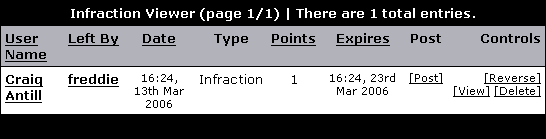
- The user that received the infraction
- The user that left the infraction
- The date and time the infraction was left
- The type of Infraction
- The number of points that was given for the infraction
- The expiration time of the infraction
- The post that the infraction was left for
Issuing User Infractions |
- General infraction
- Per-post infraction
To see more detail and search using various filtering criteria, click [View].
To give an infraction for a particular offending reply, click the Yellow Card / Red Card icon. (The location of the icon varies depending on your Postbit layout and style.)
By default it looks like the following.
<<<Insert a screenshot of of the Yellow Card / Red Card icon.>>>
After you select an infraction type to assign to the user, the Infraction screen opens.
In the Infraction screen, you can select the specific infraction to issue, add an administrative note and send a message to the user.
User Profile Fields |
Commonly used custom profile fields include Location, Occupation, and Interests.
An Introduction to Custom Profile Fields |
There are six input options to choose from to tailor your required user profile data collection method.
Single-Line Text Box
A single-line textbox that allows the user to enter a response.
Multiple-Line Text Box
A multiple-line textbox.
Single-Selection Radio Buttons
This option offers the user a choice of multiple answers, allowing them to make one selection.
Single-Selection Menu
This option offers the user a single choice of multiple answers presented as a dropdown menu.
Multiple-Selection Menu
This option offers multiple choices to the user, allowing multiple selections to be made from a drop down menu plus a selection box.
Multiple-Selection Checkbox
This option also offers multiple choices to the user, allowing multiple selections to be made from a set of checkboxes.
These fields can be required at registration or you can have them be shown after registration via the user's profile and options in the User CP.
User Profile Field Manager |
Add New User Profile Field |
In the Add New User Profile Field form, choose which type of input field you want to use. Examples include Single-Line Text Box, Single-Selection Radio Buttons, or Multiple-Selection Menu.
Single Line Text Box |
The Single-Line Text Box form allows you to add a custom single line text box field to the User Profile form.
Note:
You must click Save for changes to take effect.
- Title
The name of your single-line text box field. - Description
This is the description of the field as shown to your users. You should describe here what the field is intended for, and if it is required field or not, and/or if it is private from other users or not. - Profile Field Category
It is possible to group custom user profile fields into categories so that they can be logically grouped. The primary purpose of doing this is to allow different categories to be shown in different tabs or blocks on a user's profile page (in addition to being shown in the 'About Me' tab). See the User Profile Field Categories article for more information. - Default Value
If the member doesn't change this field, then this will be the value stored in their profile. - Max length of allowed user input Default: 100
The maximum number of characters that the member will be allowed to input. - Field Length Default: 25
The width of the input box in characters. - Display Order
This sets the order in which fields are displayed. The default is to add it to the end of your current fields. Display order starts at 1 and can be any whole positive number (don't use decimals or fractions). - Field Required Default: No
- Yes, at registration and profile updating
User will be required to complete this field at registration and when updating their profile. - Yes, always
User will be required to complete this field at registration. Enabling this setting will force all users to complete it before they can continue using your forum. This applies only if the field is shown on the "Edit Your Details" page. - No
Completion of this field is optional. - No, but display at registration
Completion of this field is optional but it will appear at registration.
- Yes, at registration and profile updating
- Field Editable by User Default: Yes
- Yes
User may edit this field at any time. - No
User may never edit this field. - Only at registration
User may only edit this field at registration or if it is set to be required and it is blank.
- Yes
- Private Field Default: No
If this is set to Yes, this field can be filled in by the user but will only be viewable to those with the proper usergroup permission. - Field Searchable on Members List Default: Yes
If this is set to No, users will not be able to search using this field on the Member's List Advanced Search. - Show on Members List Default: Yes
If this is set to Yes, this field will be displayed on the Member's List for each user. - Regular Expression
You may require this field's contents to match a PCRE-type regular expression. For example, you could have a field that is for the user's ICQ number. Since ICQ numbers consist of only numerals, you could write a regular expression to check for non-numerals.
Example:If you want to allow an empty response to be given, you need to account for it within the regex:^[0-9]{7,8}$See PHP.net for more information on regular expressions.^[0-9]{7,8}$|^$
- Which page displays this option? Default: Edit Profile
This controls what page the profile field is displayed on. Most likely you want to leave this on "Edit Profile" but if you wish to create your own user options that can be manipulated via template conditionals then select "Options". This field will then appear on the "Options" page of the User CP. Also, this field will not appear when viewing a user's profile.
Multiple Line Text Box |
The Multiple-Line Text Box form allows you to add a custom multiple line text box field to the User Profile form.
Note:
You must click Save for changes to take effect.
- Title
The name of your Multiple-Line Text Box field. - Description
This is the description of the field as shown to your users. You should describe here what the field is intended for, and if it is required field or not, and/or if it is private from other users or not. - Profile Field Category
It is possible to group custom user profile fields into categories so that they can be logically grouped. The primary purpose of doing this is to allow different categories to be shown in different tabs or blocks on a user's profile page (in addition to being shown in the 'About Me' tab). See the User Profile Field Categories article for more information. - Default Value
If the member doesn't change this field, then this will be the value stored in their profile. - Max length of allowed user input Default: 100
The maximum number of characters that the member will be allowed to input. - Field Length Default: 25
The width of the input box in characters. - Text Area Height Default: 4
This is how many rows high the input should be on the forms. It is recommend that you set this to at least 2. - Display Order
This sets the order in which fields are displayed. The default is to add it to the end of your current fields. Display order starts at 1 and can be any whole positive number (don't use decimals or fractions). - Field Required Default: No
- Yes, at registration and profile updating
User will be required to complete this field at registration and when updating their profile. - Yes, always
User will be required to complete this field at registration. Enabling this setting will force all users to complete it before they can continue using your forum. This applies only if the field is shown on the "Edit Your Details" page. - No
Completion of this field is optional. - No, but display at registration
Completion of this field is optional but it will appear at registration.
- Yes, at registration and profile updating
- Field Editable by User Default: Yes
- Yes
User may edit this field at any time. - No
User may never edit this field. - Only at registration
User may only edit this field at registration or if it is set to be required and it is blank.
- Yes
- Private Field Default: No
If this is set to Yes, this field can be filled in by the user but will only be viewable to those with the proper usergroup permission. - Field Searchable on Members List Default: Yes
If this is set to No, users will not be able to search using this field on the Member's List Advanced Search. - Regular Expression
You may require this field's contents to match a PCRE-type regular expression. For example, you could have a field that is for the user's ICQ number. Since ICQ numbers consist of only numerals, you could write a regular expression to check for non-numerals.
Example:If you want to allow an empty response to be given, you need to account for it within the regex:^[0-9]{7,8}$See PHP.net for more information on regular expressions.^[0-9]{7,8}$|^$
- Which page displays this option? Default: Edit Profile
This controls what page the profile field is displayed on. Most likely you want to leave this on "Edit Profile" but if you wish to create your own user options that can be manipulated via template conditionals then select "Options". This field will then appear on the "Options" page of the User CP. Also, this field will not appear when viewing a user's profile.
Note:
Multiple-Line Text box fields can not be listed on the Members List.
Single Selection Radio Buttons |
The Single-Selection Radio Buttons form allows you to add a custom single-selection radio button field to the User Profile form.
Note:
You must click Save for changes to take effect.
- Title
The name of your single-selection radio button field. - Description
This is the description of the field as shown to your users. You should describe here what the field is intended for, and if it is required field or not, and/or if it is private from other users or not. - Profile Field Category
It is possible to group custom user profile fields into categories so that they can be logically grouped. The primary purpose of doing this is to allow different categories to be shown in different tabs or blocks on a user's profile page (in addition to being shown in the 'About Me' tab). See the User Profile Field Categories article for more information. - Options
In this box, put each value that should appear as a radio button. Make sure to separate each option with a new line carriage return ("Enter" key). - Set Default Default: Yes
If this is set to Yes, the first radio button will be preselected for the user. Otherwise, none will be selected. - Display Order
This sets the order in which fields are displayed. The default is to add it to the end of your current fields. Display order starts at 1 and can be any whole positive number (don't use decimals or fractions). - Field Required Default: No
- Yes, at registration and profile updating
User will be required to complete this field at registration and when updating their profile. - Yes, always
User will be required to complete this field at registration. Enabling this setting will force all users to complete it before they can continue using your forum. This applies only if the field is shown on the "Edit Your Details" page. - No
Completion of this field is optional. - No, but display at registration
Completion of this field is optional but it will appear at registration.
- Yes, at registration and profile updating
- Field Editable by User Default: Yes
- Yes
User may edit this field at any time. - No
User may never edit this field. - Only at registration
User may only edit this field at registration or if it is set to be required and it is blank.
- Yes
- Private Field Default: No
If this is set to Yes, this field can be filled in by the user but will only be viewable to those with the proper usergroup permission. - Field Searchable on Members List Default: Yes
If this is set to No, users will not be able to search using this field on the Member's List Advanced Search. - Show on Members List Default: Yes
If this is set to Yes, this field will be displayed on the Member's List for each user.
<<<Screenshot of Optional Input section>>>
- Allow user to input their own value for this option Default: No
If this is set to Yes, the user will be allowed to fill in a text input field as an alternative to the options you have given for this field. - Max length of allowed user input Default: 100
The maximum number of characters that the member will be allowed to input. - Field Length Default: 25
The width of the input box in characters. - Regular Expression
You may require this field's contents to match a PCRE-type regular expression. For example, you could have a field that is for the user's ICQ number. Since ICQ numbers consist of only numerals, you could write a regular expression to check for non-numerals.
Example:If you want to allow an empty response to be given, you need to account for it within the regex:^[0-9]{7,8}$See PHP.net for more information on regular expressions.^[0-9]{7,8}$|^$
- Which page displays this option? Default: Edit Profile
This controls what page the profile field is displayed on. Most likely you want to leave this on "Edit Profile" but if you wish to create your own user options that can be manipulated via template conditionals then select "Options". This field will then appear on the "Options" page of the User CP. Also, this field will not appear when viewing a user's profile.
Single Selection Menu |
The Single-Selection Menu form allows you to add a custom single-selection menu field to the User Profile form.
Note:
You must click Save for changes to take effect.
- Title
The name of your Single-Selection Menu field. - Description
This is the description of the field as shown to your users. You should describe here what the field is intended for, and if it is required field or not, and/or if it is private from other users or not. - Profile Field Category
It is possible to group custom user profile fields into categories so that they can be logically grouped. The primary purpose of doing this is to allow different categories to be shown in different tabs or blocks on a user's profile page (in addition to being shown in the 'About Me' tab). See the User Profile Field Categories article for more information. - Options
In this box, put each value that should appear as a menu item. Make sure to separate each option with a new line carriage return ("Enter" key). - Set Default Default: Yes, Including a First Blank Item
- None
The selected option will be a blank field. If you require this field, this will force the user to make a choice. - Yes, Including a First Blank Option
This sets the first option above as selected but also creates a blank option allowing the user to choose nothing if this field isn't required. - Yes, but No First Blank Option
This also sets the first option above as selected but doesn't allow the user to choose a nothing since their is no empty option to choose from.
- None
- Display Order
This sets the order in which fields are displayed. The default is to add it to the end of your current fields. Display order starts at 1 and can be any whole positive number (don't use decimals or fractions). - Field Required Default: No
- Yes, at registration and profile updating
User will be required to complete this field at registration and when updating their profile. - Yes, always
User will be required to complete this field at registration. Enabling this setting will force all users to complete it before they can continue using your forum. This applies only if the field is shown on the "Edit Your Details" page. - No
Completion of this field is optional. - No, but display at registration
Completion of this field is optional but it will appear at registration.
- Yes, at registration and profile updating
- Field Editable by User Default: Yes
- Yes
User may edit this field at any time. - No
User may never edit this field. - Only at registration
User may only edit this field at registration or if it is set to be required and it is blank.
- Yes
- Private Field Default: No
If this is set to Yes, this field can be filled in by the user but will only be viewable to those with the proper usergroup permission. - Field Searchable on Members List Default: Yes
If this is set to No, users will not be able to search using this field on the Member's List Advanced Search. - Show on Members List Default: Yes
If this is set to Yes, this field will be displayed on the Member's List for each user.
<<<Screenshot of Optional Input section>>>
- Allow user to input their own value for this option Default: No
If this is set to Yes, the user will be allowed to fill in a text input field as an alternative to the options you have given for this field. - Max length of allowed user input Default: 100
The maximum number of characters that the member will be allowed to input. - Field Length Default: 25
The width of the input box in characters. - Regular Expression
You may require this field's contents to match a PCRE-type regular expression. For example, you could have a field that is for the user's ICQ number. Since ICQ numbers consist of only numerals, you could write a regular expression to check for non-numerals.
Example:If you want to allow an empty response to be given, you need to account for it within the regex:^[0-9]{7,8}$See PHP.net for more information on regular expressions.^[0-9]{7,8}$|^$
- Which page displays this option? Default: Edit Profile
This controls what page the profile field is displayed on. Most likely you want to leave this on "Edit Profile" but if you wish to create your own user options that can be manipulated via template conditionals then select "Options". This field will then appear on the "Options" page of the User CP. Also, this field will not appear when viewing a user's profile.
Multiple Selection Menu |
The Multiple-Selection Menu form allows you to add a custom multiple-selection menu field to the User Profile form.
Note:
You must click Save for changes to take effect.
Add New User Profile Field
- Title
The name of your Multiple-Selection Menu field. - Description
This is the description of the field as shown to your users. You should describe here what the field is intended for, and if it is required field or not, and/or if it is private from other users or not. - Profile Field Category
It is possible to group custom user profile fields into categories so that they can be logically grouped. The primary purpose of doing this is to allow different categories to be shown in different tabs or blocks on a user's profile page (in addition to being shown in the 'About Me' tab). See the User Profile Field Categories article for more information. - Limit Selection Default: 0
Maximum number of options the user may select. Set to 0 to allow the user to select all options. - Box Height Default: 0
Sets the number of options to display simultaneously. Set to 0 to display them all. - Options
In this box, put each value that should appear as an option. Make sure to separate each option with a new line carriage return ("Enter" key).Note:You may have a maximum of 31 options in this field. - Display Order
This sets the order in which fields are displayed. The default is to add it to the end of your current fields. Display order starts at 1 and can be any whole positive number (don't use decimals or fractions). - Field Required Default: No
- Yes, at registration and profile updating
User will be required to complete this field at registration and when updating their profile. - Yes, always
User will be required to complete this field at registration. Enabling this setting will force all users to complete it before they can continue using your forum. This applies only if the field is shown on the "Edit Your Details" page. - No
Completion of this field is optional. - No, but display at registration
Completion of this field is optional but it will appear at registration.
- Yes, at registration and profile updating
- Field Editable by User Default: Yes
- Yes
User may edit this field at any time. - No
User may never edit this field. - Only at registration
User may only edit this field at registration or if it is set to be required and it is blank.
- Yes
- Private Field Default: No
If this is set to Yes, this field can be filled in by the user but will only be viewable to those with the proper usergroup permission. - Field Searchable on Members List Default: Yes
If this is set to No, users will not be able to search using this field on the Member's List Advanced Search. - Show on Members List Default: Yes
If this is set to Yes, this field will be displayed on the Member's List for each user.
- Which page displays this option? Default: Edit Profile
This controls what page the profile field is displayed on. Most likely you want to leave this on "Edit Profile" but if you wish to create your own user options that can be manipulated via template conditionals then select "Options". This field will then appear on the "Options" page of the User CP. Also, this field will not appear when viewing a user's profile.
Multiple Selection Checkbox |
The Multiple-Selection Checkbox form allows you to add a custom multiple-selection checkbox field to the User Profile form.
Note:
You must click Save for changes to take effect.
- Title
The name of your Multiple-Selection Checkbox field. - Description
This is the description of the field as shown to your users. You should describe here what the field is intended for, and if it is required field or not, and/or if it is private from other users or not. If you choose the limit the number of choices, you should also add that information here. - Profile Field Category
It is possible to group custom user profile fields into categories so that they can be logically grouped. The primary purpose of doing this is to allow different categories to be shown in different tabs or blocks on a user's profile page (in addition to being shown in the 'About Me' tab). See the User Profile Field Categories article for more information. - Limit Selection Default: 0
Maximum number of options the user may select. Set to 0 to allow the user to select all options. - Options
In this box, put each value that should appear as an option. Make sure to separate each option with a new line carriage return ("Enter" key).Note:You may have a maximum of 31 options in this field. - Display Order
This sets the order in which fields are displayed. The default is to add it to the end of your current fields. Display order starts at 1 and can be any whole positive number (don't use decimals or fractions). - Field Required Default: No
- Yes, at registration and profile updating
User will be required to complete this field at registration and when updating their profile. - Yes, always
User will be required to complete this field at registration. Enabling this setting will force all users to complete it before they can continue using your forum. This applies only if the field is shown on the "Edit Your Details" page. - No
Completion of this field is optional. - No, but display at registration
Completion of this field is optional but it will appear at registration.
- Yes, at registration and profile updating
- Field Editable by User Default: Yes
- Yes
User may edit this field at any time. - No
User may never edit this field. - Only at registration
User may only edit this field at registration or if it is set to be required and it is blank.
- Yes
- Private Field Default: No
If this is set to Yes, this field can be filled in by the user but will only be viewable to those with the proper usergroup permission. - Field Searchable on Members List Default: Yes
If this is set to No, users will not be able to search using this field on the Member's List Advanced Search. - Show on Members List Default: Yes
If this is set to Yes, this field will be displayed on the Member's List for each user.
- Which page displays this option? Default: Edit Profile
This controls what page the profile field is displayed on. Most likely you want to leave this on "Edit Profile" but if you wish to create your own user options that can be manipulated via template conditionals then select "Options". This field will then appear on the "Options" page of the User CP. Also, this field will not appear when viewing a user's profile.
User Profile Field Categories |
If there are no User Profile Field Categories, this screen will display:
Otherwise, the screen you arrive on will look like this:
ID
This identifies the sequence in which the category was created.
Title
This is the title of the created category. The italic text beneath is the entered description.
Contains (x) fields
This is how many custom fields have been organized into this category.
Display Order
This is the display order of the category in the User Profile Field Manager.
Edit
This link opens the edit page for a selected category.
Delete
This link starts the delete process for a selected category.
Save Display Order
This saves any changes made to the display order of the categories.
Add View Profile Field Category
This link opens the form you need to create new categories.
Adding / Editing User Profile Field Categories |
If you want to add a new category, click on the Add New Profile Field Category at the bottom of the page.
If you want to edit an existing category, click on the Edit link to the left of the category you want to edit.
Both options will open a form similar to the one above. The edit version will have the fields filled out, while the add version will have empty fields.
Title
This is the title of the category.
Translations
When inserting a custom phrase, you may also specify the translations into whatever languages you have installed.If you do leave a translation box blank, it will inherit the text from the 'Text to insert' box. You may customize the translations further at any time.
Description
This is the description for your category.
Location on Profile Page
Use this control to specify whereabouts on a users' profile pages you would like this profile field category to appear.
There are several options, some of which will cause the information to appear as a tab, and other will display the information as a block in the column next to the tabs.
Display Order
This option controls where the category will appear relative to other categories when listed. A category with a higher display order number will appear after or below a lower number.
Allow User Privacy Options
This option controls whether the category will appear in the 'Customize Profile' page, allowing users to select whether to hide or display the category's profile block to other users.
Modifying Existing Custom Profile Fields |
User Profile Field Manager
The User Profile Field Manager panel allows you to manage and modify existing profile fields on the User Profile form.
The table displays the Title, Options, Name, Display Order and links to modify the fields in the User Profile form.
- The Title column displays the text entered into the Title field in the Add New User Profile Field form.
- The Options column displays any of the following options that are active for the field:
- Required - If the field is set as any of the yes options in the Field Required field on the in the Add New User Profile Field form.
- Editable - If the field is set to Yes in the Field Editable by User field on the in the Add New User Profile Field form.
- Private - If the field is set to Yes in the Private Field radio button option on the in the Add New User Profile Field form.
- Searchable - If the field is set to Yes in the Field Searchable on Members List radio button option on the in the Add New User Profile Field form.
- Member List - If the field is set to Yes in the Show on Members List radio button option on the in the Add New User Profile Field form.
- The Name column displays the field number of the corresponding profile field. You can use a profile field's field number to make it show in user posts.
- The Display Order column shows the display order of the corresponding profile field. Display orders are used to order profile fields on the various pages of the User CP on which they can be displayed. You can change display orders by editing the display order fields and clicking the Save Display Order button.Note:You must click Save Display Order for changes to the display order to take effect.
- The Controls column displays two links: one to edit and one to delete the corresponding profile field.
Clicking the Edit link will display the options for the field, much like Add New User Profile Field form. There are a few differences that are discussed below.
Clicking the Delete link displays a confirmation screen asking if you are sure you want to delete the field. Clicking the No button will cancel the operation and return you to the User Profile Field Manager. Clicking the Yes button will delete the field and all data associated with it. This action cannot be undone.
There are a couple points that you must consider when modifying an existing profile field.
The first is that profile fields are limited in what other field types that they can be converted to.
- A Single-Line Text Box can be converted to a Multiple-Line Text Box and vice versa
- A Multiple-Selection Checkbox can be converted to a Multiple-Selection Menu and vice versa
Secondly, a special form is required when modifying the user choices in the Multiple-Selection Checkbox and Multiple-Selection Menu fields. If you wish to add, delete or change the order of the available options, click the Modify button in the Fields field of the form. It will display the following screen:
To move an item up in the list, press the up arrow to the left of the item and to move an item down press the down arrow to the left of the item.
To rename an item, click the Rename link to the right of the item. To delete an item, click the Delete link.
Use the Add form to add a new item. To add a new choice to the list, enter the name of the choice in the Name field. You can set the position of the item using the Position dropdown menu. Click the Add New Option button to save the item to the list or click the Reset button to clear the form.
User Ranks |
However, User Ranks are more flexible than User Titles because they can (if desired) be applied to specific usergroups, and can contain images and HTML in the titles.
An Introduction to User Ranks |
User's ranks generally appear beneath their username on posts, private messages, announcements, usernotes and in their profile.
Ranks can be assigned to specific usergroups or they can be assigned to cover all groups who don't have a rank specifically assigned to them.
As of vBulletin 3.5, it is possible for a user to display multiple ranks by being a member of multiple user groups, each with specific ranks. vBulletin 3.0 only allowed a single set of ranks to be displayed for a user. This is covered in more detail when editing a rank is discussed.
Navigate to User Ranks > User Rank Manager to view your current ranks. If you have none set up, you will only see the small notice that defines user ranks.
The figure above demonstrates a simple rank scheme. In this setup, members of the Administrator group who have at least 1 post would have the rank of three smilies. Since we have also set up a rank to cover All Usergroups, all members, including the Administrator group, with at least 10 posts would have a rank of .::Newbie::..
To add a new rank, navigate to User Ranks > Add New User Rank.
Modifying User Ranks |
Number of Times to Repeat Rank
This generally applies to ranks that are images. This is the number of time the image will be repeated. If you wanted 4 stars to appear, you would either create an image of 4 stars and set this to 1 or you would create an image of 1 star and set this to 4.
Usergroup
This is the usergroup that this rank applies to. If you want it to apply to all groups then leave it set to All Usergroups
Note:
When this is set to All Usergroups, Display Type controls an important feature. If Display Type is set to 'always', then this rank will display for every user, no matter what other ranks you may have defined for their usergroups. When set to 'if displaygroup = this group', then this rank will only display if the user has no other ranks explicitly defined for their usergroup. You use this setup to create a generic rank for everyone but keep it from displaying for other groups that have a special rank (Admin, Moderator, etc)
This is the minimum number of posts that the user must have to obtain this rank. If you set this to 20 and then create a second rank for the same usergroup that had a minimum posts of 30 then this rank would be shown only for users in this usergroup that have from 20 to 29 posts.
Stack Rank (Yes/No)
This allows you to control how ranks are displayed in case a user has multiple ranks displayed. If you set this to yes, this rank will be displayed on its own line. If you set this to no, this rank will follow the previous rank on the same line.
Display Type
This option controls who the rank will be shown for. If you select 'always', the rank will be displayed for any user that has this user group as a primary or secondary group. If you select 'if displaygroup = this group', then this rank will only be shown if the user is currently being identified as this group. If you are not using multiple-group membership, this option does not have any effect.
Note:
Remember, the rank will apply to the users Primary Usergroup unless the user has chosen to be identified by a Secondary Usergroup through Public Groups.
This is the file path to the image you wish to use. It is relative to your forum directory, i.e. images/smilies/biggrin.gif.
OR you may enter text
If you wish to use text instead of an image, you would put in this field.
To modify an existing rank, press Edit to the right of the rank in the User Rank Manager. Editing a User Rank presents you with the same options as adding a new rank.
To remove a rank, select the Delete option to the right of the user rank in the User Rank Manager.
User Ranks Example |
Since we have set the Display Type of the All Usergroups ranks to Displaygroup, we have invoked the special setting mentioned in Modifying User Ranks. The All Usergroups ranks will display for everyone except for those in the Administrator group since that group has a rank explicitly defined, the ADMIN rank. Since we have set Stack Rank to No for both ranks, that means that the rank will appear all on one line.
Ranks are evaluated by usergroupid in reverse order. This means that the All Usergroups rank will appear last. If you wish to have ADMIN appear on one line, and the All Usergroups rank on another, you would set the Stack Rank option of the Administrator group to Yes. This will result in an html <br /> being placed after ADMIN. The All Usergroups rank would then follow, displaying on a new line.
The ADMIN rank would only display for users that had the Administrator group as their primary Usergroup or as a Secondary group. If the Display Type of the Administrator group's rank was changed to Displaygroup, then this rank would only show for those user's who have set the Administrator group as their displaygroup. That would be accomplished either by the user only being in the Administrator group, being a member of multiple groups assigned by the admin and having the Admin group as their displaygroup, or by having used Public Groups to to join the Admin group and choosing that as their display group.
The last scenario is quite unlikely since you would not allow members to join the Administrator group on their own choosing but the logic can be applied to other groups.
User Reputation |
Using the User Reputation manager, you can create titles for a variety of reputation levels, so that users are given a reputation title when they reach a certain reputation level.
An Introduction to User Reputation |
Users gain and lose reputation based on how their posts are scored by other forum participants. Users with the ability to affect reputation, will either give or take aways points by approving or disapproving with a post's content.
User reputation can be a divisive element of your forum so great care should be taken before a decision is made to enable it.
All of the factors that affect a user's reputation score are found in the User Reputation section. Please view that section of the manual for more information on controlling how users are able to affect another user's reputation.
Add New User Reputation |
<<Insert image of form here>>
Description
The text entered here becomes the description of the reputation level. For example, if you were to enter is a fine minion! into the text field, it would display as: (username) is a fine minon! as long as they met the number entered into the Minimum Reputation Level field.
Minimum Reputation Level
This is the minimum reputation level that the user must meet before receiving the reputation description entered above. This can be a positive or negative number.
Note:
Make sure to choose a reputation level that is not the same as a level that already exists as levels must be unique. You will not be allowed to save the field if you duplicate a minimum level.
User Reputation Manager |
<<insert image of reputation manager>>
In the above example, we have all of the levels that users on this forum can achieve. For example, a user with a reputation of 55 would have the level of will become famous soon enough. A user with a reputation of -5 would have a level of has a little shameless behaviour in the past. Since the lowest level in this example is -99999, any user with a reputation lower than this would use the default undefined level that is set in the reputation section of the vBulletin Options.
From this screen you can choose to edit a level description, change a level minimum or remove a level. If you wanted to change the minimum level of has a reputation beyond repute from 2000 to 3000 you would enter 3000 in the input field where 2000 is currently and press Update.
If you wished to change the text of has a reputation beyond repute, you would press the Edit link.
<<insert image of reputation editor>>
From this screen you can also change the minimum level as you can from the previous screen. Enter the new level text in the Description field but take care as you can not use HTML in this field. Press Update when finished.
User Titles |
An Introduction to User Titles |
- The user’s amount of activity on the board (examples: Junior Member, Senior Member). This is usually set through the default user title ladder that is described in the User Title Manager article.
- The user’s relationship to the board (examples: Administrator, Moderator). This is usually set through a usergroup-specific user title that overrides the default user title ladder.
- A custom title, specified by the user. This can refer to anything the user desires. The user may not have permission to set their own user title; it is controlled by a usergroup permission. More information about Usergroup and Permissions can be found here
User Title Manager |
The User Title Manager allows you to specify user titles based on post count. When a user reaches the specified minimum post count their title will be changed. User titles are an indication of status on the forums and are displayed below names in posts and in their User Profile. The term 'ladder' is used to describe the hierarchy of the titles.
Note:
If a user's usergroup has a user title specified (see the Usergroup Manager article) then that user will have their usergroup's title instead of the ladder of titles in the User Title Manager.
The table displays the User Title, Minimum Posts, and Controls for editing or deleting the user titles.
- The User Title column displays the text entered into the Title field in the Add/Edit User Title form.
- The Minimum Posts column displays the text entered into the Minimum Posts field in the Add/Edit User Title form. This is the minimum number of posts for a user to receive this title. They will have this title until they make enough posts to be moved to the title with the next highest minimum posts value.Note:The post count checked against the minimum posts value is the value stored with the user. Therefore, posts in forums that do not count posts will not have an effect.
- The Controls column contains a dropdown with two options: one to edit and one to delete the corresponding user title.
Choosing the Edit option will open the Add/Edit User Title form for the corresponding title.
Choosing the Delete option displays a confirmation screen asking if you are sure you want to delete the title. Clicking the No button will cancel the operation and return you to the User Title Manager. Clicking the Yes button will delete the title. This action cannot be undone.
Adding or Editing A User Title |
To edit an existing user title via the Edit User Title form, click on the following to your left: User Titles> User Title Manager, find the user title you would like to edit and choose the Edit option from the dropdown in the Controls column.
The Add/Edit User Title form allows you to add a new user title or edit an existing title.
Note:
You must click Save for changes to take effect.
- Title
This is the title that will be given to a user that reaches the minimum post count specified below. It will appear below their name when the user posts. - Minimum Posts
This is the the minimum number of posts that a user needs to receive this title.
Note:
If a user has enough posts to receive a title with a higher minimum posts value, he or she will receive that title instead.
Note:
The post count checked against the minimum posts value is the value stored with the user. Therefore, posts in forums that do not count posts will not have an effect.
Paid Subscriptions |
In general, this is achieved by temporarily making a subscribed user into a member of one or more specific usergroups, which have access to the site areas or services for which they have paid.
Introduction to Paid Subscriptions |
Payment is processed automatically via the various online processors that support a call back to a user defined script, this allows the system to be virtually maintenance free.
Note:
If you run vBulletin with any sort of HTTP authentication system then the callback by the online processors will be subject to the same conditions and the subscription will not go through.
Payment API Manager |
Paid Subscriptions > Payment API Manager will present you with the following screen, the Payment API Manager allows you to change the appropriate variables regarding payment as well as enable and disable a particular gateway.
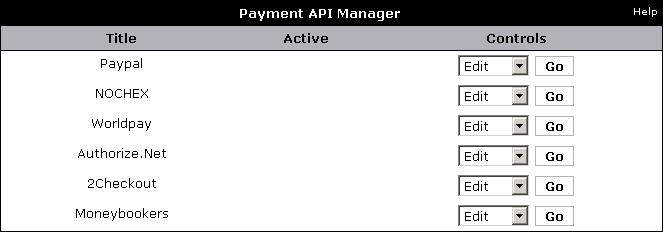
Paypal |
| 1 | Log in to your PayPal account |
| 2 | Click the settings icon at the top of your PayPal account page and then click Account Settings. |
| 3 | On the Notifications page, click the Update link for the Instant payment notifications item. |
| 4 | Click Choose IPN Settings to specify your listener's URL and activate the listener. The following page opens: You should now be presented with a screen containing the following:
Note: If the Instant Payment Notification link is not present you will need to apply for Premier Account or a Business Account from PayPal. https://www.example.com/forums/payment_gateway.php?method=paypal Make sure to replace www.example.com with your own domain name. Click |
| 5 | Go to Paid Subscriptions > Payment API Manager > PayPal in your AdminCP where you will be presented with the following screen:
|
| 6 | Enter your PayPal email address in the PayPal email field. This does not need to be the primary email address for your PayPal account and can be any email address associated with your PayPal account that you wish to use for payments received from your forum. |
| 7 | If you wish to use recurring subscriptions, you also need to enter your primary email address for your PayPal account in the PayPal Primary Account Email field. Your completed PayPal page will then look like either
|
| 8 | Finally, to activate the PayPal API for paid subscriptions, change the Active setting to Yes. |


NOCHEX |
| 1 | Log in to your NOCHEX account |
| 2 | Click on the 'Edit Automatic Payment Confirmation Details' link You should now be presented with a screen containing the following:
Note: If the 'Edit Automatic Payment Confirmation Details' link is not present you will need to contact NOCHEX support and request that your account have this feature activated. https://www.example.com/forums/payment_gateway.php?method=nochex Click |
| 3 | Go to Paid Subscriptions > Payment API Manager > NOCHEX in your vBulletin AdminCP where you will be presented with the following screen:
|
| 4 | Finally, change the active setting to Yes to activate payments via NOCHEX in vBulletin |
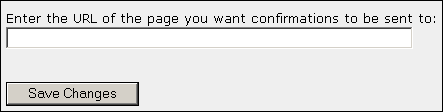
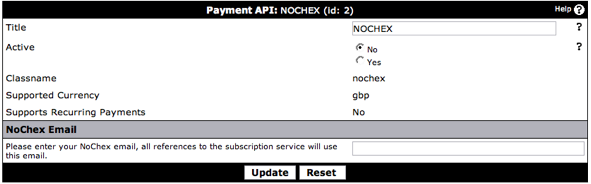
Note:
NOCHEX does NOT support recurring payments.
Worldpay |
| 1 | Log in to the WorldPay CMS You should now be presented with a screen containing the following:
|
| 2 | Click Configuration Options next to the Installation which has (Select Junior). This will lead you to the configuration screen which should look like the following:
|
| 3 | Enter the following URL in the 'Callback URL' field: https://www.example.com/forums/payment_gateway.php?method=worldpay |
| 4 | Check the 'Callback enabled?' checkbox. |
| 5 | Within the 'Callback password' field enter an appropriately secure password, this will be used for verifying transactions. Click |
| 6 | Go to Paid Subscriptions > Payment API Manager > Worldpay in your vBulletin AdminCP where you will be presented with the following screen:
|
| 7 | Enter your Installation ID that was displayed in the initial login to the WorldPay CMS and the password you setup within the CMS in the relevant fields on this page. |
| 8 | To activate WorldPay payments in your forum, change the Active setting to Yes |
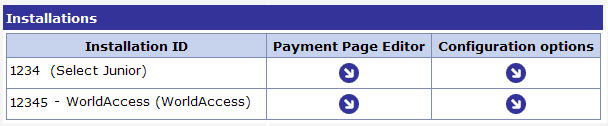
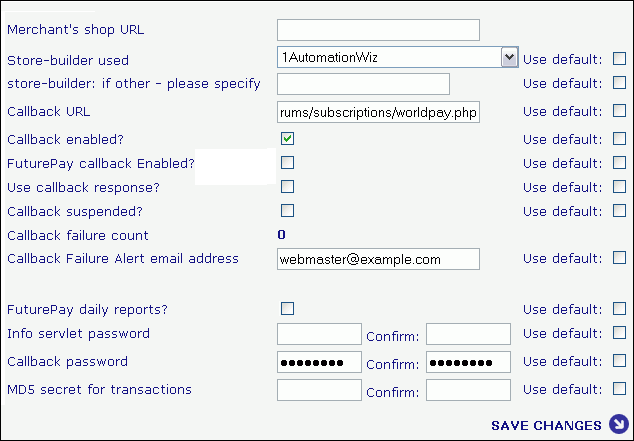
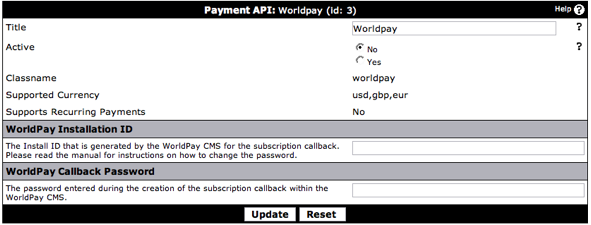
Note:
WorldPay does NOT support recurring payments.
Authorize.net |
| 1 | Log in to Authorize.Net merchant account |
| 2 | Click Settings on the left menu |
| 3 | Under the 'Transaction Response' group click Relay Response You should now be presented with a screen containing the following:
|
| 4 | You should now enter the following URL, adjusted to your forum: https://www.example.com/forums/payment_gateway.php?method=authorizenet Click |
| 5 | You should now be on the main Settings screen again, click 'Obtain Transaction Key' under the Security group. Enter the appropriate secret information and a new key will be generated for you. Note: If you already know your transaction key you dont need to generate a new one. |
| 6 | To set the Login ID and transaction key go to Paid Subscriptions > Payment API Manager > Authorize.Net in your vBulletin AdminCP where you will presented with the following page:
|
| 7 | Complete the Authorize.Net Login ID and Authorize.Net Transaction Key with your login for Authorize.net and the transaction key that you have generated in the relevant fields. |
| 8 | If you have a MD5 Hash Security Key for your Authorize.net account, then you can enter it in the MD5 Hash Security Key field. This is not a required field, so if this field is not completed then it will not affect the operation of the paid subscriptions. |
| 9 | Finally, to activate Authorize.Net payments, change the Active setting to Yes. |
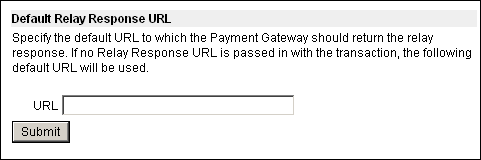
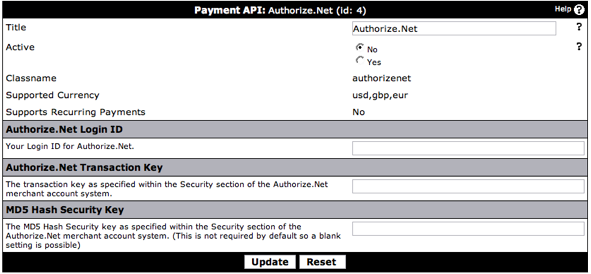
Note:
Authorize.Net does NOT support recurring payments.
Adding or Editing a Paid Subscription |
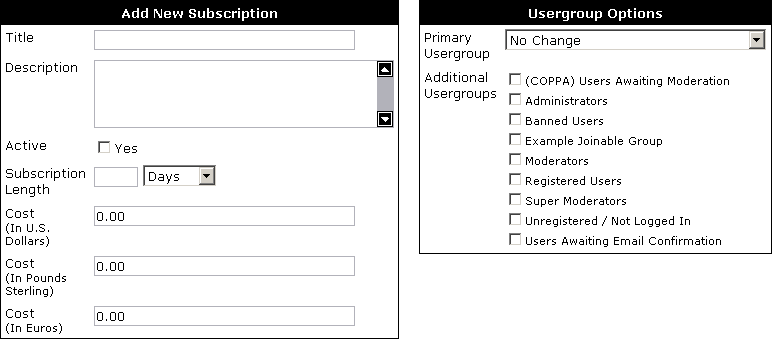
- Title – Subscription title.
- Description – a short description which can be used to describe what the subscription offers.
- Active – if checked users will be able to subscribe to this Subscription.
- Subscription Length – the length of time the user will remain in the subscription before being reverted.
- Cost – the various costs in each currency, if the value is left blank the payment option will not be available.
- Primary Usergroup – the primary usergroup that the subscription should change, this is not always required.
- Additional Usergroups – the secondary usergroups that the user joins on subscription.
Practical Example of a Paid Subscription |
The subscription will offer some benefits over our a regular user such as increased attachment space, large avatars and more private messaging space.
Creating the new Usergroup
| 1 | Login to the Admin Control Panel |
| 2 | Open the Usergroups menu and click "Add New Usergroup" |
| 3 | At the top of the screen choose "Registered Users" from the Create usergroups Based off of Usergroup menu and click |
| 4 | Adjust usergroup permissions appropriately, increasing attachment space, avatar dimensions and private messaging space |
| 5 | Click |
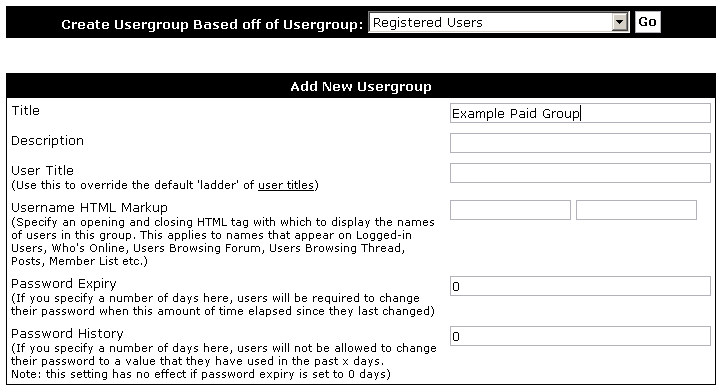
| 1 | Open the Subscriptions menu and click "Add New Subscription" |
| 2 | Enter the appropriate title, description, length and cost for your subscriptions |
| 3 | On the right of the screen there will be a Usergroup Options table, under Additional Usergroups check the Usergroup that you created earlier in this example |
| 4 | Click |
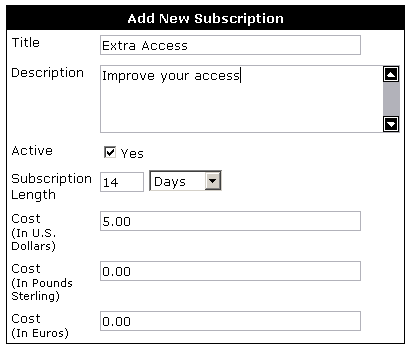
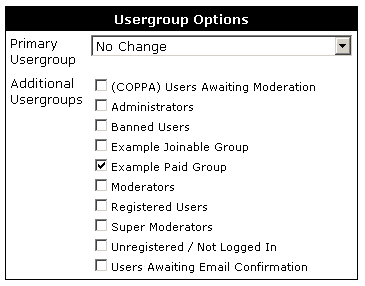
Subscription Manager |

- Title – the title of your Subscription.
- Cost – the cost of your Subscription in various currencies.
- Active – the number of users with active subscriptions.
- Completed – the number of users with completed subscriptions.
- Total – the total number of users with active or completed subscriptions.
- Controls – these options allow you to edit a subscriptions, manage users with a subscriptions or manually add a user to a subscription.
Manually Adding a Subscribed User |
You will be presented with a screen containing the following:
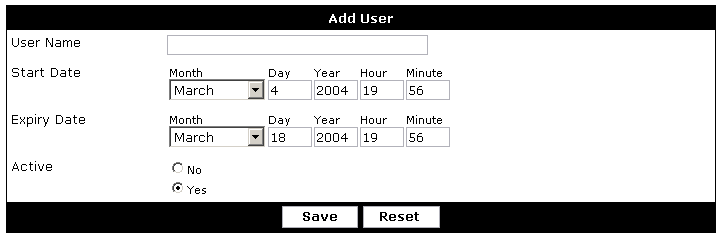
Transaction Log |
This log offers several search options that enable you to narrow down searches to specific criteria.
![]()
End Date - Date to limit the newest transaction to.
Subscription - Include transactions that pertain to all subscriptions or limit transactions to thost that pertain to a specific subscription.
Processor - Include transactions that pertain to all payment processors or limit transactions to those that pertain to a specific payment processor.
Currency - Include transactions that pertain to all currencies or limit transactions to those that pertain to a specific currency.
Type - Include failure, charged and reversed transactions or limit to either one.
Note:
Failed transactions are those that could not be matched up with a subscription. This generally happens when there is a misconfiguration. Click on Failure when viewing these transactions to see raw output of what was sent by the payment processor. This information can be used by support to help you troubleshoot problems.
that pertain to a specific user.
Order By - Control the order of the resulting log. The order can also be changed when viewing the log by clicking the column headers.
Note:
Transactions completed before vBulletin 3.6.0 Beta 1 will contain incomplete information.
Transaction Stats |
Stats offers several search options that enable you to narrow down searches to specific criteria.
![]()
End Date - Date to limit the newest transaction to.
Subscription - Include transactions that pertain to all subscriptions or limit transactions to those that pertain to a specific subscription.
Processor - Include transactions that pertain to all payment processors or limit transactions to those that pertain to a specific payment processor.
Currency - Include transactions that pertain to all currencies or limit transactions to those that pertain to a specific currency.
Type - Include charged and reversed transactions or limit to either one.
Order By - Control the order of the resulting stats. List the stats in order of most transaction or in order of date.
Scope - Groups transactions into the chosen option. Example, selecting Monthly would show you how many transaction were performed each month.
Note:
Transactions completed before vBulletin 3.6.0 Beta 1 will contain incomplete information.
Subscription Permissions |
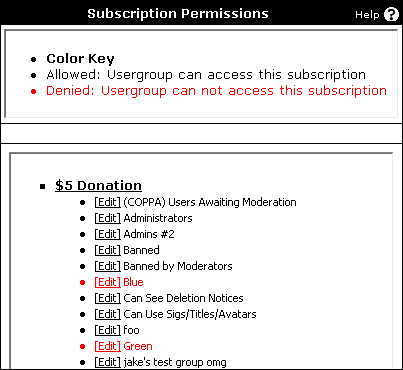
To edit a subscription, simply find the appropriate subscription and usergroup, and click [Edit]. This will lead you to this screen:
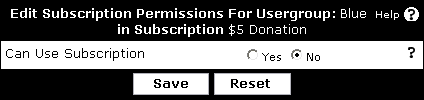
Avatars |
Using the Avatar Manager, you can pre-define groups of avatars from which your members can choose one as their own avatar.
Also under this section is a tool to control the storage of your members' custom avatars (those which they have uploaded themselves). You may choose to store custom avatars in the database, or as files on the server's file system.
User Picture Storage Type |
Database vs File System
There are no real advantages or disadvantages to using one of these storage types over the other. Keeping items in the database provide an easier backup method, while using a file system may be slightly more efficient as there are less queries that need to be run. But both require disk space and are easy to manage via the AdminCP.
At the end of the day it comes down to your own preference on how you want to manage your user picture images and how you want to store them.
Note:
The default storage type is to store the images in the database.
Smilies |
Smilies (also called emoticons in some quarters) are small images used to convey some form of emotion in messages.
Example
| What you type: | Hi there! :) |
| Will get parsed as: | Hi there!  |
Note:
Don't forget to go through the settings of the Settings > Options > Message Posting and Editing Options where you can control the 'Maximum Images Per Post/Signature'.
Smilie Manager |
You can manage your smilies using this panel. The smilie images can be arranged in groups, or categories.
The above image shows a list of your smilie categories. By default there will be only one - Generic Smilies. As you add more categories, they will be listed there.
- Title
This column tells you the name of each category. You can click on the category name to view which smilies are in it, after which you can edit or delete a smilie and update its display order. See below for more information*. - Contains
This column tells you how many images are in the corresponding category. - Display Order
This column tells you the display order of each smilie category. The display order is used to order the smilie category listing in this Smilie Manager as well as how it is displayed on your forums. You can update the display orders shown on this page by changing the number values and clicking the [Save Display Order] button. - Controls
On the right side you will find several options for each smilie category. - The [Mass Move] link takes you to a page where you can select a new category for each smilie in the corresponding category and submit the changes all at once.
- The [View] link does the same thing as clicking on the category name to the left, it takes you to a page where you can view all smilies in the corresponding category.
- The [Edit] link allows you to edit the title and display order of the corresponding category.
- The [Delete] link takes you to a page where you can delete the corresponding category and all of its smilies or mass move the categories smilies to another category and then delete the original category.
Click on the [Add New Smilie Category] link to add new new smilie category. The Add New Smilie Category form has two fields: Title and Display Order. Enter the title for the new category in the Title field. If you don't know the number for the display order than you can leave this empty. Then press the [Save] button to add this new smilie category. You will then return to the initial overview of all the smilie categories.
Click on the [Show All Smilies] link to load a page from where it will display all the smilies from all the categories. On this page you can also edit and delete a smilie.
*Smilie Category Content Listing
When clicking on the name of a Smilie Category, you will open a new page with the list of smilies in that category. The screenshot below shows the default ‘Generic Smilies’ category listing:
<<<Screenshot of the Generic Smilies listing>>>
Each smilie on this page has the following options:
- Edit
This option allows you to edit an existing smilie and change its:- Title
The title of the image as shown when a user hover’s over the smilie - Text to Replace
This is what the user will type to have transformed into a smilie. For example :) or :( - keep in mind, this is case-sensitive. S:) and s:) are not the same thing. - Smilie File Path
The path to the image relative to the core/ directory - Smilie Category
The category you wish to move the image to - leave as it to remain in the category being edited. - Display Order
This determines the order in which images are shown on the smilie pop-up within the editor. For more information, see the Smilies Display Order article.
- Title
- Delete
This option allows you to delete a smilie from the current category being viewed. - Display Order
The text box determines the order in which images are shown on the smilie pop-up within the editor. For more information, see the Smilies Display Order article.
Add New Smilies |
This screen allows you to add one or more images at a time. These images must already reside on the server, having been uploaded using the Upload Smilie option or by FTP prior to doing this.
You can either add a single image or add multiple images at the same time.
Note:
Don't forget to upload the smilies to your core/images/smilies/ directory first before using this feature. If you don't know how to do that you can also use the alternative feature to manually upload a smilie.
- Title
This is the title you want to give to describe your smilie, for example, ‘Happy Face’
- Text to Replace
This is the replacement text for the smilie. When a user types this text in a post, it will get replaced with the smilie image.
- Smilie File Path
Type the path and filename of the smilie you want to add. An example would be images/smilies/happy.gifNote:This path is relative to the core directory. Best practice is to add all smilies to the core/images/smilies giving a path of images/smilies/filename - Smilie Category
This drop down box will have all the possible smilies categories - select one to add this smilie to this category.
- Display Order
If you know which order you'd like to give to your smilie you can enter it here. This is an optional field, if you don't know what the display order should be you can leave this field empty. You can always change it later. View the Smilie Display Order article for more information.
Adding Multiple Smilies
- Smilie Category
This drop down box will have all the possible smilies categories - select one to add all the smilies to.
- Smilies File Path
Type the path and not filename of the smilies directory you want to add. An example would be images/smilies/newones/ (if you have uploaded your smilies to the newones/ directory)Note:This path is relative to the core directory. Best practice is to add all smilies to the core/images/smilies giving a path of images/smilies/filename - Smilies to Show Per Page
This is the number of images to display per page while adding them.
Smilie Display Order |
Consider this example where you have two smilies:
| Smilie Name | Smilie Text | Smilie Image |
| Smilie 1 | :o |  |
| Smilie 2 | :o) |  |
, but also the first two characters of Smilie 2 would be matched and converted, leaving you with ).To make these smilies parse correctly, Smilie 2 should have a smaller display order than Smilie 1, so that it is parsed first and is not picked up in the search for Smilie 1.
Upload Smilies |
On this screen, you can upload one image at a time through your browser for use on your forum. To do this, both your web server and PHP must have permission to write files to disk. If they do not, this will fail.
Note:
The directory that you are trying to put the file in must be CHMOD 777. Consult your FTP program documentation for how to do this.
If you don't know how to do that you can also use the alternative feature to add one or more smilies through the Add New Smilie manager.
If you don't know how to do that you can also use the alternative feature to add one or more smilies through the Add New Smilie manager.
- Filename
Click on the Browse.. button and select from your hard drive the smilie you want to upload.
- Title
This is the title you want to give to describe your smilie, for example - Happy Face.
- Text to Replace
This is the replacement text for the smilie. When a user types this text in a post, it will get replaced with the smilie image.
- Smilie File Path
Type the path of the smilie directory. An example would be images/smilies. This directory should be readable and writable by the webserver (usually CHMOD 777).Note:This path is relative to the core directory. Best practice is to add all smilies to the core/images/smilies/your-folder-name giving a path of images/smilies/your-folder-name/filename - Smilie Category
This drop down box will have all the possible smilies categories - select one to add this smilie to this category.
- Display Order
If you know which order you'd like to give to your smilie you can enter it here, this is an optional field. If you don't know what the display order should be you can leave this field empty, you can always change it later. View the Smilies Display Order article for more information.
Scheduled Tasks |
The vBulletin Scheduled Task Manager allows you to control tasks that will be executed by vBulletin at specific intervals, much like the Unix Cron system.
When vBulletin is installed, it has a number of tasks already set to run at specific times. Using the Scheduled Task Manager, you can modify, disable or delete an existing scheduled task. You can also add your own scheduled task definitions.
Managing Scheduled Tasks |
<<<Insert a level-setting screenshot of Scheduled Task Manager.>>>
The Scheduled Task Manager displays all the currently defined tasks and lets you modify them and add new tasks.
The table has the following columns:
Checkbox
To disable a number of tasks at once, uncheck the checkbox next to the tasks you’d like to disable and click the button. To enable any disabled task, check the checkbox and click the button.
m
(Minute) The minute that a task runs. If this is an asterisk it runs every minute.
h
(Hour) The hour that a task runs. If this is an asterisk it runs every hour.
D
(Day) The day of the month (numerically) that a task runs. If this is an asterisk it runs every day.
M
(Month) The month of the year that a task runs. If this is an asterisk it runs every month.
DoW
(Day of Week) The day of the week that a task runs. If this is an asterisk, it defers to the Day setting.
Title
The title of the scheduled task in bold with a short description of the task below.
Next Time
The next time the task is scheduled to run. You can run it immediately using the button on the far right.
Controls
This column contains a drop-down with “Edit”, “Enable/Disable” and “Delete” controls, and a button to run the task immediately.
To edit the settings for a task, select Edit. This opens the Edit Scheduled Task form.
To delete a task, select Delete.
Products and Hooks |
<<<Insert a screenshot of the Products & Hooks menu and its submenus.>>>
From the Products & Hooks menu you can do the following:
- Manage hooks
- Add or edit a new hook
- Temporarily deactivate a hook
- Completely remove a hook from the system
- Manage products
- Import / install a product
- Temporarily deactivate a product
- Remove / uninstall a product
- View a list of your package API extensions
Moderators |
Many of the product functions important to moderators are located in the vBulletin Moderator Control Panel (ModCP), a menu of your vBulletin installation and its submenus. The ModCP is a scaled-down version of the AdminCP.
What are Moderators |
The Administrator can assign a moderator to a single channel by adding them in the Channel Manager screen. Administrators can also create Super Moderators by setting the user's primary usergroup to Super Moderator in the User Manager.
Note:
Placing a user in the Moderator usergroup is only for organization. The default permissions of this group do not apply any actual Moderator functionality.
Inline Moderation |
Topic Moderation

To access the inline moderation for topics open a forum page, and click on the Topics tab, if not already selected. A list of topics is displayed. Each topic has a checkbox at the end of the row. Selecting the checkbox adds the topic to the list of topics to be moderated. The topic will be highlighted to signify that the topic has been chosen.
Once you have selected the topics that you want to work with, select the moderation menu as indicated by the image below.
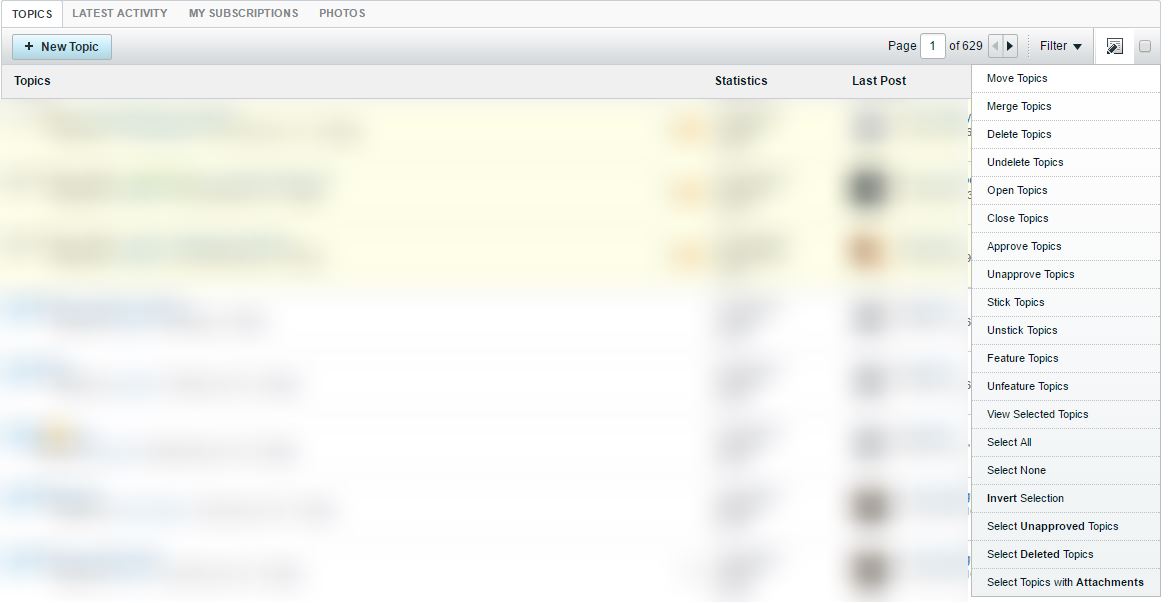
Then choose the action that you wish to complete. All selected topics will have the action applied to them.
Note:
Selecting the checkbox to the right of the Moderation Menu Control will select all topics on the current page.
If you enter a single topic, you can perform all topic moderation actions on it from the Topic Moderation Menu.
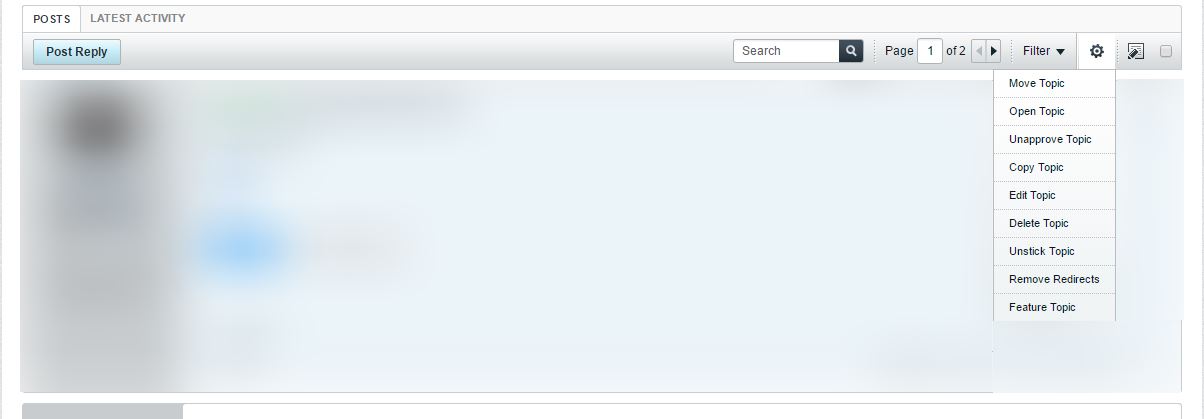
Post Moderation

If you enter or view a specific topic, you gain access to the Post Moderation icon. This allows you to treat individual posts as a group similarly to how topics are handled on the Forum page. Each post will have a checkbox in the upper-right corner of its display. Selecting the post will mark it for moderation actions. Once you have selected the posts you want to act on, then you can choose from the moderation menu, as shown below.
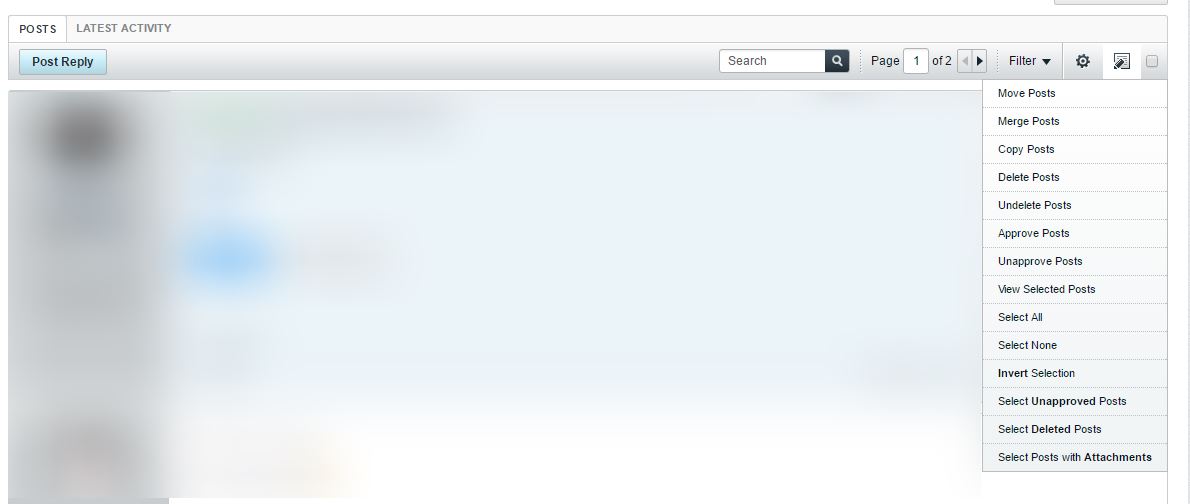
Actions Available
Mark This Channel Read
Marks the channel as read.
Move Threads
Brings up the move topicss interface. This allows you to move a thread to another Forum.
Merge Threads
Merges the selected topics into a new thread.
Delete Threads
Brings up the delete topics interface that allows you to choose between soft and hard deletion (depending on permission level). You can also choose to delete the topic as SPAM. When you do this, you can ban the user from your site.
Undelete Threads
Restores soft-deleted topic.
Open Threads
Opens one or more closed topics.
Close Threads
Closes on or more open topics.
Approve Threads
Publish one or more topics that have been marked as suspect either by another moderator or the system's Anti-Spam Controls.
Unapprove Threads
Unapproves one or more topics, sending them back to moderation. Unapproved topics, are not visible to most users.
Stick Topic
Pins the topic to the top of the page. This highlights the topic and removes it from the normal sort order.
Unstick Topics
Removes the pinned topic and places it in the normal sort order.
Feature Topics
Adds a flag to the thread so that if a user searches for “Featured Topics” this thread will appear in the results. Featured Topics are used for content in the Content Slider Module.
Unfeature Topics
Removes the featured topic flag from one or more topics.
Select All
Selects all the topics on the current page, including sticky, soft-deleted, unapproved, and closed topics.
Select None
Resets the selected topics on the current page, including sticky, soft-deleted, unapproved, and closed topics.
Invert Selection
Selects all currently unselected topics, and resets previously selected topics on the current page, including sticky, soft-deleted, unapproved, and closed topics.
Select Unapproved Threads
Selects all the threads that are not visible to members (in the moderator queue) on the current page, including sticky, soft-deleted, and closed topics.
Select Deleted Topics
Highlights all the topics that are marked as soft-deleted on the current page, including deleted topics that are sticky, unapproved, and/or closed.
Select Threads with Attachments
Highlights all the topics that are have attachments added to them on the current page, including topics with attachments that are soft-deleted, sticky, unapproved, and closed.
Developers |
Extensions |
vBulletin Template Syntax |
New Built-in Methods
{vb:set}
{vb:set} is used for assigning template variables during the execution of a template.
| Parameter Position | Parameter Name | Type | Required | Description |
| 1 | variable | string | Yes | The name of the variable being assigned |
| 2 | value | compilable code | Yes | The value being assigned |
{vb:set name, 'Adrian'}
The value of $name is {vb:raw name}.
The value of $name is Adrian.
{vb:template} is used for including other templates in the current template.
| Parameter Position | Parameter Name | Type | Required | Description |
| 1 | template | string | Yes | The name of the template to include |
| 2...∞ | [var=value] | compilable code | No | Variable to pass local to template |
This is {vb:raw arg1}. Today is {vb:raw arg2}
{vb:template template, arg1="an example", arg2="Sunday"}
This is an example. Today is Sunday
{vb:js} is used for including javascript files from filesystem easily before body close tag.
| Parameter Position | Parameter Name | Type | Required | Description |
| 1...∞ | path[, ...] | relative path | Yes | Relative path of the javascript file to include |
{vb:js js/test.js, js/test1.js}
<script type="text/javascript" src="https://localhost/vb5/js/test.js?v=500a36"></script>
<script type="text/javascript" src="https://localhost/vb5/js/test1.js?v=500a36"></script>
{vb:cssextra} is used for including css templates easily before head close tag (all css templates are included in one request).
| Parameter Position | Parameter Name | Type | Required | Description |
| 1...∞ | template[, ...] | string | Yes | The name of the css template |
{vb:cssextra test.css, test1.css}
<link rel="stylesheet" type="text/css" href="https://localhost/vb5/core/css.php?styleid=x&td=xxx&sheet=xxx.css,...,test.css,test1.csss?ts=xxxxxxxxxxx" />
{vb:hook}
{vb:hook} is used for including templates hooks in current template.
| Parameter Position | Parameter Name | Type | Required | Description |
| 1 | hook | string | Yes | The name of the template hook |
{vb:hook test}
{vb:redirect} is used for perfoming a php redirect during the execution of a template.
| Parameter Position | Parameter Name | Type | Required | Description |
| 1 | url | url | Yes | The url of the page to redirect |
{vb:redirect 'https://www.google.com.ar/'}
{vb:strcat} is used for concatenating values to the given variable.
| Parameter Position | Parameter Name | Type | Required | Description |
| 1 | variable | string | Yes | The name of the variable being assigned |
| 2...∞ | string[, ...] | compiable code | No | The value being concatenated |
{vb:strcat test, 'This is a', ' test'}
{vb:raw test}
This is a test
{vb:strrepeat} is used for repeating a string to the given variable.
| Parameter Position | Parameter Name | Type | Required | Description |
| 1 | input | variable | Yes | The string variable to be repeated |
| 2 | multiplier | variable | Yes | The positive integer variable of time the input should be repeated |
{vb:set input, '. '}
{vb:set multipler, 10}
{vb:strrepeat input {vb:raw multipler}}
{vb:raw input}
. . . . . . . . . .
{vb:data} is used for setting an API class and method return value to the given variable.
| Parameter Position | Parameter Name | Type | Required | Description |
| 1 | variable | string | Yes | The name of the variable being assigned |
| 2 | controller | string | Yes | The name of the called controller |
| 3 | method | string | Yes | The name of the called method |
| 4...∞ | argument | compilable code | No | Variable to pass to called method |
{vb:data unread, content_privatemessage, getUnreadInboxCount}
{vb:raw unread}
The above example will output the count of undeleted notifications.
{vb:url}
{vb:url} is used for building an hyperlink url of the specified route.
| Parameter Position | Parameter Name | Type | Required | Description |
| 1 | route | string | Yes | The route identifier (routeid or name) |
| 2 | data | array | No | Data for building route |
| 3 | extra | array | No | Additional data to be added |
| 4 | options | array | No | Options for building URL noBaseUrl: skips adding the baseurl |
{vb:url 'lostpw'}
https://localhost/vb5/lostpw
{vb:debugvardump} is used for dumping information about a variable.
| Parameter Position | Parameter Name | Type | Required | Description |
| 1 | expression | variable | Yes | The variable you want to dump |
{vb:debugvardump $user}
{vb:php}
{vb:php} is used to run allowed php functions during the execution of a template.
| Parameter Position | Parameter Name | Type | Required | Description |
| 1 | function name | string | Yes | The name of the function |
| 2...∞ | string[, ...] | compiable code | No | Arguments of the function |
{vb:set test, {vb:php implode, ',', {vb:raw variable}}}
<?php


$test = implode(',', $variable);
- implode()
- explode()
- array_merge()
- array_intersect()
- array_intersect_key()
- array_keys()
- array_push()
- array_pop()
- array_shift()
- array_unshift()
- array_unique()
- array()
- current()
- str_repeat()
- str_pad()
- strip_tags()
- strtolower()
- strtoupper()
- trim()
- substr()
- vbstrtolower()
vBulletin Options |
When you first enter this section, you will be presented with a screen that allows you to select what settings you wish to display. The select box will look one of two ways:
| Unexpanded This is the default view. It will display each setting group. To display a group, double click its name or select it and click . If you wish to display all settings, select [Show All Settings]. |
| Expanded To use this view, click [Expand Setting Groups] on the left-hand side of the screen. This view will display each setting within a group. To display a setting, double click its name or select it and click . |


Once you have changed the all the options you wish to change, click . Changes will take effect immediately.
vBulletin Options |
Turn Your vBulletin On and Off |
Only users in the Administrator usergroup will be able to browse the site, visitors will be presented with a closed message which you can set in this setting group.
- Forum Active
From time to time, you may want to turn your forum off to the public while you perform maintenance, update versions, etc.
Selecting 'Yes' will set the forum Active.
Selecting 'No' will set the forum Inactive (turns it off for the public).
When the forum is set Inactive users in the Administrator usergroup will be able to browse the forum. They will see a notice displayed in the header and footer of each page stating that the forum is closed. Visitors who browse any page on the forum will receive a message that states that the forum is temporarily unavailable. You could set a custom message.
Do not forget to set the forum active again when you are done with your maintenance. - Reason For Turning Forum Off
When you have set your forum to inactive, this is the message that a visitor will receive when they browse any page on the forum.Note:This field expects the use of HTML code.
You can not use BBCode here.
Site Name / URL / Contact Details |
After a fresh installation or upgrade, server or site move it is advised to walk through these site details setting group to ensure they are up to date.
- Forum Name - Name of your forum. This appears in the title of every page.
- Forum URL - URL of your forum.
Note: do not add a trailing slash. ("/") - Homepage Name - Name of your homepage. This appears at the bottom of every page.
- Homepage URL -URL of your home page. This appears at the bottom of every page.
- Contact Us Link - Link for contacting the site admin. To use the built-in email form, specify sendmessage.php otherwise use something such as 'mailto:[email protected]' or your own custom form. This appears at the bottom of every page.
- Allow Unregistered Users to use 'Contact Us' - The last option only applies if you specify 'sendmessage.php' in the previous option. You may require guests to pass Human Verification in order to use this form by enabling the option found in the Human Verification Options.
- Contact Us Options - You may pre-define subjects (and corresponding recipients) for users to pick from when using the default Contact Us form listed above. Please place one subject per line. An 'Other' option will be automatically added to the end when the form is viewed. For more information on how to set this up, view the inline help within the Admin Control Panel
- Webmaster's Email - Email address of the webmaster. This can be different than the technical contact listed in the includes/config.php. This is the person who will receive all emails from vBulletin itself except for database errors.
- Privacy Statement URL - Enter the URL of your privacy statement, if you have one.
For more information on Privacy Policies check out https://www.truste.org. - Copyright Text - Copyright text to insert in the footer of the page.
- Company Name - The name of your company. This is required for COPPA compliance.
- Company Fax - Fax number for your company. COPPA forms will be faxed to this number.
You may wish to check out https://www.efax.com. - Company Address - Address of your company. COPPA forms will be posted to this address.
General Settings |
This ranges from meta tags to the use of forumjump, enabling access masks to the display of IM icons.
- Meta Keywords
Enter the meta keywords for all pages. These are used by search engines to index your pages with more relevance.
Meta Keywords are used by some search engines to determine what your pages are about and to rank them. Other search engines such as Google do not take keywords into account.
All keywords you enter here will be put in the keywords meta tag in the header of every page. Separate keywords or phrases with a single comma and no space.
Example: vbulletin,forum,bbs,discussion,jelsoft,bulletin board
- Meta Description
Enter the meta description for all pages. This is used by search engines to index your pages more relevantly.
The Meta Description is used by some search engines to determine what your pages are about and to rank them. Other search engines such as Google do not take the description into account.
Enter a short description of your site here and it will be placed in the meta description tag in the header of every page. Most engines will accept a maximum of 255 characters for the description.
Example: This is a discussion forum powered by vBulletin. To find out about vBulletin, go to https://www.vbulletin.com/ .
- Use Forum Jump Menu
The Forum Jump menu appears by default on most pages and provides a quick jump to any of the forums on your forum as well as several other places (search, private messaging, etc.). While it can have a marginal impact on performance, typically you will only want to disable this if you have an extremely large number of forums as it will generate a large amount of HTML in that case, which will increase the size of pages and bandwidth usage.
Set this option to 'no' if you want to turn it off.
- Number of Pages Visible in Page Navigator
On thread and forum pages, as well as private messaging lists and other places, if there are multiple page number links to be displayed, this setting determines how many are shown on either side of the page currently being viewed. Setting this to 0 will cause all page links to be displayed.
Example: 3
- Enable Access Masks
Access masks allow you to enable or disable access to a particular forum for individual user(s). To use them, you must enable this option. This option also affects whether or not users will be able to see forums they do not have access to on forumhome and forumdisplay. (If this is off, they will see them in forum listings but not be able to enter them. If this is on, they will not see them at all.)
Set this option to 'no' if you want to turn it off.
- Add Template Name in HTML Comments
Setting this to 'yes' will add the template name at the beginning and end of every template rendered on any page. This is useful for debugging and analyzing the HTML code, but turn it off to save bandwidth when running in a production environment.
When modifying templates, it is often helpful to have this setting enabled so you can view the source of a page to determine what template(s) control it. In the course of normal usage, however, you will usually want this disabled as it will increase your page sizes and therefore bandwidth usage.
- Use Login "Strikes" System
Setting this to 'yes' will enable a system that tracks a user's (with a specific IP address) login attempts. After 5 incorrect login attempts the account is locked from that IP address for 15 minutes. This is to prevent bruteforce login attacks.
- Enable Forum Leaders
Forum Leaders is a listing of your important user groups. The display of assigned forum Moderators on this page is controlled with this option while the display of other groups is controlled via the usergroup manager.
- Post Referrer Whitelist
For security purposes, vBulletin only allows data to be submitted via post from within the domain the board is installed on. If you are submitting post requests from a different domain or subdomain, you must add them here.
- Thread/Forum Read Marking Type
This option controls how threads and forums are marked as read. The options are:
1) Inactivity/Cookie Based - once a user has been inactive for a certain amount of time (the value of the cookie timeout option) all threads and forums are considered read. Individual threads are marked as read within a session via cookies. This option is how all versions of vBulletin before 3.5 functioned.
2) Database (no automatic forum marking) - this option uses the database to store thread and forum read times. This allows accurate read markers to be kept indefinitely. However, in order for a forum to be marked read when all threads are read, the user must view the list of threads for that forum. This option is more space and processor intensive than inactivity-based marking.
3) Database (automatic forum marking) - this option is the same as a previous option, but forums are automatically marked as read when the last new thread is read. This is the most usable option for end users, but most processor intensive.Note:Changing this setting to database marking will mark all threads in the time set in the 'Database Read Marking Limit' as unread - Database Read Marking Limit
The amount of time in days to store the topic and forum read times. All topics or forums without posts in this many days will be considered read.
- Disable AJAX Features
This allows you to disable all AJAX Features or problematic AJAX Features only. Some languages, such as Arabic based languages, require this to be set to Disable Problematic AJAX Features in certain server and database configurations
- Enable Inline Moderation Authentication
Inline moderation actions will require a user to authenticate again prior to being performed. The timeout is based on the admin control panel timeout, or one hour if that option is disabled.
If you do not wish moderators and administrators to authenticate when using inline moderation then you can disable this using this setting.
Image Settings |
- Image Processing Library
vBulletin provides two options for manipulating attachment thumbnails, custom avatars, and profile pictures.
The first is GD, which is bundled with PHP 4.3.0 and later. GD supports the following file types: GIF, JPEG, and PNG.
The second supported library is ImageMagick v6 by ImageMagick Studio LLC. ImageMagick is an executable binary that must be installed at the server level to be called by PHP. Only the identify and convert binaries from ImageMagick are required by vBulletin. ImageMagick supports the following file types: GIF, JPEG, PNG, BMP, TIFF, and PSD. ImageMagick also has better support for handling animated GIF.
- Image Verification Library
This is similar to the option above but it chooses the Image Manipulation Library for inline image verification. These verification images can be enabled for registration and the Contact Us forms. There are two options for GD. The first, "GD (Simple Font)" will use an internal GD font. The second, "GD (True Type Font)" will use the fonts located in the images/regimage/fonts directory of your forum. On some PHP installations the TTF font option will not work. If you have the TTF font option selected and are seeing no fonts, try the Simple Font option.
- Image Verification Options
There are several options that allow you to control the level of difficulty presented by the image verification.
- ImageMagick Binary Path
Path to the ImageMagick 6 binaries (convert and identify). Example:
Unix: /usr/local/bin/
Windows: C:\imagemagick\
Human Verification Options |
- Verify at Registration
New users will be required to pass the Human Verification test during registration. - Verify Guest Posts
Guest posters will be required to pass the Human Verification test before their messages are posted. - Verify Guest Searches
Searches by guests will be required to pass the Human Verification test before searching is executed. - Verify Guest Contact Us
Guests will be required to pass the Human Verification test before leaving feedback. This only applies if sendmessage.php is being used as the Contact Us Link and Guests are allowed to use Contact Us in Site Name / URL / Contact Details
Date and Time Options |
- Datestamp Display Option
This option controls the display of dates throughout your forum
'Normal' uses the date and time formats below this option.
'Yesterday / Today' will show 'Yesterday' and 'Today' for dates that fall in those periods.
'Detailed' will show times such as '1 Minute Ago', '1 Hour Ago', '1 Day Ago', and '1 Week Ago'.
- Default Time Zone Offset
Time zone offset for guests and new users. Do not take DST into consideration, rather use the next option to enable/disable DST.
- Enable Daylight Savings
If Daylight Savings Time is currently in effect for the above time zone, enable this option so that guests will see the correct times on posts and events. This has no effect on registered users as they control their DST options in the User CP. This setting is not automatic and it will need to be changed when the timezone changes twice a year.
- Format For Date
Format in which the date is presented on vBulletin pages.
Examples:
US Format (e.g., 04-25-98): m-d-y
Expanded US Format (e.g., April 25th, 1998): F jS, Y
European Format (e.g., 25-04-98): d-m-y
Expanded European Format (e.g., 25th April 1998): jS F Y
- Format For Time
Format in which the time is presented on all vBulletin pages.
Examples:
AM/PM Time Format (eg, 11:15 PM): h:i A
24-Hour Format Time (eg, 23:15): H:i
- Format For Registration Date
This is used to format dates shown with users' posts. In the left hand column of a topic display, under the username and title, there is some text showing when the user registered.
- Format For Birthdays with Year Specified
Format of date shown in profile when user gives their birth-year.
- Format For Birthdays with Year Unspecified
Format of user's birthday shown on profile when the user does not specify their birth-year. DO NOT put in a code for the year.
- Log Date Format
Format of dates shown in Control Panel logs.
Note:
Date and Time formats follow PHP formatting rules. You can find out more about these rules by visiting the PHP manual.
For information on date and time formats in PHP please visit the following page: https://www.php.net/manual-lookup.php?function=date
For information on date and time formats in PHP please visit the following page: https://www.php.net/manual-lookup.php?function=date
Cookies and HTTP Header Options |
- Session Timeout
This is the time in seconds that a user must remain inactive before any unread posts are marked read. This setting also controls how long a user will remain on Who's Online after their last activity.
- Path to Save Cookies
The path to which the cookie is saved. If you run more than one forum on the same domain, it will be necessary to set this to the individual directories of the forums. Otherwise, just leave it as / .
Please note that your path should always end in a forward-slash; for example '/forums/', '/vbulletin/' etc.Warning:Entering an invalid setting can leave you unable to login to your forum. Only change this setting if you absolutely need to do so. - Cookie Domain
This option sets the domain on which the cookie is active. The most common reason to change this setting is that you have two different urls to your forum, i.e. example.com and forums.example.com. To allow users to stay logged into the forum if they visit via either url, you would set this to .example.com (note the domain begins with a dot.Warning:You most likely want to leave this setting blank as entering an invalid setting can leave you unable to login to your forum. - GZIP HTML Output
Selecting yes will enable vBulletin to GZIP compress the HTML output of pages, thus reducing bandwidth requirements. This will be only used on clients that support it, and are HTTP 1.1 compliant. There will be a small performance overhead.If you are already using mod_gzip on your server, do not enable this option.Note:This feature requires the ZLIB library.
- GZIP Compression Level
Set the level of GZIP compression that will take place on the output. 0=none; 9=max.
We strongly recommend that you use level 1 for optimum results.
- Add Standard HTTP Headers
This option does not work with some combinations of web server, so is off by default. However, some IIS setups may need it turned on.
It will send the 200 OK HTTP headers if turned on.
- Send Internet Explorer 7 Compatibility Header
This option sends an HTTP header that instructs Internet Explorer 8 to render pages as Internet Explorer 7 would do so, rather than enabling full standards-compliance mode, which may result in rendering problems for templates that have not been updated for IE8.
- Add No-Cache HTTP Headers
Selecting yes will cause vBulletin to add no-cache HTTP headers. These are very effective, so adding them may cause server load to increase due to an increase in page requests.
- Remove Redirection Message Pages
Enabling this option will remove the update pages that are displayed after a user makes a post, starts a search, etc. These pages provide assurance to the user that their information has been processed by the forum. Disabling these pages will save you bandwidth and may lessen the load of the forum on your server.Note:Some pages will still use the redirection page when cookies are involved to prevent some potential problems.
Server Settings and Optimization Options |
- Public phpinfo() Display Enabled
If you enable this option, anyone can view your phpinfo() page by adding &do=phpinfo to a forum URL. vBulletin Support may ask you to temporarily enable this to help diagnose problems if you request technical support. Otherwise, we recommend turning it off.
- Cached Posts Lifespan
Posts are normally stored with bbcode tags etc. in the same form as the user posted them with so that it may be edited later, and then parsed at display time. By caching them, they are parsed at post time (instead of display time) into the HTML they will be displayed in and stored separately from the pre-parsed posts. This results in a faster display on topics, since the posts do not have to be parsed at display time.
This option determines how long posts are stored. While a post is cached, it will take approximately twice as much storage space since it is essentially being stored twice. If you have a busy site, and topics typically don't last very long, you can probably set this to a lower value such as 10 days. If you have a slower site, and topics typically last longer, 20 to 30 days might be a better choice. If you have the disc space, you can set this to a higher value for better performance.
- Update Thread Views Immediately
If you enable this option, the thread view counter for a thread will be updated in realtime as threads are viewed. Otherwise, they will be stored and updated every hour (by default) en masse. We recommend disabling this option for larger or busier forums as updating them in realtime can have a performance impact.
- Update Attachment Views Immediately
If you enable this option, the attachment view counter for an attachment will be updated in realtime as attachments are viewed. Otherwise, they will be stored and updated every hour (by default) en masse. We recommend disabling this option for larger or busier forums as updating them in realtime can have a performance impact.
- Simultaneous Sessions Limit
Set this to the maximum number of simultaneous sessions that you want to be active at any one time. If this number is exceeded, new users are turned away until the server is less busy.
Set this to 0 to disable this option.
- *NIX Server Load Limit
vBulletin can read the overall load of the server on certain *NIX setups (including Linux).
This allows vBulletin to determine the load on the server and processor, and to turn away further users if the load becomes too high. If you do not want to use this option, set it to 0. A typical level would be 5.00 for a reasonable warning level.
- Safe Mode Upload Enabled
If your server has Safe Mode enabled, you should set this to Yes. You can determine if Safe Mode is enabled by viewing your phpinfo page and searching for Safe Mode.
- Safe Mode Temporary Directory
If your server is running in PHP Safe Mode, you'll need to specify a directory that is CHMOD to 777 that will act as a temporary directory for uploads. All files are removed from this directory after database insertion.Note:Do NOT include the trailing slash ('/') after the directory name. - Duplicate Search Index Information on Topic Copy?
It is not strictly necessary to index a copied topic since the original topic is already indexed. However, you may wish to index copied topics for the sake of completeness. Setting this option to yes will cause search index information to be copied with each post in the topic. This allows the copied version of the topic to be searchable as well. However, on larger boards, this may cause significant delays in copying a topic. If this is a problem for you, we recommend disabling this option.
- Session IP Octet Length Check
This is used to specify to which octet an IP is verified to during session retrieval. This means that if for some reason an IP changes between requests as long as it is within the allowed length the session will remain. This is most likely to happen when an ISP has transparent proxies such is the case with AOL.
- Use Remote YUI
YUI (Yahoo! User Interface Library) script files, used for some functions in vBulletin, are hosted locally on your server, you may however have them served from Yahoo's own servers, saving you some bandwidth and potentially decreasing load times.
More information about this service can be found here.
Style & Language Settings |
Here you can setup the behaviours for the CSS file (store as file), Popup menus (hide or show) and postbit (new or legacy).
- Default Language - Set the default language for your forums. This language will be used for all guests, and any members who have not expressed a language preference in their options.
- Default Style - Set the default style for your forums. This style will be used for all guests, and any members who have not expressed a style preference in their options, or are attempting to use a style that does not exist or is forbidden.
- Allow Users To Change Styles - This allows users to set their preferred style set on registration or when editing their option. Setting this to 'No' disables that option and will force them to use whatever style has been specified.
- Location of clear.gif - Please enter the path of your clear.gif image, relative to your forum directory. By default, the value of this setting is 'clear.gif', meaning that the image is located in the base directory of your vBulletin installation (in the same folder as forumdisplay.php).
This URL must be relative, NOT beginning with 'https://'. - Store CSS Stylesheets as Files? - If you would like to store the CSS stylesheet for each style as a file, you must ensure that you have a directory called 'vbulletin_css' inside the 'clientscript' folder, and that the web server has permission to write and delete files within that directory.
- Use 'vBMenu' DHTML Popup Menus? - Use dynamic HTML popup menus to reduce screen clutter if user's browser is capable? Please note that disabling this option will also disable some AJAX features, such as user name suggestion.
- Use Legacy (Vertical) Postbit Template - If you prefer the old-style postbit, using two vertical columns rather than the new horizontal layout, you can switch back to using that template with this switch. Please note that if you enable this option and wish to customize the template, you should edit the 'postbit_legacy' template rather than the 'postbit'.
- Show Instant Messaging Program Icons
Setting this option to yes will show the images for ICQ, AIM, MSN, and Yahoo! Messenger if the user has entered the correct information in his/her profile. These links are shown in various places through out the forum, on posts, who's online, memberlist, profile, etc. When set to no the information will be displayed in their profile in the form of text.
- Use SkypeWeb Graphics
If set to 'Yes', load Skype™ icon from the SkypeWeb server in order to show users' online status, otherwise use local (static) graphic.
If set to 'Language Specific', graphics in the language being used by the visiting user will be loaded.
Email Options |
Here you can setup everything related to how your forum sends and handles email.
- Enable Email features? - Enable the following email-sending features: Report Bad Post, 'Contact Us' Link, Email a Member, Email this Page to a Friend, New Post Notifications to Members
You can turn off the 'Send to Friend' feature for individual user groups in the User Permissions area. - Allow Users to Email Other Members - Allow users to send emails to other users. Use the option below to determine how the emails are sent.
- Use Secure Email Sending - If 'Allow Users to Email Other Members' is set to 'Yes', how should members' email addresses be displayed? If this is set to 'Yes', then an online form must be filled in to send a user an email, thus hiding the destination email address. Setting 'No' will mean that the user is just given the email address in order to send email using their email client application.
- Email Flood Check - Specify in seconds how much time must elapse before a user may send consecutive emails. Set to 0 to disable this flood check.
- Use Mailqueue System - When enabled, subscription emails generated by your site will be processed in batches to lessen the load on your server. Account activation, lost passwords and other vital emails are sent instantly regardless of this setting. If your site has low traffic, subscription emails may be delayed.
If you have a large site, you may wish to enable locking. This prevents a rare situation where the same email is sent multiple times. - Number of Emails to Send Per Batch - vBulletin includes a mail queuing system to prevent bottlenecks when sending lots of email. Use this option to specify how many emails will be sent per batch.
- Bounce Email Address - The email address where bounce messages will be directed. If this field is blank, the Webmaster Email address will be used.
This email is used when using an SMTP server, or when the 'Enable -f Parameter' email for sendmail is switched on. - Enable "-f" Parameter - Some sendmail servers may require the "-f" parameter to be sent with email calls from PHP. If you are having problems with users not receiving email, try enabling this option. In all likelihood, your problem will not be caused by this setting.
- SMTP Email - Set this option to yes to use a SMTP server rather than the internal PHP mail() function.
- SMTP Host - If you've enabled SMTP mail, please specify the host here. You may find that specifying an IP Address rather than a domain name, results in better performance. Example: smtp.gmail.com
- SMTP Port - If you've enabled SMTP mail, please specify the port here.[/b]
- SMTP Username - If you've enabled SMTP mail and your server requires authentication, please specify your username here.
- SMTP Password - If you've enabled SMTP mail and your server requires authentication, please specify your password here.
- SMTP Secure Connection - If you've enabled SMTP mail and your server requires a TLS connection, please set this to yes. This requires OpenSSL support to be compiled into PHP.
Warning:
To obtain your SMTP information, you will need to contact your SMTP provider. This is not information that can be obtained through vBulletin or from support staff.
Sending Email via SMTP |
The SMTP server options can be edited via the Email Options in the vBulletin Options, this will be enabled via the SMTP Email switch and then the appropriate settings must be completed.
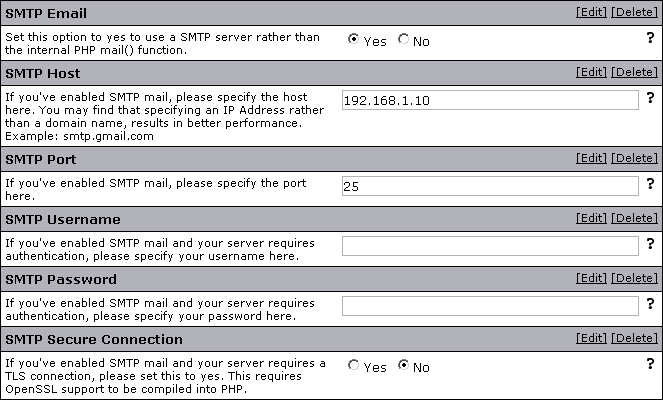
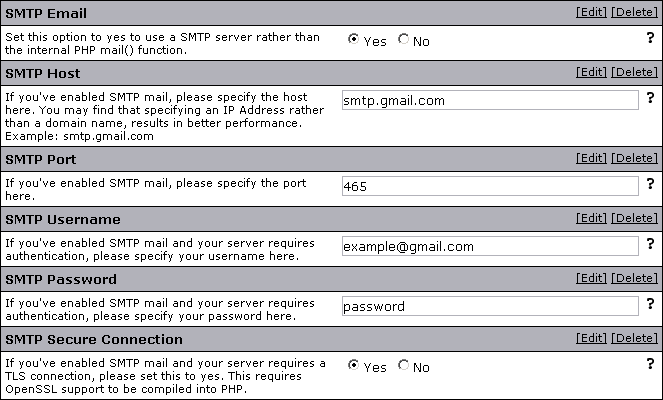
Censorship Options |
All message titles and messages will be affected.
Note:
To use the censor feature on your site, don't forget to activate it!
- Censorship Enabled - You may have certain words censored on your forum. Words you choose to censor will be replaced by the character you specify below. All message titles and messages will be affected.
- Character to Replace Censored Words - This character (or characters) will be used to replace censored words. For example, if you have censored the word 'dog' and you set the censor character here to an asterisk (*) then any occurrences of 'dog' in messages will appear as '***'.
- Censored Words - Type all words you want censored in the field below. Do not use commas to separate words, just use spaces. For example, type "dog cat boy", rather than "dog, cat, boy."
If you type "dog", all words containing the string "dog" would be censored (dogma, for instance, would appear as "***ma"). To censor more accurately, you can require that censors occur only for exact words. You can do this by placing a censor word in curly braces, as in {dog}. Signifying "dog" in the curly braces would mean that dogma would appear as dogma, but dog would appear as "***". Thus your censor list may appear as: cat {dog} {barn} barn
Do not use quotation marks and make sure you use curly braces, not parentheses, when specifying exact words. - Blank ASCII Character Stripper - If there are certain raw ASCII characters you would like to strip from posts/usernames etc, enter their ASCII numbers here, separated by spaces.
Please note that stripping raw ASCII characters with this setting may break some double-byte languages. If you are unsure, remove the contents of this setting.Note:If your forum is set up to use UTF-8 character encoding then this setting will need to be emptied.
User Registration Options |
vBulletin Options > vBulletin Options > User Registration Options
- Allow New User Registrations - If you would like to temporarily (or permanently) prevent anyone new from registering, you can do so. Anyone attempting to register will be told that you are not accepting new registrations at this time.
- Use COPPA Registration System - Use the COPPA registration system. This complies with the COPPA laws and requires children under the age of 13 to get parental consent before they can post.
For more info about this law, see here: https://www.ftc.gov/bcp/conline/pubs/buspubs/coppa.htm - COPPA Registration System Cookie Check - This option will save a cookie onto the user's computer if an age under 13 is entered. Subsequent registration attempts will be failed, no matter what age is entered. This only applies if the previous option is set to either Enable COPPA or Deny registration for users under 13 years.
- Moderate New Members - Allows you to validate new members before they are classified as registered members and are allowed to post.
- Send Welcome Email - Enabling this option will send a welcome email to new users using the email body/subject phrases for 'welcomemail'.
Note: If you require emails to be verified, this email will be sent after the user has activated his or her account. If you moderate new memberships, no welcome mail will be sent as the user will already be receiving an email. - Welcome Private Message - Enabling this option will send a welcome private message to new users. Please input the username of the user that this PM is to be sent from. To alter or translate this message, use the email body/subject phrases for 'welcomepm'.
Note: If you require emails to be verified, this message will be sent after the user has activated his or her account. Also ensure that Receive Private Messages is enabled in the Default Registration Options. - Email Address to Notify About New Members - This email address will receive an email message when a new user signs up. Leave the option blank to disable this function.
- Allow Multiple Registrations Per User - Normally, vBulletin will stop users signing up for multiple names by checking for a cookie on the user's machine. If one exists, then the user may not sign up for additional names. Note: This does not stop users from logging out and then registering new accounts.
If you wish to allow your users to sign up for multiple names, then select yes for this option, and they will not be blocked from registering additional usernames. - Verify Email address in Registration - If you set this option to 'Yes' new members will not be allowed to post messages until they visit a link that is sent to them in an email when they sign up.
If a user's account is not activated by the user visiting the link, it will remain in the 'Users Awaiting Activation' usergroup. - Require Unique Email Addresses - The default option is to require unique email addresses for each registered user. This means that no two users can have the same email address. You can disable this requirement by setting this option to 'No'.
- Minimum Username Length - Enter the minimum number of characters in a valid username, for the purpose of ensuring that new members create valid usernames.
- Maximum Username Length -
Enter the maximum number of characters in a valid username, for the purpose of ensuring that new members create valid usernames. - Illegal User Names - Enter names in here that you do not want people to be able to register. If any of the names here are included within the username, the user will told that there is an error. For example, if you make the name John illegal, the name Johnathan will also be disallowed. Separate names by spaces.
- Username Regular Expression - You may require the username to match a regular expression (PCRE). The admin help provides some examples that may be useful. To disable this function leave the option blank.
- User Referrer - If you enable the User Referrer system, then a user who visits your forum through a link that contains 'referrerid=XXX' will give referral credit to the owner of the referrerid when they register (where XXX is the userid of the referring user).
- Default Registration Options - The user options on the New User creation form in the Admin Control Panel, as well as the New User registration form will default to the following settings.
You can control the following settings:
Receive Admin Emails
Invisible Mode
Display Email
Receive Private Messages
Send Notification Email When a Private Message is Received
Pop up a Notification Box When a Private Message is Received
Enable Visitor Messaging
Limit usage of Visitor Messages to Contacts and Moderators
Allow vCard Download
Display Signatures
Display Avatars
Display Images
Display Reputation
Automatic Thread Subscription Mode
Message Editor Interface
Thread Display Mode
Require Birthday - Username Reuse Delay - When a username is changed, you may wish to prevent users from registering with that name for a certain length of time. Use this setting to determine the time before a deleted or previous username can be reused, or set it to 0 to disable this function.
User Infractions & Post Reporting Options |
- User Infraction Discussion Forum
A discussion thread can be created for each user infraction for moderators to discuss the infraction further. Choose a forum for the discussion threads to be created in.
If you do not wish a discussion thread to be created for user infractions, set this to Select Forum - Require Infraction Message
This option requires that the user sending an infraction include a PM or Email, depending on your forum settings. - Post Reporting Discussion Forum
A discussion thread can be created for each reported post for moderators to discuss the post further. Choose a forum for the discussion threads to be created in.If you do not wish a discussion thread to be created for reported items, set this to Select ForumNote:Reported Visitor Messages, Social Group Messages and Album Pictures & Messages also are posted in the forum set here. - Post Reporting User
Reported post discussion threads default to being posted under the username of the reporter. To have the threads reported under another username, enter an existing username. - Post Reporting Email
This option sends an email to the specified users when a post is reported. It can be sent to moderators, super moderators and administrators, moderators only, or no email sent.Note:If the Post Reporting Email is set to No Email and the Post Reporting Discussion Forum is set to Select Forum then no notifications of any kind will be issued for reported items.
User Profile Options |
vBulletin Options > vBulletin Options > User Profile Options
Enabled User Profile Features
Use this option to globally enable or disable the various user profile-related features. Additional options are available for each feature in their respective sections.
Require Date of Birth
Require users to provide a valid date of birth (1902 to current year).
[note]When this is set to Yes users cannot edit their date of birth once it has been set.
User Title Maximum Characters
This is the maximum number of characters allowed for a user's custom title.
Censored Words for Usertitle
Type all words you want censored in the Usertitle in the field below. Do not use commas to separate words, just use spaces. For example, type "dog cat boy", rather than "dog, cat, boy."
If you type "dog", all words containing the string "dog" would be censored (dogma, for instance, would appear as "***ma"). To censor more accurately, you can require that censors occur only for exact words. You can do this by placing a censor word in curly braces, as in {dog}. Signifying "dog" in the curly braces would mean that dogma would appear as dogma, but dog would appear as "***". Thus your censor list may appear as: cat {dog} {barn} barn
Do not use quotation marks and make sure you use curly braces, not parentheses, when specifying exact words.
Exempt Moderators From Censor
Do you want to exempt your forum Moderators from the censor words? You will want to set this to yes if you censor anything that is part of a moderator's title like 'moderator' as they have custom titles by default and will get censored.
Number of friends to display in the small friends block
The Number of Friends to display in the Small Friends Block on the Users' Profile Pages
Friends Per Page on Full Friends List[b]
The Amount of Friends to show "per page" on the large friends list.
[b]Maximum Visitors to Show on Profile Page
Set an upper limit for the number of recent visitors to show. Recent visitor records are cleaned out on a regular basis, so keep this to a reasonably small number. Somewhere between 5 to 30 is ideal.
Show Last Post on Profile Page
Showing the last post on a member profile can cause large table scans which leads to table locking. This may increase load time on your forums as well as the load of your server. This option should only be enabled for smaller forums.
Signature Soft-Linebreak Character Limit
When counting the number of lines in a signature, this setting controls the number of characters that can be displayed before text wraps in the browser and is displayed as multiple lines. Once this value is surpassed, the run of text will be counted as multiple lines.
The value in this setting should be based on the number of normal-sized characters. Other sized characters will be scaled appropriately to this setting.
Allow Users to 'Ignore' Moderators
Allow users to add Moderators and Administrators to their ignore list?
User Profile: Album Options |
vBulletin Options > vBulletin Options > User Profile: Album Options
Albums Per Page
When listing multiple albums on one page, this controls how many will be displayed before pagination occurs.
Number of Albums to display in the Users Profile
The Maximum Number of Albums to Display on the Users' Profile Pages
Pictures Per Page
When viewing an album, this controls how many pictures are displayed before pagination occurs.
Picture Moderation
When enabled, all new pictures are placed into moderation. This can also be enabled in usergroup permissions.
Album Thumbnail Size
The maximum height and width of thumbnails in the album system. Each picture's aspect ratio will be maintained when it is thumbnailed.
Caption Preview Length
The amount of characters from a picture's caption that will be shown when a user hovers over the picture.
Number of Pictures that can be Uploaded Simultaneously
This controls the number of pictures users can upload simultaneously. They will not be able to violate any album- or usergroup-implied size limits if you set this value too large.
Maximum Pictures per Album
You may choose to limit the number of pictures that a user can have in one album. This is primarily useful for encouraging your users to have albums for smaller topics, but it does have minor performance considerations as well. Setting this to 0 disables the limit.
Enable Picture Comments
Set this option to yes if you would like to enable commenting on album and group pictures. Comments are associated with the picture itself, so comments will be shown anywhere the picture is shown.
Moderate Picture Comments
When enabled, all new picture comments are placed into moderation. This can also be enabled in usergroup permissions.
Default Picture Comments Per-Page
This setting allows you to define the default number of picture comments displayed per-page with a picture.
Maximum Picture Comments Per-Page
This setting allows you to limit the number of picture comments users may display per page with a picture.
Allowed BB Code Tags in Picture Comments
This setting allows you to enable and disable the use of various BB codes in picture comments.
User Profile: Style Customization Options |
vBulletin Options > vBulletin Options > User Profile: Style Customization Options
Allowed Fonts
The list of allowed fonts for profile style customizations. Each font must be on its own line.
Allowed Font Sizes
The list of allowed fonts size for profile style customizations. Put each font size on its own line. You may use any size that is valid in CSS.
Allowed Border Widths
The list of allowed border width sizes for profile style customizations. Put each border width size on its own line.
Allowed Padding
The list of allowed padding sizes for profile style customizations. Put each padding size on its own line.
User Profile: Visitor Messaging Options |
vBulletin Options > vBulletin Options > User Profile: Visitor Messaging Options
Maximum Characters Per Visitor Message
Maximum characters to allow in a visitor message. Set this to 0 for no limit.
Default Visitor Messages Per-Page
This setting allows you to define the default number of messages displayed per-page in the user profiles.
Maximum Visitor Messages Per-Page
This setting allows you to limit the number of messages users may display per page in the user profiles.
Visitor Message Moderation
When enabled, all new visitor messages are placed into moderation. This can also be enabled in usergroup permissions.
Allowed BB Code Tags in Visitor Messages
This setting allows you to enable and disable the use of various BB codes in visitor messages.
Social Group Options |
vBulletin Options > vBulletin Options > Social Group Options
Social Group Name Maximum Length
Enter the maximum number of characters allowed in social group names. Names longer than this limit will be rejected.
Social Group Message Moderation
When enabled, all new group messages are placed into moderation. This can also be enabled in usergroup permissions.
Enable Social Group Messages
If you select this option, members of each group will be able to post messages in the group. Users who are not part of the group will still be able to read the messages.
Allow Groups Owners to Force New Group Messages into Moderation Queue
This option allows a group owner (with the Manage Own Social Groups' Content Permission) to set the group so that all Group Messages are automatically sent to the moderation queue.
Enable Social Group Pictures
If this option is selected, any users with albums will be able to add pictures from an album to groups they belong to.
Allow Join-to-View Groups
When set, this allows the creator of a group the option to only show contents (messages, pictures) of the group to members of that group (or Administrators and Moderators).
Allowed BB Code Tags in Social Group Messages
This setting allows you to enable and disable the use of various BB codes in group messages.
Allow Owners to Delete Social Group if Empty
This option will allow any group owner to delete a Social Group if they are the only member of that group (even if they lack the "Can Delete Own Social Groups" permission)
User Picture Options |
Note:
This is the section for the global switch, use the usergroup permissions to setup the permissions on a usergroup basis.
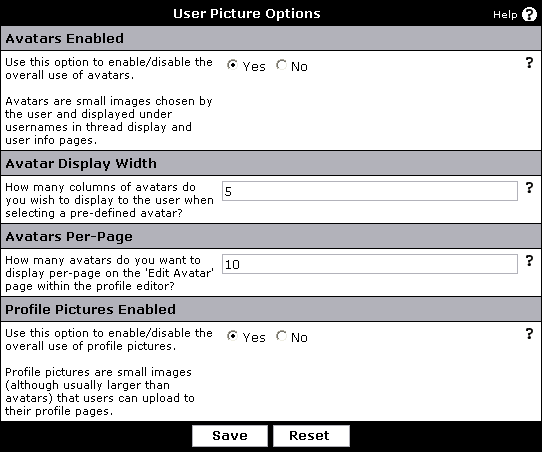
- Avatars Enabled
Use this option to enable/disable the overall use of avatars.
Avatars are small images chosen by the user and displayed under usernames in thread display and user info pages.
You can enable/disable avatars on a per-usergroup level by disabling their ability to use any avatar categories under Avatars > Avatar Manager. You can enable/disable custom avatars in Usergroups > Usergroup Manager.
Set this option to 'no' to turn it off.
- Avatar Display Width
How many columns of avatars do you wish to display of pre-defined avatars in the User Control Panel to the user when selecting a pre-defined avatar?
Example: 5
- Avatars Per-Page
How many avatars do you want to display per-page on the 'Edit Avatar' page within the profile editor, broken into columns by the Avatar Display Width setting above?
Example: 10
- Profile Pictures Enabled
Use this option to enable/disable the overall use of profile pictures.
Profile pictures are small images (although usually larger than avatars) that users can upload to their profile pages. You can set this per-usergroup with the Can Upload Profile Pictures setting in Usergroup Manager.
Set this option to 'no' to turn it off.
Note:
To manage your pre-defined avatars, or to control the storage of avatars, go to the Avatars section.
User Reputation |
- Enable User Reputation system
This is the global switch for the reputation system. If you disable this, users will not be able to rate each other nor will their scores be visible. - Default Reputation
This is the reputation score that new users will start out with. - Number of Reputation Levels to Display
When a user enters their User CP, they will see a list of their most recent reputation ratings. This affects how many of the latest ratings to display. - Administrator's Reputation Power
If you wish to have administrator's wield a certain reputation power independent of their calculated score, enter it here. Otherwise, set this to 0 and they will use the same calculations as everyone else. - Register Date Factor
The number of reputation points that a user is able to give or take is dependant on several factors, with the length they have been registered as one of them. A user's power is first initialized at 1 and then this factor and the factors that follow are used to increase it. For example if you set this to 365, every 365 days that the user has been a member of your forum, they would gain one point. So if they have been a member for five years, they would gain 5 points of power for a total of 6. - Post Count Factor
The amount of posts that a user has can also affect their reputation power. Set this to number of posts that you want to award one point for. For example, set this to 50 and for a user with 500 posts, they would gain 10 points of power. - Reputation Point Factor
The users current reputation score can also affect their reputation power. Set this to 100 and a user with a reputation of 1000 would gain 10 points of reputation power. If you set any of the power factors to 0, that will effectively remove that factor from having an effect on the user's reputation power. - Minimum Post Count
If the reputation system is enabled, anyone will be able to rate a post but only users with a post count above the level you set here will be able to actually give points or take points from another user. - Minimum Reputation Count
As with the post count above, a user must have a reputation above this level to be able to give or take points from another user's score. - Daily Reputation Clicks Limit
This sets how many unique members that a forum user will be able to rate in any 24 hour period. Administrators can rate as many people as they wish. - Reputation User Spread
This setting dictates how many unique members that a user must rate before they are able to rate the same member twice. The goal of this setting is to stop a member from either artificially bumping or dropping a user by repeatedly rating their posts.
User Notes Options |
The vBulletin Options > vBulletin Options > User Notes Options setting group allows you to set up the parsing for a usernote. You can turn on or off the use of BB Code, Smilies, [IMG] tags and usage of HTML.
Note:
The ability to use usernotes, read them, read your own, allow others to reply or manage them is a usergroup setting. Do not forget to walk through each usergroup to set the use and permissions of usernotes correctly.
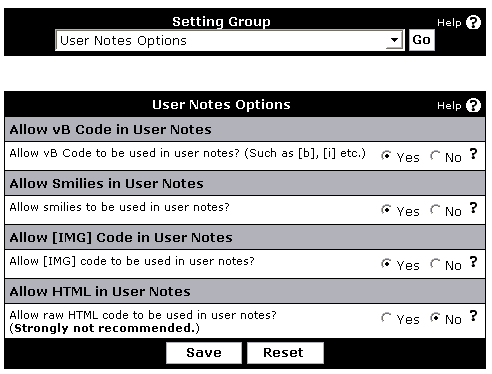
- Allow vB Code in User Notes
If you want to markup the text with BOLD or ITALIC or other common vBulletin BB Code tags, set this option to Yes.
- Allow Smilies in User Notes
If you want a smilie like :) parsed to an image, set this option to Yes.
- Allow [IMG] Code in User Notes
If you want to allow insertion of images into the usernotes, set this option to Yes.
- Allow HTML in User Notes
If you even want to allow HTML to be used, set this option to Yes.
Warning! If you allow HTML to be inserted, you are open for risks of abuse - it is strongly not recommended.
User Listing Options |
This section of the Admin Control Panel allows you to set options for the Member List including:
- Members List Enabled
This allows users to view all users who belong to those usergroups that have "Viewable on Memberlist" enabled (See Usergroups & Permissions). - Minimum Posts
You can define a minimum post count that a user must reach before they are displayed on the memberlist. - Member List Field Options
Allows you to select which User Profile fields are viewable on the memberlist. - Members Per Page
The number of records per page that will be shown by default in the members list before the results are split over multiple pages. - Allow Advanced Searches
Allow the use of the advanced search tool for the Member List. If turned off, members will only be able to search by username.
User Banning Options |
This section of the Admin Control Panel allows you to set the Banning Options for your forum along with IP bans.
- Enable Banning Options
Banning allows you to stop certain IP addresses and email addresses from registering and posting to the forum. - Banned IP Addresses
Use this option to prevent certain IP addresses from accessing any part of your board.
If you enter a complete IP address (242.21.11.7), only that IP will be banned.
If you enter a partial IP (243.21.11. or 243.21.11), any IPs that begin with the partial IP will be banned. For example, banning 243.21.11 will prevent 243.21.11.7 from accessing your board. However, 243.21.115.7 would still be able to access your board.
You may also use an '*' as a wildcard for increased flexibility. For example, if you enter 243.21.11*, many IPs will be banned including: 243.21.11.7, 243.21.115.7, 243.21.119.225.Warning:Use this option with caution. Entering an incorrect IP can result in banning yourself or other genuine users from your forums. - Banned Email Addresses
Email address ban lists: You may ban any email addresses from registering and posting. Type in the complete email address ([email protected]), or use a partial email address (as in @example.com).
Note that partial email addresses are matched from the end of the address unless you enable 'Aggressive Email Banning' below. Therefore if you ban @example.com you will ban [email protected], but if you ban @example that user will not be banned. If you enable 'Aggressive Email Banning', [email protected] would be banned by @example.
If the email address of a user attempting to register or change their email address matches any of the addresses you specify here will see a no-permission error. For example, if you have banned 'example.com' then a user attempting to use '[email protected]' will be rejected. - Aggressive Email Banning
If this option is enabled, when checking for banned emails, incomplete addresses are matched anywhere in the email address, not just the end.
For example, if this option is enabled 'yahoo' will block any email address with 'yahoo' in it. If this option is disabled, no emails will be banned unless the ban was changed to 'yahoo.com'. - Allow User to Keep Banned Email Addresses
If you ban an email address and a user already uses that address, a problem will occur. Using this option, you can specify whether the user will have to enter a new email address in their profile when they next modify their email address, or whether the user can just keep the email address which you have banned. - Tachy Goes to Coventry
This option allows you to effectively add a user or users to every member's 'Ignore List'. However, users in this list can still see their own posts and threads...
Enter a list of userid numbers, separated by spaces (for example: 4 12 68 102).Note:If you change this option, you need to rebuild thread and then forum information in Maintenance > Update Counters.
BB Code Settings |
- Enabled Built-in BB Code Tags
This setting allows you to enable and disable various built-in BB code tags in vBulletin. The BB Codes that can be enabled or disabled here are:
Basic BB Code (Bold, Italic, Underline)
Color BB Code
Size BB Code
Font BB Code
Alignment BB Code
List BB Code
Link BB Code
Code BB Code
PHP BB Code
HTML BB CodeNote:Disabling a BB code tag will prevent it from working anywhere on the forum, including signatures, private messages, user notes etc. - Maximum [CODE] Lines
When a user posts a block of [CODE], [PHP] or [HTML] in one of their messages, the system will place it in a box, which expands to contain their message.
This value controls the number of lines at which the box stops adding height and inserts a scrollbar.
- Allow BB Code in Non Forum Specific Areas
Allow users to include BB code in non-forum-specific areas? (Such as [b], [i] etc.) - Allow Smilies in Non Forum Specific Areas
Allow users to include smilies in Non Forum Specific Areas? - Allow [IMG] Code in Non Forum Specific Areas
Allow users to include [IMG] codes in Non Forum Specific Areas? - Allow HTML in Non Forum Specific Areas
Allow users to include raw HTML code in Non Forum Specific Areas?Warning:Enabling this setting is strongly not recommended.
Message Posting and Editing Options |
- Quick Reply
If you enable Quick Reply, a box will appear on the showthread.php page allowing users to reply to the current thread without needing to load the full newreply.php page.
When Quick Reply is enabled, you may specify whether or not users must click the Quick Reply icon in order to start typing in the Quick Reply editor.
If you choose not to require a click, the system will not know to which post a user is replying, making both the threaded and hybrid display modes nonsensical.Note:We strongly recommend that you set the option to require a click if you use Quick Reply and have Threaded Mode available on your forums. - Quick Edit
By enabling Quick Edit, a click on the Edit button in a post will open an editor within that post via AJAX if the visitor's browser is compatible.
Users may use the full editor by clicking the 'Go Advanced' button in the inline editor. - Multi-Quote Enabled
If this option is enabled, an additional button will appear on posts. A user may click as many of these buttons as they wish. Once they click a reply button, the content of each of the selected posts will be quoted and shown in the reply window. - Multi-Quote Quote Limit
Enter a value to limit the number of quotes that can be created with Multi-Quote, once this limit is reached the user will be unable to add any more quotes.Note:The Quote BB code can still be entered manually, this is not a limit on the number of quotes in a post. - Minimum Characters Per Post
If this number is set to a value greater than 0, users must enter at least that number of characters in each new post.Note:Setting this to 0 will not completely disable the minimum characters per post check. Users must always enter at least 1 character. - Maximum Characters Per Post
Posts that contain more characters than the value specified here will be rejected with a message telling the user to shorten their post.
Set the value to 0 to disable this function. - Maximum Characters Per Thread/Post Title
Thread and post titles will be limited to this number of characters. Please choose a value larger than 0 and less than 251. - Ignore Words in [QUOTE] Tags For Min Chars Check
Setting this option to 'YES' will cause the system to not count words in [QUOTE] tags towards the total number of characters posted.
The primary use for this is to prevent users posting messages with enormous quotes and a single short word of their own. - Automatically Quote Post / Thread Title
Setting this to 'Yes' will automatically fill the title field of new posts with either the thread or the parent post title, prefixed by 'Re: '.
The user may specify their own title if they want to do so. - Maximum Images Per Post
When a new post is submitted or edited vBulletin will check the number of images and smilies in the text and reject it if the number is greater than the value specified here.
Set the value to 0 to disable this function. - Prevent 'SHOUTING'
Prevent your users 'shouting' in their thread titles/message text by changing all-uppercase titles with at least this many characters to capitalization only on the first letters of some words.
Set the value to 0 to disable this function.Note:Disable this for some international forums with different character sets, as this may cause problems. - Minimum Time Between Posts
You may prevent your users from flooding your forum with posts by activating this feature.
By enabling floodcheck, you disallow users from making another post within a given time span of their last posting. In other words, if you set a floodcheck time span of 30 seconds, a user may not post again within 30 seconds of making his last post.Recommended: 30 seconds. Type the number of seconds only. Enter 0 to disable this function.Note:Administrators and moderators are exempt from floodcheck. - Time Limit on Editing of Thread Title
Specify the time-limit (in minutes) within which the thread title may be edited by the user whom started the thread. - Time Limit on Adding a Poll to a Thread
Specify the time-limit (in minutes) within which the thread may have a poll added to it. - Time Limit on Editing of Posts
Time limit (in minutes) to impose on editing of messages. After this time limit only moderators will be able edit or delete the message. 1 day is 1440 minutes.
Set the value to 0 to allow users to edit their posts indefinitely. - Time to Wait Before Starting to Display 'Last Edited by...'
Time limit (in minutes) to allow user to edit the post without the "Last edited by..." message appearing at the bottom of the edited post. - Log IP Addresses
For security reasons, you may wish to display the IP address of the person posting a message. - Post Edit History
Enable this option to log the previous versions of posts when they are edited.
Edits will not be logged if an 'edited by' notice is not displayed or updated. This occurs in the following situations:- The editing user is in a group that does not show edited by notices and no reason for editing is specified.
- The post is edited quickly enough after being posted to trigger the Time to Wait Before Starting to Display 'Last Edited by...' option.
Note:This will increase the amount of disk space used by vBulletin for database storage.
Message Posting Interface Options |
- Enable Clickable Message Formatting Controls
This global switch allows you to set the available message formatting toolbar and clickable smilies for the Full Editor, Quick Reply and Quick Edit individually. The option set for each one here is the maximum toolbar level available for each area.
- Smiliebox Total Smilies
How many smilies should be displayed in the smiliebox before the user is prompted to click for the more smilies popup window?
Set this value to 0 if you would like to hide the clickable smiliebox completely. - Smiliebox Smilies Per Row
If the smiliebox is enabled, how many smilies should be shown per row of the box? - Smilie Menu Total Smilies
Use this option to set the number of smilies that will appear in the WYSIWYG popup smilie menu before the 'show all smilies' link is displayed.
Set this value to 0 if you would like to hide the popup smilie menu completely.
Message Attachment Options |
- Limit Space Taken Up By Attachments (Total)
Use this option to limit the total combined amount of disk space in bytes that all attachments can occupy.
Set the option to 0 to have no disk space limit. - Attachments Per Post
Number of files that may be attached to a single post. Set to '0' to have no limit. - Attachment Upload Inputs
This option sets how many attachment upload input boxes are displayed on the upload form. - Attachment URL Inputs
This option sets how many attachment URL input boxes are displayed on the upload form. - Allow Deletion of Attachments Beyond Edit Time Limit
Allow users to delete attachments, even if the post edit time limit has been exceeded? If you have attachment quotas enabled then you will need this option enabled to allow users to delete attachments once they reach their quota. The user will still need permission to edit posts in the forum for this to apply. - Allow Deletion of Attachments in Closed Threads
Allow users to delete attachments from threads that are closed? If you have attachment quotas enabled then you might need this option enabled to allow users to delete attachments once they reach their quota. The user will still need permission to edit posts in the forum for this to apply. If the above option is set to NO then this option will only apply up to the edit time limit setting. - Allow Duplicate Attached Images
This setting only checks for attachments posted by the user that is making the post. - Resize Images
If an image is larger than your maximum allowed dimensions or filesize, an attempt to resize it will be tried. This may fail if the image is too large to be successfully processed or if the image type is not supported for resizing. When this option is enabled, you should limit the Attachment Input options above to one, otherwise the uploading of multiple large images by one user could strain your server. - View Attached Images Inline
If thumbnails are enabled, any image without a thumbnail will be shown as a link, regardless of this setting's status, unless the image size happens to be within the thumbnail size limits.
Set this to 'No' if you want to preserve bandwidth or server processor resources. - Thumbnail Creation
If your version of PHP supports image functions, you may enable the creation of thumbnails for images. This is the master switch to enable/disable thumbnail display. Go to Attachments -> Attachment Manager -> Edit -> Display to choose what image types will be thumbnailed. You will need to go to Maintenance -> Update Counters -> Rebuild Attachment Thumbnails after changing this setting. - Thumbnail Size
Maximum width and height that the thumbnail can have. The image will be proportionately resized so that the longest side is no larger than this setting. If you change this setting, you will need to go to Maintenance -> Update Counters -> Rebuild Attachment Thumbnails. - Thumbnail Quality
Quality of JPG thumbnails. 75 is a good balance between file size and image quality. - Thumbnails Per Row
How many thumbnails do you wish to display per line on user's post, assuming you allow more than one attachment per post? - Thumbnail Color
This setting controls the border and label color in the Thumbnail Creation option above. Please specify the color using standard Web Colors. - Use Image Lightbox
Use the lightbox for quick display of attached image thumbnails rather than instantly loading the full size image on a new page.
Poll and Thread Rating Options |
- Maximum Poll Options
Maximum number of options a user can select for the poll.
Set this option to 0 to allow any number of options. - Poll Option Length
Maximum length that a poll option can be. - Update Thread Last Post on Poll Vote
If you set this option to 'Yes' the thread's last post time will be updated when a vote is placed, thereby returning it to the top of its parent forum listing.Note:This option can cause confusion. The last post time of a thread will be changed with no visible post. - Required Thread Rating Votes to Show Rating
This option specifies the number of thread rating votes that must be cast of a particular thread before the current rating is displayed on forumdisplay.php and showthread.php. - Allow Thread Rating Vote Changes
Allow users to change their original rating of a thread
Message Searching Options |
- Search Engine Enabled
Allow searching for posts and threads within the forums. This is a relatively server-intensive process so you may want to disable it if you have problems.
- Minimum Time Between Searches
The minimum time (in seconds) that must expire before the user can perform a new search.
Set this to 0 to allow users to search as frequently as they want. - Search Results Posts Per Page
Number of successful search results to display per page. - Maximum Search Results to Return
Any search results over this number will be discarded. - Search Index Minimum Word Length
When using the vBulletin default search, this option limits the size of indexed words. The smaller this number is, the larger your search index, and conversely your database is going to be.Note:When using the Fulltext search, this option limits the size of words that may be searched for. Smaller words take longer to search for as they are more common. MySQL Fulltext has its own minimum word length as well that must be changed at the server level. - Automatic Similar Thread Search
Setting this option will cause a search for similar threads to be automatically done when a new thread is posted. These similar threads are then linked to from the newly posted thread's page. This can have an effect on performance. - Search Result Sharing
In order to conserve resources, vBulletin will allow search results to be shared among users for one hour. The downside of this is that search results can appear out of order if a thread is updated in the interim. - Similar Threads Relevance Threshold
For a post to be matched in a search for similar threads, it must have a score of this number or greater, per searchable word. For more information on how post scores are determined, see the Search Algorithms section. - Words to be excluded from search
If there are special words that are very common for your forum, you may wish to remove them from being searchable. Searching for very common words on a large forum can be server intensive. Separate each word with a space.
Message Searching Options (vBulletin Internal Search) |
Words to be Included Despite Character Limit
If there are special words that are important for your forum but are outside the word length limits you specified above, you may enter them here so that they will be included in the search index.
For example, a web-programming forum with a minimum word length of 4 characters might want to include 'PHP' in the search index, even though the word is only 3 characters long.
Separate each word with a space.
Search Index Maximum Word Length
Enter the maximum word length that the search engine is to index. The larger this number is, the larger your search index, and conversely your database is going to be.
Allow Search Wild Cards (yes/no)
Allow users to use a star (*) in searches to match partial words? (Eg: 'bu*' matches 'building' and '*bu*' matches 'vBulletin').
Message Searching Relevance Options (vBulletin Internal Search) |
Note:
These settings only apply if you are using the vBulletin Search Engine. They do not apply if you are using Full Text Search.
- Search Relevance Multi-Word Match Bonus Score
If the search query is for multiple words, this number will be added to the score for the item each time another word from the query is found. - Search Relevance Date Score
The newest item in the result set will score this number, with the score decreasing to 0 for the oldest item in the result set. - Search Relevance Thread Title Score
Score for a word appearing in the thread title. - Search Relevance Post Title Score
Score for a word appearing in the post title. - Search Relevance Reply Score
Amount to multiply the number of replies in a thread to get the score for the thread. - Search Relevance Reply Function
Allows you to specify a function to operate on the number of replies of a thread.
Works like: = func($thread[replies]) * $replyscore - Search Relevance View Score
Amount to multiply the number of views of a thread to get the score for the thread. - Search Relevance Views Function
Allows you to specify a function to operate on the number of views of a thread.
Works like: = func($thread[views]) * $viewscore - Search Relevance Rating Score
Amount to multiply the average rating of a thread to get the score for the thread. - Search Relevance Rating Function
Allows you to specify a function to operate on the average rating of a thread.
Works like: = func($thread[rating]) * $ratingscore
Tagging Options |
- Enable Thread Tagging
This is a global option to enable or disable the thread tagging system. You may choose which usergroups can apply tags to threads in the usergroup permissions section. - Tag Minimum Length
The minimum number of characters in a tag name. This can be between 1 and 100. - Tag Maximum Length
The maximum number of characters in a tag name. This can be between 0 and 100. - Thread Tag Banned Words
These words will be checked in addition to those listed in includes/searchwords.php to form a list of words whose use is banned in tagging.
Separate each word with a space or carriage return. - Thread Tag Allowed Words
Words entered here will be allowed as tags, regardless of whether or not their use would be otherwise disallowed due to length, censorship, commonality etc.
If a word is specified in the 'Banned' words group and here, it will be allowed.
Separate each word with a space or carriage return. - Tag Separators
This option allows you to specify additional tag separators. Regardless of the value here, a comma will always be used as a separator.
Separate each tag separators with a space. If you would like to use a space in a tag separator, click the '?' for information on the advanced separator syntax. - Maximum Tags per Thread
The maximum total tags per thread. No users may add more tags than this to an individual thread.
0 disables this. - Maximum Tags Applied by Thread Starter
The maximum number of tags the thread starter can apply. Even if this setting allows it, the number of tags in a thread cannot exceed the "Maximum Tags per Thread" setting.
0 disables this limit. To prevent a user from tagging a thread, use user group permissions. - Maximum Tags Applied by Other Users
The maximum number of tags the users other than the thread starter can apply. Even if this setting allows it, the number of tags in a thread cannot exceed the "Maximum Tags per Thread" setting.
0 disables this limit. To prevent a user from tagging a thread, use user group permissions. - Force Tags to be Lower Case
If you enable this option, "A" through "Z" will be replaced with "a" through "z" in tag names. Other characters will not be changed. - Tag Cloud: Number of Tags
The maximum number of tags to display in the tag cloud. - Tag Cloud: Number of Levels
The number of levels to be shown in the tag cloud.
By default, there are 5 levels named level1 to level5, with the font size growing from its smallest size at level 1 to its largest at level 5.
Increasing this value above 5 requires a template change. - Tag Cloud: Cache Time
Amount of time in minutes before the tag cloud data cache is regenerated.
A value of 0 will generate the tag cloud on each view. - Tag Cloud: Usage History (Days)
The number of days worth of data that should be used to generate the usage-based tag cloud here.
Tags added more than this many days ago will not change the size of the link in the cloud. - Tag Cloud: Build Usergroup
The tag cloud pulls together data from threads in many forums. Users may not be able to see all the threads that make up the tag cloud results. With this option, you can force the tag cloud to be built as if it were viewed by a particular usergroup.
Live permission checking is the most accurate, but disables the above specified caching. - Enable Search Tag Cloud
This option controls whether a tag cloud relating to the frequency of tag searches is shown at the bottom of the advanced search.
A usage-based tag cloud is always shown here. - Search Tag Cloud: History (Days)
Amount of days that the system will keep a record of tag searches for use in the search tag cloud.
0 means to use all data available.
Forums Home Page Options |
- Script Name for Forum Home Page
This option allows you to set the script name of the page that acts as your forum home page. By default this will be 'index' (meaning index.php but you may want to call it 'forum' or whatever else you like for your own purposes.Note:If you change this value you must manually rename the forumhome PHP script to match the new value. - Display Logged in Users?
Displays those users that have been active in the last XXX seconds on the home page, where XXX is the value specified by your Cookie Time-Out option (Default is last 15 minutes). Not recommended for sites with hundreds of simultaneous users. The Alphabetical option requires more resources than the random option. - Display Today's Birthdays?
Displays today's birthdays for those usergroups that have birthday display enabled (see User Groups->Usergroup Manager). - Display Calendar Events?
Choose the number of upcoming days that you wish to display upcoming events from.
Set to 0 to disable upcoming events. - Display Custom Holidays
Display upcoming custom holidays in the above events list? - Upcoming Event Type
Choose the method by which you wish to display the upcoming events if the "Display Calendar Events" option is enabled. - Active Members Time Cut-Off
Enter a number of days here that represents a threshold for 'active' members. If a user has visited the board within the past number of days you specify, they are considered 'active'.
Enter '0' to treat all members as 'active'. - Active Members Options
Using the boxes here, you can choose to show only birthdays for those members considered 'active', and to show or hide the total number of 'active' members.
A member is considered 'active' if they have visited the board within the number of days specified in 'Active Members Time Cut-Off'.
Forum Listings Display Options |
- Depth of Forums - Forum Home
Depth to show forums on forum home forum listings. If you set this value to '2', forum listings will show the current forum level and any child forums one level below (etc.) - Depth of Forums - Forum Display
This setting does the same job as the setting above, but this time for forumdisplay.php pages, rather than forum home. - Depth of Sub-Forums
If you have forums below the depth specified in the 'Depth of Forums' settings above, you can display them as sub-forum links in each forum's display area.
Set this value to 0 if you want to display no sub-forums. - Show Forum Descriptions in Forum Listings
Show forum descriptions below forum titles in forum listings? - Show Private Forums
Select 'No' here will hide private forums from users who are not allowed to access them. Users who do have permission to access them will have to log in before they can see these forums too.
This option applies to any forum listing, including the Forum Jump menu, and Search Results. - Show Lock Icons to Users
Do you wish to have the new post indicators shown on the index page (on.gif and off.gif) be shown with locks to guests and other members who have no permission to post? - Last Thread Title Maximum Displayed Characters
This value will chop the title of the last thread posted down to a specific number of characters for its display on a forum listing.
A value of 0 will not trim the titles at all. - Show Moderator Column
Turns the moderator column on and off for forumhome, forumdisplay and usercp. - Show Thread Prefix in Last Post Column?
You may choose to show a thread's prefix in the last post column, along with the title. This will increase the size of the data included in that column, however.
Forum Display Options (forumdisplay) |
- Enable Forum Description
This option displays the forum description in the navbar. Helps visitors to know what the topic of a forum is, as well as possibly increasing search engine rankings. - Show Users Browsing Forums
Enabling this option will show the current users browsing a particular forum on forumdisplay.php while adding one query. This can have an effect on performance. The Alphabetical option requires more resources than the random option. - Maximum Displayed Threads Before Page Split
The number of threads to display on a forum page before splitting it over multiple pages.
Note: This number must be at least 1. - Show Sticky Threads on All Pages
Select 'Yes' to show sticky threads on every forumdisplay.php page, regardless of page number. Set 'No' to only display them on page one. - Highlight Threads in Which User Has Posted
When this feature is enabled, a logged in user will see an 'arrow' (or whatever graphic you choose) on the folder icons (hot folders, new folders, etc.) next to the threads that they have posted in. - Hot Threads Enabled
Hot threads indicate threads with a lot of activity. - Hot Threads Qualifying Views
If 'Hot Threads' are enabled, threads with the specified number of views or more will be shown as hot. - Hot Threads Qualifying Posts
If 'Hot Threads' are enabled, threads with the specified number of posts or more will be shown as hot. - Multi-Page Thread Links Enabled
Link to individual pages of a thread spanning multiple pages on the forum listing? - Multi-Page Thread Maximum Links
When linking to multiple pages in the forum display, this allows you to set the cut-off point on which long posts stop adding more page numbers and are replaced by 'more...' - Length of Thread Preview Text
This setting allows you to specify how many characters of the first post in a thread to display in the 'title' tag of the thread title on the forumdisplay page.
Set this value to 0 to disable thread previews. - Group Announcements
Combine a forum's announcements into one listing, where the newest announcement is displayed?
Setting this to No lists all active announcements individually in their applicable forums
Thread Display Options (showthread) |
- Show Users Browsing Threads
Enabling this option will show the current users browsing a particular thread on showthread.php while adding one query. This can have an effect on performance. The Alphabetical option requires more resources than the Random option. - Maximum Displayed Posts Before Page Split
The number of posts to display on a thread page in linear or hybrid mode before splitting it over multiple pages.
Note: This number must be at least 1. - User-Settable Maximum Displayed Posts
If you would like to allow the user to set their own maximum posts per thread then give the options separated by commas. Leave this option blank to force users to use the 'Maximum Displayed Posts Before Page Split' setting above this option.
Example setting: 10,20,30,40 - Show Default Post Icon
If you would like to use a default icon for messages without an icon, enter the path to the image here. - Number of Characters Before Wrapping Text
If you want posts to automatically insert spaces into long words to make them wrap after a certain number of characters, set the number of characters in the box above.
If you do not want this to occur, enter 0.Note:This should be set to 0 with some language sets - Check Thread Rating
If enabled, this option will check if a user voted on a thread and show their vote if they have. Otherwise, they will see the voting options even if they are not able to vote again. This can have an effect on performance. - Check Thread Subscription
If enabled, this option will notify the user that they are subscribed to a thread by displaying a small icon when viewing forumdisplay and search results. It will also change the "Subscribe to this thread" text on showthread to "Unsubscribe from this thread". This can have an effect on performance. - Show Similar Threads?
Set this value to 'Yes' if you would like to see 'similar threads' displayed on the show thread page.Note:This setting will only work if you have 'Automatic Similar Thread Search' enabled in the message searching options section. - Post Elements
There is optional user information that you may display on each post. These options require a bit of processing time to calculate. This information includes Age, Reputation Power and Infractions - Enable Social Bookmarking
Use this switch to quickly disable the display of the bookmarks section of the page, on which links to social bookmarking sites (set up through the Social Bookmarking Manager) are shown.Note:Social bookmarking links will only be displayed in guest-viewable threads.
Threaded / Hybrid Mode Options (showthread) |
- Enable Threaded / Hybrid Mode
Use this setting to enable or completely disable the Threaded and Hybrid thread display modes. - Use Threaded Mode by Default
Set this value to 'Yes' if you would like users (who have not explicitly set a preference) to view threads in the threaded display mode.Note:This setting will have no effect if 'Enable Threaded / Hybrid Mode' is set to 'No'. - Threaded Mode: Posts Depth
When in the threaded display mode, a list of posts within the current thread is displayed at the bottom of the page. This option allows you to set how 'deep' this list displays beyond the currently selected post. - Threaded Mode: Maximum Cached Posts
When in the threaded display mode, a list of posts within the current thread is displayed at the bottom of the page. This option allows you to set how 'deep' into the tree of posts that vBulletin uses the Javascript 'caching' mechanism. This makes the initial download larger, but means that the page does not have to be reloaded for every post that is viewed. - Threaded Mode: Trim Titles
This value will chop the title of the thread titles in the viewing pane down to a specific number of characters. A value of 0 will not trim the titles at all.
Private Messaging Options |
Private Messaging Enabled (yes/no)
Turns the entire private messaging system on and off.
Instant Messaging Support - Check for New Private Messages (yes/no)
Selecting 'Yes' for this option will cause the system to check the private message database every time a user loads a page, and will display a visible prompt if a new message has just been saved.
Maximum Characters Per Private Message (default: 5000)
Maximum characters to allow in a private message.
Set this to 0 for no limit.
Floodcheck - Minimum Time Between Messages (default: 60)
Private Message Flood Checking. Select the minimum time that must pass before a user can send another private message. This is to prevent a single user 'spamming' by sending lots of messages very quickly.
Set this to 0 to disable the option.
Default Messages Per-Page (default: 50)
This setting allows you to define the default number of messages displayed per-page on the private messages listings pages.
Maximum Messages Per-Page (default: 100)
This setting allows you to limit the number of messages users may display per page on the private messages folder view pages.
Allow Message Icons for Private Messages (yes/no)
Allow the use of the standard message icons for private messages.
Allow vB Code in Private Messages (yes/no)
Allow users to include vB Code in their Private Messages? (Such as [b], [i] etc.)
Allow Smilies in Private Messages (yes/no)
Allows users to include smilies in their Private Messages.
Allow [IMG] Code in Private Messages (yes/no)
Allows users to include [IMG] codes in their Private Messages.
Allow HTML in Private Messages (yes/no)
Allow users to include raw HTML code in their Private Messages?
(Strongly not recommended.)
Who's Online Options |
- Who's Online Enabled
This is the master switch for the Who's Online page. If you select no, anyone who tries to access the page will be shown a no permission page.
If you select yes, you may still control usergroup permissions for Who's Online via Usergroups > Usergroup Manager. - Who's Online Refresh Period
If you set this to a value greater than 0, after that many seconds of being on the same page in Who's Online, your browser will automatically refresh the page. - Who's Online Display Guests
Controls whether guests are shown on Who's Online. Browsing registered users are always shown. - Who's Online Resolve IP Addresses
If you have permission to view IP addresses on Who's Online, this controls whether you will be shown a raw IP address or something that has been resolved to a name-based host. The name-based host cannot always be resolved, but when it can additional information about the browsing user can be more easily determined (for example, his or her Internet Service Provider).
Resolving IP addresses to names is a very slow process. If you have problems displaying Who's Online, you should disable this option. - Enable Spider Display
Controls whether spiders are shown as spiders instead of guests on Who's Online. Identification of spiders is controlled via an XML file, which is discussed here.
Identifying Spiders on Who's Online |
The file looks similar to this:
<?xml version="1.0" encoding="ISO-8859-1"?>

<searchspiders>
    <spider ident="https://www.almaden.ibm.com/cs/crawler">
        <name>Almaden Crawler</name>
        <info>https://www.almaden.ibm.com/cs/crawler/</info>
        <email>[email protected]</email>
    </spider>
    <spider ident="Ask Jeeves">
        <name>AskJeeves</name>
    </spider>
    <spider ident="Googlebot">
        <name>Google</name>
    </spider>
    <spider ident="Mediapartners-Google">
        <name>Google AdSense</name>
        <info>https://www.google.com/adsense/faq</info>
        <email>[email protected]</email>
    </spider>
    Place additional spiders here!
</searchspiders>At the minimum, you should provide the ident attribute and the name tag. Other tags are simply for your information and not used. The ident attribute is used to distinguish a regular guest from a spider. The value of this attribute is looked up in the browsing user's user agent (what the user's browser identifies him/her as). If a match is found, the value of the name tag is displayed on Who's Online.
Search Engine Friendly Archive |
Forum Archive Enabled (yes/no)
The Search-Friendly Archive works only under the Apache web server with PHP compiled as a module.
It provides a basic structure that search engines can spider to grab all the content on your site.
Display Simple View of Threads (yes/no)
By default, threads in the Archive are displayed in a simple manner. Set this to no to have the real threads linked from the archive.
Forum Archive Threads Per Page (default: 250)
The number of threads to display per page in the threads listing.
This is done on a per-forum basis.
Forum Archive Posts Per Page (default: 250)
The number of posts to display per page in the thread listing.
Note:
On your own forum you can find the Archive here: https://www.yourforum.com/forumdir/archive/
(live example: https://www.vBulletin.com/forum/archive/)
(live example: https://www.vBulletin.com/forum/archive/)
Admin Control Panel Options |
Control Panel Style Folder
This setting allows you to specify an alternative style for the Admin / Moderator Control Panels, based on a folder contained within the 'cpstyles/' folder. The style you select here will be displayed to all Moderators, and any Administrators who have not expressed their own preference.
Comes default with 5 different Admin Control Panel Styles to choose from. You can set a default here, but upon login one could select the style they prefer.
Folders in the 'cpstyles' folder must contain at least the following:
- controlpanel.css
- cp_logo.gif
- cp_help.gif
Timeout Admin Login (yes/no)
After a period of inactivity, Administrators are logged out of the Admin Control Panel. If this option is set to yes, the inactivity period will be the same as the Cookie Timout setting found in vBulletin Options -> Help Cookies and HTTP Header Options (defaults to 15 minutes). If this option is disabled, then the period will be one hour.
Logins to the admincp are more secure with this enabled.
Control Panel Quick Statistics (yes/no)
Displays the 'Quick Stats' on the main index page of the Admin Control Panel.
Forum Manager Display
There are three options for the display of the Forum Manager:
- Default - Displays all of the forums on one page but may not work on all browsers, especially if you have a large number of forums.
- Collapsible - Allows collapsing/expansion of certain forums within the forum manager. This may reduce the ease of usability of the forum manager, but will prevent rendering problems with the dropdown menus with certain browsers/operating systems.
- Single - Display a single dropdown from which you may choose the forum you wish to modify. This is most useful if you have a large number of forums.
Number of columns to display in user editor. Smaller resolutions will probably want to set this to 1.
External Data Provider |
Here you can select which type can be turned on/off. You can choose between javascript, rss and/or xml.
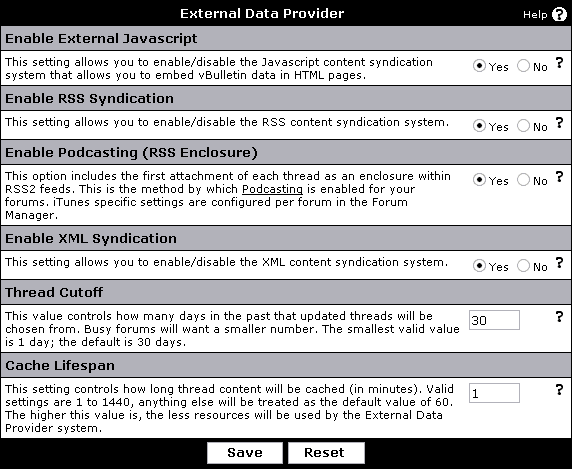
- Enable External Javascript
This setting allows you to enable/disable the Javascript content syndication system that allows you to embed vBulletin data in HTML pages.
If you set this option to 'yes', you can call it by going to:
https://www.example.com/forum/external.php?type=js
You could use javascript directly in your html pages to control the returned data.
- Enable RSS Syndication
This setting allows you to enable/disable the RSS 0.91, 1.0, and 2.0 content syndication system.
If you set this option to 'yes', you can call it by going to:
https://www.example.com/forum/external.php?type=rss
https://www.example.com/forum/external.php?type=rss1
https://www.example.com/forum/external.php?type=rss2
(example) There is a news-plugin, 'Good News', for Trillian which lets you use RSS feeds to get the latest information posted in your Trillian program.
- Enable Podcasting (RSS Enclosure)
This option includes the first attachment of each thread as an enclosure within RSS 2.0 feeds. If the feed is requested with &lastpost=1 appended to the url then the first attachment of the last post in the thread will be included. This is the method by which Podcasting is enabled for your forum. iTunes specific settings are configures per forum in the Forum Manager.
The iTunes specific features will be only included if a specific forum is specified via the addition of &forumids=X where X is the forumid.
- Enable XML Syndication
This setting allows you to enable/disable the XML content syndication system.
If you set this option to 'yes', you can call it by going to:
https://www.example.com/forum/external.php?type=xml
- Thread Cutoff
This value controls how many days in the past that updated threads will be chosen from. Busy forums will want a smaller number. The smallest valid value is 1 day; the default is 30 days.
- Cache Lifespan
This setting controls how long thread content will be cached. Valid settings are 1 to 1440, anything else will be treated as the default value of 60.
vBulletin uses a an internal cache system as well as a http cache to lessen the load of calls to external.php.
- Maximum External Records
This option limits the maximum amount of records that can be returned by the external data provider. By default 15 records will be returned. This option allows the user to tack on &count=X to their RSS feed to retrieve more records.
Implementing the External Data Provider |
Below are examples on how you can control what is shown on these websites.
To syndicate in a Javascript format you would call the following URL from your external site. This will require additional javascript on the external site (an example is listed below).
www.yourdomain.com/forumpath/external.php?type=js
Example Code:
<script src="https://www.yourdomain.com/forumpath/external.php?type=js" type="text/javascript"></script>
<script type="text/javascript">
<!--
for (i in threads)
{
document.writeln(threads[i].title + " (" + threads[i].poster + ")<br />");
}
//-->
</script>
The URLS to access these feeds are:
XML - www.yourdomain.com/forumpath/external.php?type=xml
RSS - www.yourdomain.com/forumpath/external.php?type=rss
RSS 1.0 - www.yourdomain.com/forumpath/external.php?type=rss1
RSS 2.0 - www.yourdomain.com/forumpath/external.php?type=rss2
You can refine the listings by specifying forumids in the path. For multiple forums separate them with a comma. This will limit the feed to the specified forums only. (Below example uses xml as type, but it works with rss, rss2, and js too)
https://www.vbulletin.com/forum/external.php?type=xml&forumids=1,2,3,4
Threads will be returned in descending order based on the date of their creation. Description information will be returned from the first post of the thread.
If &lastpost=1 is added to the feed URL, threads will be returned in descending order based on the date of the last post of the thread. Description information will be returned from the last post of the thread.
If vBulletin Options > External Data Provider > Enable Podcasting is enabled, the first attachment of the post will also be returned within an <enclosure> tag. The enclosure tag is used within iTunes and other RSS aggregates to allow files to be downloaded from the feed.
Error Handling & Logging |
Log Database Errors to a File
If you would like to log all database errors to a file, enter the path to the file here. The file will be saved as {filename}.log.
Note:
Please note that the directory in which this file is to be created must be writable by the web server.
If you would like to log all failed Admin Control Panel login attempts to a file, enter the path to the file here. The file will be saved as {filename}.log
Note:
Please note that the directory in which this file is to be created must be writable by the web server.
If you would like to log all PHP fatal errors to a file, enter the path to the file here. The file will be saved as {filename}.log.
Note:
Please note that the directory in which this file is to be created must be writable by the web server.
If you would like to log all emails to a file, enter the path to the file here. The file will be saved as {filename}.log. You should only enable email logging if you suspect problems with the email system within vBulletin.
Note:
Please note that the directory in which this file is to be created must be writable by the web server.
If you would like your vBulletin error logs to be rotated when they reach a certain size, enter the maximum file size in bytes here.
1048576 bytes = 1 megabyte.
When a log file reaches this size, it will be renamed as {filename}{unix timestamp}.log and a new file will be created.
Set this value to 0 to disable log rotation.
Disable Database Error Email Sending (yes/no)
If you would like to prevent vBulletin from sending email to the $config['Database']['technicalemail'] address you specified in config.php, set this value to 'Yes'.
- Error reports about database connection errors will still be sent.
- It is not recommended that you set this value to 'Yes' unless you are logging database errors to a file. (see above)
Paid Subscriptions |
The vBulletin Subscriptions system allows you to charge your visitors for access to specific areas and services that you may offer.
In general, this is achieved by temporarily making a subscribed user into a member of one or more specific usergroups, which have access to the site areas or services for which they have paid.
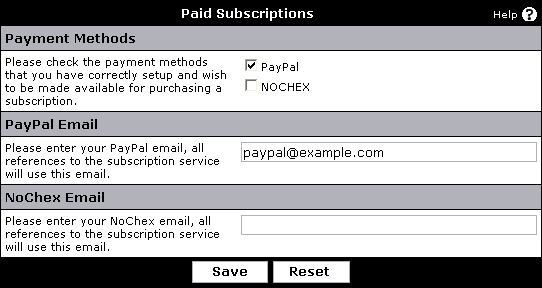
- Payment Methods
Here you check the payment methods that you have correctly setup and wish to be made available for purchasing a subscription.
In the above figure you see that the PayPal payment system is checked - the system will now assume that the PayPal payment method is setup properly in the Paid Subscriptions section.
- PayPal Email
Please enter your PayPal email, all references to the subscription service will use this email.
- NoChex Email
Please enter your NoChex email, all references to the subscription service will use this email.
Plugin/Hook System |
Enable Plugin/Hook System (yes/no)
This setting allows you to globally enable or disable the plugin/hook system.
The plugin/hook systems allows for insertion of arbitrary code into specific locations in the PHP files without having to edit the files (see Plugin Manager). This can be used to extend the functionality of vBulletin without hacking. When upgrading to future versions you do not have to re-apply these modifications to the original vBulletin files, making upgrading an easier task.
By switching the system off, only vBulletin-native code will be run, so it can be used to establish whether errors exist within vBulletin itself or in plugin code.
Note:
You can code these plugins yourself or download existing ones from the official resource community at https://www.vBulletin.org/. Please note that these plugins are unofficial and are not supported by Jelsoft.
Warning:
If you have attempted to import a product or a plugin and run into the problem of being unable to navigate/work with your forum or control panel you might require to update the config.php file with this variable, which will force-disable the hook system. Allowing you to restore your forum and uninstall the bad code/plugin.(Remove from the config.php file when done.)
define('DISABLE_HOOKS', true);Spam Management |
vBulletin Anti-Spam Key Powered by Akismet
Enter a vBulletin Anti-Spam service key to enable scanning of user data where supported.
You can get an anti-spam key here: https://www.akismet.com
Spam Scanning Post Threshold
This setting controls how many of a user's posts will be scanned by the Anti-Spam Service. Once a user's post count exceeds this threshold, his or her posts will not be scanned for spam content. To always scan posts set this value to 0.
Download / Upload Options |
To download options choose Download / Upload Options from the vBulletin Options section of the admin control panel.
From there you can choose the product you wish to download, vBulletin will export a XML file that you can use at a later date to upload.
To upload settings for a product, on the same Download / Upload Options page there is a section to Import Settings XML File, from there you can choose a file to upload.
Backup / Restore Options |
This is useful when backing up a board or moving an install from one site to another, or for replicating a board from a test environment to a live site, or visa versa for testing purposes.
To download and back the settings, choose the product you wish to download from the select list and click backup.
To restore either upload the XML file from your computer or restore the XML file from your server, do that by either locating the file to upload then clicking restore or giving the path to the XML settings file on your local server, then clicking restore.
Blacklisted settings by default are ignore, though you can override that with the option during restore.
Blacklisted options are ignore because they are specific to the server and local settings and will need to be changed when moved so its better to use the local setting of the server you are restoring to, by default the following are blacklisted :
- subscriptionmethods
- attachfile
- attachpath
- usefileavatar
- avatarpath
- avatarurl
- profilepicpath
- profilepicurl
- sigpicpath
- sigpicurl
- fulltextsearch
- cookiepath
- cookiedomain
Search Type |
You set the search type here:
Admin CP -> vBulletin Options -> Search Type
By default, vBulletin will use its internal indexing feature. The results of this indexing process is stored in two tables, word and postindex. This provides a fast search mechanism but can cause problems on larger forums due to the ever increasing size of these tables. Each unique word is indexed in the word table and each occurrence of the word is indexed in the postindex table. To get around the large amount of space these tables can occupy we implemented MySQL Fulltext Search. The search type screen allows you to switch between the two of these. It is a simple toggle so submitting the screen switches between the two modes.
When switching a forum to the fulltext search mode, you will want to consider emptying the indices that the default search engine built. These indices are not used by the fulltext search and consume a large portion of your database. You should be certain that you are going to permanently use the fulltext search before removing these indices since, generally, it takes a lot of time and server load to rebuild these indices. Another consideration is during any time that the fulltext option is enabled, these indices will not be updated by any new posts. Using fulltext search for an extended period of time will leave these indices stale and you may still wish to rebuild them.
Note:
The minimum and maximum length of words to be indexed is defined by the ft_min_word_len and ft_max_word_len system variables (available as of MySQL 4.0.0). The default minimum value is four characters. The default maximum depends on your version of MySQL. If you change either value, you must rebuild your FULLTEXT indexes. For example, if you want three-character words to be searchable, you can set the ft_min_word_len variable by putting the following lines in an option file:
[mysqld]
ft_min_word_len=3
Then restart the server and rebuild your FULLTEXT indexes. Also note particularly the remarks regarding myisamchk in the instructions following this list.
For more on Fulltext Search from MySQL please visit:
https://dev.mysql.com/doc/refman/5.0/en/fulltext-fine-tuning.html
You may want to optimize the postindex and word tables afterwards by going to the Repair / Optimize Tables section of Maintenance.
Human Verification |
This system will not stop spammers who manually spam your forums as there is nothing that can prevent those users. The spammers who uses programs to mass spam are the larger issue and this system goes along way towards foiling them.
An Introduction to Human Verification |
- Image Verification - Image verification presents a series of distorted numbers and letters that the user is required to enter. Either GD2 or ImageMagick support is required from your PHP server in order to use this option. This is the classic option that most users are accustomed to encountering. Disabled users will be blocked with this option.
- Question & Answer Verification - Question & Answer verification employs a random question challenge with a predefined set of appropriate answers. The questions and answers must be defined by the administrator. This allows the questions to be tailored to the forum content as well as preventing a common set of questions from becoming prevalent across a large section of vBulletin forums. Maintaining unique questions is required for this option to be successful. This option should be accessible to any impaired user that is able to use the Internet.
- reCAPTCHA -
reCAPCTHA employs an image verification provided by recaptcha.net. Two obscured words are provided for the user to enter. This feature offers the user the option to choose an audio test.
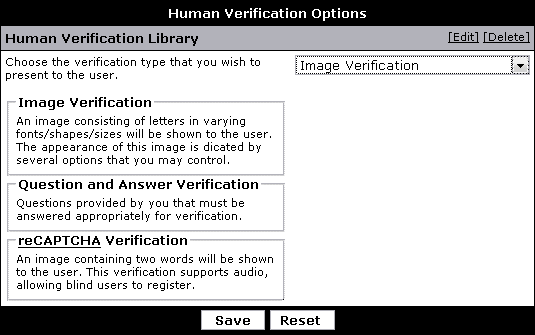
Image Verification |
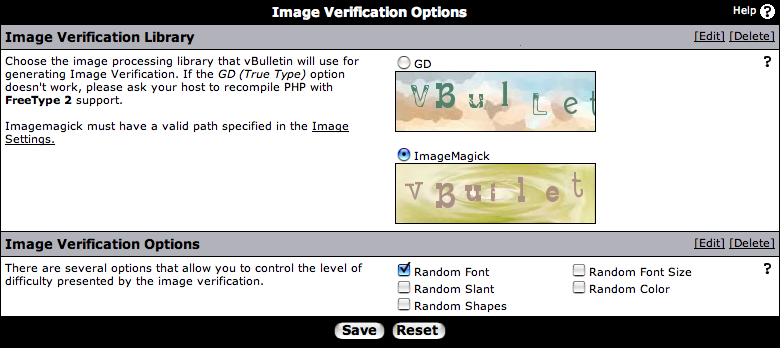
The difficulty of the image verification image can be controlled with these settings. The more options that are enabled, the more difficult it will be for your users to identify the text. Enabling a setting will cause that option to be applied to each character.
- Random Font - This option causes each letter and number to be selected from a random font.
- Random Font Size - This options causes each letter and number to be randomly sized.
- Random Slant - This option causes each letter and number to twist at a random angle to the right or the left.
- Random Color - This option causes each letter and number to appear in a random color.
- Random Shapes - This option will add random patterns and lines to the image. This option can make the image extremely difficult to discern.
Image Verification Library
vBulletin provides two options for generating the dynamic image verification image.
The first is GD, which is bundled with PHP 4.3.0 and later. The GD v2+ library is required along with having PHP compiled with freetype2 support. Having PHP compiled with freetype1 will sometimes result in the font not displaying.
The second supported library is ImageMagick v6 by ImageMagick Studio LLC. ImageMagick is an executable binary that must be installed at the server level to be called by PHP. Only the identify and convert binaries from ImageMagick are required by vBulletin. Imagemagick must be compiled with Freetype support in order to display the proper image verification.
If you do not have ImageMagick available, then your Image Verification options will look like this instead of the image at the top of the page:
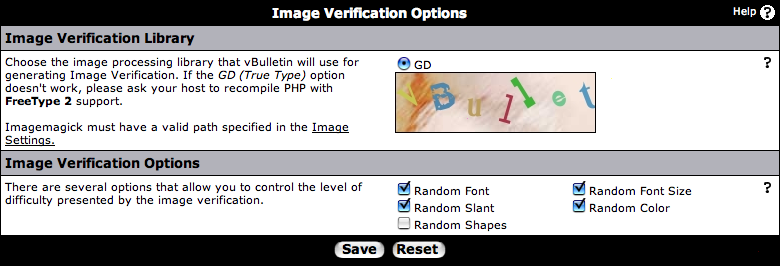
Question & Answer Verification |
An unlimited amount of questions may be specified and each question may have an unspecified amount of answers.
To add a new question, select the button. Existing questions may be deleted, modified or have answers modified by selecting the controls on the right of the question.
Before adding any questions, the following screen will be shown:
![]()
New Questions |
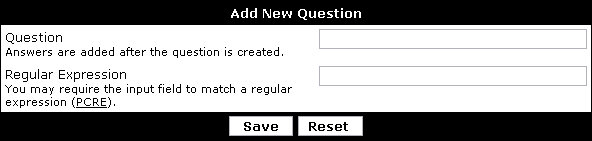
Regular Expression - You may require the answer to match a PCRE-type regular expression. You are not required to provide answers to a question if you choose to define a regular expression as satisfying the answer. You may also offer both a regular expression and a list of answers if you wish.
(Do not start or end the expression with an escape character)
Examples:
^[A-Z]+$ - Characters from A-Z only
^[A-Z ]+$ - Characters from A-Z including space
^[A-Z0-9 ]+$- Alphanumeric characters including space
^[\x20-\x7E]+$ - ASCII characters from 32-127
See PHP.net for more information on regular expressions.
Answers may be added after the question is saved.
Adding Answers
Modifying Questions |
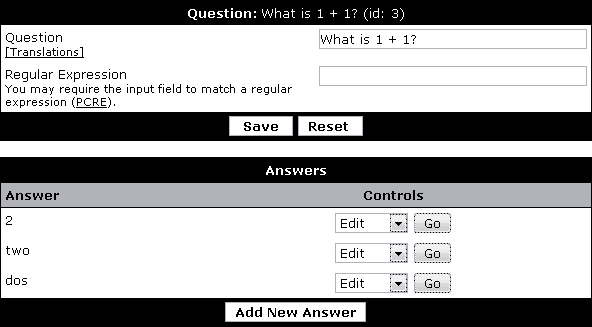
Regular Expression - You may require the answer to match a PCRE-type regular expression. You are not required to provide answers to a question if you choose to define a regular expression as satisfying the answer. You may also offer both a regular expression and a list of answers if you wish.
(Do not start or end the expression with an escape character)
Examples:
^[A-Z]+$ - Characters from A-Z only
^[A-Z ]+$ - Characters from A-Z including space
^[A-Z0-9 ]+$- Alphanumeric characters including space
^[\x20-\x7E]+$ - ASCII characters from 32-127
See PHP.net for more information on regular expressions.
You may add a new answer by selecting the . Existing answers can be modified or deleted by using the controls to the right of the answer.
Modifying Answers |

reCAPTCHA Verification |
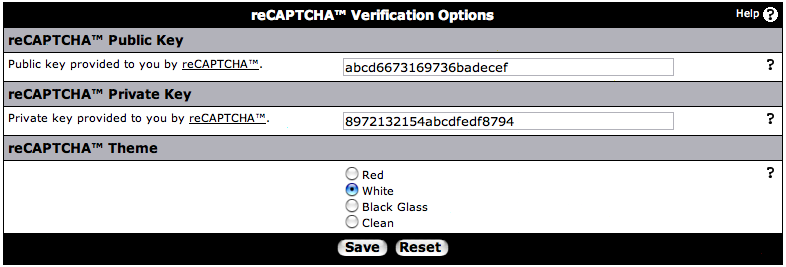
Private Key - Acquired from recaptcha.net
Public Key - Acquired from recaptcha.net
Theme - There are three themes, at the time of this writing, for which the recaptcha form will display.
You can also leave the Public and Private keys blank then the default keys will be used. However, this is not recommended if there are multiple vBulletin installations on the same server. If you are leaving the keys blank, the screen will appear as follows:
![]()
Social Bookmarking |
When a user views a publicly accessible thread they will be presented with a set of links at the bottom which allow the addition of the page to admin defined social bookmarking sites.
The Social Bookmarking Manager |
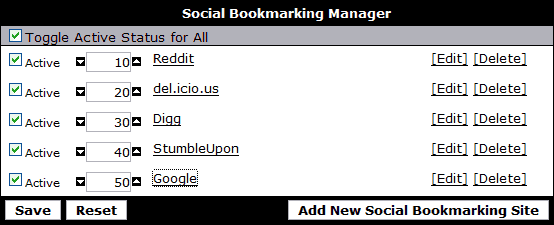
Adding or Editing a Social Bookmarking Site |
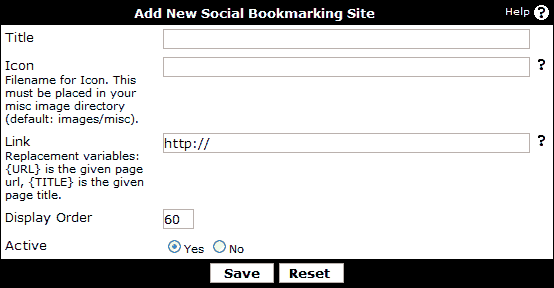
- Title -Title of the Social Bookmarking Site
- Icon - A 16 x 16 icon that will be used to link to the social bookmarking site, this image should be in the miscellaneous images directory which by default is images/misc.
- Link - Link to the add page of the social bookmarking site, you can use {TITLE} and {URL} as replacements for the current page title and link.
- Display Order - The sort order for this social bookmarking site. Lower values will be displayed first.
- Active - If this is set to 'Yes' then the icon will appear at the bottom of the thread template.
Social Bookmarking Sites
Google AdSense Integration |
To get started, you must create an AdSense account or associate an existing account via the vBulletin Members' Area. Once your account is associated with us, Google AdSense will automatically be available to your forum the next time you download vBulletin.
Warning:
If you have not associated or created an AdSense account with us, the below options will not be shown in your administrator's control panel!
| After you have downloaded vBulletin with Google AdSense integrated, you should follow the standard upgrade instructions. After logging into your administrator's control panel, you will see an Advertising block in the left-hand navigation panel. |
|

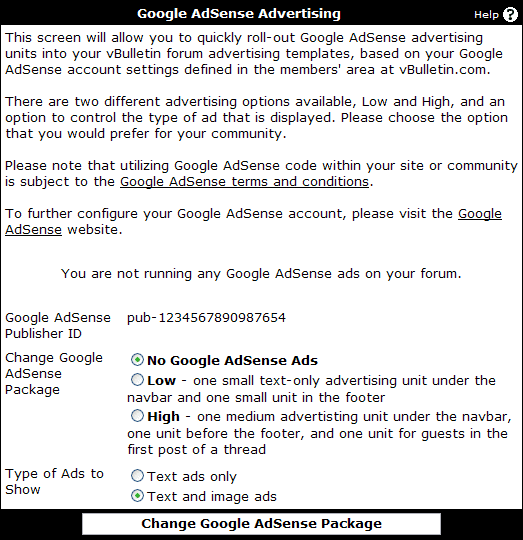
- Google AdSense Publisher ID - the AdSense publisher ID that is currently being used. If you ever wish to change the AdSense account that is associated, you can use this value to confirm the publisher ID that is currently in use.
- Change Google AdSense Package - this controls the position of the ads that are shown. Choose No Google AdSense Ads to remove all ads. See below for more details on each specific package.
- Type of Ads to Show - this is used in conjunction with the package to configure the type of ads that are shown. Text ads are less invasive to your users but not as effective. We recommend you select Text and image ads.
| Low
|
| High
|
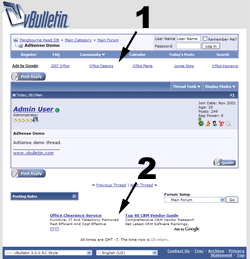
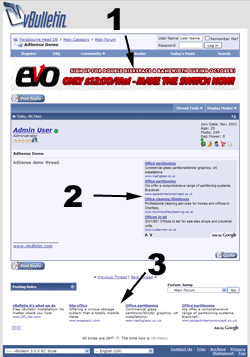
Note: It has been reported that some ad blockers can interfere with setting up Adsense via these instructions. If you have a problem try temporarily disabling your ad blockers.
Styles & Templates |
The first part of this section of the vBulletin Manual deals with how the vBulletin style system actually works, and includes a reference guide for various important elements.
vBulletin Style Reference
The second part deals with using the tools provided to you in the Style & Templates area of the Admin CP.
The Style Manager
Note:
To modify the look and feel of your vBulletin forums, a knowledge of XHTML 1.0 and CSS 1.0 is required. To learn the basics of these markup languages please visit W3schools.com. If you have questions please visit our community forums.
vBulletin Style Reference |
A variety of controls are available for your use, allowing you to make both minor changes, such as the font used for the interface, right through to changing the underlying HTML used to generate the board's individual pages.
The look of your board can be altered to your own custom preferences through a simple-to-use interface that allows you to change fonts, colors and images etc. If you want to get down and dirty with the underlying HTML of the board, you can also do this by editing individual templates via the Style Manager.
A vBulletin style comprises several elements that work together to create a complete look for your board.
Those components are as follows:
Templates |
How do Templates Work? |
A simple example template might look like this:
<table class="tborder">
<tr>
    <td class="tcat" colspan="2">My Table</td>
</tr>
$tablebits
</table>
For example, we may have another template that looks like this:
<tr>
    <td class="alt1">$username</td>
    <td class="alt2">$message</td>
</tr>
<tr>
    <td class="alt1">Mister User</td>
    <td class="alt2">This is my message</td>
</tr>
<table class="tborder">
<tr>
    <td class="tcat" colspan="2">My Table</td>
</tr>
<tr>
    <td class="alt1">Mister User</td>
    <td class="alt2">This is my message</td>
</tr>
<tr>
    <td class="alt1">Another Person</td>
    <td class="alt2">This message is in reply to that posted above.</td>
</tr>
<tr>
    <td class="alt1">Mister User</td>
    <td class="alt2">Hey, thanks for responding to my message!</td>
</tr>
</table>
Here is the header template from a current version of vBulletin. This shows how a typical template is built in vBulletin.
<div class="above_body"> <!-- closing tag is in template navbar -->
<div id="header" class="floatcontainer doc_header">
<vb:if condition="$stylevar['titleimage']"><div><a name="top" href="{vb:link forumhome}" class="logo-image"><img src="{vb:stylevar titleimage}" alt="{vb:rawphrase x_powered_by_vbulletin, {vb:raw vboptions.bbtitle}}" /></a></div></vb:if>
<div id="toplinks" class="toplinks">
<vb:if condition="$show['member']">
<ul class="isuser">
<li><a href="login.php?{vb:raw session.sessionurl}do=logout&logouthash={vb:raw bbuserinfo.logouthash}" onclick="return log_out('{vb:rawphrase sure_you_want_to_log_out}')">{vb:rawphrase log_out}</a></li>
<vb:if condition="$show['registerbutton']">
<li><a href="register.php{vb:raw session.sessionurl_q}" rel="nofollow">{vb:rawphrase register}</a></li>
</vb:if>
<li><a href="usercp.php{vb:raw session.sessionurl_q}">{vb:rawphrase user_control_panel}</a></li>
<li><a href="{vb:link member, {vb:raw bbuserinfo}}">{vb:rawphrase your_profile}</a></li>
<vb:if condition="$notifications_total">
<li class="popupmenu notifications" id="notifications">
<a class="popupctrl" href="usercp.php{vb:raw session.sessionurl_q}">{vb:rawphrase your_notifications}: <span class="notifications-number"><strong>{vb:raw notifications_total}</strong></span></a>
<ul class="popupbody popuphover">
{vb:raw notifications_menubits}
</ul>
</li>
<vb:else />
<li class="popupmenu nonotifications" id="nonotifications">
<a class="popupctrl" href="usercp.php{vb:raw session.sessionurl_q}">{vb:rawphrase your_notifications}</a>
<ul class="popupbody popuphover">
<li>{vb:rawphrase no_new_messages}</li>
<vb:if condition="$show['pmmainlink']"><li><a href="private.php{vb:raw session.sessionurl_q}">{vb:rawphrase inbox}</a></li></vb:if>
</ul>
</li>
</vb:if>
<li class="welcomelink">{vb:rawphrase welcome_x_link_y, {vb:raw bbuserinfo.username}, {vb:link member, {vb:raw bbuserinfo}}}</li>
<vb:if condition="$vboptions['enablefacebookconnect']">
{vb:raw facebook_header}
</vb:if>
</ul>
{vb:raw template_hook.header_userinfo}
<vb:comment><p>{vb:rawphrase last_visited_x_at_y, {vb:raw pmbox.lastvisitdate}, {vb:raw pmbox.lastvisittime}}</p></vb:comment>
<vb:else />
<ul class="nouser">
<vb:if condition="$show['registerbutton']">
<li><a href="register.php{vb:raw session.sessionurl_q}" rel="nofollow">{vb:rawphrase register}</a></li>
</vb:if>
<li><a rel="help" href="faq.php{vb:raw session.sessionurl_q}">{vb:rawphrase help}</a></li>
<li>
<script type="text/javascript" src="clientscript/vbulletin_md5.js?v={vb:raw vboptions.simpleversion}"></script>
<form id="navbar_loginform" action="login.php?{vb:raw session.sessionurl}do=login" method="post" onsubmit="md5hash(vb_login_password, vb_login_md5password, vb_login_md5password_utf, {vb:raw show.nopasswordempty})">
<fieldset id="logindetails" class="logindetails">
<div>
<div>
<input type="text" class="textbox<vb:if condition="!$username"> default-value</vb:if>" name="vb_login_username" id="navbar_username" size="10" accesskey="u" tabindex="101" value="<vb:if condition="$username">{vb:raw username}<vb:else />{vb:rawphrase username}</vb:if>" />
<input type="password" class="textbox" tabindex="102" name="vb_login_password" id="navbar_password" size="10" />
<input type="text" class="textbox default-value" tabindex="102" name="vb_login_password_hint" id="navbar_password_hint" size="10" value="{vb:rawphrase password}" style="display:none;" />
<input type="submit" class="loginbutton" tabindex="104" value="{vb:rawphrase log_in}" title="{vb:rawphrase enter_username_to_login_or_register}" accesskey="s" />
</div>
</div>
</fieldset>
<div id="remember" class="remember">
<label for="cb_cookieuser_navbar"><input type="checkbox" name="cookieuser" value="1" id="cb_cookieuser_navbar" class="cb_cookieuser_navbar" accesskey="c" tabindex="103" /> {vb:rawphrase remember_me}</label>
</div>
<input type="hidden" name="s" value="{vb:raw session.sessionhash}" />
<input type="hidden" name="securitytoken" value="{vb:raw bbuserinfo.securitytoken}" />
<input type="hidden" name="do" value="login" />
<input type="hidden" name="vb_login_md5password" />
<input type="hidden" name="vb_login_md5password_utf" />
</form>
<script type="text/javascript">
YAHOO.util.Dom.setStyle('navbar_password_hint', "display", "inline");
YAHOO.util.Dom.setStyle('navbar_password', "display", "none");
vB_XHTML_Ready.subscribe(function()
{
//
YAHOO.util.Event.on('navbar_username', "focus", navbar_username_focus);
YAHOO.util.Event.on('navbar_username', "blur", navbar_username_blur);
YAHOO.util.Event.on('navbar_password_hint', "focus", navbar_password_hint);
YAHOO.util.Event.on('navbar_password', "blur", navbar_password);
});
function navbar_username_focus(e)
{
//
var textbox = YAHOO.util.Event.getTarget(e);
if (textbox.value == '<vb:if condition="$username">{vb:raw username}<vb:else />{vb:rawphrase username}</vb:if>')
{
//
textbox.value='';
textbox.style.color='{vb:stylevar input_color}';
}
}
function navbar_username_blur(e)
{
//
var textbox = YAHOO.util.Event.getTarget(e);
if (textbox.value == '')
{
//
textbox.value='<vb:if condition="$username">{vb:raw username}<vb:else />{vb:rawphrase username}</vb:if>';
textbox.style.color='{vb:stylevar shade_color}';
}
}
function navbar_password_hint(e)
{
//
var textbox = YAHOO.util.Event.getTarget(e);
YAHOO.util.Dom.setStyle('navbar_password_hint', "display", "none");
YAHOO.util.Dom.setStyle('navbar_password', "display", "inline");
YAHOO.util.Dom.get('navbar_password').focus();
}
function navbar_password(e)
{
//
var textbox = YAHOO.util.Event.getTarget(e);
if (textbox.value == '')
{
YAHOO.util.Dom.setStyle('navbar_password_hint', "display", "inline");
YAHOO.util.Dom.setStyle('navbar_password', "display", "none");
}
}
</script>
</li>
<vb:if condition="$vboptions['enablefacebookconnect']">
{vb:raw facebook_header}
</vb:if>
</ul>
</vb:if>
</div>
<div class="ad_global_header">
{vb:raw ad_location.global_header1}
{vb:raw ad_location.global_header2}
</div>
<hr />
</div>
Template Syntax |
Variable Access
Variables should be referenced in templates wherever possible using the following syntax:
{vb:var variable}
Variables accessed in this manner are 'made safe' by being run through htmlspecialchars as they are output.
To access array elements, use a dot operator, rather than standard PHP square brackets:
{vb:var variable.foo} // accesses htmlspecialchars($variable['foo'])
{vb:var variable.$varkey} // accesses htmlspecialchars($variable[$varkey])
Raw Variables
To access variables in the normal, pre-vB4 fashion, use the following syntax:
{vb:raw variable}
This is equivalent to simply accessing $variable in the pre-vB4 syntax. No treatment is applied to the variable. The same dot operator is used to access array elements.
Curly-Brace Syntax
The general syntax here is
{vb:method arg1[, arg2...]}
Inside curly braces, variables can be accessed without using a separate set of surrounding braces. For example,
{vb:method {variable}} // unneccessary extra braces
{vb:method variable}
Built-in Methods
phrase
{vb:phrase phrase_name[, arguments for phrase...]}rawphrase
Inserts the specified phrase. If arguments are provided, they will be run through htmlspecialchars.
Example:
{vb:phrase welcome}
{vb:rawphrase phrase_name[, arguments for phrase...]}date
As above, though arguments bypass htmlspecialchars.
Example:
{vb:rawphrase message_by_x_on_y_at_z, {vb:link member, {vb:raw postinfo}}, {vb:raw postinfo.username}, {vb:raw postinfo.postdate}, {vb:raw postinfo.posttime}}
{vb:date timestamp[, format]}time
Formats a UNIX timestamp using the default date format for the active language. A format may also be explicitly specified. Timezone will be corrected for the viewing user.
{vb:time timestamp[, format]}number
As above, though uses the default time format instead of date format.
{vb:number number[, decimals]}raw
Outputs a number having run through vb_number_format for correct locale formatting. Number of decimal places to display can be optionally specified.
{vb:raw variable}escapejs
Outputs the variable raw, without any formatting or escaping.
{vb:escapejs variable}urlencode
Returns the variable prepared for use as a Javascript single-quoted string instead of running htmlspecialchars.
{vb:urlencode variable}if
Escapes the variable using urlencode.
{vb:if condition, true[, false]}link
Use this in instances where the full <vb:if> tag can not be used, such as within HTML tags.
Example:
<div class="{vb:if $forumid==1, forum1, forum}">...</div>
{vb:link type, info[, extra-info]}math
Used to build a hyperlink URL of the specified type and into the correct 'friendly' format.
For more information see: Link Syntax
{vb:math expression}stylevar
Primarily used within CSS, this is used to evaluate the result of the mathematical expression specified.
{vb:stylevar name[.sub-part]}
Used to output a style variable from the style system. No escaping is performed.
Tags
All tags make use of the vb namespace for ease of identification and parsing.
The following tags are available:
literal
<vb:literal>misc code</vb:literal>
Any code inside vb:literal tags will be treated as plain HTML. No curly-brace syntax or vb:tag markup will be evaluated.
if
<vb:if condition="condition">true result</vb:if>
If the expression specified in condition is true, the contents of the vb:if tags will be output, otherwise nothing will be output.
elseif
<vb:elseif condition="condition" />true result
Used in conjunction with vb:if, this allows a secondary condition to be checked and the true result to be output if the condition is met.
else
<vb:else />true result
Used in conjunction with vb:if, the true result will be output if the vb:if condition failed, and so did any vb:elseif checks.
comment
<vb:comment>a comment</vb:comment>
In cases where a comment is necessary but the usual <!-- comment --> syntax is undesirable, the vb:comment tag allows its contents to be completely removed upon compiling, so they will not be delivered to the browser. Useful for internal commenting.
each
<vb:each from="array" key="key" value="value"></vb:each>
This tag will iterate through an existing array, in a similar manner to foreach. See the example use below.
Example Use of vb:each
Array:
// We have an array of users available in PHP.

// It looks like this:

// $users = array(

//    1 => array('username' => 'Adam', 'email' => '[email protected]'),

//    2 => array('username' => 'Ben', 'email' => '[email protected]'),

//    3 => array('username' => 'Chris', 'email' => '[email protected]')

// );
<!-- our template code... -->
<vb:each from="users" key="userid" value="userinfo">
    <li><a href="member.php?u={vb:var userid}">{vb:var userinfo.username}</a></li>
</vb:each>
<!-- will output... -->
    <li><a href="member.php?u=1">Adam</a></li>
    <li><a href="member.php?u=2">Ben</a></li>
    <li><a href="member.php?u=3">Chris</a></li>
Link Syntax |
When you wish to use a url in a template the format is as follows:
{vb:link string, array[, array][, string, string]}
{vb:link [thread|member|forum|blog], {vb:raw threadinfo}[, {vb:raw pageinfo}][, 'id', 'title']}
The first argument is a string that notifies the system which type of URL is to be output. The valid types are thread, forum, and member
The second argument is an array that contains the id and title, as the minimum requirements, of the link to be generated. For thread, this would be threadid and title. For forum this would be forumid and title. For member this would be userid and username.
The third argument is an optional array that contains any arguments that are required to be sent along, such as perpage (pp), page (pagenumber), order, and so on.
The simplest forms are:
{vb:link thread, {vb:raw threadinfo}}
{vb:link forum, {vb:raw foruminfo}}
{vb:link member, {vb:raw userinfo}}
If you have an array containing the id and title but they do not follow the conventional naming conventions, then you may specify their names with the fifth and sixth options. Both must be specified for them to be recognized. For example, you have $post[threadid] and $post[threadtitle] and wish to output a thread url. You would use:
{vb:link thread, {vb:raw post}, null, 'threadid', 'threadtitle'}
null was specified for the $pageinfo argument array since this example had no arguments.
If you wish to output a url that uses & instead of & e.g.: to be used within javascript, append "|js" to your type argument so that thread becomes thread|js, member becomes member|js. If you wish to not output a sessionhash, in any instance, say for a url to be used within an email, append nosession to the type argument, so that thread becomes thread|nosession
Examples:
To output a link to a post, you could use
<a href="{link thread, {vb:raw threadinfo}, {vb:raw pageinfo_lastpost}}#post$lastpostinfo[lastpostid]">$threadinfo[title]</a>
$pageinfo_lastpost would appear like:
$pageinfo_lastpost = array('p' => 1234);
Creating Links in PHP
When creating a link in the code, use the fetch_seo_url function, which accepts the same arguments.
function fetch_seo_url(string, array, array, string, string)
In fact the {vb:link thread, {vb:raw threadinfo}, {vb:raw pageinfo}} syntax is just replaced with fetch_seo_url() when a template is compiled.
Examples:
Infractions tab of a user's profile
$linkinfo = array('postuserid' => 123, 'postusername' => 'freddie');
$pageinfo = array('tab' => 'infractions);
$memberurl = fetch_seo_url('member', $linkinfo, $pageinfo, 'postuserid', 'postusername');
Using the mod rewrite output, $memberurl would be /members/123-freddie?tab=infractions
Please refer to the code for exact examples.
Template Conditionals |
For example you may want to show a different welcome message on the front page of your board to registered users and to guests. The way to know whether or not the person visiting a page is a guest, or a logged-in user is to check the value of $bbuserinfo[userid]. If the value is 0, the visitor is a guest (or not logged-in), otherwise the visitor is a registered member.
This is a simple conditional to show a welcome message to guests only.
<vb:if condition="$bbuserinfo['userid'] == 0">
    <p>Welcome to the forum!<br />
    If this is your first visit, we hope you enjoy your stay!</p>
</vb:if>
This example extends the previous conditional to show a different message to registered members from that shown to guests.
<vb:if condition="$bbuserinfo['userid'] == 0">
    <p>Welcome to the forum!<br />
    If this is your first visit, we hope you enjoy your stay!</p>
<vb:else />
    <p>Welcome back, $bbuserinfo[username].<br />
    <a href="search.php?do=getnew">Click here to view new posts</a>.
</vb:if>
<vb:if condition="$my_variable == 1">
    <p>My variable is equal to one.</p>
<vb:elseif condition="$my_variable == 2" />
    <p>My variable is equal to two.</p>
<vb:else />
    <p>My variable is equal to neither one nor two.</p>
</vb:if>
Perhaps the easiest way to illustrate this is to demonstrate a simple example of PHP code being embedded as a template conditional.
Let us assume for the purposes of this example that we want to have the equivalent of this PHP code in our template:
if ($my_variable == 1)

{

    echo "<p>My variable is equal to one.</p>";

}
<vb:if condition="$my_variable == 1">
    <p>My variable is equal to one.</p>
</vb:if>
if ($my_variable == 1)

{

    echo "<p>My variable is equal to one.</p>";

}

else

{

    echo "<p>My variable is not equal to one.</p>";

}
<vb:if condition="$my_variable == 1">
    <p>My variable is equal to one.</p>
<vb:else />
    <p>My variable is not equal to one.</p>
</vb:if>
if ($my_variable == 1)

{

    echo "<p>My variable is equal to one.</p>";

}

else if ($my_variable == 2)

{

    echo "<p>My variable is equal to two.</p>";

}

else

{

    echo "<p>My variable is equal to neither one nor two.</p>";

}
<vb:if condition="$my_variable == 1">
    <p>My variable is equal to one.</p>
<vb:elseif condition="$my_variable == 2" />
    <p>My variable is equal to two.</p>
<vb:else />
    <p>My variable is equal to neither one nor two.</p>
</vb:if>
Using PHP Functions in Template Conditionals |
This, for example, would be disallowed by the vBulletin template system, as it contains a call to a 'forbidden' function: mysql_query.
<vb:if condition="$my_variable = mysql_query('SELECT * FROM mytable')">
    <!-- naughty naughty... -->
</vb:if>
- in_array
- is_array
- is_numeric
- isset
- empty
- defined
- array
- can_moderate*
- can_moderate_calendar*
- exec_switch_bg*
- is_browser*
- is_member_of*
Note:
Functions marked * are custom functions defined by vBulletin itself. Each function name is a link that will take you to the documentation for that function. Use of these functions requires knowledge of PHP
<vb:if condition="isset($my_variable) AND is_browser('ie')">
    <!-- $my_variable is set and the browser is Internet Explorer -->
</vb:if>
Collapsing Elements |

Firstly, you need to decide on a unique identifying name for your collapsing element. The name can use numbers, letters (in upper or lower case) and underscores. Using any other characters in the identifier may cause problems.
Here, we'll call it MyELEMENT.
A collapsible element consists of two parts - a control (usually a button) to control the expanding and collapsing behavior, and the actual content to be expanded and collapsed.
A collapse control looks like this:
<a href="#top" onclick="return toggle_collapse('MyELEMENT')"><img
    id="collapseimg_MyELEMENT"
    src="$stylevar[imgdir_button]/collapse_thead$vbcollapse[collapseimg_MyELEMENT].gif"
alt="" border="0" /></a>Note:
In the example, the image being used for the collapse control has a prefix of collapse_thead. This is because the image is designed to blend into the background color of elements using the '.thead' CSS class.
There are also images to blend with the '.tcat' and '.alt1' / '.alt2' CSS classes, with prefixes of collapse_tcat and collapse_alt respectively.
There are also images to blend with the '.tcat' and '.alt1' / '.alt2' CSS classes, with prefixes of collapse_tcat and collapse_alt respectively.
A very simple example of a collapsible element container for MyELEMENT looks like this:
<div id="collapseobj_MyELEMENT" style="$vbcollapse[collapseobj_MyELEMENT]">
    <!-- any HTML here will be hidden when the
    'MyELEMENT' collapse control is clicked -->
</div>The following example shows a complete collapsing element.
<div class="tborder">
    <div class="tcat" style="padding:4px">
        <a href="#top" style="float:$stylevar[right]"
            onclick="return toggle_collapse('MyELEMENT')"><img
            id="collapseimg_MyELEMENT"
            src="$stylevar[imgdir_button]/collapse_tcat$vbcollapse[collapseimg_MyELEMENT].gif"
            alt="" border="0" /></a>
        Click this button to show/hide the content below:
    </div>
    <div id="collapseobj_MyELEMENT" style="$vbcollapse[collapseobj_MyELEMENT]">
        <div class="alt1" style="padding:8px">
            <p><strong>Hello!</strong> Welcome, $bbuserinfo[username].</p>
            <p>If you would like to check your private messages,
            <a href="private.php?$session[sessionurl]">Click here</a>.</p>
        </div>
    </div>
</div>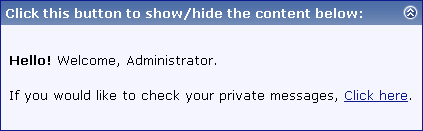

Collapsing <table> Rows |
Sometimes you will want to allow your users to collapse individual rows (or groups of rows) within an HTML <table>. In order to be cross-browser compatible, and to ensure that your pages remain XHTML compliant, there are a few additional rules you need to follow.
It is not possible to arbitrarily collapse every tag in HTML. To collapse rows within a <table>, you must surround those rows with the little-known <tbody> tag.
The original idea of the <tbody> tag was to enable browsers to display the top (head) and bottom (foot) of a table, and then load the body of the table in between the head and foot. Unfortunately, very few browsers can actually make use of this system.
However, the <tbody> tag is very useful to us, as it allows us to define a container for one or more table rows, and we can expand and collapse that container using our collapsible elements system.
There is one caveat. In order to be legal XHTML, we can't just stuff <tbody> tags selectively around arbitrary groups of rows in a table, and leave the other rows without a container. We must include the <thead> tag, and ensure that all rows in the table are enclosed either by the <thead> or a <tbody> tag.
The following code is not XHTML compliant because it does not include the <thead> tag, and there are rows that are not enclosed by <thead>, <tbody> or <tfoot> tags:
<table class="tborder" cellpadding="$stylevar[cellpadding]" width="100%">
<tr><td class="tcat"><strong>Table title</strong></td></tr>
<tbody>
    <tr><td class="alt1">First row of collapsible element</td></tr>
    <tr><td class="alt2">Second row of collapsible element</td></tr>
</tbody>
<tr><td class="alt1">Another row</td></tr>
</table><table class="tborder" cellpadding="$stylevar[cellpadding]" width="100%">
<thead>
<tr><td class="tcat"><strong>Table title</strong></td></tr>
</thead>
<tbody>
<tr><td class="alt1">First row of collapsible element</td></tr>
<tr><td class="alt2">Second row of collapsible element</td></tr>
</tbody>
<tbody>
<tr><td class="alt1">Another row</td></tr>
</tbody>
</table><table class="tborder" cellpadding="$stylevar[cellpadding]" width="100%">
<thead>
<tr><td class="tcat">
<a href="#top" style="float:$stylevar[right]"
onclick="return toggle_collapse('MyELEMENT')"><img
id="collapseimg_MyELEMENT"
src="$stylevar[imgdir_button]/collapse_tcat$vbcollapse[collapseimg_MyELEMENT].gif"
alt="" border="0" /></a>
<strong>Table title</strong>
</td></tr>
</thead>
<tbody id="collapseobj_MyELEMENT" style="$vbcollapse[collapseobj_MyELEMENT]">
<tr><td class="alt1">First row of collapsible element</td></tr>
<tr><td class="alt2">Second row of collapsible element</td></tr>
</tbody>
<tbody>
<tr><td class="alt1">Another row</td></tr>
</tbody>
</table>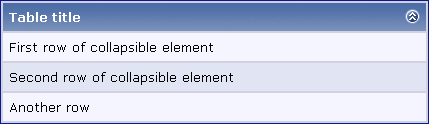

vBMenu Popup Menus |
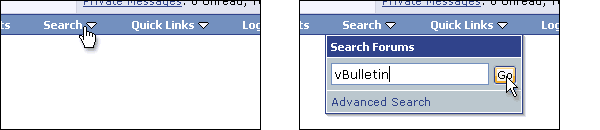
A vBMenu popup consist of two elements: The popup control, and the popup itself. Any popup can have any number of controls, and clicking any one of the controls will open the popup immediately below the control.
Each vBMenu popup must have a unique identifying name, which will be used by the vBMenu system to distinguish popups from each other and allows popup controls to communicate with their associated popup elements.
For our example, we will call our vBMenu MyMENU.
The HTML code for a vBMenu popup control looks like this:
<td id="MyMENU" class="vbmenu_control">
    <a href="#">My vBMenu Example</a>
    <script type="text/javascript">
        vbmenu_register("MyMENU");
    </script>
</td>- A block-level tag (<td>, <div> etc.) with an id attribute using the vBMenu identifying name (in this case, MyMENU).
- A hyperlink (the href attribute of which should point somewhere relevant to the menu).
- A Javascript block containing a call to the vbmenu_register() function, using the vBMenu identifying name as the argument to the function.
<script type="text/javascript">
    vbmenu_register("MyMENU", true);
</script>
<div class="vbmenu_popup" id="MyMENU_menu" style="display:none">
    <!-- Any HTML here will be a part of the
    vBMenu popup identified as 'MyMENU' -->
</div>- Must use the vbmenu_popup CSS class
- Must be identified by 'MenuName_menu' (In our example, 'MyMENU_menu' would be the correct id)
- Must have a style="display:none" CSS attribute
vBMenu Popup Content |
vBMenu popups usually take the form of a <table> with individual rows for separate options on the menu, with a single hyperlink inside each cell, which points to the desired page.
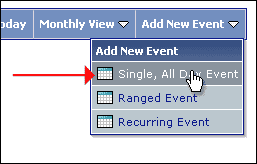
An example of content for a vBMenu popup element might look like this:
<table cellpadding="4" cellspacing="1" border="0">
<tr>
    <td class="thead">This is my example vBMenu</td>
</tr>
<tr>
    <td class="vbmenu_option"><a href="index.php">Home Page</a></td>
</tr>
<tr>
    <td class="vbmenu_option"><a href="usercp.php">User CP</a></td>
</tr>
</table>
<tr>
    <td class="vbmenu_option" title="nohilite">
        This row will not hilight on mouse-over.
    </td>
</tr>
Multiple Popup Controls, Single vBMenu Popup |
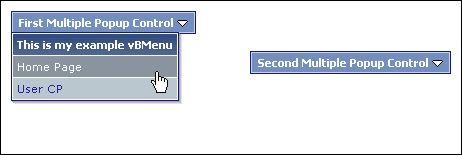
With a single control, the id attribute of the popup control uses the unique identifier for the vBMenu it controls, like this:
<td id="MyMENU" class="vbmenu_control">
    <a href="#">Single Popup Control</a>
    <script type="text/javascript">
        vbmenu_register("MyMENU");
    </script>
</td>
<td id="MyMENU.first" class="vbmenu_control">
    <a href="#">First Multiple Popup Control</a>
    <script type="text/javascript">
        vbmenu_register("MyMENU.first");
    </script>
</td>
<td id="MyMENU.second" class="vbmenu_control">
    <a href="#">Second Multiple Popup Control</a>
    <script type="text/javascript">
        vbmenu_register("MyMENU.second");
    </script>
</td>
The $show['popups'] Conditional |
In order to prevent these browsers from attempting to initialize menus that they can't use, a special template conditional is used.
$show['popups']
By surrounding all vBMenu controls and popups in a conditional that checks the value of $show['popups'], Javascript errors can be avoided, and alternative HTML can be shown to browsers that can't use popups.
For example:
<if condition="$show['popups']">

    <!-- content here is for browsers that
    are able to use the vBMenu system -->

<else />

    <!-- content here is shown to browsers
    that are unable to use vBMenu popups -->

</if>
Example vBMenu HTML Code |
<if condition="$show['popups']">

    <!-- start vBMenu control element -->
    <table class="tborder" cellpadding="4" cellspacing="1">
    <tr>
        <td id="MyMENU" class="vbmenu_control">
            <a href="#">Second Multiple Popup Control</a>
            <script type="text/javascript">
            <!--
            vbmenu_register("MyMENU");
            //-->
            </script>
        </td>
    </tr>
    </table>
    <!-- end vBMenu control element -->

    <!-- start vBMenu popup element -->
    <div class="vbmenu_popup" id="MyMENU_menu" style="display:none">
        <table cellpadding="4" cellspacing="1" border="0">
        <tr>
            <td class="thead">This is my example vBMenu</td>
        </tr>
        <tr>
            <td class="vbmenu_option"><a href="index.php">Home Page</a></td>
        </tr>
        <tr>
            <td class="vbmenu_option"><a href="usercp.php">User CP</a></td>
        </tr>
        </table>
    </div>
    <!-- end vBMenu popup element -->

<else />

    <!-- start alternative, non-vBMenu content -->
    <table class="tborder" cellpadding="4" cellspacing="1">
    <tr>
        <td class="vbmenu_control"><a href="index.php">Home Page</a></td>
        <td class="vbmenu_control"><a href="usercp.php">User CP</a></td>
    </tr>
    </table>
    <!-- end alternative content -->

</if>
Disabling the vBMenu System |

The Legacy Postbit Template |
New Postbit
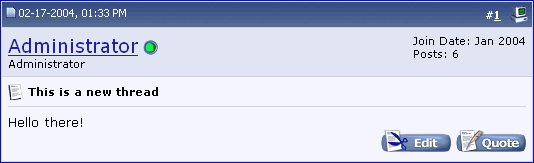
Old (Legacy) Postbit
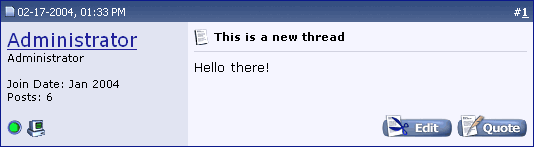
If you would like to run your board using the old-style postbit template, you can do so by going to vBulletin Options > Style & Language Settings and switching the Use Legacy (Vertical) Postbit Template? setting to Yes.
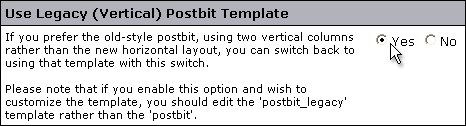
Note:
If your board is set to use the Legacy Postbit template you should be aware that you will need to make any postbit-related template customizations to the postbit_legacy template instead of the postbit template.
Including External Files |
Warning:
This is considered modifying the code. To get further help and support with including external files you will need to visit https://www.vbulletin.org/.
Note:
The Plugin system must be enabled in vBulletin Options -> Plugin System for plugins to work. It is disabled by default.
1. Create a Plugin for global_start with this code:
$includedhtml = implode('', file('path/to/this/file/myfile.html'));2. Place {vb:raw includedhtml} in one of your templates, such as header, navbar, FORUMHOME, depending upon where you want the contents of your HTML file to appear.
Including a PHP file:
1. Create a Plug-in for global_start with these contents:
  ob_start();
  include('path/to/this/file/myfile.php');
  $includedphp = ob_get_contents();
  ob_end_clean();
2. Place {vb:raw includedphp} in one of your templates, such as header, navbar, FORUMHOME, depending upon where you want the contents of your PHP file to appear.
Warning:
Plugins that contain invalid or malicious code may cause your forum to stop functioning or even lead to data loss. Using Plugins is not supported and you'll be asked to disable them in the event that you request tech support. If a Plugin has made your forum inaccessible, please disable plugins. Troubleshooting errant plugins and products is handled at our sister site, https://www.vBulletin.org.
Most PHP files that you might wish to include in your forum contain echo or other output statements in your PHP file, it will break vBulletin because it is still in the process of initializing when it loads your PHP file. All echo and other output commands must be output buffered using ob_start, ob_clean, etc. commands. The output of your PHP script will be buffered for later use and inserted into a variable. All other statements in the PHP script will execute normally.
A word about variables.
It is very important that any variables initialized in your PHP script do not overlap built-in vBulletin variables or you will get unpredictable results. It may be advisable to create a PHP script just for inclusion in your forum rather than including a larger script used by another part of your website.
Variables are also subject to scope. You may need to access your variable out of the $global array like {vb:raw global.variablename} instead of simply {vb:raw variablename}. You may also need work with a hook location that is more accessible to the template that you wish to alter.
Please see the PHP documentation for more information on variable scope:
https://www.php.net/manual/en/language.variables.scope.php
Registering Variables
In vBulletin 4+, you need to register variables for them to be available in specific templates and usable. You would do this with code like this:
vB_Template::preRegister('FORUMHOME',array('includedphp ' => $includedphp));
Which hook should I use?
The hook used above (global_start) makes your HTML or PHP file available in almost every template on your vBulletin forum. You may wish to include a PHP file or HTML file only on certain pages or parts of your forum. You'll need to select the correct hook where your code should be loaded. To determine which hook you should use, turn on Debug and then make this change to the appropriate functions php file.
How do I turn on debug mode?
Please note that you should not turn on debug mode in a live environment.
Open the config.php file.
At the top, on a new line below <?php
add: $config['Misc']['debug'] = true;
Note:
If you wish to include() multiple PHP files, make sure you use ob_clean() before each include() to reset the buffer.
CSS |
For the most part, vBulletin hides the nitty-gritty of editing CSS from you, instead presenting you with a user-friendly interface in the Style Manager in which to enter values to control the styling of your board. However, in the interest of a knowledge of what is going on behind the scenes in the vBulletin style system, we'll talk a little about CSS here.
CSS is a system designed to allow the style of a web site to be separated from the content itself.
Before CSS, web sites had to include HTML code defining how to display content along with the content itself. For example, to display a page of text using a bold, red, medium-sized font, it was necessary to include <font> tags in the actual content:
<p><font size="2" face="verdana, arial, helvetica, sans-serif" color="red">
    <b>This is my first paragraph.</b>
</font></p>

<p><font size="2" face="verdana, arial, helvetica, sans-serif" color="red">
    <b>This is my second paragraph.</b>
</font></p>

<p><font size="2" face="verdana, arial, helvetica, sans-serif" color="red">
    <b>This is my third paragraph.</b>
</font></p>
The net result is HTML code that is bloated by display-related code. Worse still, if we decided at a later date that we wanted to change all the text on our site to use an italic, blue font rather than a bold, red font, we would have to edit the HTML code of every page on the site.
CSS allows us to get away from this far-from-ideal situation by allowing us to define style rules, known as classes.
We could set up a class wherein all content with the class applied would appear with our bold, red, medium-sized font. For now, we'll call this 'myclass'.
<p class="myclass">This is my first paragraph.</p>

<p class="myclass">This is my second paragraph.</p>

<p class="myclass">This is my third paragraph.</p>
The CSS code that defines 'myclass' looks like this:
<style type="text/css">
<!--
.myclass
{
    font: bold 10pt verdana, arial, helvetica, sans-serif;
    color: red;
}
-->
</style>Better still, the class definitions can be kept entirely separate from the HTML code by putting them into a .css file and linking to the file from each HTML page. Therefore, updating a single .css file can change the style of an entire web site, without having to edit a single HTML file.
To demonstrate the extent of use of CSS in vBulletin, here is a comparison of a page from the vBulletin.com web site shown with and without CSS.

CSS Templates |
Styles & Templates > Style Manager > Edit Templates (on All Style Options Dropdown)
Once in the template list, double-click on CSS Templates. Then double-click on the template that you want to edit.
Additional.css |
Body |
Applied directly to the <body> tag of every vBulletin page, the Body class is arguably the most important of the CSS classes used by vBulletin.
Its main use is to control the background color of the outermost portion of pages.
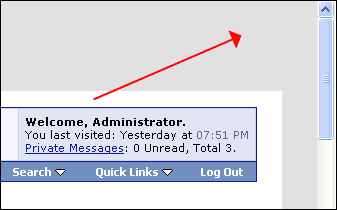
All links in the outermost portion of vBulletin pages, and for that matter, all links unless overridden by subsequent CSS classes, will be controlled by the Body class.
Example of element using this class:
<body>
<!-- The BODY tag uses this class -->
</body>
Page Background |
The majority of content on vBulletin pages is contained within an inner-block that starts at the end of the header template and finishes at the beginning of the footer template.
In the default vBulletin style, this can be seen as the white surround of the main page content.
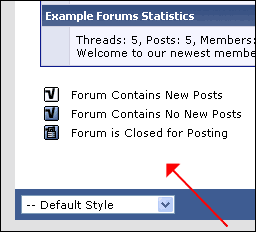

<div class="page" style="width:100%; text-align:left">
<!-- The DIV tag above uses this class -->
</div>
Table Border |
The Table Border class is applied to the majority of table tags in vBulletin.
It controls the background color of tables, which is usually only seen in the margins between cells (the width of which is controlled by the Inner Border Width StyleVar).
The Table Border class is also often used to create a border around the outside of tables.
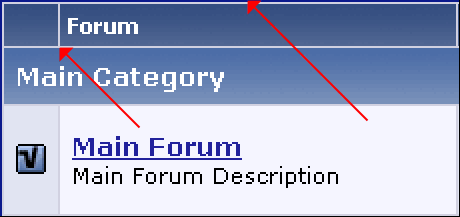

<table class="tborder" cellspacing="1" cellpadding="6">
<tr>
    <td>The TABLE tag above uses this class</td>
</tr>
</table>
Category Strips |
The first use of the Category Strips CSS class is to provide the styling for the parts of forum listings that represent a no-posting forum (also known as a category).
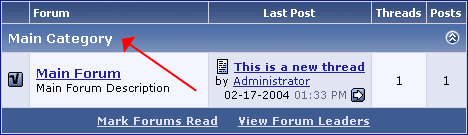
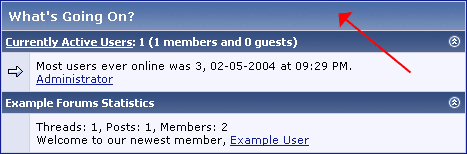
Example of element using this class:
<table class="tborder" cellspacing="1" cellpadding="6">
<tr>
    <td class="tcat">This TD tag uses this class</td>
</tr>
</table>
Table Header |
Like the Category Strips class, the Table Header class serves multiple purposes.
It primary use is to serve as a control mechanism for column headings in tables of data/results, acting as a label for each column.
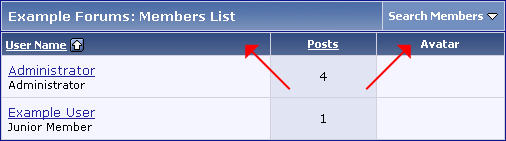
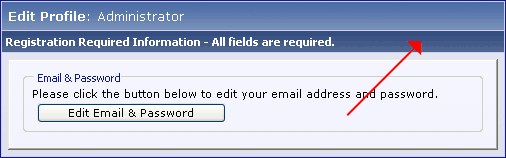
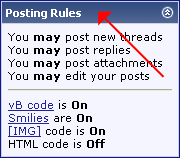
<table class="tborder" cellspacing="1" cellpadding="6">
<tr>
    <td class="thead">This TD tag uses this class</td>
</tr>
</table>
Table Footer |
Some tables in vBulletin include controls at the bottom of the table, or otherwise require some visual cues to show that the table finishes at a certain point. In these cases, the Table Footer class is used.
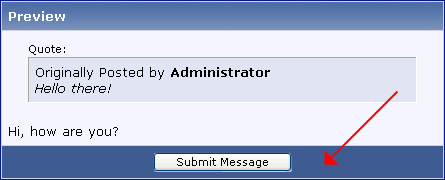
Example of element using this class:
<table class="tborder" cellspacing="1" cellpadding="6">
<tr>
    <td class="tfoot">This TD tag uses this class</td>
</tr>
</table>
First / Second Alternating Color |
When presenting data in a table, vBulletin will usually alternate the background color of cells to assist in readability.
The background colors used for these two alternating cells are controlled by the First and Second Alternating Color classes.

Example of element using these classes:
<table class="tborder" cellspacing="1" cellpadding="6">
<tr>
    <td class="alt1">Tag using the First Alt. Color class</td>
    <td class="alt2">Tag using the Second Alt. Color class</td>
</tr>
</table>
Active First / Second Alternating Color |
A special case applies to the Active First and Second Alternating Color classes, which use the CSS selectors .alt1Active and .alt2Active.
The actual styling of the Active classes is taken directly from the styling applied to the First and Second Alternating Color classes.
When enabled in the footer template, these classes respond to the mouse pointer being hovered over them by switching their background color to that of the opposite Alternating Color class. That is, when your mouse hovers over a cell using the Active First Alternating Color class, it will switch to use the Second Alternating Color class, and when your mouse leaves the cell again it will revert to its original class.

That special information will consist of a letter, followed by a string of digits. The letter indicates the type of the item to which the link will point, and the digits represent the item id of the item in question. For example id="t123" indicates that the item points to thread (t) id 123, so the browser will be redirected to [https://www.example.com/forums/showthread.php?t=123].
The various letters used by vBulletin are listed here:
| Letter | Represents | Redirects to |
u | User (userid) | member.php?u=[userid] |
t | Thread (threadid) | showthread.php?t=[threadid] |
p | Post (postid) | showthread.php?p=[postid] |
f | Forum (forumid) | forumdisplay.php?f=[forumid] |
m | Private Message (pmid) | private.php?pmid=[pmid] |
To enable this functionality, you will need to edit the footer template and un-comment the call to the activecells_init() Javascript function by changing this code:
    // Initialize 'Active' Table Cells
//activecells_init(); // Initialize 'Active' Table Cells
activecells_init();Example of element using these classes:
<table class="tborder" cellspacing="1" cellpadding="6">
<tr>
    <td class="alt1Active" id="t1138">
        Click anywhere inside this cell to be
        taken to the thread with thread ID 1138.
    </td>
</tr>
</table>
WYSIWYG Editor |
The WYSIWYG class is applied to the text input area of the WYSIWYG version of the vBulletin message editor.
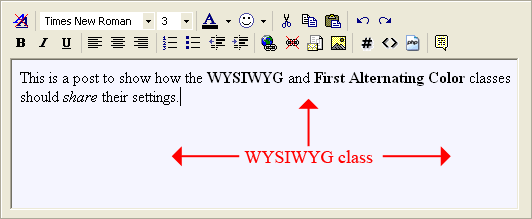
Therefore, for the best results, you should duplicate the settings used for the First Alternating Color class here in the WYSIWYG class.
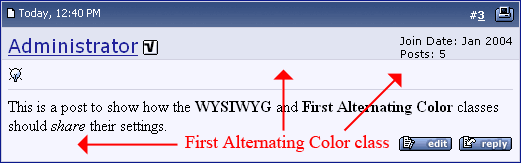
Example of element using this class:
<div id="htmlbox" class="wysiwyg">
    This DIV uses the WYSIWYG class.
</div>
Input Fields |
The Input Fields class is applied to text box form elements, including <textarea>, <input type="text" /> and <input type="password" />.
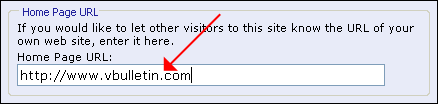
Warning:
If values are omitted from the available fields in this class, the values that will appear on the page will be inherited from the visitor's own PC's system preferences.
This can cause problems if you have specified the background color for the class but not the text color if your visitor has a non-standard color scheme on their computer.
For example, if you specify only the background color, setting it as white, but leave the font color field empty, it may look fine to you, but a visitor using an inverted white-on-black type system color scheme such as the High Contrast Black color scheme available in Windows® will have black text on a black background!
Therefore, if you edit either the background color for this class, make sure you also edit the font color to a suitable value, and vice-versa.
<div><input type="text" class="bginput" name="myinput" /></div>

<div><textarea name="mytextarea" rows="4" cols="60"></textarea></div>

<div>The INPUT and TEXTAREA tags above use the Input Fields class.</div>
Buttons |
The Buttons class is used to style all button-type elements within forms in vBulletin. These include <input type="button" />, <input type="submit" /> and <input type="reset" />.
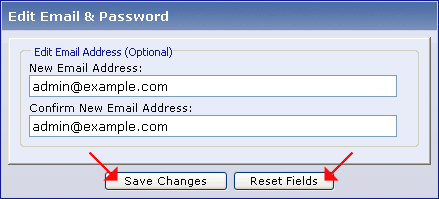
Note:
Under Windows® XP, form buttons will use the 'Luna' theme for their background and borders, unless a background color or a border style is applied. Specifying either one of these attributes will cause buttons to use the classic Windows® styling.

<input type="submit" class="button" value="Save Changes" accesskey="s" />
<br />
The button above uses the 'Button' class.
<select> Menus |
This class is applied to every <select> menu seen in vBulletin.
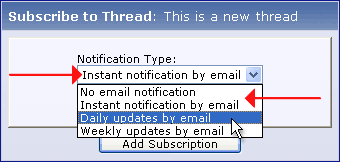
You should find that you can set values for background color, font size and font family successfully. However, certain operating systems; most notably Mac OS X on the Apple Macintosh, will completely ignore all CSS applied to <select> tags, choosing instead to use the system themes engine to display the menus.
Example of element using this class:
<select name="myselect">
    <option value="1">One</option>
    <option value="2">Two</option>
</select>
<div>The SELECT tag above has its style controlled by this class.</div>
Small Font |
The Small Font class is used liberally throughout vBulletin, and does 'exactly what it says on the tin', that being to specify a style for a smaller-than-normal font.

Example of element using this class:
<p>This text does not use the Small Font class,
<span class="smallfont">but this text <strong>does</strong>
use the Small Font class!</span></p>
Time Color |
The Time class is applied to (most) elements containing a time in vBulletin.

Example of element using this class:
<div>Tuesday, March 9th 2004, <span class="time">5:10pm</span>.</div>
NavBar Text |
The NavBar Text class is applied to all text making up the navigation 'breadcrumb' in the navbar template.

Example of element using this class:
<span class="navbar">Example Forums</span> <span class="navbar">> Main Category</span> <span class="navbar">> Main Forum</span>
Highlighted Font |
The Highlighted Font class is used primarily to highlight words in messages that match the conditions of a search. For example, if you searched for 'vBulletin' and then clicked to view the matching threads or posts, the word 'vBulletin' would be highlighted in matching posts.
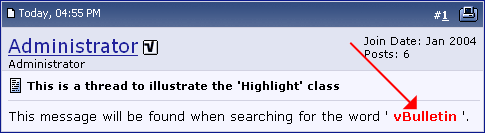
Example of element using this class:
<p>Only one word of this sentence uses the
<span class="highlight">highlight</span> class.</p>
Panel Surround |
The majority of forms in vBulletin appear as a raised panel inside a table.
The Panel Surround class is used to define the style for the thick border that surrounds the panel and includes the submit and reset buttons.
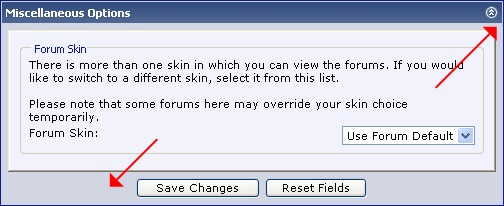
<table class="tborder" cellspacing="5" cellspacing="1">
<tr>
    <td class="panelsurround">
        This cell uses the Panel Surround class.
    </td>
</tr>
</table>
Panel (Forms) |
Used in conjunction with the Panel Surround class, the Panel class is used to control the style of the raised panel used to house controls on most vBulletin forms.
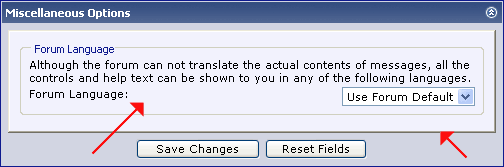
Example of element using this class:
<div class="panel">
    This DIV uses the Panel class.
</div>
<legend> |
Elements within forms in vBulletin are often grouped inside a <fieldset> tag. The titles of these fieldsets are set inside <legend> tags, which take their styling from the <legend> class.
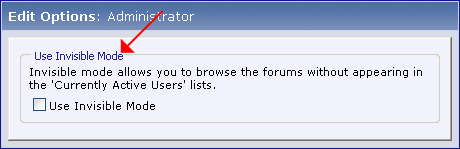
Example of element using this class:
<form>
    <fieldset>
        <legend>This uses the Legend class</legend>
        <div>Some form elements here...</div>
    </fieldset>
</form>
Popup Menu Controls |
vBulletin hides complex and infrequently used functionality from immediate view by placing it in vBMenu popup menus.
For the most part, vBMenu popups are controlled by clicking on an element that opens or closes the menu, and these elements' style is controlled with the Popup Menu Controls class.
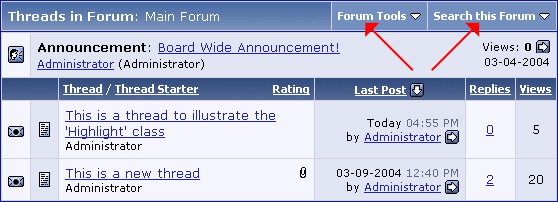
Example of element using this class:
<table class="tborder" cellpadding="6" cellspacing="1">
<tr>
    <td id="myMenu" class="vbmenu_control">
        <a href="#myMenu">The TD tag Uses This Class</a>
        <script type="text/javascript"> vbmenu_register("myMenu"); </script>
    </td>
</tr>
</table>
Popup Menu Body |
When a vBMenu popup menu is opened, its contents are usually bordered by a bounding box, and a color is visible through the margins between individual components of the menu itself.
This border and the color showing through the gaps is controlled by the Popup Menu Body class.

Example of element using this class:
<div class="vbmenu_popup" id="myMenu_menu" style="display:none">
    <table cellpadding="4" cellspacing="1" border="0">
    <tr>
        <td class="thead">
            The DIV surrounding this table
            uses the Popup Menu Body class
        </td>
    </tr>
    </table>
</div>
Popup Menu Option Row |
Individual elements of a vBMenu popup menu will usually derive their styling from the Popup Menu Option class.
Elements within popup menus usually take the form of a <td> tag within a table.
Example of element using this class:
<div class="vbmenu_popup" id="myMenu_menu" style="display:none">
    <table cellpadding="4" cellspacing="1" border="0">
    <tr>
        <td class="vbmenu_option">
            This element within a popup menu
            uses the Popup Menu Option class.
        </td>
    </tr>
    </table>
</div>
Popup Menu Highlighted Option |
The Popup Menu Highlighted Option class is unusual in that it is not actually applied to any elements in the vBulletin templates. Instead, it is applied dynamically via Javascript when a user's mouse pointer hovers over an element with the Popup Menu Option Row class applied, making a rollover effect.
Note:
For best results, you should apply similar settings to this class as you applied to the Popup Menu Option Row class, making only subtle changes such as the background color and the text color. Making extreme changes such as changing the font family or size will result in menus that appear to 'jump around' when rolling over options.
<div class="vbmenu_popup" id="myMenu_menu" style="display:none">
    <table cellpadding="4" cellspacing="1" border="0">
    <tr>
        <td class="vbmenu_option">
            This element will have the Popup
            Menu Highlighted Option class applied
            when the user's mouse pointer hovers over it.
        </td>
    </tr>
    </table>
</div>
Forum Jump Menu Classes |
| .fjsel | Selected Menu Item | .fjdpth0 | Depth 0 Menu Item |
| .fjdpth1 | Depth 1 Menu Item | .fjdpth2 | Depth 2 Menu Item |
| .fjdpth3 | Depth 3 Menu Item | .fjdpth4 | Depth 4 Menu Item |
Of the six classes, the first (.fjsel) is applied to whatever <option> tag is currently selected, thereby creating a cue for the user to see where they are in relation to the rest of the board.
The remaining five classes, .fjdpth0 to .fjdpth4 are applied to <option> tags containing forums in the menu, with the depth determined by the level of nesting of each forum.

Note:
As with the <select> Menus class, the Forum Jump Menu classes are applied to <select> and <option> tags, which on non-Windows® operating systems (in particular Macintosh operating systems) can sometimes not be styled.
At most you will be able to style the background color and the text color for these classes, and all other styling will be inherited from the <select> Menus class, if indeed the operating system allows these elements to be styled at all.
At most you will be able to style the background color and the text color for these classes, and all other styling will be inherited from the <select> Menus class, if indeed the operating system allows these elements to be styled at all.
<select name="myselect">
    <option class="fjsel" selected="selected">Selected item</option>
    <option class="fjdpth0">Depth 0 item</option>
    <option class="fjdpth1">Depth 1 item</option>
    <option class="fjdpth2">Depth 2 item</option>
    <option class="fjdpth3">Depth 3 item</option>
    <option class="fjdpth4">Depth 4 item</option>
</select>
Style Variables |
For example, one StyleVar (called $stylevar[cellspacing]) controls the spacing between cells in all <table> tags used in vBulletin, as you can see from the following examples:
| Firstly, with the $stylevar[cellspacing] StyleVar set at its default value of 1, you can see a single-pixel border between cells in the table. |
| Next, with $stylevar[cellspacing] set to equal 0, you can see that the border between cells has completely disappeared. |
| Finally, with $stylevar[cellspacing] set at 3, a much wider, 3 pixel border is produced between each cell. |
| At the default value of $stylevar[cellpadding]: 6, tables appear with a large amount of padding around the content of each cell. |
| After reducing $stylevar[cellpadding] to 3, the margin around cell content is halved from the default amount of padding. |
| And finally, with $stylevar[cellpadding] set at 0, all padding is removed, leaving a rather nasty, cluttered layout having no margin between cell content and cell border at all. |
<table class="tborder" cellpadding="$stylevar[cellpadding]" cellspacing="$stylevar[cellspacing]">
<tr>
    <td class="thead" align="$stylevar[left]">Welcome to vBulletin</td>
    <td class="thead" align="$stylevar[right]">$bbuserinfo[username]</td>
</tr>
<tr>
    <td class="alt1" colspan="2">
        <img src="$stylevar[titleimage]" alt="vBulletin Logo" />
    </td>
</tr>
</table>
The following sections list and explain all the StyleVars used by vBulletin, so you can edit them with confidence, and incorporate them into any custom templates you might create.
How Style Variables Interact with CSS |
When you look at the CSS templates you will see code like this:
.postbit, .postbitlegacy, .eventbit {
    margin-bottom: {vb:stylevar padding};
    display:block;
    width: 100%;
    clear:both;
    position: relative;
    float: {vb:stylevar left};
    color: {vb:stylevar body_color};
    border: {vb:stylevar postbit_border};
}
CSS Math
Primarily used within CSS, this is used to evaluate the result of the mathematical expression specified.
{vb:math expression}
An example of this might look like:
height:{vb:math 8px + {vb:math {vb:stylevar font.fontSize}-1}};
This determines the height of an element based on the font size specified in the font style variable and an extra value of 8 pixels.
Types of Stylevars |
Simple Stylevars
Simple stylevars usually have a single option to set. These include strings, numbers, image paths, image names, colors, and others.
- String - Allows you to specify any string value
- Numeric - Allows you to specify any numeric value
- Url - These stylevars require a valid URL
- Path - Simple relative path here i.e. ./images/
- Color - Allows any valid CSS color value including named colors, RGB, and Hex Values. Provides a color palette tool.
- Image Directory - Allows you to specify a directory where images are located. This will be relative to the directory the software is installed in.
- Image - Allows you to specify a valid image type
- Font List - Specify a list of fonts in comma delimited format for typography
- Size - Set the size of elements. Includes a dropdown for the unit type (pt, px, em, etc...)
Complex Stylevars have a variety of options usually denoting the complex nature of the setting. These stylevars include backgrounds, fonts, text decoration, dimensions, borders, padding and margins.
- Background - Specify the different attributes of a background. This includes image url, color, horizontal/vertical offsets and repeat values.
- Font - Specify the font for elements. Includes font family, size, weight, and transformation.
- Text Decoration - Specify the text decoration of an element, e.g. underline, strike-through, overline.
- Dimension - Sets the dimension of an element. Both horizontal and vertical be set.
- Border - Sets the border of an element including left, right, top, bottom, width, variation and color.
- Padding - Sets the padding around the contents of a block element.
- Margin - Sets the margins of a block element. Note: To automatically center the contents of an element horizontally, set the values for the left and right margins to auto.
Adding Stylevars |
Note:
This is a developer feature
To add a new stylevar, click the "Add New Stylevar" button on the Stylevar Manager. You will be able to define the name, description, variable, group and type of stylevar. You can also assign your stylevar to a specific product for export in a product.xml file.
Stylevar Dictionary |
Ads |
| Name | Description |
| ad_margin | This stylevar controls the margin of ads. |
| ad_padding | This stylevar controls the padding of ads. |
| ad_post_maxWidth | This stylevar controls the maximum width of ads in forum posts. |
Album |
| Name | Description |
| album_content_width | This stylevar controls the width of the user's album column on the main album page. |
| albumedit_blockrow_border | This stylevar controls the border of block rows in the edit album picture page. |
| albumedit_maineditor_background | This stylevar controls the background of the caption textbox in the edit album picture page. |
| albumedit_maineditor_border | This stylevar controls the border of the caption textbox in the edit album picture page. |
| albumedit_maineditor_width | This stylevar controls the width of the caption textbox in the edit album picture page. |
| albumlist_blockbody_background | This stylevar controls the background of the album list. |
| albumlist_entry_background | This stylevar controls the background of the album covers in the album list. |
| albumlist_entry_border | This stylevar controls the border of the album covers in the album list. |
| albumlist_image_shadow_color | This stylevar controls the shadow color of the album cover pictures in the album list. |
| albumtop_margin | This stylevar controls the width of the Picture URL and BB Code fields in the album picture page. |
| picture_background | This stylevar controls the background of pictures. |
| picture_border | This stylevar controls the border of pictures. |
| picturelink_img_shadow_color | This stylevar controls the shadow color of pictures. |
AssetManager |
| Name | Description |
| assetmanager_attachment_background | This stylevar controls the background of attachments in the asset manager. |
| assetmanager_attachment_background_selected | This stylevar controls the background of selected attachments in the asset manager. |
| assetmanager_attachment_border | This stylevar controls the border of attachments in the asset manager. |
| assetmanager_attachment_color | This stylevar controls the text color of attachments in the asset manager. |
| assetmanager_border | This stylevar controls the border of the asset manager. |
| assetmanager_panel_background | This stylevar controls the background of panels in the asset manager. |
| assetmanager_panel_color | This stylevar controls the text color of panels in the asset manager. |
| assetmanager_panel_footer_background | This stylevar controls the background of panel footers in the asset manager. |
| assetmanager_panel_footer_color | This stylevar controls the text color of panel footers in the asset manager. |
| assetmanager_panel_header_background | This stylevar controls the background of panel headers in the asset manager. |
| assetmanager_panel_header_color | This stylevar controls the text color of panel headers in the asset manager. |
| assetmanager_resize_background | This stylevar controls the background of the area between the different panels in the asset manager. |
| assetmanager_upload_background | This stylevar controls the background of the file list in the advanced uploader. If enabled, the advanced uploader is used in the asset manager and in the Insert Image popup of the editor. |
| assetmanager_upload_color | This stylevar controls the text color of the file list in the advanced uploader. If enabled, the advanced uploader is used in the asset manager and in the Insert Image popup of the editor. |
Attachments |
| Name | Description |
| attachment_box_background | This stylevar controls the background of the box that contains attachments in content that supports them. |
| attachment_box_border | This stylevar controls the border of the box that contains attachments in content that supports them. |
| attachment_box_fontsize | This stylevar controls the font size of the box that contains attachments in content that supports them. |
| attachment_box_padding | This stylevar controls the padding of the box that contains attachments in content that supports them. |
| attachment_image_large_max | This stylevar controls the maximum size of inline attached images whose size is set to "Large" in their Image Settings. |
| attachment_image_medium_max | This stylevar controls the maximum size of inline attached images whose size is set to "Medium" in their Image Settings. |
| attachment_image_thumbnail_max | This stylevar controls the maximum size of inline attached images whose size is set to "Thumbnail" in their Image Settings. |
BBCode |
| Name | Description |
| bbcode_code_background | This stylevar controls the background of the [code], [html] and [php] BB code blocks. |
| bbcode_quote_background | This stylevar controls the background of quotes. |
| bbcode_quote_border | This stylevar controls the border of quotes. |
| bbcode_quote_font | This stylevar controls the font of quotes. |
| bbcode_quote_padding | This stylevar controls the padding of quotes. |
| bbcode_quote_postedby_font | This stylevar controls the font of the "Originally Posted by" text of quotes. |
| bbcode_table_border | This stylevar controls the border of tables created with BB code. |
Blocks |
| Name | Description |
| blockbody_background | This stylevar controls the background of the block body. A block body is the central part of a block, which usually contains one ore more block rows. |
| blockbody_padding | This stylevar controls the padding of the block body. A block body is the central part of a block, which usually contains one ore more block rows. |
| blockfoot_background | This stylevar controls the background of block footers. A block footer is the bottom part of a block, which usually contains action buttons. |
| blockfoot_border | This stylevar controls the border of block footers. A block footer is the bottom part of a block, which usually contains action buttons. |
| blockfoot_color | This stylevar controls the text color of block footers. A block footer is the bottom part of a block, which usually contains action buttons. |
| blockfoot_font | This stylevar controls the font of block footers. A block footer is the bottom part of a block, which usually contains action buttons. |
| blockfoot_link_color | This stylevar controls the link color of block footers. A block footer is the bottom part of a block, which usually contains action buttons. |
| blockfoot_linkhover_color | This stylevar controls the link hover color of block footers. A block footer is the bottom part of a block, which usually contains action buttons. |
| blockfoot_padding | This stylevar controls the padding of block footers. A block footer is the bottom part of a block, which usually contains action buttons. |
| blockhead_background | This stylevar controls the background of block headers. A block header is the upper part of a block, which usually contains a title for the block. |
| blockhead_border | This stylevar controls the border of block headers. A block header is the upper part of a block, which usually contains a title for the block. |
| blockhead_color | This stylevar controls the text color of block headers. A block header is the upper part of a block, which usually contains a title for the block. |
| blockhead_font | This stylevar controls the font of block headers. A block header is the upper part of a block, which usually contains a title for the block. |
| blockhead_link_color | This stylevar controls the link color of block headers. A block header is the upper part of a block, which usually contains a title for the block. |
| blockhead_linkhover_color | This stylevar controls the link hover color of block headers. A block header is the upper part of a block, which usually contains a title for the block. |
| blockhead_padding | This stylevar controls the padding of block headers. A block header is the upper part of a block, which usually contains a title for the block. |
| blockrow_background | This stylevar controls the background of block rows. A block contains one or more rows, in which data are displayed. |
| blockrow_border | This stylevar controls the border of block rows. A block contains one or more rows, in which data are displayed. |
| blockrow_color | This stylevar controls the text color of block rows. A block contains one or more rows, in which data are displayed. |
| blockrow_font | This stylevar controls the font of block rows. A block contains one or more rows, in which data are displayed. |
| blockrow_link_color | This stylevar controls the link color of block rows. A block contains one or more rows, in which data are displayed. |
| blockrow_linkhover_color | This stylevar controls the link hover color of block rows. A block contains one or more rows, in which data are displayed. |
| blockrow_padding | This stylevar controls the padding of block rows. A block contains one or more rows, in which data are displayed. |
| blocksubhead_background | This stylevar controls the background of block sub-headers. A block sub-header is usually located below the block header, containing a descriptive sub-title for the block, or is used to separate multiple block rows within the same block. |
| blocksubhead_border | This stylevar controls the border of block sub-headers. A block sub-header is usually located below the block header, containing a descriptive sub-title for the block, or is used to separate multiple block rows within the same block. |
| blocksubhead_color | This stylevar controls the text color of block sub-headers. A block sub-header is usually located below the block header, containing a descriptive sub-title for the block, or is used to separate multiple block rows within the same block. |
| blocksubhead_font | This stylevar controls the font of block sub-headers. A block sub-header is usually located below the block header, containing a descriptive sub-title for the block, or is used to separate multiple block rows within the same block. |
| blocksubhead_link_color | This stylevar controls the link color of block sub-headers. A block sub-header is usually located below the block header, containing a descriptive sub-title for the block, or is used to separate multiple block rows within the same block. |
| blocksubhead_linkhover_color | This stylevar controls the link hover color of block sub-headers. A block sub-header is usually located below the block header, containing a descriptive sub-title for the block, or is used to separate multiple block rows within the same block. |
| blocksubhead_padding | This stylevar controls the padding of block sub-headers. A block sub-header is usually located below the block header, containing a descriptive sub-title for the block, or is used to separate multiple block rows within the same block. |
Global |
| Name | Description |
| body_background | This stylevar controls the background of the body. The body is the area below the header, which contains all other elements. |
| body_color | This stylevar controls the text color of the body. The body is the area below the header, which contains all other elements. |
| body_padding | This stylevar controls the padding of the body. The body is the area below the header, which contains all other elements. |
| border_radius | This stylevar controls the radius of borders. |
| doc_background | This stylevar controls the background of the document. The document is the outer area, that contains all other elements. |
| doc_margin | This stylevar controls the margin of the document. The document is the outer area, that contains all other elements. |
| doc_maxWidth | This stylevar controls the maximum width of the document. The document is the outer area, that contains all other elements. |
| doc_minWidth | This stylevar controls the minimum width of the document. The document is the outer area, that contains all other elements. |
| doc_width | This stylevar controls the width of the document. The document is the outer area, that contains all other elements. |
| font | This stylevar controls the font of any element. |
| htmldoctype | This stylevar controls the type of the HTML document. |
| link_color | This stylevar controls the link color of any element. |
| link_textDecoration | This stylevar controls the link text decoration of any element. |
| linkhover_color | This stylevar controls the link hover color of any element. |
| linkhover_textDecoration | This stylevar controls the link hover text decoration of any element. |
| padding | This stylevar controls the padding of any element. |
| shade_color | This stylevar controls the text color of shaded text. Shaded text is usually used for option and input field descriptions. |
| shadow_color | This stylevar controls the shadow color of any element. |
| time_color | This stylevar controls the text color of the time. |
Buttons |
| Name | Description |
| control_background | This stylevar controls the background of buttons. |
| control_border | This stylevar controls the border of buttons. |
| control_color | This stylevar controls the text color of buttons. |
| control_content_background | This stylevar controls the background of content buttons. A content button is a button used to create new content (such as Post New Thread, Reply to Thread, etc.). |
| control_content_border | This stylevar controls the border of content buttons. A content button is a button used to create new content (such as Post New Thread, Reply to Thread, etc.). |
| control_content_color | This stylevar controls the text color of content buttons. A content button is a button used to create new content (such as Post New Thread, Reply to Thread, etc.). |
| control_content_font | This stylevar controls the font of content buttons. A content button is a button used to create new content (such as Post New Thread, Reply to Thread, etc.). |
| control_content_hover_background | This stylevar controls the background of hover content buttons. A content button is a button used to create new content (such as Post New Thread, Reply to Thread, etc.). |
| control_content_hover_color | This stylevar controls the text color of hover content buttons. A content button is a button used to create new content (such as Post New Thread, Reply to Thread, etc.). |
| control_content_padding | This stylevar controls the padding of content buttons. A content button is a button used to create new content (such as Post New Thread, Reply to Thread, etc.). |
| control_content_radius | This stylevar controls the radius of content button borders. A content button is a button used to create new content (such as Post New Thread, Reply to Thread, etc.). |
| control_content_shadow_color | This stylevar controls the shadow color of content buttons. A content button is a button used to create new content (such as Post New Thread, Reply to Thread, etc.). |
| control_font | This stylevar controls the font of buttons. |
| control_hover_background | This stylevar controls the background of hover buttons. |
| control_hover_color | This stylevar controls the text color of hover buttons. |
Calendar |
| Name | Description |
| calendar_addnewcontrols_dt_margin | This stylevar controls the margin of the calendar Add New Event button. |
| calendar_events_a_daynum_color | This stylevar controls the link color of day numbers in the calendar monthly view. |
| calendar_events_a_daynum_color_hover | This stylevar controls the link hover color of day numbers in the calendar monthly view. |
| calendar_events_border | This stylevar controls the border of days in the calendar monthly and weekly views. |
| calendar_events_height | This stylevar controls the minimum height of day cells in the calendar monthly view. |
| calendar_events_ol_list_margin | This stylevar controls the margin of day cells in the calendar monthly view. |
| calendar_events_ol_list_width | This stylevar controls the width of day cells in the calendar monthly view. |
| calendar_mini_othermonth_a_border | This stylevar controls the border of other month days in the calendar. |
| calendar_othermonth_a_color | This stylevar controls the text color of other month days in the calendar. |
| calendar_othermonth_background_color | This stylevar controls the background of other month days in the calendar. |
| calendar_sidebar_width | This stylevar controls the width of the calendar sidebar. |
| calendar_today_border_color | This stylevar controls the border of the current day cell in the calendar monthly view. |
| calendar_week_daynum_font_color | This stylevar controls the text color of day numbers in the calendar weekly view. |
| calendar_week_daynum_font_size | This stylevar controls the font size of day numbers in the calendar weekly view. |
| calendar_week_eventlist_birthdays_background | This stylevar controls the background of the birthday area in the calendar weekly view. |
| calendar_week_eventlist_birthdays_border | This stylevar controls the border of the birthday area in the calendar weekly view. |
| calendar_week_eventlist_birthdays_width | This stylevar controls the width of the birthday area in the calendar weekly view. |
| eventbit_dl_customfield_color | This stylevar controls the text color of custom field names in calendar events. |
Comments |
| Name | Description |
| postbit_lite_background | This stylevar controls the background of comments. A comment is a smaller-looking type of message, such as group messages, visitor messages, etc. |
| postbitlite_header_background | This stylevar controls the background of comment headers. A comment is a smaller-looking type of message, such as group messages, visitor messages, etc. |
| postbitlite_header_border | This stylevar controls the border of comment headers. A comment is a smaller-looking type of message, such as group messages, visitor messages, etc. |
| postbitlite_header_color | This stylevar controls the text color of comment headers. A comment is a smaller-looking type of message, such as group messages, visitor messages, etc. |
| postbitlite_header_link_color | This stylevar controls the link color of comment headers. A comment is a smaller-looking type of message, such as group messages, visitor messages, etc. |
Common |
| Name | Description |
| big_fontSize | This stylevar controls the size of big font. |
| content_msg_font | This stylevar controls the font of non post content types. A non post content type is any content except forums posts, private messages, forum announcements, calendar events and user notes. |
| general_hilite_color | This stylevar controls the background of general highlighted elements. |
| giant_fontSize | This stylevar controls the size of giant font. |
| heavy_border | This stylevar controls the border of any element that does not have a specific border defined and that needs a border that stands out against nearby elements. |
| highlight_background | This stylevar controls the background of highlighted text. The text is usually highlighted by either using the [highlight] BB code or when it matches search keyword(s). |
| highlight_color | This stylevar controls the text color of highlighted text. The text is usually highlighted by either using the [highlight] BB code or when it matches search keyword(s). |
| image_max_size | This stylevar controls the maximum size of images. |
| imodhilite_backgroundColor | This stylevar controls the background of the content selected with inline moderation. |
| light_border | This stylevar controls the border of any element that does not have a specific border defined and that needs a border that doesn't stand out against nearby elements. |
| line_height | This stylevar controls the height of the lines of most elements. The value of this stylevar is always and only used as part of calculations, and not directly. |
| mid_border | This stylevar controls the border of any element that does not have a specific border defined. |
| mid_fontSize | This stylevar controls the size of mid font. |
| navlinks_background | This stylevar controls the background of the navigation links. |
| navlinks_border_top | This stylevar controls the top border of the navigation links. |
| navlinks_color | This stylevar controls the text color of the navigation links. |
| restore | This stylevar controls the border of table cells. |
| restore_padding | This stylevar controls the padding of table cells. |
| small_fontSize | This stylevar controls the size of small font. |
| tabslight_border | This stylevar controls the border of tabs. This is used by the calendar tabs only. |
| tabslight_selected_background | This stylevar controls the background of the selected tab. This is used by the calendar tabs only. |
| tabslight_size | This stylevar controls the size of tabs. This is used by the calendar tabs and profile tabs only. |
| tiny_fontSize | This stylevar controls the size of tiny font. |
Editor |
| Name | Description |
| editor_autosave_notice_background | This stylevar controls the background of the editor auto-save notice. |
| editor_background | This stylevar controls the background of the editor. |
| editor_button_background | This stylevar controls the background of editor buttons. |
| editor_button_background_hover | This stylevar controls the background of hover editor buttons. |
| editor_button_disabled_opacity | This stylevar controls the opacity of disabled editor buttons. The entered value should be between 0 and 1. |
| editor_button_enabled_opacity | This stylevar controls the opacity of enabled editor buttons. The entered value should be between 0 and 1. |
| editor_button_selected_background | This stylevar controls the background of selected editor buttons. |
| editor_button_selected_background_hover | This stylevar controls the background of hover selected editor buttons. |
| editor_popupbody_background | This stylevar controls the background of the editor popups. |
| editor_popupbody_color | This stylevar controls the text color of the editor popups. |
| editor_popupbody_frame_background | This stylevar controls the background of the editor popup frame. |
| editor_popupbody_frame_color | This stylevar controls the text color of the editor popup frame. |
| editor_popupbody_tab_background_hover | This stylevar controls the background of the editor popup hover tabs. |
| editor_popupbody_tab_color_hover | This stylevar controls the text color of the editor popup hover tabs. |
| editor_smiliebox_smiliesize | This stylevar controls the maximum size of smilies in the editor smiliebox. |
| editor_text_color | This stylevar controls the text color of the editor. |
| editor_toolbar_background | This stylevar controls the background of the editor toolbar. |
| editor_wysiwyg_table_border | This stylevar controls the border of tables in the WYSIWYG editor. |
Footer |
| Name | Description |
| footer_background | This stylevar controls the background of the footer. The footer is the horizontal bar that is displayed at the bottom of every page. |
| footer_border | This stylevar controls the border of the footer. The footer is the horizontal bar that is displayed at the bottom of every page. |
| footer_color | This stylevar controls the text color of the footer. The footer is the horizontal bar that is displayed at the bottom of every page. |
| footer_copyright_color | This stylevar controls the text color of the footer copyright notice. The footer is the horizontal bar that is displayed at the bottom of every page. |
| footer_copyright_font | This stylevar controls the font of the footer copyright notice. The footer is the horizontal bar that is displayed at the bottom of every page. |
| footer_font | This stylevar controls the font of the footer. The footer is the horizontal bar that is displayed at the bottom of every page. |
| footer_link_color | This stylevar controls the link color of the footer. The footer is the horizontal bar that is displayed at the bottom of every page. |
| footer_linkhover_color | This stylevar controls the link hover color of the footer. The footer is the horizontal bar that is displayed at the bottom of every page. |
| footer_moz_shadow_color | This stylevar controls the shadow color of the footer. The footer is the horizontal bar that is displayed at the bottom of every page. |
| footer_padding | This stylevar controls the padding of the footer. The footer is the horizontal bar that is displayed at the bottom of every page. |
| footer_time_color | This stylevar controls the text color of the footer time. The footer is the horizontal bar that is displayed at the bottom of every page. |
Forms |
| Name | Description |
| form_columnleft_width | This stylevar controls the width of the left column in forms. The left column of forms usually contains option and input field names. |
| form_columnright_width | This stylevar controls the width of the right column in forms. The right column of forms usually contains option descriptions, the available option settings and input fields. |
| form_maxWidth | This stylevar controls the maximum width of forms in new content creation pages. A form is usually contained in a block, and it contains the block body and/or one or more block rows. |
| formrow_background | This stylevar controls the background of forms. A form is usually contained in a block body, and may contain one or more block rows. |
| formrow_border | This stylevar controls the border of forms. A form is usually contained in a block body, and may contain one or more block rows. |
| input_background | This stylevar controls the background of input fields. |
| input_border | This stylevar controls the border of input fields. |
| input_color | This stylevar controls the text color of input fields. |
| input_focus_background | This stylevar controls the background of input fields when they have focus. |
| input_font | This stylevar controls the font of input fields. |
| input_padding | This stylevar controls the padding of input fields. |
Forums |
| Name | Description |
| announcement_background | This stylevar controls the background of forum announcements. Announcements are displayed at the top of forumdisplay pages. |
| forum_sidebar_width | This stylevar controls the width of the forum sidebar. |
| forumbits_border | This stylevar controls the border of forum rows in forum lists. |
| forumbits_shadow_color | This stylevar controls the shadow color of forum rows in forum lists. |
| forumbits_text_color | This stylevar controls the text color of forum rows in forum lists. |
| forumhead_background | This stylevar controls the background of forum list headers. |
| forumhead_border | This stylevar controls the border of forum list headers. |
| forumhead_color | This stylevar controls the text color of forum list headers. |
| forumhead_font | This stylevar controls the font of forum list headers. |
| forumhead_top_corner_radius | This stylevar controls the radius of the top corners of forum list headers. |
| forumicon_size | This stylevar controls the size of the space forum icons can take in forum lists. |
| forumrow_background | This stylevar controls the background of forum rows in forum lists. |
| forumrow_firstentry_background | This stylevar controls the background of the first forum row in forum lists. |
Groups |
| Name | Description |
| groups_row_background | This stylevar controls the background of group rows. |
| icon_background | This stylevar controls the background of group icons in the group main page. |
Header |
| Name | Description |
| header_background | This stylevar controls the background of the header. The header is the horizontal bar that is displayed at the top of every page, which contains the logo. |
| header_border | This stylevar controls the border of the header. The header is the horizontal bar that is displayed at the top of every page, which contains the logo. |
| header_color | This stylevar controls the text color of the header. The header is the horizontal bar that is displayed at the top of every page, which contains the logo. |
| header_font | This stylevar controls the text font of the header. The header is the horizontal bar that is displayed at the top of every page, which contains the logo. |
| header_link_color | This stylevar controls the link color of the header. The header is the horizontal bar that is displayed at the top of every page, which contains the logo. |
| header_linkhover_color | This stylevar controls the link hover color of the header. The header is the horizontal bar that is displayed at the top of every page, which contains the logo. |
| header_margin | This stylevar controls the margin of the header. The header is the horizontal bar that is displayed at the top of every page, which contains the logo. |
| header_padding | This stylevar controls the padding of the header. The header is the horizontal bar that is displayed at the top of every page, which contains the logo. |
| toplinks_background | This stylevar controls the background of the links in the top right corner of the header. |
| toplinks_color | This stylevar controls the text color of the links in the top right corner of the header. |
| toplinks_hilite_background | This stylevar controls the highlighted background of the links in the top right corner of the header. |
| toplinks_link_color | This stylevar controls the link color of the links in the top right corner of the header. |
| toplinks_linkhover_color | This stylevar controls the link hover color of the links in the top right corner of the header. |
ImagePaths |
| Name | Description |
| imgdir_attach | This stylevar controls the path of the attachment image directory. This folder contains the various icons used to represent different attachment file types. |
| imgdir_button | This stylevar controls the path of the button image directory. This folder contains the various images of the buttons that can be clicked to perform actions. |
| imgdir_cms | This stylevar controls the path of the CMS image directory. This folder contains the various images used in the vBulletin CMS. |
| imgdir_editor | This stylevar controls the path of the editor image directory. This folder contains the button and interface images for the editor. |
| imgdir_misc | This stylevar controls the path of the miscellaneous image directory. This folder contains the various images that do not fit into other image categories. |
| imgdir_pagination | This stylevar controls the path of the pagination image directory. This folder contains the various images used by the pagination. |
| imgdir_rating | This stylevar controls the path of the rating image directory. This folder contains the various images used to illustrate the rating applied to a content (such as threads). |
| imgdir_reputation | This stylevar controls the path of the reputation image directory. This folder contains the various images used to display a user's current reputation. |
| imgdir_searchresults | This stylevar controls the path of the search result image directory. This folder contains the various images used by different content showed in search results. |
| imgdir_siteicons | This stylevar controls the path of the site icon image directory. This folder contains the various common icons used across all the site. |
| imgdir_statusicon | This stylevar controls the path of the status icon image directory. This folder contains the various icons representing the status of content (such as forums, threads, etc.). |
| titleimage | This stylevar controls the file path of the logo. The logo is the image that is displayed on every page in the top left corner of the header. |
| titleimage_padding | This stylevar controls the padding of the logo. The logo is the image that is displayed on every page in the top left corner of the header. |
| favicon | This stylevar controls the file path of the favicon. The favicon is the small image displayed in the browser address bar and near browser page title. |
| unknownsgicon | This stylevar controls the file path of the icon used as group icon by groups that do not have an icon specified. |
Navbar |
These style variables control the navigation tabs and submenus shown under the Header on every page.
| Name | Description |
| navbar_background | This stylevar controls the background of the navigation bar. |
| navbar_border | This stylevar controls the border of the navigation bar. |
| navbar_color | This stylevar controls the text color of the navigation bar. |
| navbar_font | This stylevar controls the font of the navigation bar. |
| navbar_link_color | This stylevar controls the link color of the navigation bar. |
| navbar_linkhover_color | This stylevar controls the link hover color of the navigation bar. |
| navbar_margin | This stylevar controls the margin of the navigation bar. |
| navbar_menu_height | This stylevar controls the height of the navigation bar menu. |
| navbar_popupmenu_link_background | This stylevar controls the background of the navigation bar popup menu rows. |
| navbar_popupmenu_link_color | This stylevar controls the link color of the navigation bar popup menu rows. |
| navbar_popupmenu_link_hover_background | This stylevar controls the background of the navigation bar popup menu hover rows. |
| navbar_popupmenu_link_hover_color | This stylevar controls the link color of the navigation bar popup menu hover rows. |
| navbar_tab_background | This stylevar controls the background of the navigation bar tabs. |
| navbar_tab_bevel | This stylevar controls the inner top border of the navigation bar tabs. |
| navbar_tab_border | This stylevar controls the border of the navigation bar tabs. |
| navbar_tab_color | This stylevar controls the text color of the navigation bar tabs. |
| navbar_tab_font | This stylevar controls the font of the navigation bar tabs. |
| navbar_tab_padding | This stylevar controls the padding of the navigation bar tabs. |
| navbar_tab_selected_background | This stylevar controls the background of the selected navigation bar tabs. |
| navbar_tab_selected_color | This stylevar controls the text color of the selected navigation bar tabs. |
| navbar_tab_selected_top_height | This stylevar controls the height of the selected navigation bar tabs. This is an extra height added to the normal height of the navigation bar tabs. |
| navbar_tab_size | This stylevar controls the size of the navigation bar tabs. |
Notices |
| Name | Description |
| notices_background | This stylevar controls the background of notices. Notices appear at the top of every page, if their conditions are met. |
| notices_shadow_color | This stylevar controls the shadow color of notices. Notices appear at the top of every page, if their conditions are met. |
Mobile |
These style variables only appear in the vBulletin Mobile Style
[table]
Page Title |
| Name | Description |
| pagetitle_background | This stylevar controls the background of the page title. |
| pagetitle_border | This stylevar controls the border of the page title. |
| pagetitle_color | This stylevar controls the text color of the page title. |
| pagetitle_color | This stylevar controls the text color of the page title description. |
| pagetitle_font | This stylevar controls the font of the page title. |
| pagetitle_link_color | This stylevar controls the link color of the page title. |
| pagetitle_linkhover_color | This stylevar controls the link hover color of the page title. |
| pagetitle_padding | This stylevar controls the padding of the page title. |
Pagination |
| Name | Description |
| pagination_background | This stylevar controls the background of the page navigation. |
| pagination_border | This stylevar controls the border of the page navigation. |
| pagination_color | This stylevar controls the text color of the page navigation. |
| pagination_current_background | This stylevar controls the background of the selected page in the page navigation. |
| pagination_current_border | This stylevar controls the border of the selected page in the page navigation. |
| pagination_current_color | This stylevar controls the text color of the selected page in the page navigation. |
| pagination_font | This stylevar controls the font of the page navigation. |
| pagination_hover_border | This stylevar controls the border of the hover pages in the page navigation. |
Polls |
| Name | Description |
| poll_background | This stylevar controls the background of polls. |
| pollbar1_background | This stylevar controls the first background of the poll bars. This background will be used once every six poll options. |
| pollbar2_background | This stylevar controls the second background of the poll bars. This background will be used once every six poll options. |
| pollbar3_background | This stylevar controls the third background of the poll bars. This background will be used once every six poll options. |
| pollbar4_background | This stylevar controls the fourth background of the poll bars. This background will be used once every six poll options. |
| pollbar5_background | This stylevar controls the fifth background of the poll bars. This background will be used once every six poll options. |
| pollbar6_background | This stylevar controls the sixth background of the poll bars. This background will be used once every six poll options. |
| pollbar_border | This stylevar controls the border of the poll bars. |
| pollbar_height | This stylevar controls the height of the poll bars. |
| pollbars_margin_size | This stylevar controls the margin of the poll bars. |
| pollbars_result_bit_width | This stylevar controls the width of the poll result area. |
PopupMenus |
| Name | Description |
| popup_padding | This stylevar controls the padding of popups. |
| popupmenu_background | This stylevar controls the background of popup menu. |
| popupmenu_border | This stylevar controls the border of popup menu. |
| popupmenu_border_radius | This stylevar controls the radius of popup menu borders. |
| popupmenu_color | This stylevar controls the text color of popup menu. |
| popupmenu_font | This stylevar controls the font of popup menu. |
| popupmenu_height | This stylevar controls the height of popup menu rows. |
| popupmenu_link_background | This stylevar controls the background of popup menu rows. |
| popupmenu_link_color | This stylevar controls the link color of popup menu rows. |
| popupmenu_link_hover_background | This stylevar controls the background of popup menu hover rows. |
| popupmenu_link_hover_color | This stylevar controls the link color of popup menu hover rows. |
| popupmenu_padding | This stylevar controls the padding of popup menu. |
Postbit |
| Name | Description |
| diff_add_background | This stylevar controls the background of added text in the post edit history. |
| diff_remove_background | This stylevar controls the background of removed text in the post edit history. |
| diffadd_color | This stylevar controls the text color of added text in the post edit history. |
| diffremove_color | This stylevar controls the text color of removed text in the post edit history. |
| post_title_font | This stylevar controls the font of post titles. This includes forums posts, private messages, forum announcements, calendar events and user notes. |
| postbit_background | This stylevar controls the background of posts. This includes forums posts, private messages, forum announcements, calendar events and user notes. |
| postbit_border | This stylevar controls the border of posts. This includes forums posts, private messages, forum announcements, calendar events and user notes. |
| postbit_color | This stylevar controls the text color of posts. This includes forums posts, private messages, forum announcements, calendar events and user notes. |
| postbit_control_background | This stylevar controls the background of the post buttons. This includes forums posts, private messages, forum announcements, calendar events and user notes. |
| postbit_control_border | This stylevar controls the border of the post buttons. This includes forums posts, private messages, forum announcements, calendar events and user notes. |
| postbit_control_color | This stylevar controls the text color of the post buttons. This includes forums posts, private messages, forum announcements, calendar events and user notes. |
| postbit_control_font | This stylevar controls the font of the post buttons. This includes forums posts, private messages, forum announcements, calendar events and user notes. |
| postbit_control_hover_background | This stylevar controls the background of the hover post buttons. This includes forums posts, private messages, forum announcements, calendar events and user notes. |
| postbit_control_hover_border | This stylevar controls the border of the hover post buttons. This includes forums posts, private messages, forum announcements, calendar events and user notes. |
| postbit_control_hover_color | This stylevar controls the text color of the hover post buttons. This includes forums posts, private messages, forum announcements, calendar events and user notes. |
| postbit_control_padding | This stylevar controls the padding of the post buttons. This includes forums posts, private messages, forum announcements, calendar events and user notes. |
| postbit_deleted_background | This stylevar controls the background of soft deleted posts. |
| postbit_font | This stylevar controls the font of posts. This includes forums posts, private messages, forum announcements, calendar events and user notes. |
| postbit_foot_background | This stylevar controls the background of post footers. This includes forums posts, private messages, forum announcements, calendar events and user notes. |
| postbit_foot_separator | This stylevar controls the line between different buttons in post footers. This includes forums posts, private messages, forum announcements, calendar events and user notes. |
| postbit_userinfo_background | This stylevar controls the background of the user information area in posts. This includes forums posts, private messages, forum announcements, calendar events and user notes. |
| postbit_userinfo_border | This stylevar controls the border of the user information area in posts. This includes forums posts, private messages, forum announcements, calendar events and user notes. |
| postbithead_background | This stylevar controls the background of post headers. This includes forums posts, private messages, forum announcements, calendar events and user notes. |
| postbithead_border | This stylevar controls the border of post headers. This includes forums posts, private messages, forum announcements, calendar events and user notes. |
| postbithead_color | This stylevar controls the text color of post headers. This includes forums posts, private messages, forum announcements, calendar events and user notes. |
| postbithead_font | This stylevar controls the font of post headers. This includes forums posts, private messages, forum announcements, calendar events and user notes. |
| postbitlegacy_userinfo_width | This stylevar controls the width of the user information area in posts when using the vertical (two column) post model. This includes forums posts, private messages, forum announcements, calendar events and user notes. |
| postbittitle_border | This stylevar controls the line between the post title and the post content. This includes forum posts, forum announcements and private messages. |
| signature_border | This stylevar controls the line between the signature and the post content. This includes forum posts, forum announcements and private messages. |
Profile |
| Name | Description |
| profile_content_subsection_border | This stylevar controls the line between each infraction in the user profile infraction tab. |
| profile_sidebar_avatar_backgroundColor | This stylevar controls the background of profile pictures in user profiles. |
| profile_sidebar_avatar_border | This stylevar controls the border of images in the profile sidebar. This includes profile picture, avatar, friends' avatars, group icons and album covers. |
| profile_sidebar_avatar_maxWidth | This stylevar controls the width of images in the profile sidebar. This includes group icons and album covers. |
| profile_sidebar_width | This stylevar controls the width of the profile sidebar. |
| profile_tiny_avatar | This stylevar controls the size of avatars in the profile sidebar friend block. |
| postbit_lite_background | This stylevar controls the background of the left column.Warning: this stylevar also controls the background of Comment areas. | [/td]
SecondaryContent |
| Name | Description |
| secondarycontent_background | This stylevar controls the background of the "What's Going On?" block on the forum home page and of the blocks at the bottom of forumdisplay and showthread pages. |
| secondarycontent_border | This stylevar controls the border of the "What's Going On?" block on the forum home page and of the blocks at the bottom of forumdisplay and showthread pages. |
| secondarycontent_color | This stylevar controls the text color of the "What's Going On?" block on the forum home page and of the blocks at the bottom of forumdisplay and showthread pages. |
| secondarycontent_font | This stylevar controls the font of the "What's Going On?" block on the forum home page and of the blocks at the bottom of forumdisplay and showthread pages. |
| secondarycontent_header_background | This stylevar controls the background of the header of the "What's Going On?" block on the forum home page and of the blocks at the bottom of forumdisplay and showthread pages. |
| secondarycontent_header_border | This stylevar controls the border of the header of the "What's Going On?" block on the forum home page and of the blocks at the bottom of forumdisplay and showthread pages. |
| secondarycontent_header_color | This stylevar controls the text color of the header of the "What's Going On?" block on the forum home page and of the blocks at the bottom of forumdisplay and showthread pages. |
| secondarycontent_header_font | This stylevar controls the font of the header of the "What's Going On?" block on the forum home page and of the blocks at the bottom of forumdisplay and showthread pages. |
| secondarycontent_subheader_fontSize | This stylevar controls the font size of the sub-header of the "What's Going On?" block on the forum home page and of the blocks at the bottom of forumdisplay and showthread pages. |
Sidebar |
| Name | Description |
| sidebar_background | This stylevar controls the background of sidebars. |
| sidebar_border | This stylevar controls the border of sidebars. |
| sidebar_content_background | This stylevar controls the background of sidebar contents. |
| sidebar_content_bevel | This stylevar controls the inner top border of sidebar contents. |
| sidebar_content_border | This stylevar controls the border of sidebar contents. |
| sidebar_content_color | This stylevar controls the text color of sidebar contents. |
| sidebar_content_fontSize | This stylevar controls the font size of sidebar contents. |
| sidebar_content_link_color | This stylevar controls the link color of sidebar contents. |
| sidebar_content_link_hover_color | This stylevar controls the link hover color of sidebar contents. |
| sidebar_content_padding | This stylevar controls the padding of sidebar contents. |
| sidebar_contentavatar_width | This stylevar controls the width of sidebar content avatars. |
| sidebar_contentlist_separator | This stylevar controls the line between different sidebar contents in the same block. |
| sidebar_contentseparator_background | This stylevar controls the background of the sidebar block separator. |
| sidebar_contentseparator_height | This stylevar controls the height of the sidebar block separator. |
| sidebar_header_color | This stylevar controls the text color of sidebar block headers. |
| sidebar_header_fontSize | This stylevar controls the font size of sidebar block headers. |
| sidebar_header_link_color | This stylevar controls the link color of sidebar block headers. |
| sidebar_postbit_header_font | This stylevar controls the font of sidebar content titles. |
| sidebar_postbit_small_fontSize | This stylevar controls the font size of sidebar content details. |
ThreadBit |
| Name | Description |
| threadbit_alt_background | This stylevar controls the alternating background of thread rows in thread lists. |
| threadbit_background | This stylevar controls the background of thread rows in thread lists. |
| threadbit_border | This stylevar controls the border of thread rows in thread lists. |
| threadbit_deleted_background | This stylevar controls the background of soft deleted thread rows in thread lists. |
| threadbit_hilite_background | This stylevar controls the background of sticky thread rows in thread lists. |
| threadbit_iconsize | This stylevar controls the size of the space thread icons can take in thread lists. |
| threadlisthead_background | This stylevar controls the background of thread list headers. |
| threadlisthead_border | This stylevar controls the border of thread list headers. |
| threadlisthead_color | This stylevar controls the text color of thread list headers. |
| threadlisthead_font | This stylevar controls the font of thread list headers. |
| threadlisthead_top_corner_radius | This stylevar controls the radius of the top corners of thread list headers. |
ToolsMenu |
| Name | Description |
| toolsmenu_background | This stylevar controls the background of tool menu. |
| toolsmenu_border | This stylevar controls the border of tool menu. |
| toolsmenu_color | This stylevar controls the text color of tool menu. |
| toolsmenu_fontSize | This stylevar controls the font size of tool menu. |
| toolsmenu_link_color | This stylevar controls the link color of tool menu. |
| toolsmenu_linkhover_color | This stylevar controls the link hover color of tool menu. |
UserCP |
| Name | Description |
| usercp_hr_seperator | This stylevar controls the line between private message/subscription folders and the other private message/subscription links in the navigation column in the setting pages. |
| usercp_nav_blockbody_background | This stylevar controls the background of the block body in the navigation column in the setting pages. |
| usercp_nav_blockbody_border | This stylevar controls the border of the block body in the navigation column in the setting pages. |
Blog |
| Name | Description |
| vbblog_bloglist_avatar_width | This stylevar controls the width of avatars in blog entry lists. |
| vbblog_bloglist_avatar_width_mobile | This stylevar controls the width of avatars in blog entry lists. |
| vbblog_bloglist_avatar_width_name_mobile | Blog Entry List Avatar Width |
| vbblog_bloglist_border | This stylevar controls the line between different blog entries in blog entry lists. |
| vbblog_bloglist_header_color | This stylevar controls the text color of blog entry titles. |
| vbblog_body_background | This stylevar controls the background of the blog body. The body is the area below the header, which contains all other elements. |
| vbblog_entry_background | This stylevar controls the background of blog entries. |
| vbblog_featured_background | This stylevar controls the background of featured blog entries in blog entry lists. |
| vbblog_featured_border | This stylevar controls the border of featured blog entries in blog entry lists. |
| vbblog_featured_header_background | This stylevar controls the background of featured blog entry headers in blog entry lists. |
| vbblog_featured_header_color | This stylevar controls the text color of featured blog entry headers in blog entry lists. |
| vbblog_listrow_background | This stylevar controls the background of rows in blog lists and in blog category lists. |
| vbblog_pagetitle_border | This stylevar controls the line between the page title and the rest of the page content in the blog. |
| vbblog_pagetitle_color | This stylevar controls the text color of the page title in the blog. |
| vbblog_pagetitle_color | This stylevar controls the text color of the page title description in the blog. |
| vbblog_pagetitle_font | This stylevar controls the font of the page title description in the blog. |
| vbblog_pagetitle_font | This stylevar controls the font of the page title in the blog. |
| vbblog_sidebar_avatar_border | This stylevar controls the border of the blog owner avatar in the blog sidebar. |
| vbblog_sidebar_tabs_background | This stylevar controls the background of the blog sidebar tabs. |
| vbblog_sidebar_tabs_border | This stylevar controls the border of the blog sidebar tabs. |
| vbblog_sidebar_tabs_color | This stylevar controls the link color of the blog sidebar tabs. |
| vbblog_sidebar_tabs_font | This stylevar controls the font of the blog sidebar tabs. |
| vbblog_sidebar_tabs_height | This stylevar controls the height of the blog sidebar tabs. |
| vbblog_sidebar_tabs_selected_background | This stylevar controls the background of the selected blog sidebar tab. |
| vbblog_sidebar_width | This stylevar controls the width of the blog sidebar. |
vbcms |
| Name | Description |
| vbcms_article_background | This stylevar controls the background of CMS content. |
| vbcms_article_preview_header_font | This stylevar controls the font of titles in CMS content previews. |
| vbcms_article_preview_image_border | This stylevar controls the border of CMS content preview images. |
| vbcms_article_preview_image_margin | This stylevar controls the margin of CMS content preview images. |
| vbcms_article_preview_image_outline | This stylevar controls the outer line of CMS content preview images. |
| vbcms_article_preview_object_size | This stylevar controls the maximum size of video in CMS content previews. |
| vbcms_body_background | This stylevar controls the background of the CMS body. The body is the area below the header, which contains all other elements. |
| vbcms_calendarwidget_day_font | This stylevar controls the font of days in the CMS calendar widget. |
| vbcms_calendarwidget_monthnav_background | This stylevar controls the background of the month navigation in the CMS calendar widget. |
| vbcms_calendarwidget_monthnav_font | This stylevar controls the font of the month navigation in the CMS calendar widget. |
| vbcms_calendarwidget_weekdays_background | This stylevar controls the background of week days in the CMS calendar widget. |
| vbcms_calendarwidget_weekdays_border | This stylevar controls the border of week days in the CMS calendar widget. |
| vbcms_calendarwidget_weekdays_font | This stylevar controls the font of week days in the CMS calendar widget. |
| vbcms_content_separator | This stylevar controls the line between different CMS content in CMS content lists. |
| vbcms_header_borderBottom | This stylevar controls the bottom border of CMS content headers. |
| vbcms_header_borderTop | This stylevar controls the top border of CMS content headers. |
| vbcms_header_color | This stylevar controls the text color of CMS content headers. |
| vbcms_header_font | This stylevar controls the font of CMS content headers. |
| vbcms_header_margin | This stylevar controls the margin of CMS content headers. |
| vbcms_header_padding | This stylevar controls the padding of CMS content headers. |
| vbcms_navwidget_menuitem_background | This stylevar controls the background of rows in the CMS navigation widgets. |
| vbcms_navwidget_menuitem_bevel | This stylevar controls the inner top border of rows in the CMS navigation widgets. |
| vbcms_navwidget_menuitem_border | This stylevar controls the border of rows in the CMS navigation widgets. |
| vbcms_navwidget_menuitem_color | This stylevar controls the text color of rows in the CMS navigation widgets. |
| vbcms_navwidget_menuitem_font | This stylevar controls the font of rows in the CMS navigation widgets. |
| vbcms_navwidget_menuitem_hover_background | This stylevar controls the background of hover rows in the CMS navigation widgets. |
| vbcms_navwidget_menuitem_hover_bevel | This stylevar controls the inner top border of hover rows in the CMS navigation widgets. |
| vbcms_navwidget_menuitem_hover_border | This stylevar controls the border of hover rows in the CMS navigation widgets. |
| vbcms_navwidget_menuitem_hover_color | This stylevar controls the text color of hover rows in the CMS navigation widgets. |
| vbcms_widget_block_padding | This stylevar controls the padding of CMS widgets. |
| vbcms_widget_header_padding | This stylevar controls the padding of CMS widget headers. |
| vbcms_widget_margin | This stylevar controls the margin of CMS widgets. |
Widgets |
HTML Doctype |
The HTML doctype StyleVar controls the first line of the HTML code for every vBulletin page.
It is used to instruct the browser how to render the page, according to a particular type of HTML.
For example, the HTML doctype for XHTML 1.0 Transitional, which is the default for vBulletin 3 is this:
<!DOCTYPE html PUBLIC "-//W3C//DTD XHTML 1.0 Transitional//EN"
"https://www.w3.org/TR/xhtml1/DTD/xhtml1-transitional.dtd"><!DOCTYPE HTML PUBLIC "-//W3C//DTD HTML 4.0 Transitional//EN">
Note:
You may leave the HTML doctype completely blank, but if you do so, Internet Explorer 6 will use the 'Quirky Rendering' mode as used by previous versions of Internet Explorer.
When attempting to achieve a layout that will look the same between Internet Explorer, Mozilla, Opera and all the other browsers out there, 'Quirky Rendering' mode can be extremely unhelpful!
When attempting to achieve a layout that will look the same between Internet Explorer, Mozilla, Opera and all the other browsers out there, 'Quirky Rendering' mode can be extremely unhelpful!
Main Table Width |
The main table width StyleVar is used to set the overall width of vBulletin pages.
It can accept values both as a percentage of the total page width for a 'liquid' layout, or an explicit value set in pixels to create a fixed layout.
Here you can see examples of the same board with different values for $stylevar[outertablewidth].
Note:
If you wish to enter a value in pixels, you should enter the number alone, do not add 'px' to the value.
For example: 640.
To set the value as a percentage, simply enter the percentage value, followed by the % symbol.
For example: 85%.
For example: 640.
To set the value as a percentage, simply enter the percentage value, followed by the % symbol.
For example: 85%.
Example of $stylevar[outertablewidth] in use:
<table width="$stylevar[outertablewidth]" align="center">
<tr>
    <td>This table's width is set by $stylevar[outertablewidth].</td>
</tr>
</table><div style="text-align: center">
<div style="width: $stylevar[outerdivwidth]; text-align: left">
This div's width is being set by $stylevar[outerdivwidth].
</div>
</div>Creating a 'Liquid' Layout |
However, you may want to change your own board to use a 'liquid' layout, which will expand to the full width of the browser window. If you don't change your default style, you can still create a separate style with a liquid layout to complement your fixed-width version.
| StyleVar Name | vBulletin Default Value | Value for Liquid Layout |
| Main Table Width $stylevar[outertablewidth] | 760 | 100% |
| Form Width $stylevar[formwidth] | 640px | auto |
| User Control Panel Form Width $stylevar[formwidth_usercp] | 480px | auto |
If you would like to have a little screen space left over, change the Main Table Width value to 95% or a similar figure, rather than the 100% specified.
Spacer Size |
The spacer size StyleVar is used to define the width in pixels of the space between the edge of the vBulletin page and the content within it.
The red arrow on this image shows the distance controlled by $stylevar[spacersize].
![]()
Note:
Do not add 'px' to the number you specify as the value for $stylevar[spacersize].
Inner Border Width |
The inner border width StyleVar is used as the value for the 'cellspacing' attribute of all tables in vBulletin. It controls the width of the border apparent between table cells.
By setting a value of 1 or greater, a margin will appear between table cells, showing the background color of the underlying table as defined in the .tborder CSS class.
At the default value of 1, a thin, one pixel border is seen between table cells:

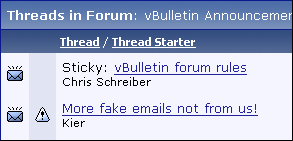
<table class="tborder" cellspacing="$stylevar[cellspacing]" cellpadding="5">
<tr>
    <td class="alt1">First Cell</td>
    <td class="alt2">Second Cell</td>
</tr>
</table>Note:
Do not add 'px' to the value of this StyleVar.
Table Cell Padding |
The table cell padding StyleVar is used as the value for the 'cellpadding' attribute of all tables in vBulletin. It controls the amount of margin shown between the content of a cell and its border.
At the default value of 6, a wide margin is apparent between the content of each cell and its surrounding border.
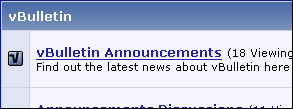
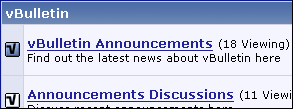
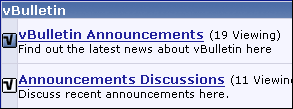
<table class="tborder" cellspacing="1" cellpadding="$stylevar[cellpadding]">
<tr>
    <td class="alt1">First Cell</td>
    <td class="alt2">Second Cell</td>
</tr>
</table>Note:
Do not add 'px' to the value of this StyleVar.
Form Element Spacer Size |
The form element spacer size StyleVar defines a distance in pixels between elements of a form in vBulletin. Its purpose is to allow a comfortable distance to be placed between form controls in order to provide a less cluttered appearance to forms.
At the default $stylevar[formspacer] value of 3, a small gap is placed between controls on a form.
![]()
![]()
Note:
Do not add 'px' to the number you specify as the value for $stylevar[spacersize].
Form Width |
The form width StyleVar is used to set the width of all forms in vBulletin. Its primary function is to restrict the way that forms can stretch to fill all the available space in a window, which can cause form elements and their descriptions to stretch to levels at which the form becomes difficult to manage.
Here, at the default value of 640px, the form elements do not expand with the rest of the page, resulting in an easy-to-manage set of controls located in the center of the page:
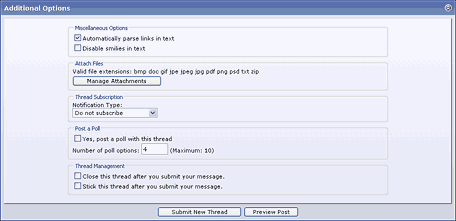
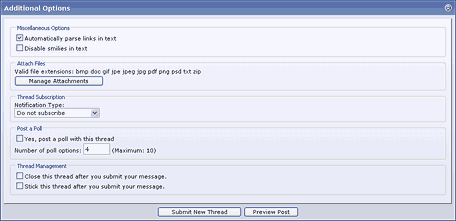
- 640px (640 pixels, fixed width)
- 75% (75% of available width)
- auto (Expand to fill all available space)
<div style="width:$stylevar[formwidth]">
  <form method="index.php" method="post">
    <fieldset>
      <legend>My Form Example</legend>
      <input type="text" name="mytextfield" value="Hello" />
      This is my text field.
    </fieldset>
  </form>
</div>
Note:
This StyleVar is used as a CSS value. If you enter a width in pixels, you must add 'px' after the number of pixels desired, for example: '500px'.
User CP Form Width |
The user control panel form width StyleVar does exactly the same job as the form width StyleVar $stylevar[formwidth], except that it allows the width of the navigation panel in the User Control Panel to be taken into account.
The red arrow shows the width controlled by $stylevar[formwidth_usercp].
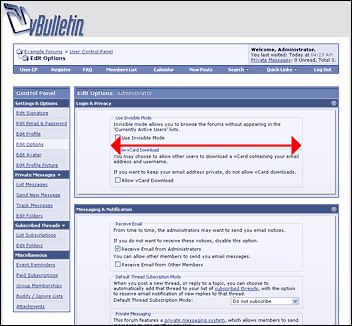
Message Area Width |
The message area with StyleVar controls with width of the text input area used for posting messages etc. in vBulletin.
The red arrow indicates the width controlled by this StyleVar.
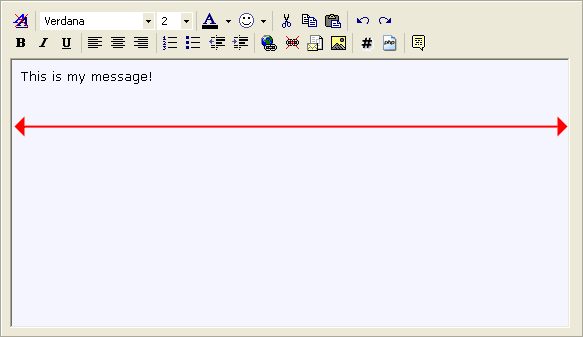
- 540px (540 pixels, fixed width)
- 75% (75% of available width)
- auto (Expand to fill all available space)
Warning:
While it is possible to use values of 'auto' or a percentage width, testing has shown that many browsers produce unpredictable results when using these methods for the message width StyleVar.
It is therefore recommended that a fixed pixel value such as '540px' be used in this case.
It is therefore recommended that a fixed pixel value such as '540px' be used in this case.
User CP Message Width |
This StyleVar is used to control the width of message input text boxes within the User Control Panel (such as the input area for the Private Message posting page).
Its functionality is identical to that of $stylevar[messagewidth], but it allows the width of the navigation panel in the User Control Panel to be taken into account.
The red arrow indicates the width controlled by this StyleVar:
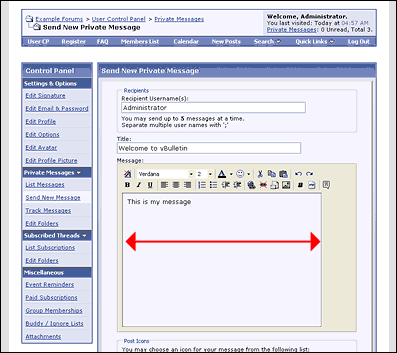
Code Block Width |
The code block width StyleVar is used to set the width of blocks of code in messages, as defined by the [CODE], [PHP] and [HTML] tags.
The red arrow indicates the width controlled by the $stylevar[codeblockwidth] StyleVar.
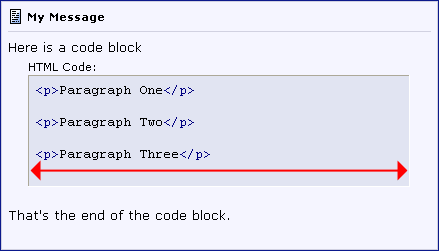
- 640px (640 pixels, fixed width)
- 75% (75% of available width)
- auto (Expand to fill all available space)
Note:
This StyleVar is used as a CSS value. If you enter a width in pixels, you must add 'px' after the number of pixels desired, for example: '500px'.
Title Image |
The title image StyleVar stores the URL of the main logo image that usually appears in the header template of vBulletin.
Rather than being bunched in with all the other images, the title image is given its own StyleVar in order to make it as easy as possible to make simple customizations to your board, such as changing the colors and the logo image.
The red border indicates the position of the title image at the top-left of a vBulletin page:
- A complete URL, such as https://www.example.com/forums/images/titleimage.gif
- An absolute path URL such as /forums/images/titleimage.gif
- A file path relative to your forum's URL such as images/titleimage.gif
<img src="$stylevar[titleimage]" border="0" alt="$vboptions[bbtitle]" />
Image Directory Paths |
| $stylevar[imgdir_button] | Button Images Folder |
| $stylevar[imgdir_status] | Item Status Icon Folder |
| $stylevar[imgdir_attach] | Attachment Icons Folder |
| $stylevar[imgdir_misc] | Miscellaneous Images Folder |
| $stylevar[imgdir_editor] | Text Editor Controls Folder |
| $stylevar[imgdir_poll] | Poll Images Folder |
| $stylevar[imgdir_rating] | Ratings Images Folder |
| $stylevar[imgdir_reputation] | Reputation Images Folder |
The purpose of having several different StyleVars pointing to different image directories is to allow the administrator to choose which images are shared between styles, and which images are unique to each style.
For example, if a board has three different styles called 'Red', 'Green' and 'Blue', where the only difference between the three styles is the color scheme, the administrator may decide that each style will share all of its images, except for the button images, where he has created specially colored versions of the buttons to match the color schemes of the three styles.
In this case, all the image directory StyleVars could point to the same group of directories, with the exception of the $stylevar[imgdir_button] StyleVar, which would have a unique value for each style to point to the appropriate directory containing the colored buttons for each style.
In use, you will find the image directory StyleVars throughout the templates whenever an image is referenced. For example:
<img src="$stylevar[imgdir_button]/newthread.gif" alt="Post New Thread" />
If our 'Red', 'Green' and 'Blue' styles have unique values for the button images folder, we might see that StyleVar being evaluated in the templates in this sort of manner:
'Red' Style
<img src="images/red_buttons/newthread.gif" alt="Post New Thread" />
<img src="images/greenButtons/newthread.gif" alt="Post New Thread" />
<img src="images/buttons_for_blue/newthread.gif" alt="Post New Thread" />
- A complete URL, such as https://www.example.com/forums/images/buttons
- An absolute path URL such as /forums/images/buttons
- A file path relative to your forum's URL such as images/buttons
Warning:
Do not include a trailing slash at the end of your image directory paths.
This is correct:
images/buttons
This is incorrect:
images/buttons/
This is correct:
images/buttons
This is incorrect:
images/buttons/
Replacement Variables |
Their uses are many and when used correctly they can be very powerful. A common use for replacement variables is to correct annoying spelling mistakes. For example, on the vBulletin Community Forums a replacement variable exists to replace all instances of the incorrect abbreviation for vBulletin VBB with the correct abbreviation vB.
Another use for replacement variables is to insert commonly-used blocks of HTML. For example, a replacement variable could be set up to replace <tablestart> with <table class="tborder" cellpadding="6" cellspacing="1" border="0" width="100%" align="center">.
Therefore, your templates could have blocks of code like this:
<tablestart>
<tr>
    <td class="alt1">Cell contents...</td>
</tr>
</table>
<table class="tborder" cellpadding="6" cellspacing="1" border="0" width="100%" align="center">
<tr>
    <td class="alt1">Cell contents...</td>
</tr>
</table>
The replacement variable system is activated in the last stages of page processing before the HTML is delivered to a visitor's browser. The system searches for target text in the completed, parsed templates. In some ways this can be very useful, but there are caveats of which you should be aware.
Warning:
While powerful, replacement variables can also break the functionality of your board if used incorrectly.
For example, creating a replacement variable to search for 'html' and replace it with 'HTML', any hyperlinks pointing to files with a .html suffix will have those links replaced with .HTML, which is not the same file as far as Unix web servers are concerned.
Worse still, you might choose to use a replacement variable to turn every instance of the word home into a hyperlink pointing to your home page: <a href="home.html">home</a>.
While this will work, you will have the situation where the word 'home' is used in locations where creating a hyperlink would cause invalid HTML, such as this:
<img src="home.gif" alt="" />...which would end up being delivered to the browser as
<img src="<a href="home.html">home</a>.gif" alt="" />...which is obviously invalid HTML and will not function correctly.
Preventing Visitors from Activating Replacement Variables |
For this reason, it is recommended that you set any replacement variables that should be used in templates only to appear as HTML tags, such as <myreplacement>.
This is done because most forums do not allow visitors to post raw HTML in their messages (this is seen as a serious security risk). In forums where HTML posting is disallowed, any special HTML characters such as the < and > characters are replaced with their equivalent HTML character entities to prevent the HTML code from being interpreted as HTML rather than printed text.
For example, the < character is replaced with < and the > character is replaced with >. This replacing of special HTML characters makes it impossible for a user to post <myreplacement> in their messages, as it would be translated into <myreplacement>, which does not match the trigger text. It will therefore not be replaced with the replacement text for your <myreplacement> variable.
Where are the Replacement Vars from vB2? |
Where did they all go?
The answer is that all of the replacement variables from vBulletin 2 have been translated into CSS classes, or have been migrated to the new StyleVars system.
The new systems are less processor-intensive (easier on your server's resources) than using replacement variables, and offer a lot more flexibility in the way that they can be used.
The following table lists all the default vBulletin 2 replacement variables, and shows how they have been translated for use in vBulletin 3.
| Item Name | Replacement Text | vBulletin 3 Equivalent | Description |
| HTML Doctype | {htmldoctype} | StyleVar: HTML Doctype | The HTML Doctype replacement variable has been migrated directly to the HTML Doctype StyleVar. |
| Body Tag | <body> | CSS: Body class | All attributes controlled by the <body> tag replacement variable in vBulletin 2 are now managed by the Body CSS class. |
| Main Table Width | {tablewidth} | StyleVar: Main Table Width | The width of vBulletin tables; controlled by the {tablewidth} replacement variable in vBulletin 2, is now controlled by the Main Table Width StyleVar. |
| Content Table Width | {contenttablewidth} | StyleVar: Spacer Size | The width of tables inside the main page body; previously controlled by the {contenttablewidth} replacement variable, is now handled in a different way by the Spacer Size StyleVar. |
| Outer Borders Width | {tableouterborderwidth} | CSS: Table Border class | The width of the border around tables in vBulletin is now controlled via CSS as part of the Table Border class. |
| Inner Borders Width | {tableinnerborderwidth} | StyleVar: Inner Border Width | Control of the amount of spacing between table cells has been transferred to the Inner Border Width StyleVar. |
| 'Extra' Table Attributes | {tableouterextra} {tableinnerextra} {tableinvisibleextra} | n/a | In vBulletin 2 these replacement variables were used to allow arbitrary code to be inserted into <table> tags. This functionality is no longer necessary, as any code that might have been inserted here can now be emulated using CSS. |
| Page Background / Text Colors | {pagebgcolor} {pagetextcolor} | CSS: Page Background class | The background color and text color of the main page body is now controlled by the Page Background CSS class. |
| Table Border Color | {tablebordercolor} | CSS: Table Border class | The {tablebordercolor} replacement variable was used to set the color of all borders around and inside <table> tags in vBulletin 2. This functionality is now managed by CSS in the Table Border class. |
| Category Strip Background / Text Colors | {categorybackcolor} {categoryfontcolor} | CSS: Category Strips class | The background and text colors used in category strips and main table title bars is now controlled by the Category Strips CSS class. |
| Table Heading Background / Text Colors | {tableheadbgcolor} {tableheadtextcolor} | CSS: Table Header class | Previously controlled by the {tableheadbgcolor} and {tableheadtextcolor} replacement variables, the style of column headings is now a part of the Table Header CSS class. |
| First Alternating Table Background Color | {firstaltcolor} | CSS: First Alternating Color class | In vBulletin 2, only the background color of elements using the First Alternating Color could be specified. In vBulletin 3 the First Alternating Color CSS class allows significantly more control. |
| Second Alternating Table Background Color | {secondaltcolor} | CSS: Second Alternating Color class | Partnering the First Alternating Color CSS class, the Second Alternating Color CSS class defines the style of elements previously colored with the {secondaltcolor} replacement variable. |
| Hyperlink Normal / Hover Colors | {linkcolor} {hovercolor} | CSS: Body and Page Background classes | vBulletin 2 allowed administrators to control the color of standard hyperlinks, and to also specify a color for those links when a mouse pointer is hovered over them. In vBulletin 3, almost every individual CSS class can define its own settings for hyperlink styling, although it is often the case that only the Body CSS class will have link styles defined, in which case this class will control all hyperlinks. |
| Time Color | {timecolor} | CSS: Time Color class | In order to control the color of times shown on vBulletin pages, it is now necessary to look at the Time Color class, which allows not only the color but a variety of other attributes to be controlled for the styling of time displays. |
| Calendar Colors | {calbgcolor} {calbirthdaycolor} {caldaycolor} {calprivatecolor} {calpubliccolor} {caltodaycolor} | n/a | The various colors defined by the calendar color replacement variables in vBulletin 2 have become redundant with the new calendar system in vBulletin 3. |
| Image Folder Path | {imagesfolder} | StyleVar: Image Directory Paths | While vBulletin 2 defined a single images directory with the {imagesfolder} replacement variable, vBulletin 3 defines a variety of folders to serve different purposes. These are controlled by the Image Directory Paths StyleVars. |
| Title Image Path | {titleimage} | StyleVar: Title Image | The path controlled by the Title Image Path replacement variable is now controlled by the Title Image StyleVar in vBulletin 3. |
| New Thread / Reply / Closed Image Paths | {newthreadimage} {replyimage} {closedthreadimage} | n/a | While vBulletin 2 specified replacement variables for three button images relating to posting new threads and replying to posts, all of these images are now found in the $stylevar[imgdir_button] StyleVar, one of the Image Directory Path StyleVars. |
| Main Font | <normalfont> | CSS: Body and <td>, <th>, <p>, <li> classes | In vBulletin 2 it was necessary to surround all text with <normalfont> tags in order to have it use the fonts and sizes specified. In vBulletin 3 this is no longer the case, and text display is controlled by the Body and <td>, <th>, <p>, <li> CSS classes. |
| Small Font | <smallfont> | CSS: Small Font class | When a smaller-than-normal font size is required in vBulletin 3, it is a simple matter of applying the Small Font CSS class to an HTML tag surrounding the text to be made small. |
| Large Font | <largefont> | n/a | The <largefont> replacement variable was used so infrequently in vBulletin 2 that it was decided not to waste resources on replicating it in vBulletin 3, so it is no longer available. |
| Highlighted Font | <highlight> | CSS: Highlighted Font class | In vBulletin 2 the color of highlighted text was controlled by the <highlight> replacement variable, but much more control is afforded by the vBulletin 3 Highlighted Font CSS class that replaces it. |
| Textarea Column Settings | {textareacols_IE} {textareacols_NS4} {textareacols_NS6} | n/a | In the bad old days before CSS was widely supported by browsers it was necessary to rely on the cols="x" attribute of <textarea> tags to specify the width of a <textarea>. Different browsers interpreted this value with a different resultant width, resulting in the need for a set of replacement variables in order to achieve roughly the same width for <textarea> tags in all browsers. With CSS the 'width' style attribute can be used to control the width more precisely, rendering these three replacement variables obsolete. |
Style Inheritance |
In essence, this means that you can create an unlimited number of styles in which your board can be viewed, and customizations made in one style will be inherited by all of its 'child' styles.
Inheritance Example |
Many site owners will want to customize the look of their vBulletin installation so that it fits in with the style of the rest of the site. This is normally done by editing the colors used by vBulletin, and by editing the header and footer templates.
Let us imagine that we want to customize your header and footer templates, but we also want to offer three different color schemes for our visitors to choose between. For argument's sake, we'll call these the 'Red', 'Green' and 'Blue' styles.
We could create three new styles, calling one 'Blue', one 'Green' and one 'Red', then customize the header and footer templates in each style. That would be a perfectly valid solution, but has one serious disadvantage, in that should we decide that we want to alter the HTML in the customized header template, we would need to go through and edit the template in each of our three styles individually.

Each of these child styles will inherit the customized header and footer templates from the 'Custom Header / Footer' parent style, so we will not need to edit that template in the child styles, and if we choose to change the HTML of either the header or footer templates at some point in the future, we need only edit those templates in the parent style, and the changes will be automatically inherited by the three child styles.
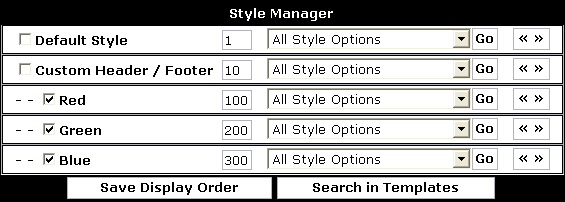
In the next section we will look into the mechanics behind this system in order to gain a good understanding of how to use vBulletin styles most effectively.
Inheritance Mechanics |
In order to explain this in simple terms, let us assume that a vBulletin style consists of [x] individual elements, those being a background color, a text color, a font style and a few templates. For the purposes of this example, we will represent the contents of a style like this:
| Background Color | Text Color | Font Style | Header Template | Footer Template | |
| vBulletin Default | #FFFFFF | #000000 | 10pt verdana, arial, helvetica, sans-serif | <p>This is the default 'header' template!</p> | <div>This is the default 'footer' template!</div> |
| Background Color | Text Color | Font Style | Header Template | Footer Template | |
| vBulletin Default | #FFFFFF | #000000 | 10pt verdana, arial, helvetica, sans-serif | <p>This is the default 'header' template!</p> | <div>This is the default 'footer' template!</div> |
| Custom Header / Footer | #FFFFFF | #000000 | 10pt verdana, arial, helvetica, sans-serif | <p>This is my custom 'header' template!</p> | <div>This is my custom 'footer' template!</div> |
We will now add the final branch of the style tree from our previous example, namely the 'Blue' style.
| Background Color | Text Color | Font Style | Header Template | Footer Template | |
| vBulletin Default | #FFFFFF | #000000 | 10pt verdana, arial, helvetica, sans-serif | <p>This is the default 'header' template!</p> | <div>This is the default 'footer' template!</div> |
| Custom Header / Footer | #FFFFFF | #000000 | 10pt verdana, arial, helvetica, sans-serif | <p>This is my custom 'header' template!</p> | <div>This is my custom 'footer' template!</div> |
| Blue | #0000FF | #FFFFFF | 10pt verdana, arial, helvetica, sans-serif | <p>This is my custom 'header' template!</p> | <div>This is my custom 'footer' template!</div> |
Furthermore, if we now decided to customize the header template in the 'Blue' style, we would have something like this:
| Background Color | Text Color | Font Style | Header Template | Footer Template | |
| vBulletin Default | #FFFFFF | #000000 | 10pt verdana, arial, helvetica, sans-serif | <p>This is the default 'header' template!</p> | <div>This is the default 'footer' template!</div> |
| Custom Header / Footer | #FFFFFF | #000000 | 10pt verdana, arial, helvetica, sans-serif | <p>This is my custom 'header' template!</p> | <div>This is my custom 'footer' template!</div> |
| Blue | #0000FF | #FFFF00 | 10pt verdana, arial, helvetica, sans-serif | <p>This is my special BLUE 'header' template!</p> | <div>This is my custom 'footer' template!</div> |
To illustrate the ability of vBulletin's style system to allow a theoretically infinte level of parent/child relationships between styles, we will now add a child style to the 'Blue' style, in which we will set the font size to be extra large. We will call this style 'Big Font Blue'.

| Background Color | Text Color | Font Style | Header Template | Footer Template | |
| vBulletin Default | #FFFFFF | #000000 | 10pt verdana, arial, helvetica, sans-serif | <p>This is the default 'header' template!</p> | <div>This is the default 'footer' template!</div> |
| Custom Header / Footer | #FFFFFF | #000000 | 10pt verdana, arial, helvetica, sans-serif | <p>This is my custom 'header' template!</p> | <div>This is my custom 'footer' template!</div> |
| Blue | #0000FF | #FFFF00 | 10pt verdana, arial, helvetica, sans-serif | <p>This is my special BLUE 'header' template!</p> | <div>This is my custom 'footer' template!</div> |
| Big Font Blue | #0000FF | #FFFF00 | 14pt verdana, arial, helvetica, sans-serif | <p>This is my special BLUE 'header' template!</p> | <div>This is my custom 'footer' template!</div> |
Were we to now customize the font style in the 'Custom Header / Footer' style, the change would automatically be inherited by the 'Blue' style, but would not be inherited by the 'Big Font Blue' style, as it has its own customized version.
| Background Color | Text Color | Font Style | Header Template | Footer Template | |
| vBulletin Default | #FFFFFF | #000000 | 10pt verdana, arial, helvetica, sans-serif | <p>This is the default 'header' template!</p> | <div>This is the default 'footer' template!</div> |
| Custom Header / Footer | #FFFFFF | #000000 | 12pt verdana, arial, helvetica, sans-serif | <p>This is my custom 'header' template!</p> | <div>This is my custom 'footer' template!</div> |
| Blue | #0000FF | #FFFF00 | 12pt verdana, arial, helvetica, sans-serif | <p>This is my special BLUE 'header' template!</p> | <div>This is my custom 'footer' template!</div> |
| Big Font Blue | #0000FF | #FFFF00 | 14pt verdana, arial, helvetica, sans-serif | <p>This is my special BLUE 'header' template!</p> | <div>This is my custom 'footer' template!</div> |
| Background Color | Text Color | Font Style | Header Template | Footer Template | |
| vBulletin Default | #FFFFFF | #000000 | 10pt verdana, arial, helvetica, sans-serif | <p>This is the default 'header' template!</p> | <div>This is the default 'footer' template!</div> |
| Custom Header / Footer | #FFFFFF | #000000 | 12pt verdana, arial, helvetica, sans-serif | <p>This is my custom 'header' template!</p> | <div>This is the default 'footer' template!</div> |
| Blue | #0000FF | #FFFF00 | 12pt verdana, arial, helvetica, sans-serif | <p>This is my special BLUE 'header' template!</p> | <div>This is the default 'footer' template!</div> |
| Big Font Blue | #0000FF | #FFFF00 | 14pt verdana, arial, helvetica, sans-serif | <p>This is my special BLUE 'header' template!</p> | <div>This is the default 'footer' template!</div> |
This diagram illustrates the decision system used by vBulletin when loading each element from a style.
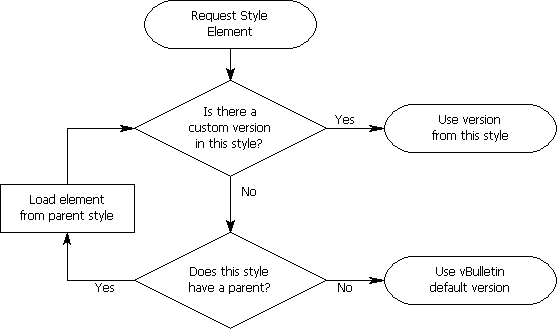
The Style Manager |

- The 'Allow User Selection' Checkbox
This checkbox controls whether or not the style will be available for non-administrators to use. If the checkbox for a style is cleared, only administrators will be able to use that style. - The Style Title Hyperlink
The style title is also a hyperlink. Clicking it will open a new window and show the public area of your vBulletin using the style you clicked, even if the public are not able to use that particular style. - The Display Order Text Box
The small text box containing a number controls the display order of a style. Higher numbers will be displayed later in the listing. This value makes absolutely no difference to the content of the style, and is used soley for convenience of display. - The Style Options Menu
This popup menu contains links to make alterations to the style such as changing its title, downloading the style as a style.xml file etc. - The Expand/Collapse Templates List Button
Clicking the button will open or close the list of templates for the current style.
Note:
- Examples of (modified) vBulletin boards: https://www.vBulletin.com/links.php
- Examples of vBulletin style and template modifications here: https://www.vBulletin.org/forum/
Creating New Styles |
This will bring up the Add New Style interface.
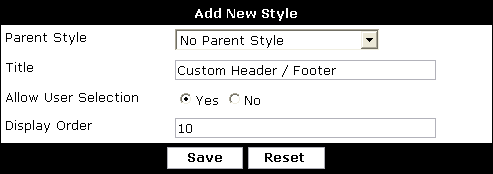
| Parent Style | This menu controls the way that this new style will inherit attributes from other styles that you may have defined. For a complete discussion of vBulletin 3 style inheritance principles, see Style Inheritance. |
| Title | Here you should enter the name you have chosen for your new style |
| Allow User Selection | This Yes/No choice corresponds to the checkbox next to each style on the main Style Manager interface, and affects whether or not your visitors will be able to use this style to view the board. |
| Display Order | This text box expects you to enter a whole number (0, 15, 99, 1007 etc) to affect the position at which this style will appear in any style lists. It corresponds to the display order text box on the main Style Manager interface. |

Creating Child Styles |

You may continue to add further child styles to child styles in order to satisfy any inheritance critera you may require.
Editing Style Settings |
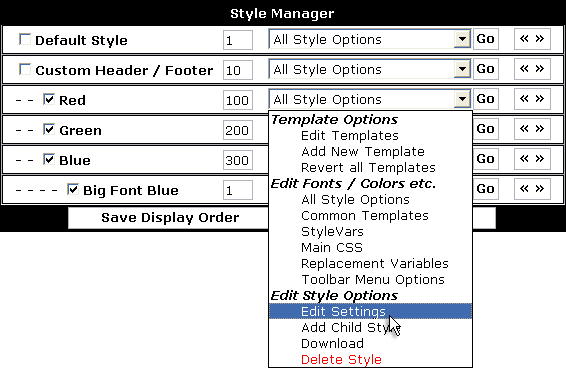
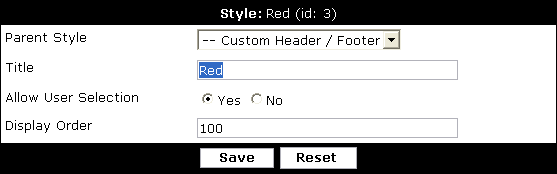
Note:
If you choose to change the parent style, you should bear in mind the changes to your styles that this alteration will make.
For example, if we were to change the parent of the 'Red' style to 'No Parent', any templates, CSS or StyleVars currently being inherited from the 'Custom Header / Footer' style would no longer be inherited. In practice, this would mean that the customized header and footer templates defined by the 'Custom Header / Footer' style would no longer be used by the 'Red' style.
Consider changes such as this before changing the parent of an existing style.
Deleting a Style |
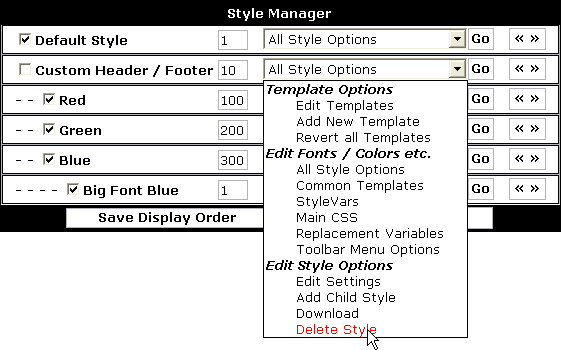
Note:
When you delete a style, any customized templates, CSS, StyleVars or replacement variables belonging to that style will be deleted along with the style.
On the other hand, if the style you choose to delete has one or more child styles, an extra step will be added into the deletion process should you choose to continue with the deletion.
Any child styles of the style you delete will not be deleted, but rather they will be attached to the parent style of the style you have deleted.
For example, if you have a style arrangement of
Custom Header / Footer
-- Red
-- Green
-- Blue
---- Big Font Blue
... and you chose to delete the 'Blue' style, then the child style of 'Blue' will be attached to the parent style of 'Blue', resulting in this:
Custom Header / Footer
-- Red
-- Green
-- Big Font Blue
Note:
When deleting styles that have child styles, be aware that any customizations made in the style to be deleted will no longer appear in the child styles after the style has been deleted.
Editing Fonts, Colors etc. |

The values of each item on the following pages will be shown in a different color depending on whether they are using the default value for that item, if they have been customized, or if their values are being inherited from a parent style.
Consult the Color Key at the top of the page to see which color indicates what status:
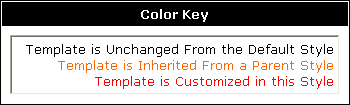
The Common Templates Editor |
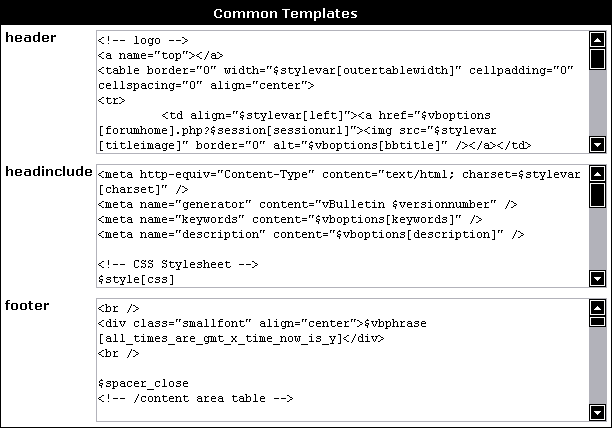
- header
This is the template that appears immediately after the <body> tag at the start of all vBulletin pages. Customizing this template can result in dramatic alterations to the look and feel of your board. - footer
Partnering the header template, this template is included immediately before the </body> tag at the end of all vBulletin pages. The footer footer template is often used to close tags opened in the header template, which affect the entire page. - headinclude
This template is included in the <head> tag of all vBulletin pages, and is often customized to add special Javascripts effects and <meta> tags
When the page reloads, you will see that any customized templates are shown with their text in a different color to indicate its customized status.
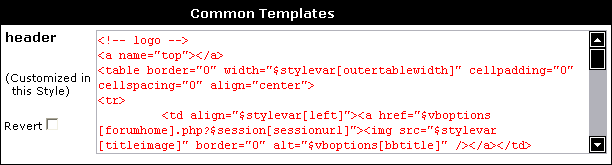
If a common template is being inherited from a customization made in a parent style, the text will be shown in a different color again to indicate this.
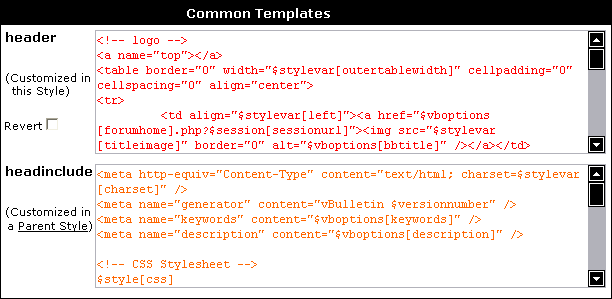
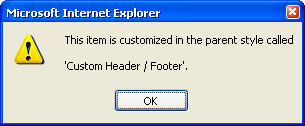
The StyleVars Editor |
The editor consists of a list of text boxes, each of which contains a single StyleVar, together with its title and a short description.
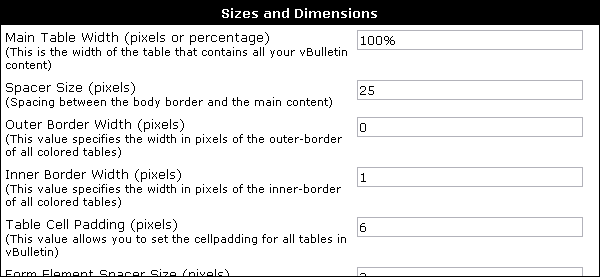
As with the Common Templates Editor, items that have been customized in the current style will be shown in a different color to indicate this.
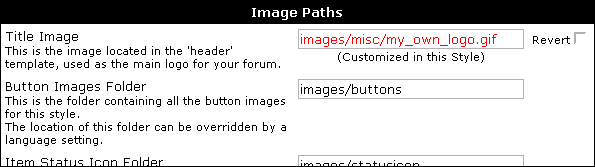
If the value of a StyleVar is inherited from a parent style, it will be shown in a color to identify it as an inherited value.
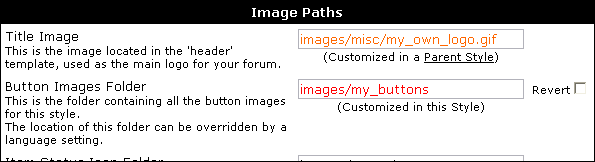
Note:
For a complete list of all StyleVars used in vBulletin, along with an in-depth description of what each StyleVar does and how it is used, see the StyleVars section of the vBulletin 3 Style Reference.
The CSS Editor |
It provides you with a simple interface to edit the individual CSS classes that combine to build the style sheet used by vBulletin.
Note:
For a complete list of all the CSS classes defined by vBulletin, along with descriptions of what they do and how to use them, see the CSS section of the vBulletin 3 Style Reference.
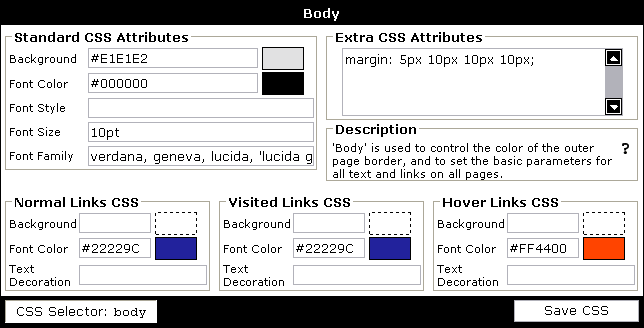
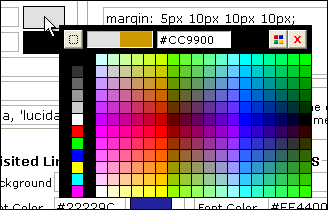
To change the values of any of field, simply click in the field you want to change and type the value you want to use. When you are finished editing, click the button.
Note:
Clicking any of the buttons, or the button at the bottom of the page will save all values on the page.
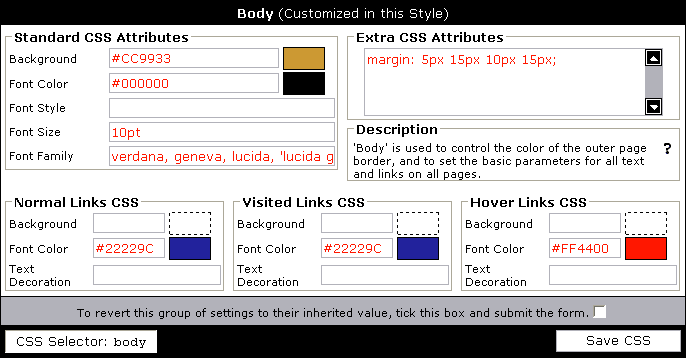
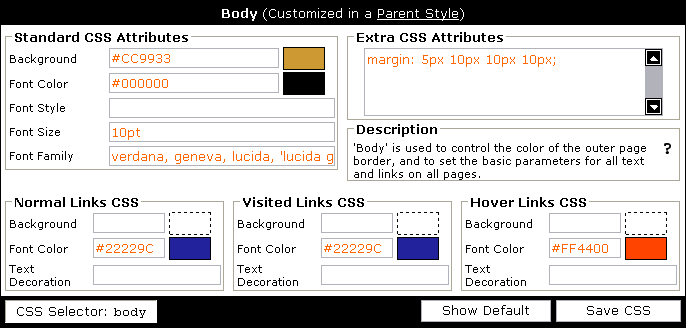
Fields in the CSS Editor |
Background and Font Color |
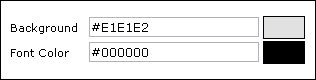
Normally this field will contain just a simple color value, but the background CSS attribute also allows items such as a background image to be specified.
Example values:
- #FF0000
- rgb(255,0,0)
- red
- red url(/forums/images/background.gif) repeat-x top left
This field will only accept a simple color value.
Example values:
- #000000
- rgb(0,0,0)
- black
Font Style, Size and Family |
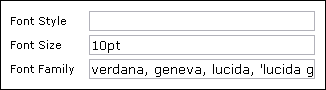
Example values:
- bold
- italic
- bold italic
A size can be defined in many different ways, but the most common methods are to specify the height of the font in points (pt) or pixels (px).
Example values:
- 10pt
- 11px
- 14em
- x-small
Font Family specifies the font face used for text. If you are familiar with appropriate values for the deprecated HTML <font face=""> syntax, any value valid as the 'face' of a <font> tag is valid here.
You may specify a single font, or a list of fonts separated by commas.
Comma separated lists are employed to make sure that visitors to your site whose computers do not have the specific font specified installed will still see a font that is something like what you intended. For example, if you set the font family value to tahoma but a visitor did not have the Tahoma font installed, their browser would show your site using the system default font. On the other hand, if you specified the value as tahoma, verdana, arial, sans-serif the browser would traverse the list looking for the first font that it can use.
Note that fonts whose names contain spaces must be enclosed in quotes.
Example values:
- verdana
- verdana, arial, helvetica, sans-serif
- verdana, geneva, lucida, "lucida grande", arial, helvetica, sans-serif
In practice, this means that the following set of values...
| Font Style | bold italic |
| Font Size | 10pt |
| Font Family | verdana, arial, sans-serif |
    font-weight: bold;
    font-style: italic;
    font-size: 10pt;
    font-family: verdana, arial, sans-serif;
font: bold italic 10pt verdana, arial, sans-serif;
Links CSS |

- When a visitor sees a link for the first time, the link will use the Normal Links group of settings.
Normal Links corresponds to the a:link CSS pseudo class. - After that visitor has clicked a link and visited the page to which the link points, that link will subsequently be displayed using the Visited Links group of settings.
Visited Links corresponds to the a:visited CSS pseudo class). - If the visitor has a compatible web browser, moving the mouse pointer so that it hovers over a hyperlink will cause that link to temporarily switch to using the Hover Links group of settings, until the mouse pointer moves away from the link again, at which time the link will revert to using whatever style settings it was using before.
Hover Links corresponds to the a:hover CSS pseudo class.
The Background field corresponds to the background CSS property, and should be used in the same way as the main background field found in each CSS class.
The Font Color field corresponds to the color CSS attribute, and will accept any color value, in the same way as the main font color field.
The Text Decoration field corresponds to the text-decoration CSS property. Normal practice is to use a value of none or underline here (to specify whether or not links should be underlined), but the field will accept any combination of the following:
- none
- underline
- overline
- line-through
Note:
By default, the vast majority of web browsers will underline hyperlinks. To avoid this, specify none as the Text Decoration value for Normal and Visited links.
If you do this, it is important to distinguish links from plain text to your visitors. This is often done by having links change color when the mouse pointer is over them, and is achieved by simply specifying different values in the Font Color fields for Normal and Hover links.
If you do this, it is important to distinguish links from plain text to your visitors. This is often done by having links change color when the mouse pointer is over them, and is achieved by simply specifying different values in the Font Color fields for Normal and Hover links.
Extra CSS Attributes |
In order to make the main CSS classes defined by vBulletin fully flexible, and to allow advanced administrators to customize their CSS classes to the limits of the abilities of CSS itself, the Extra CSS Attributes field is provided.
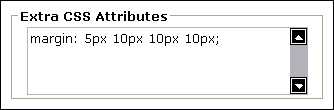
If you so desire, you can leave all the predefined fields empty and make all your CSS customizations using the Extra CSS Attributes field.
Common uses for the Extra CSS Attributes field include specifying border properties, margin properties and other properties not controlled by the predefined input fields, such as white-space handling.
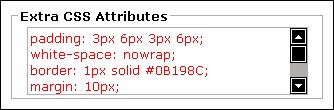
Forum Jump CSS |
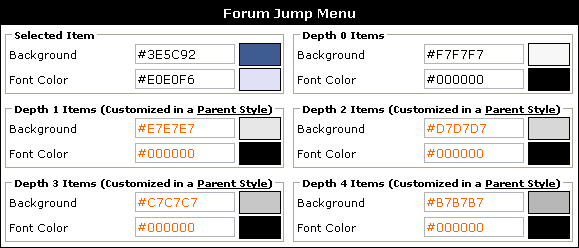
The Background field of each class corresponds to the background-color CSS property, which will accept any color value specified as either a hexadecimal number (#00CCFF), an RGB value (rgb(0,128,200)) or a named color (white).
Similarly, the Font Color field of each class also expects a valid color value.
Example values:
- darkslategray
- #483D8B
- rgb(178,34,34)
Note:
Leaving any of the Forum Jump Menu fields blank will result in the corresponding part of the Forum Jump menu inheriting its font and background color from the <select> Menus CSS class.
Additional CSS Definitions |
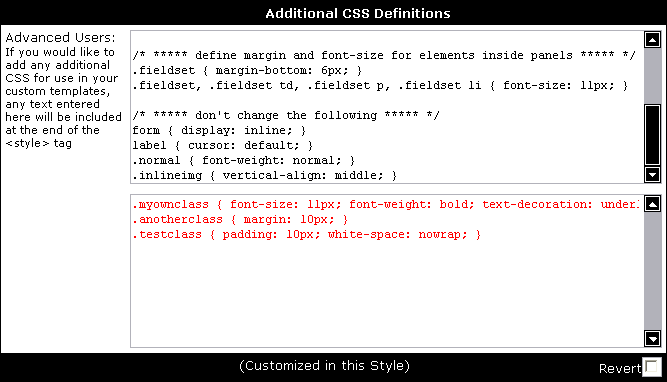
For a complete discussion of the use of these fields, see the Additional CSS Definitions section of the vBulletin 3 Style Reference.
The Color Picker |
The color picker provides various controls and feedback. The function of each control is listed here:
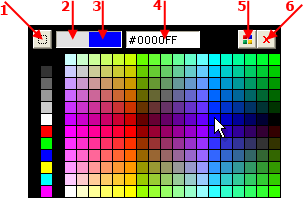
- Click this button to select transparent as your color choice
- This area shows a swatch of the color currently being used
- This area shows a swatch of the currently selected color in the picker
- This area shows the hexadecimal color value of the currently selected color in the picker
- This button changes the palette of colors displayed in the picker (see below)
- This button closes the color picker without making any changes
|
|
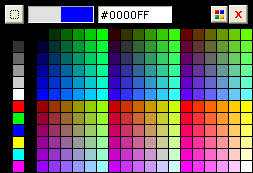

To exit the color picker, either select the color you want, or click the close gadget at the top right of the picker.
Store CSS as Files |
One of the beauties of CSS is that the stylesheet can be held in a separate file from the HTML content, allowing web browsers to store the CSS in their cache, negating the need to reload the stylesheet with every page viewed.
vBulletin allows you to have your stylesheets automatically saved to files by the system, resulting in lower bandwidth usage and faster-loading pages for your visitors.
To enable vBulletin to save your stylesheets as files, you must first ensure that your web server has permission to write and delete files within the clientscript/vbulletin_css directory.
You should then go to vBulletin Options > Style & Language Settings and switch the Store CSS Stylesheets as Files? setting to Yes.

Whenever you make a change to your styles that alters the CSS, the stored files will automatically be updated.
The Replacement Variable Editor |
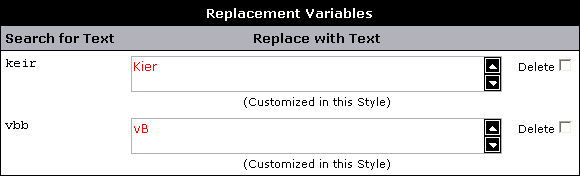
Note:
The default vBulletin style does not use any replacement variables, so the list will appear empty on a fresh vBulletin installation.
As with the StyleVars Editor and CSS Editor, replacement variables customized in the current style will be shown in a different color, along with a Revert checkbox. To delete a customization, click the checkbox and hit the button.
When a replacement variable's value is being inherited from a parent style, another different color will be used, and a hyperlink will be shown.
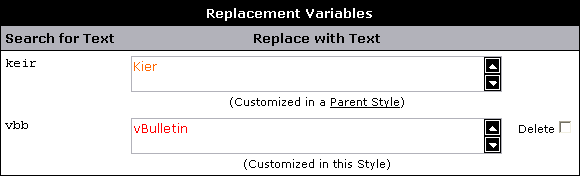
The Toolbar Options Editor |
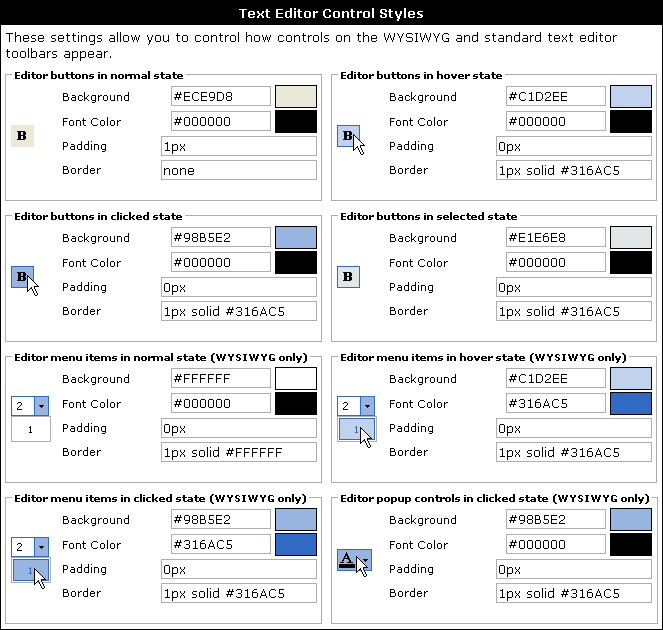
The Background field corresponds to the background CSS property, and can be used in the same way as the Background attribute of the main vBulletin CSS classes.
Example values:
- #FF0000
- rgb(255,0,0)
- red
- red url(/forums/images/background.gif) repeat-x top left
Example values:
- #000000
- rgb(0,0,0)
- black
Example values:
- 1px
- 1px 2px 1px 2px
Example values:
- 1px solid #316AC5
- thin outset
- 4px ridge
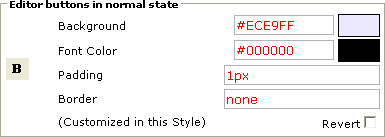
Editing the Templates |
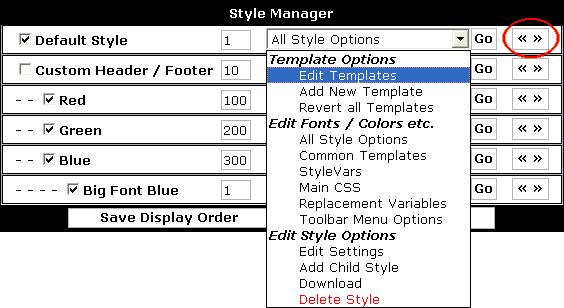
- Add New Template – this takes you to the form to add a new template not based on any existing template.
- Revert all Templates – this will automatically remove all templates that have been customized in this style. The templates in this style will become equivalent to the templates of its parent style.
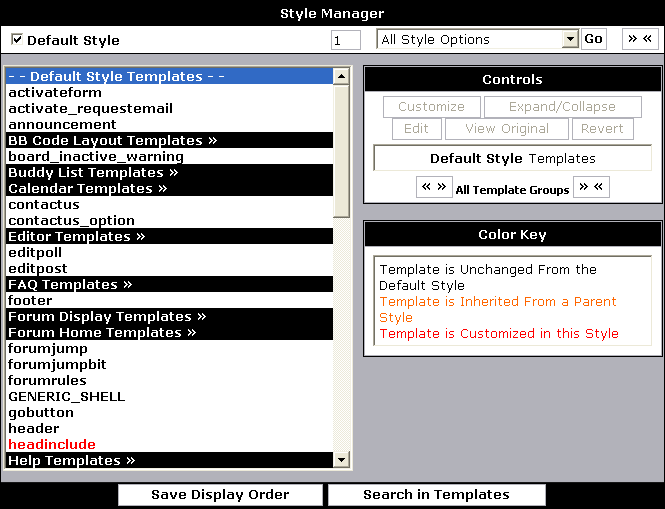
- Customize – if a template has yet to be edited in this style, click this button to edit it.
- Expand/Collapse – this button expands or collapses a specific template group.
- Edit – if a template has already been edited in this style, click this button to edit it further. This is effectively the same action as Customize.
- View Original – if the selected template has been edited in this style, clicking this button will show you the original version of the template.
- Revert – this button allows you to revert a template to the version that is being used in the parent style (or the original if there is no parent style). If the template being reverted is a custom template with no corresponding original/default then it will be deleted.
Templates are color coded as follows:
- Black – this template is unmodified in this style or any parent styles. The version included with vBulletin will be used.
- Orange – this template has been modified in a parent style, but not in this style. The modified template will be used.
- Red – this template has been modified in this style. The customized version will be used.
Note:
The template manager will look significantly different in browsers other than Internet Explorer. However, the functionality is the same.
Adding or Editing a Single Template |
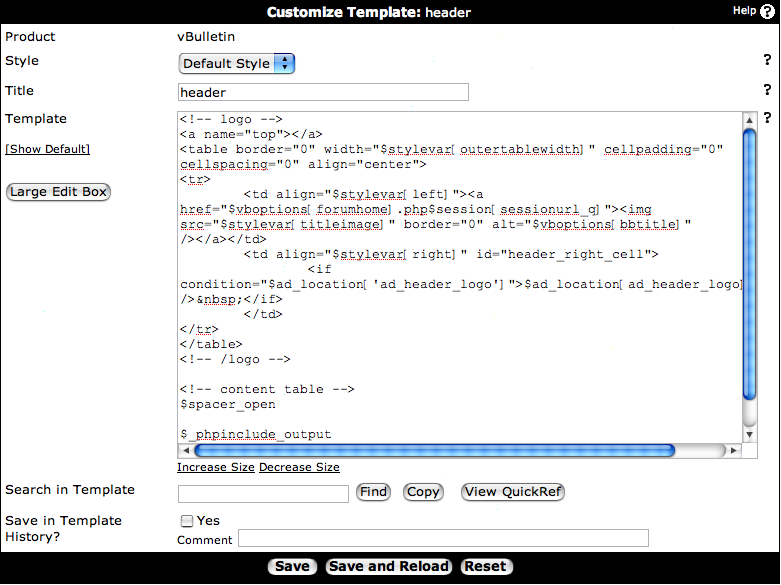
- Product - the name of the product which introduced this template. By default this will be vBulletin.
- Style – the name of the style that this template is in or will be inserted into.
- Title – the title of the template. This is what is used to identify a template, so it must be unique. Generally, only a-z, A-Z, 0-9, and _ are used. If there is more than one template revision stored an additional link of [View History] will be shown. This link will allow you to compare the current template with previous versions.
- Template – this is the actual body of the template. The [Show Default] link will show you the unmodified version of the template.
- Search in Template – the text box and allow you to search within the template text. Please note that this is not available in all browsers.
This row also contains several additional options:
Copy – this automatically copies the context of the Template box to your clipboard.
View QuickRef – this displays the language quick reference. - Save in Template History - This row allows you to save your template revision for future comparison if needed. You can add a comment to help you remember what was changed.
Comparing Templates |

- Status - This will tell you if the template is the currently active template, a historical revision or the current default.
- Last Modified - When the template was last modified and who edited it.
- Version - The version of vBulletin in which the template was modified.
- View - Simply allows you to view the template by itself.
- Old/New - Allows you to select the template revisions for comparison. Old is showed on the left side of the resulting screen and New is shown on the right.
Once you select two templates to compare, click on the Compare Versions button. The result will be similar to the image below and show where differences between the two versions occur using color highlights and using View Side-By-Side mode
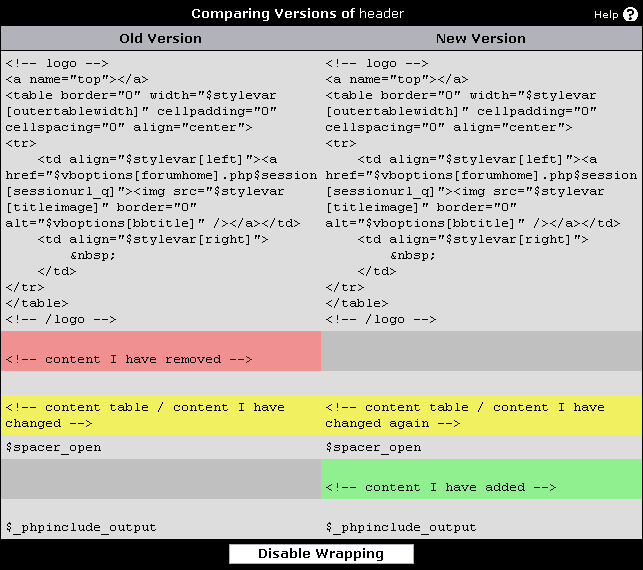
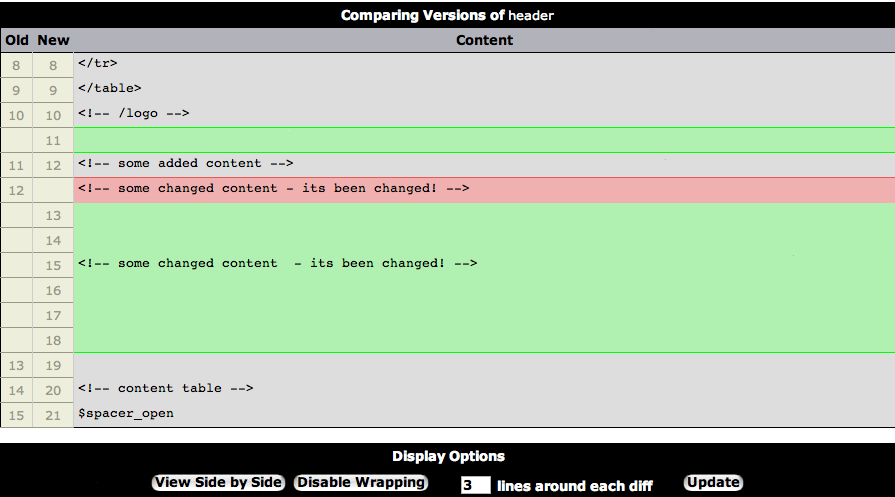
Mobile Style |
Installing the vBulletin Mobile Style |
Before you start, you need to upgrade your vBulletin installation to vBulletin 4.1.2. Please see this page for help with upgrading: https://www.vbulletin.com/docs/html/upgrade. Once you have upgraded, follow the steps below. It is recommended to read all the steps before proceeding.
| 1 | Go to your vBulletin Admin Control Panel |
| 2 | In the left hand navigation, go to Styles & Templates. Expand this by clicking on the right arros if the box is not already expanded. |
| 3 | Click Download / Upload Styles. The Download / Upload Wizard should load in the right window. |
| 4 | In Import Style XML File (this is the second form on the page), change "Or import the XML from your server" path to the following file: ./install/vbulletin-mobile-style.xml |
| 5 | Next go to "Title for Upload Style" enter a new style name. "Mobile" is a good name. |
| 6 | If you have the Publishing Suite you need to repeat the above two steps to import the Blog and CMS Mobile Styles as well. The file names for these components are: vbulletin-mobile-style-blog.xml vbulletin-mobile-style-cms.xml Note: When importing the Blog and CMS styles, you want to merge into the previously created Mobile Style. This will ensure that all the changes are in the same style. |
| 7 | After importing the styles go to Settings -> Options -> Style & Language settings |
| 8 | Adjust settings for the new Mobile Style options. Set them to the new style you created above. |
Disabling the Mobile Style |
- Admin CP -> Settings -> Options -> Style & Language Settings -> Default Style for Old Mobile Browsers. Set 'None'.
- Admin CP -> Settings -> Options -> Style & Language Settings -> Default Style for Modern Mobile Browsers. Set 'None'.
- Admin CP -> Styles & Templates -> Style Manager. Edit any style in the mobile style list and set "Allow User Selection" to No.
Enabling the Mobile Style |
- Admin CP -> Settings -> Options -> Style & Language Settings -> Default Style for Old Mobile Browsers. Select 'None' from the Dropdown menu.
- Admin CP -> Settings -> Options -> Style & Language Settings -> Default Style for Modern Mobile Browsers. Set 'Default Mobile Style' from the dropdown menu.
- Admin CP -> Styles & Templates -> Style Manager. Edit any style in the mobile style list and set "Allow User Selection" to Yes.
Note:
Note: Not all Old Mobile Browsers will be able to use the Default Mobile Style. For the purposes of these older browsers, you may be able to find a style available at www.vbulletin.org.
Frequently Asked Questions |
This is because it is based off a secondary Master Style.
What are the benefits of basing the Mobile Style off a secondary Master Style?
It allows the Mobile Style to work like the Default Style. This helps with installation, upgrades and customizations. Plus you can create multiple mobile styles and save customization between versions and upgrades.
My users are saying the Mobile Style doesn't work properly
The Mobile Style is based on the jQuery Mobile Module. As such it requires that Javascript and Cookies are enabled on the device. If they are using an iOS Device, they will either need to turn off Private Browsing or delete their cache due to issues with the Safari Browser.
What devices are supported by the Mobile Browser?
The vBulletin Mobile Browser is based on the jQuery Mobile module. It should support all devices that jQuery Mobile supports. You can see a list of devices here:
https://jquerymobile.com/demos/1.1.0-rc.1/docs/about/platforms.html
Are you going to add more devices?
We do not intend to add devices not on the above list at this time.
Does the mobile browser support RTL languages like Hebrew or Arabic?
No, it does not at this time.
Search in Templates |
Search Templates |
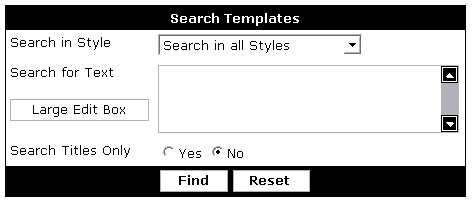
- Search in Style
Select the style in which you want to search. You can select to search in all the styles or just one.
- Search for Text
Enter the string of text you want to search for. This search string is case sensitive. The search will find any words / phrases containing the string you enter here. For example, if you search for "bullet" the search will find "vbulletin", "bullets", etc.
Additionally you could select the if you have a chunk of text which you would like to have an overview on while entering.
- Search Titles Only
Select yes if you want to search only through the template titles and not through the actual content of the templates.
Note:
Use the Styles & Templates > Search in Templates > Find and Replace in Templates feature if you have a lot of templates in one or more styles that has text that you wish to have replaced. This could save you quite some time.
Find and Replace in Templates |
Warning:
Replacing strings in templates could result in errors if you do not know what you are doing. This is an action that can not be undone, so please be aware that you should look twice before applying a find and replace on templates. Adviced is to run a test first.
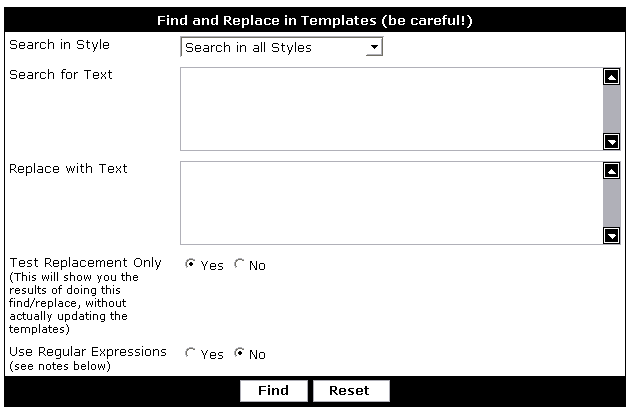
- Search in Style
Select the style in which you want to search. You can select to search in all the styles or just one.
- Search for Text
Enter the string of text you want to search for. This search string is case sensitive. The search will find any words / phrases containing the string you enter here. For example, if you search for "bullet" the search will find "vbulletin", "bullets", etc.
- Replace with Text
Enter a replacement string here. This string will be substituted in for all instances of the search string above.
For example, if you search for "bullet" and your replacement string is "carrot" then "vbulletin" would become "vcarrotin".
- Test Replacement Only
Select no if you are really sure you wish to replace found strings in a template. It is adviced to run a test replacement first. Running a test replacement first will show the result of doing this find/replace, without actually updating the templates.
- Use Regular Expressions
The regular expression option is for advanced users only! Setting this option to 'yes' will use preg_replace() instead of str_replace() for your find/replace operation. Do not use this option if you are not sure how to use PCRE regular expressions!
Replacement Variable Manager |
Note:
To learn more about Replacement Variables, please read the Replacement Variables Introduction
Add New Replacement Variable |
On the Add New Replacement Variable page, you will find a form in which you can specify the style to which you want to add a new replacement variable, along with two text fields.
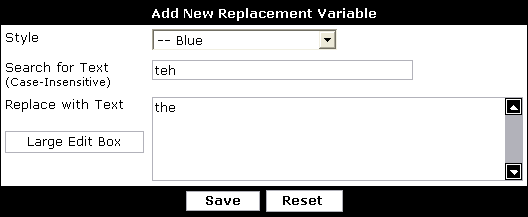
Note:
The find text is not case sensitive, meaning that dog will match DOG, DoG, dOG etc.
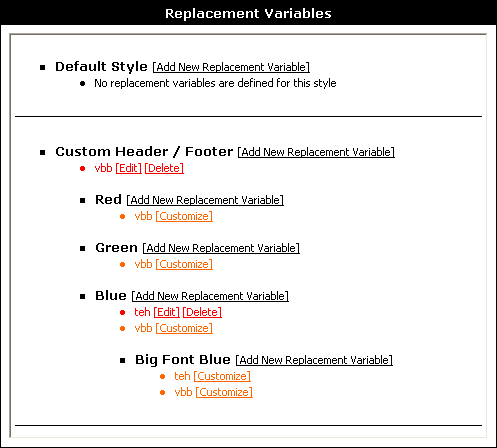
Customizing a Replacement Variable |
To customize a replacement variable, simply click the [Customize] link next to any replacement variable on the main page.
This will load the Replacement Variable Customization form, which looks almost identical to the Add New Replacement Variable interface, and works in exactly the same way.
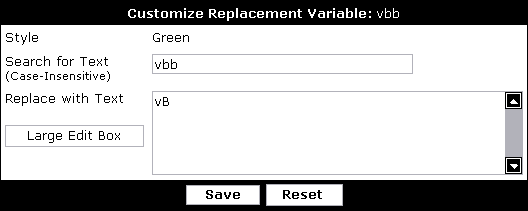
Download / Upload Styles |
Downloading styles is handy when you want to make a backup of your templates and options, or share your work with other forum administrators.
Uploading styles is handy to revert to a backup or applying the same style to several boards. You can use this option to import a style that someone has given you.
Make sure you read and understand all the options to avoid incomplete style downloads / uploads.
Note:
When you upload or download a style, the process will not transfer any image files. Your image files should be managed with an FTP client.
Downloading a Style |
Both of these actions are catered for by the Style Download system, which allows you to download all the customized StyleVars, CSS, Replacement Variables and Templates into a single XML file.
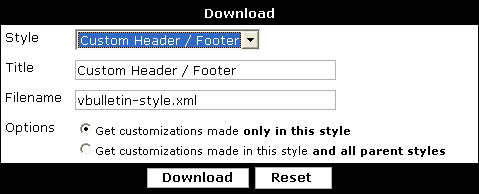
| Style | Use this menu to pick the style you want to download |
| Title | By default, the downloaded XML file will contain the title of the style as it exists on your web server. If you would like the XML file to store a different name for the style you are downloading, enter it here. |
| Filename | This field allows you to specify the name of the XML file vBulletin will send to your web browser when you click the button. However, most browsers allow you to rename a file as you download it, so this field may be irrelevant to you. |
| Options | The options give you a choice of two types of style download. If you choose to Get customizations made only in this style, then the style XML file you download will contain only items that are customized specifically in the style you are downloading. Items that are inherited from parent styles will not be included. On the other hand, if you choose to Get customizations made in this style and all parent styles, the style XML file will contain not only items customized specifically in the style you are downloading, but also any items that have been customized in a parent style. |
Note:
The XML file you download can not contain any image files. If your style includes custom images, you should download these separately using an FTP client.
Uploading a Style |
This system will read an XML file, convert the data inside it into StyleVars, CSS, Replacement Variables and Templates and write the data into your database.
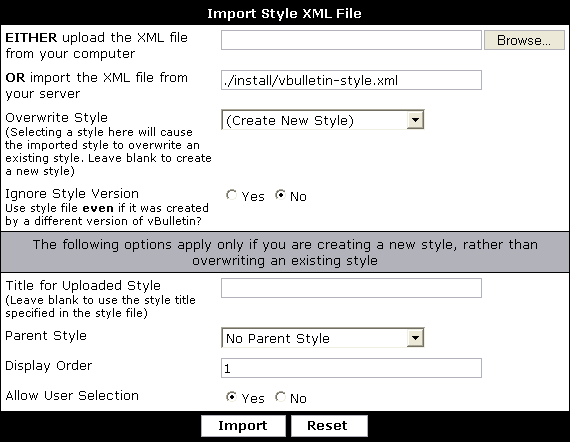
| Either Upload XML File from your computer | If the XML style file you want to import is located on your own computer, use this control to find the file and upload it. |
| Or Import XML file from your server | If the XML style file you want to import is located on your web server, enter the file path to the file here. |
| Merge Into Style | If you are restoring a style backup, you will probably want to import the XML file over the top of the style of which it is a backup. To do this, select the style you want to merge into from the list provided. If no style is chosen from the list, a new style will be created and the data in the XML file will be imported into this style. |
| Ignore Style Version | When a style file is downloaded from vBulletin, the version number of the vBulletin exporting the file is included. If the version number included in the style file you are importing does not match the version number of the vBulletin doing the import a warning will be shown to alert you to possible incompatabilities. If you are confident that no errors will occur as a result of importing a style from a different version of vBulletin, use this control to force vBulletin to accept the file regardless of the stored version number. |
| Title for Uploaded Style | If you chose to create a new style rather than overwrite an existing style, vBulletin will use the style title included in the XML file as the title for the new style unless you specify an alternative title using this control. |
| Parent Style / Display Order / Allow User Selection | These controls are only applicable when creating a new style rather than overwriting an existing style. Their function is identical to that described in the section dealing with adding a new style. |
Note:
XML style files can not contain image files, so no images will be imported when using this system. If the style you are importing requires special images, you will need to upload them to your web server using an FTP client.
Find Updated Templates |
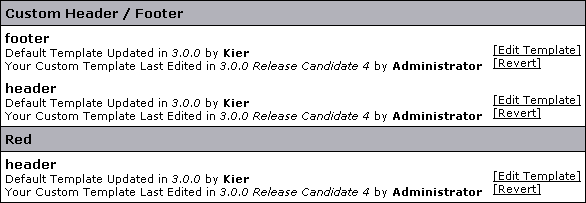
You can choose to modify or revert a template if it is listed.
Note:
The Find Updated Templates system is primarily of use to check for modified templates after running an upgrade script.
Notices |
The criteria available make this a powerful system for notifying users about a variety of conditions.
Notices appear by default in the navbar template, in a box underneath the main board links.
Each notice is displayed wrapped in the navbar_noticebit template, which allows the administrator to change the way notices are displayed.
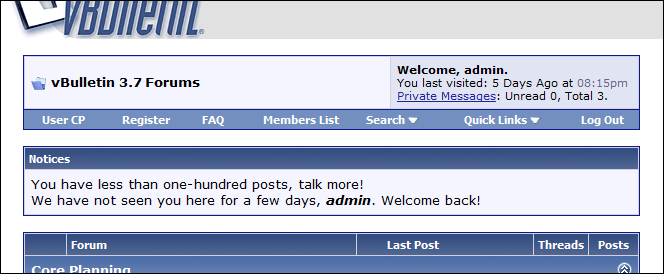
The Notices Manager |
The Notices Manager is the central interface for working with notices. It lists all notices created by administrators for your board, and allows you to see at a glance the active status and display order of all notices.
![]()
When you have one or more notices defined in your system, you will see each of them listed in the manager.
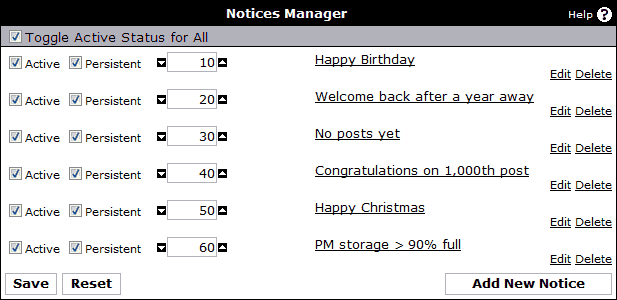
To edit a notice, click its title. To delete a notice, there is a 'Delete' link at the end of each notice's row in the manager.
Each notice is displayed with two checkboxes and a text box containing a number. These represent the Active status, the Persistent nature of the notice, and the notice's Display Order.
If a notice is not active, it will not be displayed to visitors under any circumstances.
A notice that is not persistent will be displayed the first time a user visits the board and will then disappear until they visit again (it is displayed once per browser-session).
The display order text box controls the order in which the notice is shown, both in the notices manager and to visitors. Display order also controls the order in which notices are checked, so it's important for the 'Notice x has not already been displayed' condition.
After using the Active, Persistent and Display Order controls, you need to click the 'Save' button to commit your changes.
You may make quick changes to display orders by using the arrow buttons either side of the display order text boxes.
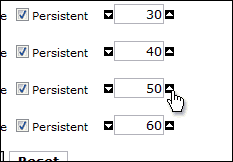
Adding and Editing Notices |
The notice editor provides controls to create and edit notices for your board, and to set up criteria for when each notice should appear.
The top part of the editor deals primarily with the actual HTML of the notice, while the bottom of the editor sets up display criteria.

- Title - This is a convenience for management only. The title is used only on the notices manager to assist in identifying notices. It is never shown to visiting users. You can add multple translations of the title text using the Translations link.
- Notice HTML - The notice HTML textbox contains the raw HTML of the notice that will be displayed on the front-end to users when criteria are met.In addition, you may use the special variables {userid}, {username}, {musername} and {sessionurl} in the HTML to personalize the notice text. For example,Warning:You may use any HTML so be careful about potentially breaking your layout or including code that can be abused.will be replaced with
Hello, {username}, how are you?when John Doe is viewing the notice.Hello, John Doe, how are you?
A more complex example, making use of the {sessionurl} variable to make links within the board work properly follows:Hello, {musername}.<br /> <a href="member.php?{sessionurl}u={userid}">View Your Profile</a> - Display Order - The display order text box controls the order in which the notice is shown, both in the notices manager and to visitors. Display order also controls the order in which notices are checked, so it's important for the 'Notice x has not already been displayed' condition.
- Active - If a notice is not active, it will not be displayed to visitors under any circumstances. It is a useful control to use when you want to temporarily disable a notice without actually deleting it completely.
- Persistent - A notice that is not persistent will be displayed the first time a user visits the board and will then disappear until they visit again (it is displayed once per browser-session).
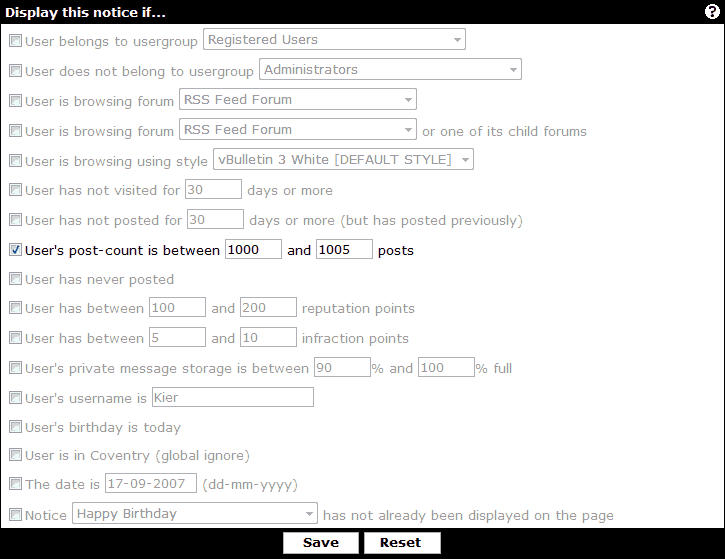
You may activate as many criteria as you like, but if any of the active criteria are not satisfied, the notice will not show.
Value is between [ x ] and [ y ] criteria
These criteria, such as User has between [ x ] and [ y ] reputation points or User's private message storage is between [ x ]% and [ y ]% full can be used in several ways.
- x = number, y = greater number - This is the standard use of the fields. If the value is equal to or greater than the lower number, but equal to or less than the higher number, the criteria are fulfilled.
Example: x = 10, y = 100 - x = number, y = number - This method can be used to specify an exact number for which to check. If you wanted to check for a value of exactly 10, enter 10 into both boxes.
Example: x = 10, y = 10 - x = number, y = (empty) - This configuration is used to set up a greater-than-or-equal-to check. By leaving the second box empty, only the first box is checked, so you can set up checks such as value is greater than or equal to 10, with no upper limit.
Example: x = 10, y = (empty) - x = (empty), y = number - The inverse of the previous configuration, by leaving the first box empty it is possible to set up a less-than-or-equal-to-check, with no lower limit.
Example: x = (empty), y = 100
Thread Prefixes |
When a user creates a thread, he or she will have the option of specifying a prefix to the thread title. This prefix can be used to filter threads within the forum or searched on.
For example, you may wish to use prefixes in a marketplace forum, where people post "Wanted" and "For Sale" entries. Alternatively, if you have multiple products and only one announcement forum, you could have prefix threads in that forum depending on the product they relate to.
Users will then see the selected prefix where ever the thread title is shown:

The Thread Prefix Manager |

Adding or Editing a Prefix Set |

- Prefix Set ID - This is the unique identifier for this prefix set. Only one set can have this value and the value may only contain A-Z, a-z, 0-9, and _ (underscores) only.
- Title - This is the title of this prefix set. You should not use any special HTML markup. It will be shown when administering thread prefixes or if a user must choose between prefixes in more than one set.
- Use Prefix Set in These Forums - Prefix sets must be attached to forums before they can be used. Select the forum or forums this prefix set will be available in using this field. Once you do this, when a user creates a new thread in a selected forum, he or she will be able to select a prefix from this set.
- Display Order - The sorting order for sets. Sets with lower values will be shown before sets with higher values. Note that the display order setting for individual prefixes only controls their order within the set.
Adding or Editing a Prefix |
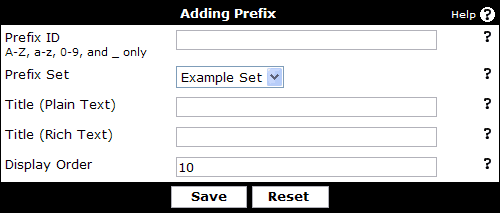
- Prefix ID - This is the unique identifier for this prefix. Only one prefix can have this value and the value may only contain A-Z, a-z, 0-9, and _ (underscores) only.
- Prefix Set - The set this prefix is to be placed in. This prefix will only be selectable in forums that have this set enabled. If you change this set, threads that can no longer use this prefix will have it removed!
- Title (Plain Text) - This is the title of the prefix, using no special markup. This will be shown in the prefix list menu, when the thread title is shown in the navigation bar, or when the thread title is used in an email.
- Title (Rich Text) - This is also the title of the prefix, but you may use HTML to add additional markup to the title. This version of the prefix will be shown in a list of threads and within the thread itself.
- Display Order - The sort order for this prefix. Lower values will be displayed first within the selected prefix set.
Prefixes will also be placed directly before a thread title, with only a space separating them. For this reason, you will probably want to include something to make the prefix stand out from the title. In the rich text value, this could be color, italics, or an image (For Sale). However, in the plain text version, you may need to include a colon or square brackets ("For Sale:" or "[For Sale]").
Smilies |
Smilies (also called emoticons in some quarters) are small images used to convey some form of emotion in messages.
Example
| What you type: | Hi there! :) |
| Will get parsed as: | Hi there! |
Note:
Don't forget to go through the settings of the vBulletin Options > vBulletin Options > Message Posting and Editing Options where you can control the 'Maximum Images Per Post/Signature'.
Smilie Manager |
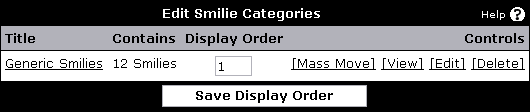
- Title
This column tells you the name of each category. You can click on the category name to view which smilies are in it, after which you can edit or delete a smilie and update its display order.
- Contains
This column tells you how many images are in the corresponding category.
- Display Order
This column tells you the display order of each smilie category. The display order is used to order the smilie category listing in this Smilie Manager as well as how it is displayed on your forums. You can update the display orders shown on this page by changing the number values and clicking the button.
- Controls
On the right side you will find several options for each smilie category.
The [Mass Move] link takes you to a page where you can select a new category for each smilie in the corresponding category and submit the changes all at once.
The [View] link does the same thing as clicking on the category name to the left, it takes you to a page where you can view all smilies in the corresponding category.
The [Edit] link allows you to edit the title and display order of the corresponding category.
The [Delete] link takes you to a page where you can delete the corresponding category and all of its smilies or mass move the categories smilies to another category and then delete the original category.
Click on the link to load a page from where you can enter a 'title' for the new category and the display order. If you don't know the number for the display order than you can leave this empty. Then press the button to add this new smilie category. You will then return to the initial overview of all the smilie categories.
Click on the link to load a page from where it will display all the smilies from all the categories. On this page you can also edit and delete a smilie.
How to Add a new Smilie Category |

- In the Title input field enter a title for the new smilie category.
Example: Yellow Smilies - In the Display Order input field enter a number if you know where you want to have it ordered between the other categories. This is an optional field, if you don't know this number you can leave it empty.
Example: 2 - Press the button which will insert the new smilie category and redirect you back to the index of the Smilie Manager.
Note:
More information about the Display Order is adviced to read. It contains valuable information about smilie parsing.
Add New Smilie |
You can either add a single image or add multiple images at the same time.
Note:
Don't forget to upload the smilies to your images/smilies directory first before using this feature. If you don't know how to do that you can also use the alternative feature to manually upload a smilie.
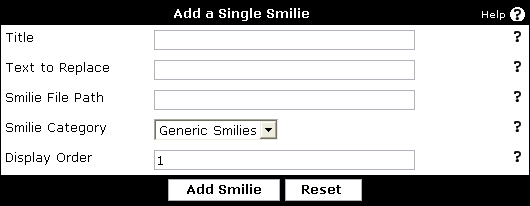
- Title
This is the title you want to give to describe your smilie.
- Text to Replace
This is the replacement text for the smilie. When a user types this text in a post, it will get replaced with the smilie image.
- Smilie File Path
Type the path and filename of the smilie you want to add. An example would be images/smilies/happy.gif
- Smilie Category
This drop down box will have all the possible smilies categories - select one to add this smilie to this category.
- Display Order
If you know which order you'd like to give to your smilie you can enter it here. This is an optional field, if you don't know what the display order should be you can leave this field empty. You can always change it later.
Adding Multiple Smilies (Admin Control Panel > Smilies > Add New Smilie > Add Multiple Smilies)
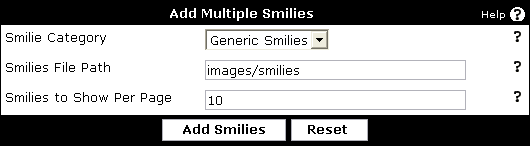
- Smilie Category
This drop down box will have all the possible smilies categories - select one to add all the smilies to.
- Smilies File Path
Type the path and not filename of the smilies directory you want to add. An example would be images/smilies/newones/ (if you have uploaded your smilies to the newones/ directory)
- Smilies to Show Per Page
This is the number of images to display per page while adding them.
Smilie Display Order |
Consider this example where you have two smilies:
| Smilie Name | Smilie Text | Smilie Image |
| Smilie 1 | :o | |
| Smilie 2 | :o) | |
, but also the first two characters of Smilie 2 would be matched and converted, leaving you with ).To make these smilies parse correctly, Smilie 2 should have a smaller display order than Smilie 1, so that it is parsed first and is not picked up in the search for Smilie 1.
Upload Smilie |
Note:
The directory that you are trying to put the file in must be CHMODed 777. Consult your FTP program documentation for how to do this.
If you don't know how to do that you can also use the alternative feature to add one or more smilies through the Add New Smilie manager.
If you don't know how to do that you can also use the alternative feature to add one or more smilies through the Add New Smilie manager.
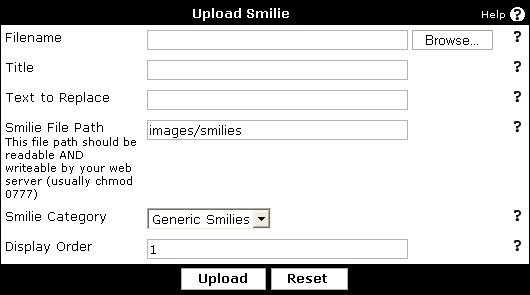
- Filename
Click on the button and select from your hard drive the smilie you want to upload.
- Title
This is the title you want to give to describe your smilie.
- Text to Replace
This is the replacement text for the smilie. When a user types this text in a post, it will get replaced with the smilie image.
- Smilie File Path
Type the path of the smilie directory. An example would be images/smilies. This directory should be readable and writable by the webserver (usually CHMOD 777).
- Smilie Category
This drop down box will have all the possible smilies categories - select one to add this smilie to this category.
- Display Order
If you know which order you'd like to give to your smilie you can enter it here, this is an optional field. If you don't know what the display order should be you can leave this field empty, you can always change it later.
Custom BB Codes |
The Custom BBCode manager allows you to define new bbcode tags in order to extend the range of formatting available to your members.
Here is a list of all the default BBcode, https://www.vbulletin.com/forum/misc.php?do=bbcode
An Introduction to BB Codes |
Many BB code tags are included by default in vBulletin. Some of these include [b] for bold, [i] for italics, and [url] for inserting hyperlinks. Their output is not directly modifiable. However, you can disable specific tags in the vBulletin Options section.
BB codes may take one of two formats: with an option or without. An example BB code with an option is [url=https://www.vbulletin.com]vBulletin[/url]; [url]https://www.vbulletin.com[/url] is an example of a BB code that does not have an option. Essentially, an option allows you to specify two values per BB code reference. It is not possible to have more than one option in a BB code.
Things to keep in mind when creating BB codes:
- BB codes must not be empty. Empty tag usage, such as [i][/i], will be removed before parsing and there for nothing will be displayed in its place, even if something normally would.
- BB codes must have a closing tag. [i] will not be parsed alone; it needs the [/i] to be parsed.
- If you wish to have a tag that accepts both an option and non-option version, such as [url], you must create both. Simply create one tag with Use {option} set to yes and the other set to no.
BB Code Manager |
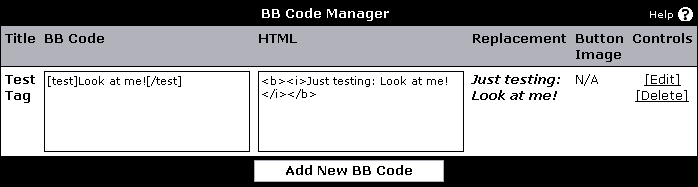
- Title – the title of your BB code.
- BB Code – an example of the BB code.
- HTML – the HTML output of the example.
- Replacement – an HTML rendering of the example
- Button Image – the button being displayed with the editors, if you have specified one.
- Controls – these options allow you to edit or delete this BB code.
Adding or Editing a BB Code |
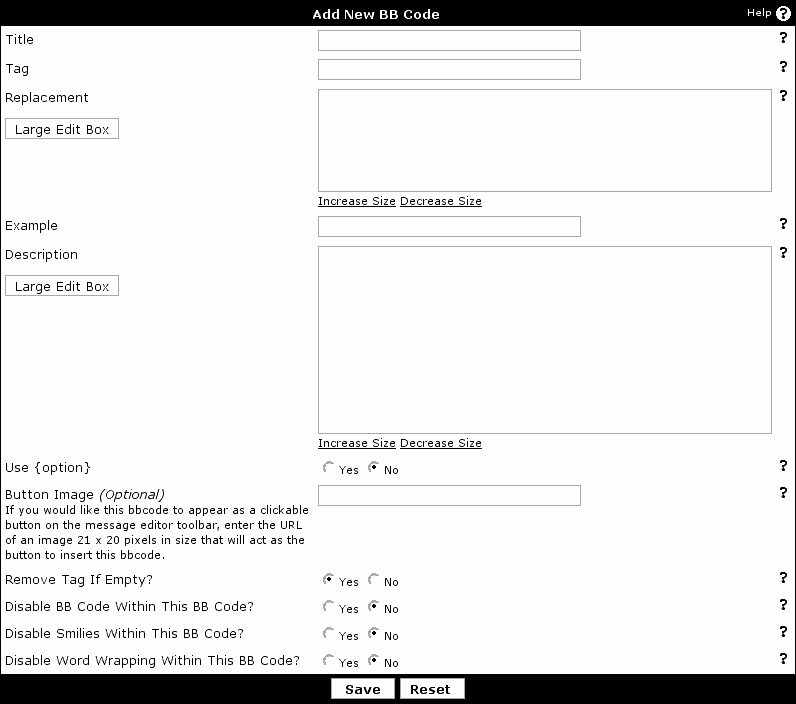
- Title – the title of your tag, which will be used to generate the BB code list.
- Tag – this is the text for the BB code, which goes inside the square brackets. For example, you would use 'b' for [b] tags and 'url' (without quotes) for [url] tags.
- Replacement – this is the HTML code for the BB code replacement. Make sure that you include '{param}' (without the quotes) to insert the text between the opening and closing BB code tags, and '{option}' for the parameter within the BB code tag. You can only use {option} if 'Use Option' is set to yes.
For example, you would use <b>{param}</b> for [b] tags and <a href="{option}">{param}</a> for [url=xxx] . You will always use '{param}', but you will only use '{option}' when Use Option? is yes. - Example – this is a sample piece of BB code to use as an example for this particular BB code. For example, you would use [b]Bold[/b] for [b] tags, [url=https://www.vbulletin.com]vBulletin[/url] for [url] tags.
- Description – this is a piece of text to describe the BB code tag. This can include HTML tags if you wish.
- Use Option – setting this option to yes will allow you to create a [tag=option][/tag] style tag, rather than just a [tag][/tag] style tag.
- Button Image – this is the URL to an image that will be displayed when a user is making a new post. Clicking the image will allow a user to quickly insert this tag. The image should be 21-pixels-wide by 20-pixels-high and the path should be specified relative to the main vBulletin directory.
- Remove Tag If Empty? - setting this option to yes will remove this BB Code from your text if there is nothing within it. For example, if this option is set, [tag][/tag] will not be displayed, whereas [tag]text here[/tag] will be displayed. Set this option to no if you wish the BB Code's replacements to be shown no matter what
- Disable BB Code Within This BB Code? - setting this option disables the parsing of any BB Code within this BB Code, displaying them as plain text.
- Disable Smilies Within This BB Code? - setting this option disables smilies within the BB Code, displaying them as plain text.
- Disable Word Wrapping Within This BB Code? - setting this option disables word-wrapping within this BB Code.
Podcasting |
The term is also often used to simply describe any .mp3 audio file that is available for download from a website by clicking on a link. In regards to vBulletin, podcast media is only accessible from your RSS feeds.
Configuring vBulletin for Podcasting
- Forums & Moderators > Forum Manager > Controls > Podcast Settings
Choose a forum that will host the podcast files and configure the iTunes settings. Podcast feeds will work inside of iTunes, and other clients that support RSS Enclosures, without any information on this page being filled in. These settings are used when you wish to submit one of your forums as a podcast to iTunes as a podcast that can be searched for within iTunes.- Set Enabled to Yes
- Select a Category
This forum must be viewable to guests so verify this by logging out of your forum and checking if you can view threads and attachments within this forum. If not, configure the permissions for this forum to allow guests to view.
- vBulletin Options > External Data Provider > Enable RSS Syndication must be enabled.
- vBulletin Options > External Data Provider > Enable Podcasting must be enabled.
Browse to the forum that you setup for podcasting and click on New Thread. You will see a few new posting options that pertain to podcasting.
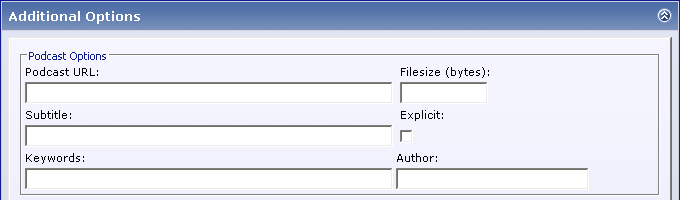
- Podcast URL - URL to your media file. Do not enter a value in this field if you are going to use the vBulletin attachment system to upload your media file.
- Filesize - Size of media file. Do not enter a value in this field unless an error message asks you to do so after submitting the thread.
- Subtitle - Subtitle of your media file, used by iTunes and can be ignored.
- Explicit - Check if the media file contains explicit language, used by iTunes and can be ignored.
- Keywords - Keywords for iTunes search, can be ignored.
- Author - Author of the media file, used by iTunes and can be ignored.
- You may upload your media file to your website, or another website, via ftp and link to it directly. To use this method, specify the complete URL in the Podcast URL that appears on the New Thread screen. You do not need to specify the filesize unless your are prompted to after submitting the thread. If you want your media file to appear in the thread to those that are viewing the thread via your forums, you will need to place the link within your post, such as Download: https://www.example.com/podcast.mp3 The handling of the media file will be handled automatically for those that view the podcast forum via RSS.
- The second option for specifying your media file is to use the vBulletin attachment system. You will be limited by the permissions of your usergroup. Only the first uploaded file will appear in the RSS feed as well. iTunes will not function with attachment uploads on IIS servers and some Apache servers. It is best to use the first method when possible.
Note:
You may specify any filetype that you wish, but take note that iTunes only supports six filetypes:
.m4a, .m4v, .mp3, .mp4, .mov, and .pdf
.m4a, .m4v, .mp3, .mp4, .mov, and .pdf
If you used the vBulletin attachment system, you should see a normal attachment link within the first post of the thread that you just created. If using the Podcast URL method (preferred) then you will only see a link if you manually placed a link within the first post.
For this example, we will use a forumid of 10 for our podcast forum. You can get the forumid of your podcast forum by hovering over any links to your podcast forum and looking for forumid=10.
The link to our example podcast forum is
https://www.example.com/forums/external.php?forumids=10
This is the URL that you would enter into iTunes and other RSS clients that support enclosures. Enclosure is the technical name for including a media file via RSS and is the preferred nomenclature for some clients.
Note:
Do not specify more than one forumid for your podcast URL
Users that are subscribed to your podcast forum will make periodic queries to the podcast URL to check for updates. Some clients can be programmed to automatically download the media file when a new post is found.
You may post as many threads in your podcast forum as you wish, whereas the first post of each thread will be considered a podcast. You should include a media file with each thread but are not required to do so.
You may allow your users to respond to the podcast thread, as a normal thread, as it will not affect the viewing of the podcast by podcast clients.
Troubleshooting and Common Solutions |
Solutions to Common Problems
When viewing my board, I get an error that says "Cannot add cookie information, headers already sent"
The most common reason for this is a blank or exta line in your config.php. You are not allowed to have anything outside the <?php and ?> delimiters. Not even a space. It is recommended to eliminate all extra lines and spaces before or after these delimiters.
I installed a new plugin and now my forum doesn't work. I can't login into the Admin Control Panel to fix this.
To temporarily disable the plugin system, edit config.php and add this line right under <?php
define('DISABLE_HOOKS', true);
I have several domains pointed to my forums. However when users login via one domain, they get an error that says "In order to accept POST request originating from this domain, the admin must add this domain to the whitelist".
That error can happen when you post to a vBulletin form from an external referrer that isn't on the white list:
Admin CP -> vBulletin Options -> General Settings -> Post Referrer Whitelist
Edit this list to include all referrers that you use.
I have tried the above but cannot log into my Admin Control Panel to make the changes.
You can temporarily disable the Whitelist by editing your config.php file. Open this file in wordpad and in a line above the ?> add the following code:
define('SKIP_REFERRER_CHECK',true);
Please view the source of the page and compare the error to those listed in the section on troubleshooting MySQL. If the error isn't listed there, please open a support ticket at https://www.vbulletin.com/go/techsupport/
Upgrade Issues |
Q. I receive the following error when trying to upgrade:
We have detected that you have already tried to run the upgrade script.
You will not be able to proceed unless you revert to a vB 2.2.x/2.3.x database.
This happens you do not upload all files, especially: install/upgrade.php
Upload all the files from the vBulletin .zip file again, making sure you upload them 100%, overwrite existing files (do not skip or resume). Then run that upgrade script again, at that step. You can skip install/install.php and includes/config.php.new and the whole images/ directory.
Q. My Postbit is no longer showing the avatar, its a broken image / its just text now!
As of vBulletin 3.5.0 beta 1 there were a lot of changes done to the postbit and postbit_legacy templates, you will either need to make the changes as outlined in the release threads (links to listed changed) or revert the template itself.
Q. The Quick Reply / Inline Moderation / Drop Down menus are not working.
vBulletin 3.5.0 has quite a few template changes, its recommended that you try using a stock style and seeing if this fixes the problems. Again as there have been many changes it may be easier to start fresh and re-customize.
(We recommend you go to the "Find Updated Templates" page of the "Styles & Templates" section of your control panel and revert all templates listed there!)
Q. After the upgrade I got a few database error emails, however I did not see these errors myself.
As of per the gold release announcement, if you are upgrading from 3.0.x to 3.5.0 you should totally close off your website, otherwise you may experience this. If you did not get anymore and are not seeing error messages now you should be fine.
Q. After upgrading from 3.0.x to 3.5.0 I run Admin Control Panel > Maintenance > Diagnostics > Suspect File Version and noticed that I was still running a few 3.0.x files; Can I remove those?
If you are 100% sure you have uploaded all the vBulletin 3.5.0 files, overwriting any file already on the server (not skipping or resuming them), you can remove the left-over files from 3.0.x.
Q. After upgrading from vBulletin 3.0.x to 3.5.0 Internet Explorer Says displays a popup that says it cannot display the page. "Internet Explorer Cannot Open Internet Site https://domain.com/forums/page.php=x"
You are an incompatable style from the vBulletin 3.0.x serries and it needs to be reverted before it will work.
Email Issues |
First, make sure that you actually have turn on the email functions here:
Admin CP -> vBulletin Options -> Email Options -> Enable Email features -> Yes
Then verify that the email system for your forum is working via the Admin Control Panel. You can do that under diagnostics.
Admin Control Panel -> Maintenance -> Diagnostics -> Email Diagnostics
If there is an error stated, you can look at the logs for your mailer daemon to find out what error is occuring. If their is no error and the email is sent to the supplied address, then the issue is on the ISP/mailbox end. Continue reading further down this page for other suggestions.
If there is no error and you didn't get the emails then make sure you have a valid webmaster's email address in your Admin CP settings and that there is only one address. In addition make sure the domain on the email address matches the domain for your site. Otherwise some ISPs may treat this as spam. Then try this:
Admin CP -> vBulletin Options -> Email Options -> Enable "-f" Parameter -> Yes
Then try the vB email functions again. If it still doesn't work, then this is either a server and/or mailbox issue. By default vB uses PHP's mail() function for all its email and uses the SMTP server specified in php.ini. If PHP and the mail server are configured correctly then email will work. You can view the details here: https://us3.php.net/mail/
To troubleshoot any email problems you will need to view the mail logs on the server to see what happened to those emails that don't work. Once vB sends it to PHP it's in the hands of the server. If you are on a shared server you may need to ask your host to look through the logs for you.
Many large service providers such as Verizon, AOL and MSN are implementing aggressive filtering. In many cases, the customers of these providers can place the email address you use for notification in their contact list and then your emails will be allowed through. If this doesn't work, you should contact the provider in question and ask to be placed on their whitelist. Some providers will charge a listing fee for this.
In addition, AOL (and possibly others) will not accept emails from domains that do not have reverse DNS setup. It's possible these emails are being placed into a spam folder or are being filtered.
The problem could also be caused by aggressive spam filters on the user's machine. In these cases their anti-spam software should be configured to allow emails from your domain name. Refer them to the documentation for the software they are using.
If all else fails you can switch to the SMTP mail option to see if this works better for you. These settings are here:
Admin CP -> vBulletin Options -> Email Options -> SMTP Email -> Yes
Then fill out the appropriate SMTP settings for your account and server.
My host only allows me to send a certain number of emails per hour to control spam. How can I make vBulletin get around this limitation?
You cannot circumvent hard limitations created by your hosting provider. However, you can use vBulletin's SMTP email processing to point the software to an off-site email provider with more privileges.
Admin Control Panel -> vBulletin Options -> Email Options
Email is sent as "[email protected]"
You need to enable the "-f parameter" in vBulletin. This sends the email address specified in the Admin Control Panel to the email client.
Admin Control Panel -> vBulletin Options -> Email Options.
For more information please see:
https://us3.php.net/manual/en/ref.mail.php
Email from my forums is blocked
One of the reasons for email being blocked is if it is coming from a different domain than what is in the 'From' email address. To ensure a better chance of your email getting through, make sure the Webmaster's email address is using the same domain as your forums.
Error: unrouteable mail domain "****.com"
This problem is caused by this option being checked in WebHost Manager for the server:
Prevent the user 'nobody' from sending out mail to remote addresses (php and cgi scripts generally run as nobody if you are not using phpsuexec and suexec respectively.)
Unchecking this option should stop this problem. You will of course need to have root access to the server to do this. If you don't, then you'll need to ask your web host to do this for you.
McAfee VirusScan Enterprise
McAfee VirusScan Enterprise blocks SMTP port 25 by default, which blocks all emails from being sent. Eliminating or changing that rule will allow emails to go through.
How can I send emails as HTML
vBulletin does not support HTML emails at this time.
Can I log Emails sent by vB?
Yes, in vB 3.6 you can log all sent emails to make sure that vB is sending these. You do this here:
Admin CP -> vBulletin Options -> Error Handling & Logging -> Log sent eMails to a File
Then if the emails appear in this log but they are not being received, then you will know this a problem with either the mail server or the recipient's mailbox. If the logs show 'FAILED" then this is a server problem. The server's email function returned a failure. Please see server configuration/logs for more details. You will need to consult your host if you are on a shared server.
SMTP Server Setup
If you are using SMTP for email, in some rare instances the SMTP server will require an additional field that is not part of the normal settings, namely this:
ini_set("SMTP","mail.yourdomain.com");
To add that setting, edit your config.php file and add this line right under <?php:
ini_set("SMTP","mail.yourdomain.com");
...changing "mail.yourdomain.com" with your specific mail domain, of course. If you do not have such a mail domain, then ask this host about this.
Invalid Webmaster's Email
Another possible cause of that problem is that you do not have a valid Webmaster's email address. You need to set this to a valid email address:
Admin CP -> vBulletin Options -> Site Name / URL / Contact Details -> Webmaster's Email
You cannot use more than one address in that field.
Note:
Please be aware that vB does not have it's own email application. It has to use either PHP or SMTP, and both of those are server applications. There is very little control vB has over these.
For the PHP option, you have the -f setting and the webmaster's email address. That's it. The rest is up to the server which needs to be setup correctly for PHP email to work.
For SMTP, the only options in vB for this are the SMTP settings. If those don't work, then this means either the settings are wrong, or there is a problem connecting to that SMTP server from your server. There is nothing vB can do about this.
Image Manipulation Issues |
This is caused by Freetype 2 support not being compiled into PHP and requires PHP to be recompiled.
Most likely the original PHP configure string contained --with-freetype but this usually only enables support for Freetype version 1, which does not support True Type fonts. To enable Freetype 2 support (assuming that the server has the Freetype 2 libraries installed), this part of the configure string neeeds to be removed and replaced with (normally) --with-freetype-dir=/usr
To find out if a Linux server has Freetype 2 support, run locate freetype2 at the command line and look for some results, usually in /usr/include/freetype2.
Blank or 'White' Pages |
1. You did not upload the vB files correctly. Reupload the vB non-image files and make sure you upload these in ASCII format and that you overwrite the ones on the server. Make sure you upload the Admin CP files to the admincp directory specified in your config.php file. Then, if you can access the Admin CP, run 'Suspect File Versions' in Diagnostics to make sure you have all the original files for your version:
Admin CP -> Maintenance -> Diagnostics -> Suspect File Versions
Do any show as 'File does not contain expected contents', 'version mismatch' or missing? If so, you need to reupload the original vB non-image files. Make sure you upload these in ASCII format and overwrite the ones on the server.
2. You have extra space or lines in your config.php file. Make sure there is no whitespace or extra lines in config.php either before the <?php or after the ?>. [Note: Beginning with 3.6.3 the trailing ?> was removed.]
3. If this is happening on the forum home page only, then you may have an empty index.html or index.htm file in that directory. Delete it.
4. You have a bad plugin installed. To disable the plugin system, edit config.php and add this line right under <?php
define('DISABLE_HOOKS', true);
Note: If you are running vBSEO or other add-ons that use .htaccess rewrite, you will need to remove those changes as well.
5. The servername setting in config.php is wrong. Doublecheck this setting. 99% of the time, 'localhost' is correct:
$config['MasterServer']['servername'] = 'localhost';
6. Your PHP has magic_quotes_sybase turned on. You have to turn this off. On *nix systems you can do this by creating an .htaccess file with this content and placing it in your main forum directory:
php_flag magic_quotes_sybase 0
7. [For multiple white pages] You have added code to your header, headinclude or phpinclude templates that is no longer functional.
[For white pages in a select area] You have added code to one of your templates that is causing this problem.
The quickest way to find out if a custom template is at fault is to create a new style with no parent style and try that:
Admin CP -> Styles & Templates -> Style Manager -> Add New Style
8. You have a corrupted template. Repairing the template table may help:
REPAIR TABLE template;
9. You have GZIP enabled. Try turning GZIP off here:
Admin CP -> vBulletin Options -> Cookies and HTTP Header Options -> GZIP HTML Output -> No
Or by running these queries in the SQL tab in phpMyAdmin:
UPDATE setting SET value = '0' WHERE varname = 'gzipoutput';
UPDATE datastore SET data=REPLACE(data,'s:10:"gzipoutput";i:1;','s:10:"gzipoutput";i:0;') WHERE title='options';
You can also edit config.php and add this right under the <?php line to disable GZIP:
DEFINE('NOZIP', 1);
Sometimes this problem is caused when your server is already using GZIP and by turning this on in vB you were double compressing. This causes problems with some pages but not others. It also happens to some people and not others.
10. Sometimes this can also be caused when PHP has the 'display_errors' function turned off. So instead of displaying the actual error so you can see what is wrong, you get a blank page. Look at your phpinfo page and if 'display_errors' is Off or '0', then add this line to your includes/config.php file right under <?php
ini_set("display_errors", true);
11. Check your phpinfo page to see if suhosin is installed as a module. If it is, this could be the cause of this problem. To fix this, add or edit an .htaccess file in your root forum directory and add these lines to it:
php_flag suhosin.cookie.encrypt Off
php_value suhosin.request.max_vars 2048
php_value suhosin.post.max_vars 2048
12. This can be caused by a bug in PHP 5.2.5:
https://bugs.php.net/bug.php?id=43620
13. This can also be caused by a memory_limit setting in php.ini that causes the server to time out before displaying the page. Edit config.php and add this right under the <?php line:
ini_set('memory_limit', -1);
14. If the script producing this problem is showgroups.php, then you may have too many usergroups for this. Make sure this is set to 'No' for any groups except Admins and Mods:
Admin CP -> Usergroups -> Usergroup Manager -> Edit Usergroup -> Viewable on Show Groups
15. Check the file and directory permissions. Although this can differ by server, in general the directories should be chmod'd to 755 (-rwxr-xr-x) and files to 644 (-rw-r--r--). If any are set to 777 (-rwxrwxrwx) then this could result in blank pages.
16. Check your .htaccess file for any rewrite rules that may be effecting the page(s) you are having the issue with. If your problem is only in one particular directory, you may need to exclude the rewrite rules from working in that directory.
17. There is a bug in PHP 5.3.5 that can cause white pages during search and possibly other functions. The link to this bug is here: https://bugs.php.net/bug.php?id=51425
Further info is here: https://www.vbulletin.com/forum/showthread.php/371767-New-post-search-returning-blank-white-pages-%28no-errors-indicated%29?p=2108112#post2108112
MySQL Issues |
Common MySQL Error Messages |
OS Error Code 11: Cannot create thread
This is an out of memory error. The operating system does not have enough memory to create a new process for MySQL to perform the query. You should increase the amount of memory available to MySQL by editing the MY.CNF file.
OS Error Code 13: Permission denied
You do not have permission to write to a directory. Most commonly the temporary files directory. Create a directory in your User Home directory on the server and chmod it 777. If this does not resolve the issue then you must contact your host and have them fix your permissions.
OS Error code 28: No space left on device
Either the swap, a partition, temp directory or hard drive on the web server is out of space or doesn't have enough space to complete the above operation.
This is a server issue, you need to contact your hosting provider to get more space to write to. I advice you to shut down your forum to prevent more errors or data loss. You can upload the tools.php file from the vbulletin .zip file do_not_upload/ folder into your forumdir/admincp/ directory and run it through the browser, there's a switch there to turn your forum on/off.
MySQL error code 126: Index file is crashed / Wrong file format
MySQL error code 127: Record-file is crashed
MySQL error code 132: Old database file
MySQL error code 134: Record was already deleted (or record file crashed)
MySQL error code 135: No more room in record file
MySQL error code 136: No more room in index file
MySQL error code 141: Duplicate unique key or constraint on write or update
MySQL error code 144: Table is crashed and last repair failed
MySQL error code 145: Table was marked as crashed and should be repaired
These error codes all have the same solution. They specify that something has gone wrong with your data. You should run optimize & repair on your database tables. You can upload the tools.php file from the vbulletin .zip file do_not_upload/ folder into your forumdir/admincp/ directory and run it through the browser, there's a switch there to run optimize and repair. Run it a few times for best result.
For more information on repairing your database please view the MySQL documentation at:
https://dev.mysql.com/doc/refman/5.0/en/repair.html
Socket Connection Error
This most commonly looks like this:
mysql_connect(): Can't connect to local MySQL server through socket '/var/lib/mysql/mysql.sock'
(2) /home/exampledomain/public_html/forums/includes/class_core.php on line 273
1. The info in your config.php file is wrong (in which case your forums wouldn't work at all), or
2. MySQL crashed, it's not running or it can't find the socket. You need to contact your host about this. Here is more info on this error:
https://dev.mysql.com/doc/mysql/en/Can_not_connect_to_server.html
mysql_connect(): Too many connections
The server has maxed out the number of MySQL connections it allows. You can try turning persistent connections off by adding this to your config.php:
$config['MasterServer']['usepconnect'] = 0;
Here is more info on that error: https://dev.mysql.com/doc/refman/5.0/en/too-many-connections.html
Error code 1064: MySQL Parse Error (error in SQL syntax
SQL parse errors are mostly caused by installed modifications. In order to test this temporarily disable all products and plugins by adding this line to your config.php file under <?php:
define('DISABLE_HOOKS', true);
It means that a query is sent that is larger than your host allows for.
MySQL Error : Got a packet bigger than 'max_allowed_packet' bytes
You need to ask your host to increase the 'max_allowed_packet' variable in the my.cnf file and restart MySQL. The default is 1Mb, but most hosts run 8-16 Mb without problems.
More info here: https://dev.mysql.com/doc/refman/5.0/en/packet-too-large.html
Link ID == False |
This error could be caused by any of the following:
- The database information in your config.php file is wrong (in which case your forums won't work at all.)
- The user doesn't have permission to access the database specified in config.php.
- The database doesn't exist.
- MySQL isn't accepting new connections. (The server could either be down or has reached it's maximum connections limit.)
To find out which of these is the cause of the problem, you can copy the text below and save it into a file called 'connect.php', then upload it to your forums directory and run it with a web browser.
<?php

require_once('./includes/config.php');

$db = @mysql_connect($config['MasterServer']['servername'], $config['MasterServer']['username'], $config['MasterServer']['password']) or die(mysql_error());

mysql_select_db($config['Database']['dbname'], $db);

echo "Connected sucessfully.";

?>
Failure to Connect |
This error means either:
- One or more of the following is wrong in your config.php file:
$config['MasterServer']['servername'] (except in rare cases, this should almost always be left as 'localhost' or '127.0.0.1')
$config['MasterServer']['username']
$config['MasterServer']['password']
$config['Database']['dbname']
If you are unsure of what the appropriate values are then you will need to ask your web host.
NOTE: Please note that you can NOT use the config.php file from version 2.x or 3.0.x on a 3.5.0 forum. - Or that this db user is not assigned to that database or does not have permission to access MySQL to create or access a database. You may need to first manually create the database and assign the db user to it. Since each web host is different, if you do not know how to do this then contact your web host for help.
- Or you are running MySQL 4.1.x. As of MySQL 4.1.X there is a new password hashing system. PHP4 does not have builtin support for it as of yet, however PHP5 does. In order for your old PHP4 MySQL clients to be able to connect to the MySQL 4.1.X database you need to set an OLD_PASSWORD. You should be able to run the following Query to make it possible for PHP4 to access the MySQL 4.1.X database.
SET PASSWORD FOR 'username'@'localhost' = OLD_PASSWORD('password');
More info is here:
https://dev.mysql.com/doc/mysql/en/password-hashing.html
https://dev.mysql.com/doc/mysql/en/upgrading-from-4-0.html
Duplicate entry 'XXX' |
This error is most commonly caused by plugins or addons that incorrectly set auto increment fields within vBulletin. Please remove your plugins or addons and verify that the database keys are set correctly.
It can also be caused by backing up a newer MySQL database with the "Compatibility Option" if this is the case, the MYSQL backup does not contain auto-increment information and the proper indexes are not created when the backup is restored.
Please run these queries to create the proper indexes in vBulletin.
ALTER TABLE `adminhelp` CHANGE `adminhelpid` `adminhelpid` INT( 10 ) UNSIGNED NOT NULL AUTO_INCREMENT;
ALTER TABLE `adminlog` CHANGE `adminlogid` `adminlogid` INT( 10 ) UNSIGNED NOT NULL AUTO_INCREMENT;
ALTER TABLE `adminmessage` CHANGE `adminmessageid` `adminmessageid` INT(10) UNSIGNED NOT NULL AUTO_INCREMENT;
ALTER TABLE `announcement` CHANGE `announcementid` `announcementid` SMALLINT( 5 ) UNSIGNED NOT NULL AUTO_INCREMENT;
ALTER TABLE `attachment` CHANGE `attachmentid` `attachmentid` INT( 10 ) UNSIGNED NOT NULL AUTO_INCREMENT;
ALTER TABLE `attachmentpermission` CHANGE `attachmentpermissionid` `attachmentpermissionid` INT( 10 ) UNSIGNED NOT NULL AUTO_INCREMENT;
ALTER TABLE `avatar` CHANGE `avatarid` `avatarid` SMALLINT( 5 ) UNSIGNED NOT NULL AUTO_INCREMENT;
ALTER TABLE `bbcode` CHANGE `bbcodeid` `bbcodeid` SMALLINT( 5 ) UNSIGNED NOT NULL AUTO_INCREMENT;
ALTER TABLE `calendar` CHANGE `calendarid` `calendarid` INT( 10 ) UNSIGNED NOT NULL AUTO_INCREMENT;
ALTER TABLE `calendarcustomfield` CHANGE `calendarcustomfieldid` `calendarcustomfieldid` INT( 10 ) UNSIGNED NOT NULL AUTO_INCREMENT;
ALTER TABLE `calendarmoderator` CHANGE `calendarmoderatorid` `calendarmoderatorid` INT( 10 ) UNSIGNED NOT NULL AUTO_INCREMENT;
ALTER TABLE `calendarpermission` CHANGE `calendarpermissionid` `calendarpermissionid` INT( 10 ) UNSIGNED NOT NULL AUTO_INCREMENT;
ALTER TABLE `cron` CHANGE `cronid` `cronid` INT( 10 ) UNSIGNED NOT NULL AUTO_INCREMENT;
ALTER TABLE `cronlog` CHANGE `cronlogid` `cronlogid` INT( 10 ) UNSIGNED NOT NULL AUTO_INCREMENT;
ALTER TABLE `event` CHANGE `eventid` `eventid` INT( 10 ) UNSIGNED NOT NULL AUTO_INCREMENT;
ALTER TABLE `forum` CHANGE `forumid` `forumid` SMALLINT( 5 ) UNSIGNED NOT NULL AUTO_INCREMENT;
ALTER TABLE `forumpermission` CHANGE `forumpermissionid` `forumpermissionid` SMALLINT( 5 ) UNSIGNED NOT NULL AUTO_INCREMENT;
ALTER TABLE `groupmessage` CHANGE `gmid` `gmid` INT( 10 ) UNSIGNED NOT NULL AUTO_INCREMENT;
ALTER TABLE `holiday` CHANGE `holidayid` `holidayid` INT( 10 ) UNSIGNED NOT NULL AUTO_INCREMENT;
ALTER TABLE `icon` CHANGE `iconid` `iconid` SMALLINT( 5 ) UNSIGNED NOT NULL AUTO_INCREMENT;
ALTER TABLE `infraction` CHANGE `infractionid` `infractionid` INT ( 10 ) UNSIGNED NOT NULL AUTO_INCREMENT;
ALTER TABLE `infractionban` CHANGE `infractionbanid` `infractionbanid` INT ( 10 ) UNSIGNED NOT NULL AUTO_INCREMENT;
ALTER TABLE `infractiongroup` CHANGE `infractiongroupid` `infractiongroupid` INT ( 10 ) UNSIGNED NOT NULL AUTO_INCREMENT;
ALTER TABLE `infractionlevel` CHANGE `infractionlevelid` `infractionlevelid` INT ( 10 ) UNSIGNED NOT NULL AUTO_INCREMENT;
ALTER TABLE `imagecategory` CHANGE `imagecategoryid` `imagecategoryid` SMALLINT( 5 ) UNSIGNED NOT NULL AUTO_INCREMENT;
ALTER TABLE `language` CHANGE `languageid` `languageid` SMALLINT( 5 ) UNSIGNED NOT NULL AUTO_INCREMENT;
ALTER TABLE `mailqueue` CHANGE `mailqueueid` `mailqueueid` INT( 10 ) UNSIGNED NOT NULL AUTO_INCREMENT;
ALTER TABLE `moderator` CHANGE `moderatorid` `moderatorid` SMALLINT( 5 ) UNSIGNED NOT NULL AUTO_INCREMENT;
ALTER TABLE `moderatorlog` CHANGE `moderatorlogid` `moderatorlogid` INT( 10 ) UNSIGNED NOT NULL AUTO_INCREMENT;
ALTER TABLE `paymentapi` CHANGE `paymentapiid` `paymentapiid` INT( 10 ) UNSIGNED NOT NULL AUTO_INCREMENT;
ALTER TABLE `paymentinfo` CHANGE `paymentinfoid` `paymentinfoid` INT( 10 ) UNSIGNED NOT NULL AUTO_INCREMENT;
ALTER TABLE `paymenttransaction` CHANGE `paymenttransactionid` `paymenttransactionid` INT( 10 ) UNSIGNED NOT NULL AUTO_INCREMENT;
ALTER TABLE `phrase` CHANGE `phraseid` `phraseid` INT( 10 ) UNSIGNED NOT NULL AUTO_INCREMENT;
ALTER TABLE `plugin` CHANGE `pluginid` `pluginid` INT( 10 ) UNSIGNED NOT NULL AUTO_INCREMENT;
ALTER TABLE `picture` CHANGE `pictureid` `pictureid` INT( 10 ) UNSIGNED NOT NULL AUTO_INCREMENT;
ALTER TABLE `picturecomment` CHANGE `commentid` `commentid` INT( 10 ) UNSIGNED NOT NULL AUTO_INCREMENT;
ALTER TABLE `pm` CHANGE `pmid` `pmid` INT( 10 ) UNSIGNED NOT NULL AUTO_INCREMENT;
ALTER TABLE `pmtext` CHANGE `pmtextid` `pmtextid` INT( 10 ) UNSIGNED NOT NULL AUTO_INCREMENT;
ALTER TABLE `poll` CHANGE `pollid` `pollid` INT( 10 ) UNSIGNED NOT NULL AUTO_INCREMENT;
ALTER TABLE `pollvote` CHANGE `pollvoteid` `pollvoteid` INT( 10 ) UNSIGNED NOT NULL AUTO_INCREMENT;
ALTER TABLE `post` CHANGE `postid` `postid` INT( 10 ) UNSIGNED NOT NULL AUTO_INCREMENT;
ALTER TABLE `postedithistory` CHANGE `postedithistoryid` `postedithistoryid` INT( 10 ) UNSIGNED NOT NULL AUTO_INCREMENT;
ALTER TABLE `productcode` CHANGE `productcodeid` `productcodeid` INT( 10 ) UNSIGNED NOT NULL AUTO_INCREMENT;
ALTER TABLE `productdependency` CHANGE `productdependencyid` `productdependencyid` INT( 10 ) UNSIGNED NOT NULL AUTO_INCREMENT;
ALTER TABLE `profilefield` CHANGE `profilefieldid` `profilefieldid` SMALLINT( 5 ) UNSIGNED NOT NULL AUTO_INCREMENT;
ALTER TABLE `ranks` CHANGE `rankid` `rankid` SMALLINT( 5 ) UNSIGNED NOT NULL AUTO_INCREMENT;
ALTER TABLE `reminder` CHANGE `reminderid` `reminderid` INT( 10 ) UNSIGNED NOT NULL AUTO_INCREMENT;
ALTER TABLE `reputation` CHANGE `reputationid` `reputationid` INT( 10 ) UNSIGNED NOT NULL AUTO_INCREMENT;
ALTER TABLE `reputationlevel` CHANGE `reputationlevelid` `reputationlevelid` INT( 10 ) UNSIGNED NOT NULL AUTO_INCREMENT;
ALTER TABLE `rssfeed` CHANGE `rssfeedid` `rssfeedid` INT( 10 ) UNSIGNED NOT NULL AUTO_INCREMENT;
ALTER TABLE `search` CHANGE `searchid` `searchid` INT( 10 ) UNSIGNED NOT NULL AUTO_INCREMENT;
ALTER TABLE `smilie` CHANGE `smilieid` `smilieid` SMALLINT( 5 ) UNSIGNED NOT NULL AUTO_INCREMENT;
ALTER TABLE `style` CHANGE `styleid` `styleid` SMALLINT( 5 ) UNSIGNED NOT NULL AUTO_INCREMENT;
ALTER TABLE `subscribeevent` CHANGE `subscribeeventid` `subscribeeventid` INT( 10 ) UNSIGNED NOT NULL AUTO_INCREMENT;
ALTER TABLE `subscribeforum` CHANGE `subscribeforumid` `subscribeforumid` INT( 10 ) UNSIGNED NOT NULL AUTO_INCREMENT;
ALTER TABLE `subscribethread` CHANGE `subscribethreadid` `subscribethreadid` INT( 10 ) UNSIGNED NOT NULL AUTO_INCREMENT;
ALTER TABLE `subscription` CHANGE `subscriptionid` `subscriptionid` SMALLINT( 5 ) UNSIGNED NOT NULL AUTO_INCREMENT;
ALTER TABLE `subscriptionlog` CHANGE `subscriptionlogid` `subscriptionlogid` MEDIUMINT( 8 ) UNSIGNED NOT NULL AUTO_INCREMENT;
ALTER TABLE `subscriptionpermission` CHANGE `subscriptionpermissionid` `subscriptionpermissionid` INT( 10 ) UNSIGNED NOT NULL AUTO_INCREMENT;
ALTER TABLE `template` CHANGE `templateid` `templateid` INT( 10 ) UNSIGNED NOT NULL AUTO_INCREMENT;
ALTER TABLE `templatehistory` CHANGE `templatehistoryid` `templatehistoryid` INT( 10 ) UNSIGNED NOT NULL AUTO_INCREMENT;
ALTER TABLE `thread` CHANGE `threadid` `threadid` INT( 10 ) UNSIGNED NOT NULL AUTO_INCREMENT;
ALTER TABLE `threadrate` CHANGE `threadrateid` `threadrateid` INT( 10 ) UNSIGNED NOT NULL AUTO_INCREMENT;
ALTER TABLE `upgradelog` CHANGE `upgradelogid` `upgradelogid` INT( 10 ) UNSIGNED NOT NULL AUTO_INCREMENT;
ALTER TABLE `user` CHANGE `userid` `userid` INT( 10 ) UNSIGNED NOT NULL AUTO_INCREMENT;
ALTER TABLE `useractivation` CHANGE `useractivationid` `useractivationid` INT( 10 ) UNSIGNED NOT NULL AUTO_INCREMENT;
ALTER TABLE `userchangelog` CHANGE `changeid` `changeid` INT(10) UNSIGNED NOT NULL AUTO_INCREMENT;
ALTER TABLE `usergroup` CHANGE `usergroupid` `usergroupid` SMALLINT( 5 ) UNSIGNED NOT NULL AUTO_INCREMENT;
ALTER TABLE `usergroupleader` CHANGE `usergroupleaderid` `usergroupleaderid` SMALLINT( 5 ) UNSIGNED NOT NULL AUTO_INCREMENT;
ALTER TABLE `usergrouprequest` CHANGE `usergrouprequestid` `usergrouprequestid` INT( 10 ) UNSIGNED NOT NULL AUTO_INCREMENT;
ALTER TABLE `usernote` CHANGE `usernoteid` `usernoteid` INT( 10 ) UNSIGNED NOT NULL AUTO_INCREMENT;
ALTER TABLE `usertitle` CHANGE `usertitleid` `usertitleid` INT( 10 ) UNSIGNED NOT NULL AUTO_INCREMENT;
ALTER TABLE `userpromotion` CHANGE `userpromotionid` `userpromotionid` INT( 10 ) UNSIGNED NOT NULL AUTO_INCREMENT;
ALTER TABLE `word` CHANGE `wordid` `wordid` INT( 10 ) UNSIGNED NOT NULL AUTO_INCREMENT;
Lost connection to MySQL server during query |
1. Is that the server timed out and closed the connection. By default, the server closes the connection after 8 hours or 28800 seconds if nothing has happened. You can change the time limit by setting the wait_timeout variable when you start mysqld via your server's /etc/my.cnf as well.
2. Another common reason to receive the MySQL server has gone away error is because you have issued a ``close'' on your MySQL connection and then tried to run a query on the closed connection. You can check that the MySQL hasn't died by executing mysqladmin version and examining the uptime.
i.e. to check mysql uptime, in shell as root user type:
mysqladmin -u root -p version
3. You can also get these errors if you send a query to the server that is incorrect or too large. If mysqld gets a packet that is too large or out of order, it assumes that something has gone wrong with the client and closes the connection. If you need big queries (for example, if you are working with big BLOB columns), you can increase the query limit by starting mysqld with the -O max_allowed_packet=# option (default 1M) or via max_allowed_packet variable in your /etc/my.cnf file and restarting mysql after you edited your /etc/my.cnf file. The extra memory is allocated on demand, so mysqld will use more memory only when you issue a big query or when mysqld must return a big result row
4. Or simply your host restarted MySQL. I'd contact your web host and ask him to look into this.
Links to additional information:
https://dev.mysql.com/doc/refman/5.0/en/gone-away.html
https://dev.mysql.com/doc/refman/5.0/en/common-errors.html
https://dev.mysql.com/doc/refman/5.0/en/server-parameters.html
https://dev.mysql.com/doc/refman/5.0/en/option-files.html
https://dev.mysql.com/doc/refman/5.0/en/show-variables.html
Can't connect to local MySQL server through socket |
1. The info in your config.php file is wrong (in which case your forums wouldn't work at all), or
2. MySQL crashed, it's not running or it can't find the socket. You need to contact your host about this. Here is more info on this error:
MySQL 5.1:
https://dev.mysql.com/doc/refman/5.1/en/can-not-connect-to-server.html
MySQL 5.0:
https://dev.mysql.com/doc/refman/5.0/en/can-not-connect-to-server.html
MySQL 3.23, 4.0, 4.1:
https://dev.mysql.com/doc/refman/4.1/en/can-not-connect-to-server.html
In Windows:
https://dev.mysql.com/doc/refman/5.1/en/can-not-connect-to-server-on-windows.html
https://dev.mysql.com/doc/refman/5.0/en/can-not-connect-to-server-on-windows.html
3. In the rare instance that this server is not using the default MySQL port (3306) then you will need to edit config.php to change this to the port it is using:
$config['MasterServer']['port'] = xxxx;
...with 'xxxx' being the port number.
Branding Free Instructions |
Warning:
Please note that you are not permitted to remove the vBulletin branding / copyright unless you have purchased the branding-free option. The costs are $170 on a per license basis and is a one time fee.
Removing the branding without permission will result in having your license being revoked.
Removing the branding without permission will result in having your license being revoked.
Here are the steps to remove all the public branding from vB4:
1. Edit the footer template here:
Admin CP -> Styles & Templates -> Style Manager -> Edit Templates -> footer
And remove this section:
<div id="footer_copyright" class="shade footer_copyright">
    <!-- Do not remove this copyright notice -->
    {vb:rawphrase powered_by_vbulletin}
    <!-- Do not remove this copyright notice -->
</div>
Admin CP -> Styles & Templates -> Edit Templates -> footer
2. In your headinclude template remove this line:
<meta name="generator" content="vBulletin {vb:raw vboptions.templateversion}" /><meta name="generator" content="vBulletin {vb:raw vboptions.templateversion}" /><div id="footer_copyright" class="shade">
<!-- Do not remove this copyright notice -->
{vb:rawphrase powered_by_vbulletin}
<!-- Do not remove this copyright notice -->
</div>x_powered_by_vbulletin
From this:
{1} - powered by vBulletin
To this:
{1}
5. Then, edit the vbulletin_message phrase and change this:
vBulletin Message
...to whatever you want.
6. To change the default metatags in vBulletin, you would do so under the General Options
Admin CP -> Settings -> Options -> General Settings -> Meta Keywords and Meta Description
7. And finally, in the file /archive/index.php you need to remove this section:
<div id=\"copyright\">$vbphrase[vbulletin_copyright]</div>
</div>
A. To edit Templates:
Admin CP -> Styles & Templates -> Style Manager -> Edit Templates
B. To edit Phrases:
Admin CP -> Languages & Phrases -> Search in Phrases -> phrasename (Phrase Variable Name Only)
Click on edit, and place the new phrase in the available language text boxes.
Warning:
Please note that if you are not permitted to remove the vBulletin branding / copyright unless you have purchased the branding-free option. The costs are $170 on a per license basis and is a one time fee.
Removing the branding without permission will result in having your license being revoked.
Removing the branding without permission will result in having your license being revoked.
Restoring the Required Copyright Notice |
The copyright notice must be clearly visible on all forum pages unless you have purchased the Branding Free license option.
Your footer must contain at least the following text and must not be masked by color or images:
Powered by vBulletin®
Copyright ©2000-2008 Jelsoft Enterprises Limited.
Restoring the copyright notice
If you have removed the copyright and need to add it back in you can do one of two things:
1. Revert the footer template.
AdminCP -> Styles & Templates -> Style Manager -> Edit Templates -> select the 'footer' template -> Click the 'Revert' button
2. Edit the footer template and add in the following text:
<!-- Do not remove this copyright notice -->
$vbphrase[powered_by_vbulletin]
<!-- Do not remove this copyright notice -->
3. Revert the 'powered_by_vbulletin' phrase
AdminCP -> Languages & Phrases -> Search in Phrases -> enter 'powered_by_vbulletin' -> select 'Phrase Variable Name Only ' -> Click the 'Find' button -> Click the 'Copy Default Text' -> Save
Appendix: Terminology |
vBulletin-Related Terms |
Admin Control Panel |
Only administrators have access to the AdminCP.
Administrator |
Avatar |
There are two types of avatars, predefined and custom:
- Predefined avatars are images that the board administrator has made available to use.
- Custom avatars are images created by the user that can be uploaded to the board if the Adminstrator has granted that particular permission.
BB Code |
Examples:
In html to make text bold, italics or underlined you would use:
<b>Bold</b>
<i>Italic</i>
<u>Underlined</u>
[b]Bold[/b]
[i]Italic[/i]
[u]Underlined[/u]
Bulletin Board |
Category |
Since vBulletin version 2.0, Categories have ceased to be separate entities from Forums - a category is simply a Forum that is configured to accept no posts.
Channel |
Conditionals |
Customer Number |
Customer Password |
Data APIs |
For example, instead of having different code to update a user record from the Admin Control Panel and from the User Profile editor, both systems can now simply direct their data to the user data manager, which will deal with ensuring that the data is valid and complete, then save it to the database.
Forum |
Guest |
This could be because they have not yet registered, or because they are a registered member who has logged out.
Hook |
Hooks in the code look like this:
($hook = vBulletinHook::fetch_hook('unique_hook_id')) ? eval($hook) : false;
In this instance, the hook is called 'unique_hook_id'.
Ignore List |
Posts from users that you are ignoring are hidden from view when logged into the forums.
Inline Moderation |
The following actions can be performed on threads with inline moderation from forumdisplay:
- Delete Threads
- Undelete Threads
- Open Threads
- Close Threads
- Approve Threads
- Unapprove Threads
- Stick Threads
- Unstick Threads
- Move Threads
- Merge Threads
- Merge Posts
- Move Posts
- Delete Posts
- Undelete Posts
- Approve Posts
- Unapprove Posts
- Approve Attachments
- Unapprove Attachments
Member |
Members' Area |
The Members' Area is where you can download vBulletin releases and updates as well as access to additional documentation and resources not publically available.
The Members' Area is currently located at https://members.vbulletin.com.
Moderator |
Moderator Control Panel |
The ModCP is a vastly scaled down version of the AdminCP and allows Moderators to perform duties based on the permissions assigned to them by the Administrator.
Plugin |
Plugins allow code to be added to vBulletin without actually modifying the PHP files.
Post |
Post Icon |
Product |
vBulletin products are arranged in a such a way that they can be semi-automatically installed and uninstalled through the Product Manager.
Products are used to extend or modify functionality in vBulletin.
Prune |
Replacement Variable |
Smilies |
Sticky Thread |
Making a thread sticky is part of the Thread Tools that are available to Adminstrators and Moderators.
StyleVar |
Super Administrator |
Superadministrators must be added to the vBulletin config.php file to enable their superadmin status:
//    ****** SUPER ADMINISTRATORS ******

//    The users specified below will have permission to access the administrator permissions

//    page, which controls the permissions of other administrators

$config['SpecialUsers']['superadministrators'] = '1';
Super Moderator |
Thread |
User |
User Control Panel |
Usergroup |
General Internet-Related Terms |
AJAX |
Cookie |
CSS |
Domain |
FTP |
HTML |
HTTP |
IP Address |
An example would be IP Address 66.135.192.87 is for ebay.com
Javascript |
When JavaScript is combined with Cascading Style Sheets(CSS), and later versions of HTML (4.0 and later) the result is often called DHTML.
Search bot |
Server |
Spider |
Typically search engines use spiders to gather information from web sites to increase there search index.
example search engine spiders:
- Googlebot
- lycos
- ask jeeves
- scooter
- fast-webcrawler
- slurp@inktomi
- turnitinbot
AdminCP > vBulletin Options > Who's Online Options
- Enable Spider Display - Setting this to Yes will allow you to see the spiders you have specified in the Spider Identification Description
- Spider Identification Strings - Enter the unique identifier for the spider you want to see
- Spider Identification Description - the description of the spider to be displayed in the Who's Online section of your board
SSH |
You will need to check with your hosting company to see if it is available with your hosting package.
Telnet |
You will need to check with your hosting company to see if it is available with your hosting package.
Note:
Telnet is generally considered to be insecure, as your login username and password is transferred using plain text.
To prevent this, it is preferable to use the SSH protocol.
To prevent this, it is preferable to use the SSH protocol.
URL |
XHTML |
XSS |
XML |
Miscellaneous Terms |
AIM |
ASCII |
CGI Shebang |
COPPA |
vBulletin is compliant with the COPPA law and requires children under the age of 13 to get parental consent before they can post.
For more info about this law, see: https://www.ftc.gov/bcp/conline/pubs/buspubs/coppa.htm
DST |
FAQ |
Firewall |
ICQ |
Import |
- Conversion
Importing is conversion of data from a different Bulletin Board program to vBulletin. Merging two forums together (users, forums, attachments, etc).
- Admin Control Panel
Importing of additional Style- or Language Packs. This allows you to update or include (additional) styles or languages on your board.
Localhost |
localhost uses the reserved loopback IP address 127.0.0.1.
In general a MySQL server runs on the same server as your web server. You can enter in the vBulletin includes/config.php file as host address for the MySQL server localhost. (See example below)
//    ****** MASTER DATABASE SERVER NAME ******

//    This is the hostname or IP address of the database server.

//    It is in the format HOST:PORT. If no PORT is specified, 3306           is used.

//    If you are unsure of what to put here, leave it at the default value.


$config['MasterServer']['servername'] = 'localhost';
MSN |
MySQL |
Note:
More information about how to get and install MySQL can be found here Technical Documents / Installing MySQL or from https://www.mysql.com
PHP |
PHP is a script language and interpreter.
Note:
More information about how to get and install PHP can be found here Technical Documents / Installing PHP and Apache or from https://www.php.net
phpMyAdmin |
RSS Enclosure |
Thumbnail |
WYSIWYG |
The vBulletin WYSIWYG editor is one that allows a user that creates a new post to see what the end result will look like while the post is being created. This is in contrast to editing a post in the vBulletin standard editor which requires you to understand BB Code tags like [b] for bold and [u] for underline.
Yahoo |
Appendix: Technical Documents |
Securing Your vBulletin Installation |
Securing Your Server |
Most hosting providers will provide this service if you have a dedicated machine so you should work with them to make sure your machine is as secure as possible. Below are some links that will help you.
Linux Kernel Hardening
Installing and Securing IIS Servers
Securing Apache
Securing PHP
Securing MySQL
Please note, that if you are on a shared server you must rely on your hosting provider to secure your server for you.
Accessing Your Server and Files |
You can find out more about these protocols at Wikipedia.com
SFTP: https://en.wikipedia.org/wiki/SSH_file_transfer_protocol
SSH: https://en.wikipedia.org/wiki/SSH
Root Accounts
Root or Super User accounts are a necessity if you maintain your own server but they are a security nightmare. You should never access your server directly with a Root Account unless you can absolutely guarantee a secure tunnel between your access point and the server itself. You can do this with a Virtual Private Networking protocol on both your server and the computer you access the server with. Not all servers will support this though and your datacenter might not allow the installation of the software to allow it.
If you are using Linux or Unix, you can create a usergroup called a "Wheel Group". This is a group of users that once logged in through SSH, can issue a command to switch to a superuser. This is the only way you should access your superuser accounts without a VPN connection. You can find information on creating wheel account users in your operating system's documentation.
Restricting Access to Your Files |
The most common method of authorizing someone is called "Basic Authorization. The Basic authentication method transmits user names and passwords across the network in plaintext or unencrypted form. A computer vandal could use a network monitoring tool to intercept this information. You can use your Web server's encryption features, in combination with Basic authentication, to secure user account information transmitted across the network.
.htaccess
.htaccess is how you can easily secure files in Apache. It allows you to use Apache's configuration directives without editing the default configuration file (httpd.conf). This makes it useful for communities on shared or virtual hosting or dedicated hosting.
There are a lot of things you can do with .htaccess but we are concerned with denying access to specific files and directories.
NTAUTH
Windows comes with a permissions system often referred to as NTAUTH. It is part of the NTFS file system and integrated into IIS and other server technologies in Windows. For instructions on how to use this to protect your server please see Microsoft's IIS Documentation:
https://www.microsoft.com/windows2000/en/server/iis/default.asp?url=/windows2000/en/server/iis/htm/core/iiabasc.htm
Alternatives to NTAUTH
IISPassword is a free utility that can be installed on your IIS server. IISPassword uses Basic HTTP Authentication for password protecting web sites on IIS, just like htaccess works on Apache. That makes your password protected Apache web site compatible with IIS, and vice versa.
CHMOD, or File Permissions on your Unix/Linux System
You can control who has access to files on your servers beyond whether a web browser can call them up and have the server execute them. This is based on file permissions and can help to protect your files if someone gains unauthorized access to another portion of the machine. File permissions will help protect your site more on a shared server which has many people accessing it than they will on a server that only you have access to. However it is a good practice to only give the minimum permissions that you need to give and allow your site to work properly.
In our case, the web server application needs to be able to read your vBulletin files as long as PHP is installed as an Apache or ISAPI Module. If you are using the CGI executable, then they will probably need Execute permissions as well. In Linux and Unix, you change permissions using a tool called CHMOD which lets you set the permissions.
CHMOD can use either bitkeys, a series of numbers to designate permissions, or letters to represent the permissions. Both of these can be confusing to the uninitiated. Using the numbers results in more concise commands with the same number of control. You will see these commonly referred to in technical documents.
To set the permissions for your vBulletin files, with PHP as a Apache or ISAPI module, you would type the following in your command prompt on the server:
chmod 644 *
If your hosting provider tells you that you need Read and Write permissions on your files then you would use this command:
chmod 755 *
Most modern SFTP clients can handle this automatically though a properties dialog on the context menu. Refer to your client software for documentation on how to do this.
Please Note: If an attacker gets root access to your machine, there is no way to protect your files with permissions. They will be able to access everything. If this happens you will need a recent backup so you can recover your site.
Securing your Config.php File |
// ****** USERS WITH ADMIN LOG VIEWING PERMISSIONS ******
// The users specified here will be allowed to view the admin log in the control panel.
// Users must be specified by *ID number* here. To obtain a user's ID number,
// view their profile via the control panel. If this is a new installation, leave
// the first user created will have a user ID of 1. Seperate each userid with a comma.
$config['SpecialUsers']['canviewadminlog'] = '1';
// ****** USERS WITH ADMIN LOG PRUNING PERMISSIONS ******
// The users specified here will be allowed to remove ("prune") entries from the admin
// log. See the above entry for more information on the format.
$config['SpecialUsers']['canpruneadminlog'] = '1';
// ****** USERS WITH QUERY RUNNING PERMISSIONS ******
// The users specified here will be allowed to run queries from the control panel.
// See the above entries for more information on the format.
// Please note that the ability to run queries is quite powerful. You may wish
// to remove all user IDs from this list for security reasons.
$config['SpecialUsers']['canrunqueries'] = '';
// ****** UNDELETABLE / UNALTERABLE USERS ******
// The users specified here will not be deletable or alterable from the control panel by any users.
// To specify more than one user, separate userids with commas.
$config['SpecialUsers']['undeletableusers'] = '';
The section of code to look for is:
// ****** UNDELETABLE / UNALTERABLE USERS ******
// The users specified here will not be deletable or alterable from the control panel by any users.
// To specify more than one user, separate userids with commas.
$config['SpecialUsers']['undeletableusers'] = '';
Making sure no one edits this file after you upload it to the server is a large priority. If an attacker can change the contents of this file they can easily take control of your community. The first thing you want to do is restrict access to this file via file permissions. Make sure no one can access this except you. Use the techniques described under Restricting Access to secure this file.
One thing you might consider doing is denying access via a Web Browser at all times. This file only needs to be read internally via PHP and should not be accessed with a Web Browser. On most installations, this would never occur. However should your version of PHP stop working for some reason, then the file can be served as plain text and any prying eyes can see it. You can counter this on the webserver level with tools like .htaccess and NTFS Permissions.
Here is an example .htaccess file that would prevent access to the config.php. You would place this file within your /includes directory.
Apache 2.2:
<Files config.php>
order deny,allow
deny from all
</Files>
<Files "config.php">
  Require all denied
</Files>
https://www.microsoft.com/windows2000/en/server/iis/htm/core/iidfpsc.htm
Moving Servers |
1. The vBulletin files, including all the vB files currently on your server as well as any attachments, avatars and profile pics (if you store these in the file system instead of the database) along with any custom images.
2. The vBulletin database which contains the actual data itself, including the user info, posts, threads, forums, setting, styles, languages, etc.
This guide will help you move your vBulletin forum from one server to another. Please note that while you can move the files themselves with FTP, moving the database generally requires Telnet or SSH access to both servers. (Other methods are available but are less reliable.)
If you only have this access on one of the servers, you may need to ask your host to assist you with the steps you cannot perform.
Warning:
Specific cookie domains (Cookie Domain) and cookie paths (Path to Save Cookies) may cause problems if you are moving servers and changing the URL to your forums.
If you are unsure whether your cookie settings will cause problems after the move, we recommend resetting your cookie path to / and removing any cookie domain value before the move. An incorrectly set cookie domain or path will likely prevent you from accessing your control panel.
If you are unsure whether your cookie settings will cause problems after the move, we recommend resetting your cookie path to / and removing any cookie domain value before the move. An incorrectly set cookie domain or path will likely prevent you from accessing your control panel.
1) Backing Up and Moving the Files |
If you are storing attachments, avatars and user profile pictures in the file system instead of the database (the default storage method) then you will need to move those files and directories over as well. As with the old server these directories will need to be made world-readable and writable, (chmod -R 777 on *Nix systems.)
Also since the exact path to these directories will very likely be different on the new server, you will need to reset these paths in the Admin CP after the transfer is done and your forums are up and running on the new server. You do this here:
Admin CP -> Attachments -> Attachment Storage Type
Admin CP -> Avatars -> User Picture Storage Type
2) Backing-Up the Current Database |
| 1 | Telnet/SSH into the server where your vBulletin is currently installed. We will call this machine1. |
| 2 | Type:mysqldump --opt -Q -uUSERNAME -p DATABASENAME > /PATH/TO/DUMP.SQLIn this line, you should change the following:
|
| 3 | Once it has returned to the prompt, verify that DUMP.SQL exists in the directory you specified. If you did not specify a full directory, the file will be in the directory you are currently in. |
Note:
When moving servers you need to check the MySQL versions on both the old and new servers. It is always best if the new server is running the same or a newer version of MySQL.
If the new server is running an older version of MySQL it would be best to seek out a different host. If this is not possible, you will need to make a compatible dump of the database.
This only applies between major version number, ie MySQL 5.x to MySQL 4.x.
Add the following option to the mysqldump command:
--compatible=name
Produce output that is more compatible with other database systems or with older MySQL servers. The value of name can be ansi, mysql323, mysql40, postgresql, oracle, mssql, db2, maxdb, no_key_options, no_table_options, or no_field_options. To use several values, separate them by commas. These values have the same meaning as the corresponding options for setting the server SQL mode.
Please note that there may still be issues even using the --compatible option
MySQL Manual
3) Transferring to the New Server |
| 1 | Telnet/SSH into machine1 if you have not already. |
| 2 | Type:ftp MACHINE2Replace MACHINE2 with the host name (www.example.com) or IP address (192.168.1.1) of the new server. You should be prompted for a username and password. This is the username and password that you use to login via FTP to your new server. |
| 3 | Type the following:ascHere you should change:
|
| 4 | Once these commands have finished, type:close |
| 5 | Verify that DUMP.SQL is in /PATH/TO/NEW/DIRECTORY on the new server. |
4) Restoring the Database on the New Server |
| 1 | On the new server, if necessary, create the database which your vBulletin will be installed in. Refer to your host for specific information on how this is done. |
| 2 | Telnet/SSH into machine2. |
| 3 | Type:mysql -uUSERNAME -p NEWDBNAME < /PATH/TO/NEW/DUMP.SQLYou should change the following parts of this line:
|
Note:
We recommend you use the method described above to restore your database, as it is the most reliable. If you don't have access to SSH then there are alternate instructions on restoring your database available in the technical section of the manual.
5) Bringing it Back Online |
| 1 | Open up includes/config.php and edit $config['MasterServer']['servername'], $config['MasterServer']['username'], $config['MasterServer']['password'], and $config['Database']['dbname'] with the values that correspond with the new server. If you are not sure what these values should be, please contact your new host. |
| 2 | Upload the new config.php and the rest of the files (if they still need to be uploaded). |
| 3 | Login to your admin control panel, go to the vBulletin Options section, and change your BB URL, if necessary. |
Note:
If you are not using the default database cache in vBulletin, you will need to flush your cache and restore it on the new server. These means updating your Memcache settings in your config.php file. If you are using the filesystem to store your Datastore, you need to make sure that includes/datastore/datastore.php is chmod 0777 so vBulletin can write to it.
Installing PHP and Apache |
This section will compile and perform a basic, generic install of Apache and PHP. If you need specific values, you will need to modify the configure lines to suit.
Note:
We will setup PHP with Apache 1.x in this section. Instructions may vary for Apache 2.x.
1) Downloading PHP and Apache |
| 1 | We need to download the latest versions of both Apache and PHP to the server. Go to https://www.php.net and download the source code of the latest version, php-xxx.tar.gz and place it in the /usr/local/src directory on your server. |
| 2 | Go to https://www.apache.org and download the source for the latest version of Apache 1.x, apache_xxx.tar.gz, and place this in the same location. |
Note:
The file names will vary slightly as they will include the version number. You will need to replace xxx in the following steps with the appropriate value.
2) Preparing to Install Apache |
| 1 | Telnet/SSH into your server if you have not already. |
| 2 | From the shell prompt, type the following:cd /usr/local/src |
| 3 | Now we need to figure out where Apache is currently running, so we can configure the new version for the same location. Type:ps –efLook for a line like this: nobody 32319 340 0 19:48 ? 00:00:00 /usr/local/etc/httpd/bin/httpdThis says Apache is installed in /usr/local/etc/httpd. This may be different on your system, if so, replace /usr/local/etc/httpd with your Apache location in the following steps. |
| 4 | Now type:cd /usr/local/src/apache_xxxThis will configure Apache and get ready for compiling in a later step. |
3) Compiling and Installing PHP |
cd /usr/local/src/php-xxxNow PHP 4 is installed and we are ready to compile and install Apache.
./configure --prefix=/usr/local/php --with-config-file-path=/usr/local/php --with-mysql --with-apache=../apache_xxx
make
make install
4) Compiling and Installing Apache |
| 1 | From the shell, type:cd /usr/local/src/apache_xxx |
| 2 | Now shut down Apache to install in new binaries:/usr/local/etc/httpd/bin/apachectl stop |
| 3 | Now install Apache:make install |
5) Completing the Installation |
| 1 | Now we just want to copy our PHP configuration file:cd /usr/local/src/php-xxxIf you have any modifications you wish to make to your php.ini file, you may make them now. |
| 2 | cd /usr/local/etc/httpd/confEdit your httpd.conf file and make sure the following line is added: AddType application/x-httpd-php .php |
| 3 | You can now reboot your system, or simply re-start Apache with:/usr/local/etc/httpd/bin/apachectl start |
Installing PHP under IIS using FastCGI |
Microsoft has posted instructions on how to install PHP under FastCGI on their IIS.net website. You can see those instructions here:
To install PHP with FastCGI under IIS6 please follow these instructions:
https://learn.iis.net/page.aspx/247/using-fastcgi-to-host-php-applications-on-iis-60/
To install PHP with FASTCGI under IIS7 please follow these instructions:
https://learn.iis.net/page.aspx/246/using-fastcgi-to-host-php-applications-on-iis-70/
Installing MySQL |
1) Compiling and Installing MySQL |
tar xfz mysql-version.tar.gzNext you need to configure the MySQL install. Unless you really know what you're doing, all you should have to do is tell it where to install. I recommend /usr/local/mysql:
cd mysql-version
./configure --prefix=/usr/local/mysqlAfter sitting through the screens and screens of configuration tests, you'll eventually get back to a command prompt. You're ready to compile MySQL:
makeAfter even more screens of compilation, you'll again be returned to the command prompt. You're now ready to install your newly compiled program:
make installMySQL is now installed, but before it can do anything useful its database files need to be installed too. Still in the directory you installed from, type the following command:
scripts/mysql_install_dbWith that done, you can delete the directory you've been working in, which just contains all the source files and temporary installation files. If you ever need to reinstall, you can just re-extract the mysql-version.tar.gz file.
2) Setting Up a New User for MySQL |
/usr/sbin/groupadd mysqlgrpBy default, MySQL stores all database information in the var subdirectory of the directory to which it was installed. We want to make it so that nobody can access that directory except our new MySQL user. The following commands will do this (I'm assuming you installed MySQL to the /usr/local/mysql directory):
/usr/sbin/useradd -g mysqlgrp mysqlusr
cd /usr/local/mysql
chown -R mysqlusr.mysqlgrp var
chmod -R go-rwx var
3) Starting the MySQL Server |
bin/safe_mysqld --user=mysqlusr &The MySQL server has now been launched by the MySQL user and will stay running (just like your Web or FTP server) until your computer is shut down. To test that the server is running properly, type the following command:
bin/mysqladmin -u root statusA little blurb with some statistics about the MySQL server should be displayed. If you get an error message, something has gone wrong. If retracing your steps to make sure you did everything described above doesn't solve the problem, a post to the SitePoint.com Forums will probably help you pin it down in no time.
4) Making MySQL Start Up with Your Server |
Assuming you've set up a special MySQL user to run the MySQL server, you'll need to edit the mysql.server script before you use it. Open it in your favorite text editor and change the mysql_daemon_user setting to refer to the user you created above:
mysql_daemon_user=mysqlusrSetting up the script to be run by your system at startup is a highly operating system-dependant task. If you're not using RedHat Linux and you're not sure of how to do this, you'd be best to ask someone who knows. In RedHat Linux, the following commands (starting in the MySQL directory) will do the trick:
cp share/mysql/mysql.server /etc/rc.d/init.d/That's it! To test that this works, you can reboot your system and request the status of the server as before to make sure it runs properly at startup.
cd /etc/rc.d/init.d
chmod 500 mysql.server
cd /etc/rc.d/rc3.d
ln -s ../init.d/mysql.server S99mysql
cd /etc/rc.d/rc5.d
ln -s ../init.d/mysql.server S99mysql
Creating a New MySQL Database for vBulletin to Use |
The following pages describe the process needed to do this under a variety of systems.
Setting-up a MySQL Database on the Command Line |
| 1 | Firstly, you will need to log in to your server via SSH or Telnet as the root user, or some other user with permission to control MySQL at the root level. Windows users can use Command Prompt. |
| 2 | Next, you will need to start the MySQL command line tool by typing something along these lines:/usr/local/mysql/bin/mysql -uroot -pon Windows it willl be similar to: c:\mysql\bin\mysql -uroot -pThe system will then ask you to provide the MySQL root password to continue. |
| 3 | When you have completed the login to MySQL you will see a mysql> command prompt. To see the list of databases that already exist, type the following:SHOW DATABASES;You will then be given a list of the databases that already exist. The name you choose for your new database must be unique, so ensure that the name you want to give to your new database is not already in use. |
| 4 | After you have decided upon a name, you can run the query to create the new database. For this example, we will call the database example_database. Type the following, replacing the name of the database with the name you have chosen: CREATE DATABASE example_database; |
| 5 | Having created the database, we will now create a MySQL user account with permission to access the new database. Doing this is a security precaution, as it's never a good idea to have PHP scripts talking to MySQL with root privileges. In this example, we will name our new user example_user and give the account a password of p4ssw0rd. Replace those values as appropriate when you type the following: GRANT ALL ON example_database.* |
$config['Database']['dbname'] = 'example_database';

$config['MasterServer']['servername'] = 'localhost';

$config['MasterServer']['username'] = 'example_user';

$config['MasterServer']['password'] = 'p4ssw0rd';
Setting-up a MySQL Database in cPanel |
The only notable difference is if you are using the cPanel Advanced theme. If that's the case, click the then the and join us again at the next step.
For all others, you should see a screen something like the one in the figure below. Click the icon.
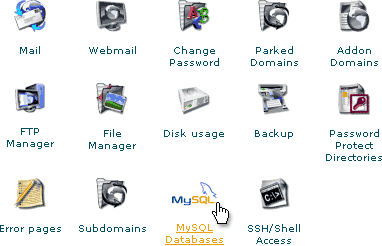
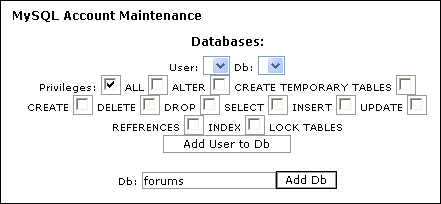
Now we have to create the database user and password. Scroll down the screen until you see this:
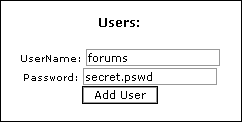
Once you have clicked you will be brought to a redirect screen confirming the creation of the username and password. Click the or link to return to the main MySQL screen.
Now you have to add the user to the database so they can have access and control. Scroll until you see this:
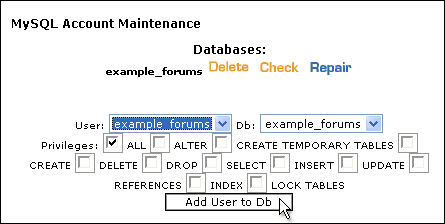
Again, you will be sent to the redirect screen confirming the addition of the user to the database. Again, click the or link to return to the main MySQL screen. You should see something like this:
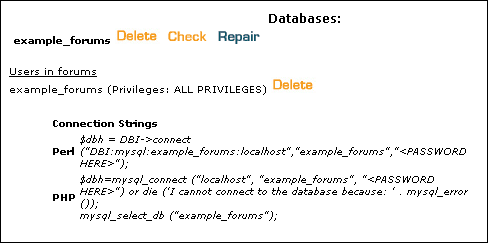
Note:
cPanel will always preface the database name and database username with your main account username and an underscore.
If you chose the database name and the database username your database will be and your database username will be
If you chose the database name and the database username your database will be and your database username will be
Setting-up a MySQL Database in Plesk |
Note:
If the button is greyed out, it means that your account does not have MySQL database access. Please contact your host to correct this.
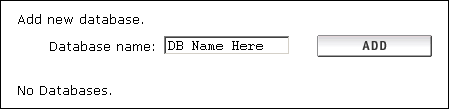
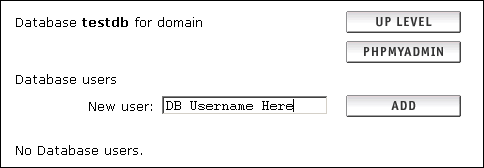
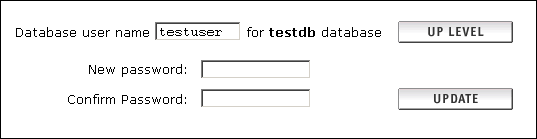

Setting-up a MySQL Database in Ensim |
When you load your control panel you should see something resembling the screen in the following figure. Most people will click the link next to the icon. Others may have to click the link in the left side nav panel.
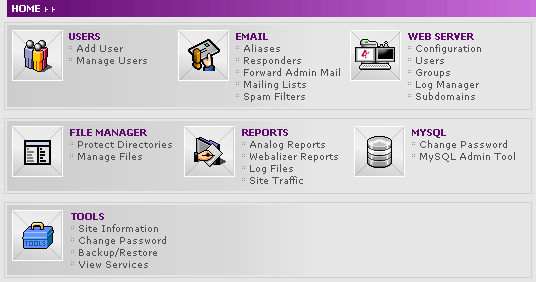
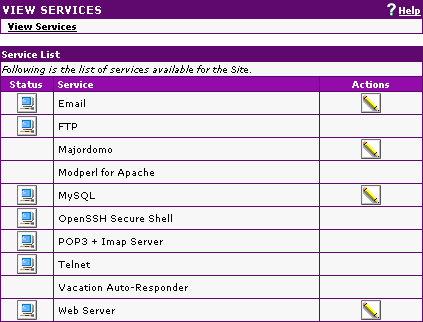

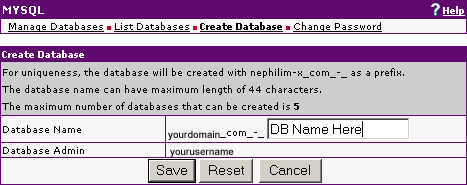
This will bring the screen where you create the database:

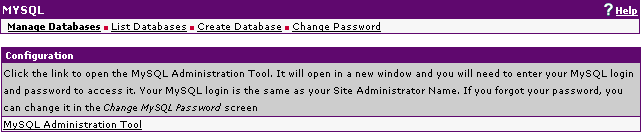
Note:
Most Ensim installations will prefix the database name with so if you choose as your database name, the actual name of the database may be
Also, Ensim will use the same username and password for the database username and password that you use for your main account login.
Also, Ensim will use the same username and password for the database username and password that you use for your main account login.
Backing-up your MySQL Database Manually |
Backing Up The Database via SSH/Telnet |
1) SSH or Telnet access to your site. You will need to check with your hosting company to see if this is available.
2) An SSH/Telnet Client, such as PuTTy.
Open your SSH/Telnet client and log into your website. The command line prompt you will see will vary by OS.
For most hosting companies, this will bring you into the FTP root folder.
Type in the following to create a backup in the current directory:
mysqldump --opt -Q -u dbusername -p databasename > backupname.sql
Or to create a backup in a separate directory (signified by /path/to/) type:
mysqldump --opt -Q -u dbusername -p databasename > /path/to/backupname.sql
You will be prompted for the database password. Enter it and the database will backup.
If your hosting company has you on a remote MySQL server, such as mysql.yourhost.com, you will need to add the servername to the command line. The servername will be the same as in your config.php. The command line will be:
Current directory:
mysqldump --opt -Q -h servername -u dbusername -p databasename > backupname.sql
Separate directory:
mysqldump --opt -Q -h servername -u dbusername -p databasename > /path/to/backupname.sql
You can then, if you wish, download the backup to your home computer.
Backing Up The Database via phpMyAdmin |
Go to phpMyAdmin in your web browser and select the database you wish to back up by clicking on the name. If you have multiple databases, you will need to select the name from the drop menu.
In the right-hand frame, you will see a row of links. Click [Export]
Now in the right-hand frame you will see three (3) areas. In the first area, called Export you select the table(s) you wish to back up by selecting them from the list. To select multiple tables, hold the Ctrl key and click the table names. To select all table, click the [Select All] link.
In the second area, called SQL Options, make sure you have the following boxes checked:
Structure
Add 'drop table'
Add AUTO_INCREMENT value
Enclose table and field names with backquotes
Data
In the third area, check Save as file and type a name for the backup in the File name template :.
If your system supports it, you may also choose a compression type. None is selected by default.
Click and you will be prompted to save the backup on your local computer.
Restoring your MySQL Database Manually |
Note:
There is no Database Restore function built into vBulletin. If you cannot use either of the methods covered in the manual, you will need to ask your hosting company to restore the database for you.
Restoring The Database via SSH/Telnet |
1) SSH or Telnet access to your site. You will need to check with your hosting company to see if this is available.
2) An SSH/Telnet Client, such as PuTTy.
Note:
If your database backup resides on your home computer, you will first have to upload it via FTP to your website
You can either change directoties to wherever the backup is located and type in the following:
mysql -u dbusername -p databasename < backupname.sql
Or if you do not want to change directories and you know the path to where the backup is located, type in the following:
mysql -u dbusername -p databasename < /path/to/backupname.sql
You will be prompted for the database password. Enter it and the database will backup.
If your hosting company has you on a remote MySQL server, such as mysql.yourhost.com, you will need to add the servername to the command line. The servername will be the same as in your config.php. The command line will be:
mysql -h servername -u dbusername -p databasename < backupname.sql
Or:
mysql -h servername -u dbusername -p databasename < /path/to/backupname.sql
Restoring The Database via phpMyAdmin |
Go to phpMyAdmin in your web broswer and select the database you wish to back up by clicking on the name. If you have multiple databases, you will need to select the name from the drop menu.
In the right-hand frame, you will see a row of links. Click [SQL]
You will see a large input box for queries and below that you will see a smaller box labeled Browse.
Click the button, navigate to and select the backup file on your home computer and click the .
Warning:
There are sometimes file size limitations on importing a database backup this way. If your database is too large, you might encounter PHP timeout errors. In that case, you will need to attempt to restore your database via SSH/Telnet.
The vBulletin Datastore |
Examples for this are
- forumcache - A serialized array with all the forums along with their options and permissions
- options - A serialized array with all the information set in the vBulletin Options
- profilefield - A serialized array of all the profile fields and their options.
/* #### DATASTORE CACHE CONFIGURATION  ####

Here you can configure different methods for caching datastore items.

vB_Datastore_Filecache - to use includes/datastore/datastore_cache.php

vB_Datastore_APCu - to use APCu (which replaces APC)

vB_Datastore_XCache - to use XCache (not available for PHP 7+)

vB_Datastore_Memcache - to use one or more Memcache servers, more configuration below.

vB_Datastore_Redis - to use one or more Redis servers, more configuration options below. */

// $config['Datastore']['class'] = 'vB_Datastore_Filecache';
vB_Datastore_Filecache
This option saves the datastore data in the /includes/datastore/datastore_cache.php file. Reading from the filesystem is generally less load-intensive than querying the database.
To use this option, you'll need to make sure that the /includes/datastore/datastore_cache.php file is writable and readable by PHP. Usually this is chmod 777. Then, uncomment the following line in the config.php file.
// $config['Datastore']['class'] = 'vB_Datastore_Filecache';
This option saves the datastore data in shared memory using APCu on a server. APCu is replacing APC.
To use this option, replace the following line:
// $config['Datastore']['class'] = 'vB_Datastore_Filecache';
$config['Datastore']['class'] = 'vB_Datastore_APCu';
This option saves the datastore data on a memcached server. This is a fast memory caching system which can also be run on a different server to reduce load on the main server.
To use this option, a memcached server has to be set up first.
To use this option, replace the following line:
// $config['Datastore']['class'] = 'vB_Datastore_Filecache';
$config['Datastore']['class'] = 'vB_Datastore_Memcache';
/* #### MEMCACHE SETTINGS #### */

$config['Misc']['memcacheServers'] = array(

    array(

        'server' => '127.0.0.1',

        'port' => 11211

    ),

);

$config['Misc']['memcacheRetry'] = 15; // Retry time in seconds.

$config['Misc']['memcacheTimeout'] = 1; // Connect timeout in seconds.

$config['Misc']['memcachePersistent'] = true; // Persistent connections.
This option is not available for versions of PHP from 7+.
To use this option, replace the following line:
// $config['Datastore']['class'] = 'vB_Datastore_Filecache';
$config['Datastore']['class'] = 'vB_Datastore_XCache';
Redis is an open source (BSD licensed), in-memory data structure store.
To use this option, replace the following line:
// $config['Datastore']['class'] = 'vB_Datastore_Filecache';
$config['Datastore']['class'] = 'vB_Datastore_Redis';
/* #### REDIS SETTINGS #### */

$config['Misc']['redisServers'] = array(

    array(

        'addr' => '127.0.0.1',

        'port' => 6379

    ),

);

$config['Misc']['redisRetry'] = 100; // Retry time in milliseconds.

$config['Misc']['redisTimeout'] = 3; // Connect timeout in seconds.

$config['Misc']['redisMaxDelay'] = 10; // Slave out of sync, timeout in seconds.
Using Forum, Blog or CMS in a Subdirectory. |
With vBulletin 4.1.1, you have gained the ability to run your forum components in different directories. This includes subdirectories of your primary installation directory and sibling directories. However due to the way that the forums and blog are implemented, it is a little different than other software packages. Implementing this on your site is fairly straightforward though.
Components Supported
Currently vBulletin supports running the CMS, Forum, and Blogs in directories other than your primary installation directory.
Uploading the files.
In your 4.1.1 package there are a number of new files located within the Do Not Upload Folder to implement this functionality. You need to upload these files first. Go into your Do Not Upload folder and you will see four subfolders. These are named – blog, forum, cms and rewrite.
You need to upload the folders that correspond to the components that you want to run in a sub-directory on your website. For our example today, we're going to concentrate on the forum directory. Upload this to your forum root directory using your favorite file transfer tool.
Using Mod_Rewrite?
If you are using mod_rewrite friendly URLs, you need to upload the .htaccess for your components as well. These are in the rewrite directory and get uploaded to their corresponding directories on the server.
Note: Only .htaccess files are provided at this time. If you are using IIS 7 with the URL Rewrite addon, you can import the .htaccess files within IIS Manager to create the appropriate web.config files. Consult the help files in IIS Manager for instructions.
vBulletin Settings
Once you have the files uploaded, you need to update some settings in your Admin Control Panel. Log in to your Admin Control Panel and go to:
Settings → Options → Site Name / URL / Contact Details.
Here you will find new options for the URLS of your different components. They exist for Forums, CMS and Blogs. These need to be set to the same directories that you uploaded the files to earlier.
Forum Component URL
If this is specified it will override the Forum URL setting for Forum specific pages. You may specify an absolute URL or a URL relative to the main Forum URL
Examples:
If vBulletin is located at https://example.com/vbulletin then entering a value of "forum" will result in the forum being located at https://example.com/vbulletin/forum.
A value of "https://www.example.com/forum" will result in the forum being located at https://www.example.com/forum.
All vBulletin URLs must have the same host name.
Cookies
You need to set your cookie path so that it is inclusive of all your vBulletin directories. If your cookie path is the default of '/' then you don't need to change anything. However if you changed this for any reason, it may need to be updated. For example, if vBulletin is located at www.host.com/mysite/vbulletin but the forum is located at www.mysite.com/mysite/forum then a cookie path of "mysite" will work, but a cookie path of "mysite/vbulletin" will not work because the cookies will not be sent to pages in the mysite/forum directory.
Note: Changing the cookies for your site will invalidate all cookies for your users. They will be logged out and must log back in.
Debug Mode |
Note:
The config file is located in your includes directory.
To do this, you need to edit your config.php file and add the following line:
$config['Misc']['debug'] = true;
Turning off Debug Mode
Edit your config.php file and remove the above line of code or comment it out by placing two slashes ('//') in front of it. Save the file and overwrite the copy stored on your server.
Appendix: ImpEx Import System |
There are three tiers of importer systems within ImpEx, check to see which one your system falls into
Planning the import |
The three most important things to do now are:
Note:
- LEAVE THE ORIGINAL BOARD RUNNING UNTIL YOU HAVE READ THIS AND DONE SOME TEST IMPORTS.
- Back up your target database.
- Read the rest of this manual for importing.
- Testing an import before shutting down the source forum is the best way to go.
- There will probably be some residual HTML from the content that will need cleaning up afterwards, which is part of the import task and process, not a function of the support team.
- The links within the forum to other threads/posts/users will be imported, and link to the old board. A 301/404 solution will need to be put in place if that is a concern.
Before the import |
Warning:
LEAVE THE ORIGINAL BOARD RUNNING UNTLL YOU HAVE READ THIS AND DONE A FEW TEST IMPORTS
"I've turned my board off and done an import and it didn't work 100% correctly first time, my users are upset, fix it now"
Isn't really the best way of getting a board imported.
Right, on we go.
Make a back up of your source board and do the initial trial run import from that, not the live board.
ImpEx only ever reads from a source board it will never alter source data. Though running an import against source data that is being updated can have some strange outcomes for the import as well as the source board, also it will cause a lot of load on the source boards database and could impair the performance of your source boards community.
Setting up |
The vBulletin license allows you to have a development board installed for the purposes of development and testing. Practicing an import is a good use of this.
Copy your source data to the same machine that your development vBulletin is installed, be that a database (i.e. phpBB) or the files (i.e. ubb.classic).
This is so you can create a testing environment to run the importer and make a note of what needs to be done before during and after the real import.
From running test imports like this you can configure the cleaner script and measure your timings, both of these will speed up your final transition.
Attachments |
Installing ImpEx |
Downloading the ImpEx Package |
You will need to log-in to the Members' Area using the Customer Number and Customer Password that was emailed to you when you purchased your license.
Click the link for the license you want to use and you will be taken to the download page, where you will be given options for how to download the latest ImpEx package.
You can choose from the following options:
- PHP File Extension
As a general rule, web servers will use .php as the extension for PHP scripts, but some servers may use a different extension, or you may simply wish to use a different extension out of your own preference. Various extensions are available here for you to choose. - Download File Format
This option allows you to choose the compression format of the package you are about to download. Most people will want to download the .zip package as Windows® has in-built support for zip files. However, if you are downloading the package directly to a Linux server you may prefer to use the tarball (.tar.gz) format. - CGI Shebang
This option will only be of use to you if your server runs PHP as a CGI rather than as a web server module. If your server runs PHP as a CGI and requires a shebang (such as #!/usr/bin/php) then you can enter the required text here and it will automatically be inserted into whichever PHP files in vBulletin require its use.
The package will then be downloaded and saved to the location you specified.
Preparing the ImpEx files for upload |
The first thing to do is to decompress the package into its constituent files. If you downloaded the .zip package and your computer is running a recent version of Windows® all the tools you need to do this are available as part of Windows®. This section will assume that you have downloaded the .zip package and that your computer is running Windows XP.
To extract the files from the package, open the folder on your computer where you saved the ImpEx package and right-click on its icon, then choose Extract All from the pop-up menu.
This will open a wizard to guide you through the unzipping progress. Accept the default options suggested and the system will decompress the files from the zip package.
When the unzipping progress is complete, you will find that the process has created a new folder called ImpEx_versionnum_licensenum (where versionnum is the version number of the package you have downloaded, and licensenum is the license number of your vBulletin license).
Within this folder you will find a further folder named licensenum.impex, and within this folder will be a collection of readme files and a folder called upload. This folder contains the ImpEx files that need to be uploaded to your web server.
However, before you upload the files you must make some changes to the ImpEx configuration file. This file is located in the impex folder (within the upload folder) and is called ImpExConfig.php.new.
The first thing you must do is to rename this file from ImpExConfig.php.new to ImpExConfig.php (removing the temporary .new extension).
It is also best to only upload the systems modules that you want to import from. There are over 70 importers and ImpEx will only use the systems that you need. In the impex/systems folder you will see many folders that contain the individual importers, if you are only importing from phpBB2, then only upload that folder.
Editing the ImpEx Configuration File |
To edit the ImpExConfig.php file, you will need to open the file in a text editor such as Windows® WordPad. (Note that we do not recommend that you use Windows® Notepad to edit ImpExConfig.php, as Notepad has problems displaying the line breaks in some file types.)
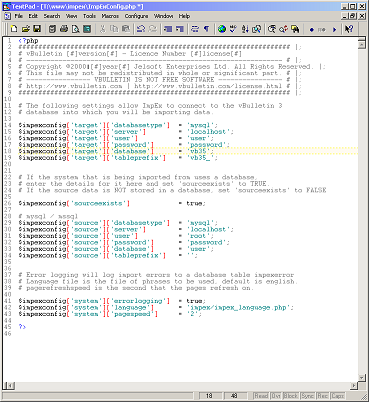
Target Database Information (Into which database do we import?)
If you have ImpEx installed correctly and are running it via the admincp, you can ignore the target settings go to the source. This is because ImpEx will read you vBulletin config file.
| $impexconfig['target']['databasetype'] | Enter the type of database here, currently this can only be mysql |
| $impexconfig['target']['server'] | This sets the address of your database server. On most installations the database server is located on the same computer as the web server, in which case the address should be set to 'localhost', otherwise use the address of the database server as supplied by your web host. |
| $impexconfig['target']['user'] | This variable contains the username provided to you by your host for connecting to your database server. |
| $impexconfig['target']['password'] | The password that accompanies the database username should be entered here. |
| $impexconfig['target']['database'] | This value should be altered to state the name of the database that will contain your vBulletin installation on the database server. |
| $impexconfig['target']['tableprefix'] | If your vBulletin installation uses a prefix on the tables, set it here. |
| $impexconfig['sourceexists'] | If the system that is being imported from uses a database, enter the details for it here and set 'sourceexists' to TRUE. If the source data is NOT stored in a database, set 'sourceexists' to FALSE. |
| $impexconfig['source']['databasetype'] | Enter the type of database here, usually this is mysql. If you are importing from a MS-SQL database, you will need MS-SQL support in PHP |
| $impexconfig['source']['server'] | This sets the address of database server from which you want to import data from. On most installations the database server is located on the same computer as the web server, in which case the address should be set to 'localhost', if this database is hosted on another domain use the address of the database server as supplied by your web host. If you are attempting to import from a remote server (i.e. you have just moved hosts) ensure that the database will allow remote connections. Other wise you will need to back up the source database and restore it on your new server so it is local. |
| $impexconfig['source']['user'] | This variable contains the username provided to you by your host for connecting to your database server. |
| $impexconfig['source']['password'] | The password that accompanies the database username should be entered here. |
| $impexconfig['source']['database'] | This value should be altered to state the name of the database that contains your other forum software data on the database server. |
| $impexconfig['source']['tableprefix'] | If that database uses a prefix for the tables, set it here. |
Note:
Please note that Jelsoft / vBulletin Support can not provide the values you require for your database(s). These variables are only available from the web host providing your web/database server.
If you need to create a new database for vBulletin to use, instructions for doing so in a variety of systems are available here.
If you need to create a new database for vBulletin to use, instructions for doing so in a variety of systems are available here.
The language is the language file that is used for the display of text, English, German, etc.
The page speed is the seconds of wait between the page refresh when automatically refreshing. Setting a longer time will help with network lag and server load.
The defines are typical settings that are changed for problem imports :
Defines for special cases (What do we want to turn off/on ?)
| impexdebug | Prints out to the screen any debug added to an install of ImpEx. |
| emailcasesensitive | When matching emails in the user module (user merge), this forces the matching to be case sensitive or not (follwing the RFC strictly, emails should be case sensitive, for the vast majority of the time, this isn't the case). |
| forcesqlmode | Some MySQL servers that have MYSQL_STRICT mode, will not accept a lot of the ImpEx SQL as it currently uses the database defaults and not a value for even field, this attempts to override that setting by passing the SQL ' set sql_mode = '' ' |
| skipparentids | The last set of updating post is setting the parent id's for the imported posts if they don't have one. This can be (and usually is) very intensive due to the amount of SQL used. The number of queries run is the number of threads times two, plus one. Though this is very effected by the number of posts as usually the post table has to be scanned (MySQL intensive). Sometimes due to the load on larger boards the final page of the import posts can time out, setting this define to true will skip that all together. The load and bottle neck here is a know issue and being looked at. |
ImpExConfig.php |
Note:
The config file has changed from an ini file to a PHP scripts in 3.5 the same as the standard vBulletin config file.
<?php

#################################################################### |;

# vBulletin [#]version[#] - Licence Number [#]license[#]

# ---------------------------------------------------------------- # |;

# Copyright ©2000–[#]year[#] Jelsoft Enterprises Ltd. All Rights Reserved. |;

# This file may not be redistributed in whole or significant part. # |;

# ---------------- VBULLETIN IS NOT FREE SOFTWARE ---------------- # |;

# https://www.vbulletin.com | https://www.vbulletin.com/license.html # |;

#################################################################### |;


# The following settings allow ImpEx to connect to the vBulletin 3

# database into which you will be importing data.


# If impex is installed in vBulletin you can ignore the target details

# as includes/config.php


$impexconfig['target']['databasetype']    = 'mysql';

$impexconfig['target']['server']          = 'localhost';

$impexconfig['target']['user']            = 'username';

$impexconfig['target']['password']        = 'password';

$impexconfig['target']['database']        = 'vbulletin_forum';

$impexconfig['target']['tableprefix']     = '';


# If the system that is being imported from uses a database,

# enter the details for it here and set 'sourceexists' to TRUE.

# If the source data is NOT stored in a database, set 'sourceexists' to FALSE


$impexconfig['sourceexists']              = false;


# mysql / mssql

$impexconfig['source']['databasetype']    = 'mysql';

$impexconfig['source']['server']          = 'localhost';

$impexconfig['source']['user']            = 'username';

$impexconfig['source']['password']        = 'password';

$impexconfig['source']['database']        = 'source';

$impexconfig['source']['tableprefix']     = '';


# Error logging will log import errors to a database table impexerror

# for use with support.

# Language file is the file of phrases to be used, default is english.

# pagespeed is the second(s) wait before the page refreshes.


$impexconfig['system']['errorlogging']    = true;

$impexconfig['system']['language']        = 'impex/impex_language.php';

$impexconfig['system']['pagespeed']       = 1;


define('impexdebug', false);

define('emailcasesensitive', false);

define('forcesqlmode', false);

define('skipparentids', false);

?>
Uploading ImpEx Scripts to Your Web Server |
Note:
Installing ImpEx in vBulletin requires the impex/ directory to be installed in the same directory as the admincp (i.e., your main forum directory) and the file cpnav_impex.xml (which can be found in upload/includes/xml) to be placed in the includes/xml directory. This because the admincp is generated from XML and needs the ImpEx XML to display the import option.
Although there are several methods available to transfer the ImpEx files from your computer to your web server, by far the most common method in use is transfer via FTP. Most operating systems have built-in tools for opening FTP connections although they are often limited in their usefulness and many people opt to use a third party FTP client application.
The easiest way to transfer the files is to upload the entire upload/ folder to the server. Using an FTP client we do this by selecting or dragging the upload folder from its location on your computer's hard disk to the web publishing folder on the server. If the transfer doesn't automaticly start, click on the button.
Note:
Only upload the folders in the impex/systems folder that you need, i.e. the system you are importing from. If you upload all of them, delete the ones you are not going to use/
- All text files to be transferred in ASCII mode
All files containing plain text from the vBulletin package should be transferred in ASCII mode.
Text file types you will find in vBulletin/ImpEx are: .html, .php, .js, .xml, .css. - All non-text files to be transferred in Binary mode
The remaining files, which are mostly images, should be transferred to your web server in Binary mode.
Binary file types used in vBulletin/ImpEx include: .gif, .png, .jpg, .ico.
Note:
The web publishing folder is usually called public_html, www or htdocs and is located within your home directory. If you are unsure of where to find your own web publishing folder, your host will be able to help you. Upload the ImpEx folder inside the installed vBulletin version 3 folder. Like public_html/forum/impex/
Once you have uploaded the whole impex/ directory, copy the cpnav_impex.xml file found in upload/impex/ to the includes/xml directory on your server.
If all has gone well, you are now ready to run the impex import script to prepare your third party forum software database import to vBulletin version 3.5.
Warning:
Before you do anything! Always make a 100% backup of your web files and database(s) to ensure you can revert to previous working version.
How to Use ImpEx |
Please note that the ImpEx system is written for version 3.5.0 and higher.
Now that you have installed ImpEx and selected the system to import from you are ready to do the actual import
Warning:
This is your last chance to back up your target database
Introduction to the ImpEx core System |
It comprises of a set of core files, being all the ones in the impex/ folder.
All the folders in the impex/systems folder are the individual systems that ImpEx can import from.
Importing a board |
Warning:
Make sure you have a 100% completed and working backup of your currently working forums (files and databases). If needed, you can revert back to your previously working version and start over again
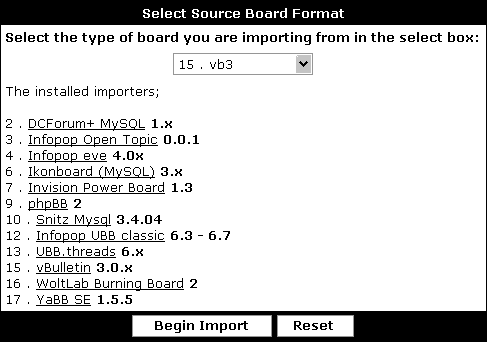

| 001 - Check and Update Database | This module will check and alter the tables in the databases as well as the connections. After clicking on the button it check the database for the tables it expects to find, you should see a green list of you source database tables, and tables listed in red are expected by the importer and missing, you import may still run as not all tables are used during an import, though if critical tables (i.e. the user table) are missing then this will break an import. ImpEx will Alter the tables in the vB database (target) to include import id numbers. (This is needed during the import process for maintaining references between the tables during an import.) If you have large tables (i.e. lots of posts) this can take some time. They will also be left after the import if you need to link back to the original vBulletin userid. |
| 002 - Associate users | You only need to run this module if you have users existing in the vBulletin database that you wish to merge with users in the source database during the import that have different email addresses. If you are doing a clean import then skip this module. |
To start the import click on the button and when that module has been completed, the statistics will update and the name of the button will change.
Re-running modules |
For instance if you run the import post module for a phpBB import for the first time, it will import all the post from the phpBB board and place them in the vBulletin database.
All the posts will have a importpostid which is the original post id of the post in the phpBB board. Any original post from the vBulletin board before the import will have no importpostid, as they are original.
So when the module is run for a second time (another practice run, you change some setting, updated a parser, got more posts, etc) it will delete all posts from the vBulletin board that have an importpostid.
This is useful for getting timings or re-running modules that had issues that you have changed or updated.
Warning:
If you have associated or merged users, the original vBulletin users will now have a importuserid, re-running the import user module will delete these users, if you don't have any associated users this isn't an issue.
Final Import Steps |
Warning:
An import will only ever get a certain amount of information from a source board into vBulletin.
Always check the permissions of moderators and forums after an import as there may not be a one to one mapping from the source boards permissions to vBulletin's permissions system.
Admin CP -> Forums & Moderators -> Show All Moderators -> Edit
Admin CP -> Forums & Moderators -> Forum Permissions
Forum cache
To rebuild the forum cache so your imported forums appear, go to your forum manager and save the display.
Counters
Update the Threads and Forums counters after an import to reflect the true values for each forum and thread.
Admin CP -> Maintenance -> General Update Tools -> Rebuild Thread Information
Admin CP -> Maintenance -> General Update Tools -> Rebuild Forum Information
Default forum
If you are importing into a fresh install of vBulletin, you may want to delete the default forum, it is advised that you do this before the import, if you are doing it after the import make sure that the imported forums and threads are not contained with in the default forum as they will be removed also.
User groups
Most importers will import the usergroups or create a default import usergroup, this is so you can check the users being imported and manage them accordingly, to move users to the default Registered Users group in vBulletin, delete the import group they are in and all the users will be moved to the Registered Users group by default.
Even with a vBulletin to vBulletin import the groups are created again, this is so you can manage the new users accordingly, in some cases you will need to keep the new users separate depending on the nature of your community to manage them.
Be sure to double-check the main Usergroup permissions to make sure they match what you want:
Admin CP -> Usergroups -> Usergroup Manager -> Edit Usergroup
Search index
You will need to rebuild the search index if you want to be able to search on the imported posts.
Admin CP -> Maintenance -> General Update Tools -> Rebuild Search Index
Remove the ImpEx files
Once you have finished and completed an import and your site is up and running, delete all the ImpEx files, this will ensure that if you do another import in the future you will get the latest version, as you will have to download ImpEx again.
Secondly, its good house keeping to remove an application that has your database config details and direct access to your site from your server once you have finished using it.
Password |
Not all systems can import the source board's passwords; this is due to the nature in which they are stored. The details for each importer should list if they can be imported or not.
If you import from a system where the passwords can not be imported or there was an error importing the passwords you can use the email all users and send them the link to your boards password reset page when you are ready to go live.
That will allow them to reset their passwords, though it relies on them having the correct email address in their source boards user profile.
Users > Send Email to Users
For example:
Hello $username,
We have recently moved our forum to vBulletin, part of moving to this amazing software is that you are required to reset your password, if you follow this link and enter your email address you will be emailed directions to resetting your password.
https://www.example.com/forum/login.php?do=lostpw&email=$email
Thanks,
Webmaster of example.com
Now what ? |
Try the import a few times to make sure you are happy with the process and know what to do when the time comes.
This is the time to ask question here about things that you don't understand or believe are going wrong, not when you do the final live import !!Have some of your trusted users or admin/moderators look around the test import boards to help with finding any issues and pointing out permissions that need to be updated etc.
This is a good time to configure impex/tools/cleaner.php if you need to remove HTML or incorrect links from your vBulletin posts.
If you wish to remove the importid's from the database read about help.php.
Cleaner.php |
https://www.yoursite.com/impex/tools/cleaner.php
...using your forum URL of course.
ImpEx parses out as much HTML and incorrect BB code as it can find, though there can sometimes be unexpected HTML or codes in the posts.
To remove this you will need to use cleaner.php, the basic principle is that is matches one string and replaces it for another, or a blank to just delete the original string.
Once cleaner has been run successfully you must rebuild the Rebuild Post Cache in the AdminCP > Maintenance > Update Counters
The file itself has many comments and instructions though as an example, if I have the post :
Hi there, I was looking though the web and I found this site and I think it <B>r0x0rs</B> , its about pirates it must be good as they are the best.
<a href="https://www.example.com/badpage.html">advert</a>
There are three errors there, the <B> tags should be BB code, we want to remove the HTML completely and pirates should be ninjas, obviously.
In the script there is this code :
$replacer = array(

            "<img>"    => "[img]",

            ""    => "",

            ""    => "",

            ""    => "",

            ""    => ""

);
$replacer = array(

            "<B>"    => "[B]",

            "pirates"    => "ninjas",

            '<a href="https://www.example.com/badpage.html">advert</a>'    => ""


);
Help.php |
There are four options on the help page.
Cancel
To cancel and return to the import, click here.
Clicking on this will send you back to the ImpEx main page.
Delete Session
To delete the import session and continue with the import, click here.
This will remove the import session. The import session contains the state of the import, the page values, paths, system selected etc. Deleting this will effectually reset the import though it will not alter any imported data in the target database.
Delete Session and all imported data
To delete the import session and all imported data for a clean retry, click here.
This will delete the session, as described above, also it will delete all imported data in the target database. This will also include any associated users, as an associated user will be assigned and importuserid and will effectively be treated as an imported user.
Remove importids
To delete the importid's in the database, click here, also removes the session. This will allow you to do consecutive imports
This will remove the importid's from the tables that have been imported into, see this section for more information.
Remove duplicate forums/threads/posts
On occasion when a browser stalls or a page fails to load you will have to refresh the page, this will mean that duplicate items will be imported, as the page will rerun the SQL from the last page load.
The duplicate items will have the same import<item>id but they will have different id's within vBulletin due to the auto_inc field, because of that ImpEx can find items that have the same import id, but a different vBulletin id, i.e. :
Thread A : threadid = 1 importthreadid = 5.
Thread B : threadid = 2 importthreadid = 5.
B must be a duplicate.
Running this function on a database that has had multi-imports which hasn't been finalised between imports could possibly remove a large percentage of the previous import, so ensure you finalise multi-imports before performing consecutive ones.
Medium / Large imports |
Manually dropping the fulltext-index 'title' (title, 'pagetext') from the post table before the post module, then adding it after the import has been run can speed up the post module considerably.
ALTER TABLE `post` DROP INDEX `title`;
ALTER TABLE `post` ADD FULLTEXT `title` (`title` ,`pagetext`);
Display
Set the following in your ImpExConfig to lower the amount of display data sent to the browser.
define('shortoutput', true);The estimates for a database based system, is that 200,000 is medium sized, over 750,000 posts is large.
The most important thing for ImpEx when dealing with medium or large imports is memory ImpEx needs to hold reference arrays when importing posts, i.e.
- userid to importuserid
- importthreadid to threadid
- userid to username
- forumid to importforumid
The bare minimum for a small import and running vBulletin is 8Meg, 16Meg is advised.
For a medium import 32-64Meg would be expected. For a large source board, its a sliding scale of how big your forum is, though 64Meg is a good setting to start with.
Changing the PHP memory limit requires access to you php.ini file and the ability to restart the webserver, if you do not have control of the webserver you may have to contact your ISP or find another server for the purposes of just doing the import.
dupe_checking
There is a setting in the ImpExConfig.php that enables and disables duplicate data checking, if you have a stable server and a fast connection where the pages are loading fine and there is no manual refreshing or back button use the setting this to false will increase the speed of the import.
Though if you need to or choose to run dupe checking, adding these indexes will help greatly :
ALTER TABLE `post` ADD INDEX `idx_importpostthread` ( `importpostid` , `importthreadid` )
ALTER TABLE `thread` ADD INDEX `idx_importthread` ( `importthreadid` )
ImpEx has the ability to run stand alone, i.e. not in the adminCP.
To do this, move the impex/ directory out of the forum/ folder i.e. If you are installed in
example.com/forum/
So you have :
example.com/forum/admincp/
example.com/forum/impex/
etc
Move ImpEx to the root folder so you have :
example.com/impex
Configure ImpExConfig.php for the target database information as it will not be able to read the vBulletin config file. Then browse to it directly e.g. www.example.com/impex/index.php.
This will lower the memory over head as it won't have to load inside the adminCP, also it will not time out within the admincp and will load slightly faster.
Quick Guide |
This is the procedure for testing and importing, always run tests before doing an import.
Get ImpEx
Down load ImpEx from the Members Area, here.
Config the file
In the downloaded archive there is a file ImpExConfig.php.new. Rename that to ImpExConfig.php and edited it's contents for the target and source details of the database. If the source is a file based system, just edit the target details.
Upload it
Upload the ImpEx folder with the newly edited ImpExConfig.php file to your webserver, into the same directory that the admincp is in, or in the webroot for a stand alone import
If you are running ImpEx installed youl have to put the cpnav_impex.xml file in the includes/xml directory for ImpEx to show in the adminCP. The file is in upload/includes/xml in the download.
Browse to it
Select the Import from the adminCP nav bar, then the system you want to from the drop down list.
Do import
Run the first module to inspect the source and alter the target database. If you are doing a clean import or the users you want to merge will have the same email addresses ignore module 002, which is for manual user id association.
Update counters
In the maintenance section of the adminCP, run the Update counters for the threads, then the forums. Re-order the forums and delete the default Main Forum if need be, then save the display order to rebuild the forum cache.
Clean up usergroups and forums
Setup the permissions for the usergroups, or delete the imported usergroups to move the users in those groups to the default Registered group.
cleaner.php
If you have HTML or unparsed content in your posts, you may need to use cleaner.php.
Review
Check over the board before opening it, get the help of some moderators or admins from the original site, to check users, posts, PM's etc.
Multiple imports. |
For instance a user will have a userid and a importuserid once they are imported. The userid is the vBulletin assigned userid and will be what ever is next in the line and available as per the database.
The importuserid is the userid from the source board.
This is imported and used to match the user to their imported posts, attachments PM's etc.
The same goes for posts for instance threadid has a importthreadid so that ImpEx knows where to put the imported posts.
When you have done an import and are completely finished and wish to do another import you will have to set all these import id's to 0.
This is so that you finalized the data in the board, that is remove its legacy id's so that it permanently becomes part of the target board, after this is done, there is no way back (apart from restoring the back up you made before starting).
As you can import into an empty board or an existing one, this has some serious implications. e.g.
You have a source board and your vBulletin target board.
The vBulletin target board has a lot of content, once you have performed an import of the source board you can still reverse the operation as the source database has importsomethingid's for all the imported data, therefore ImpEx can tell what is original and what is imported data, this is needed for the re-running of modules also.
As soon as you finishing an import, the import id's are no longer needed and serve no purpose, with one exception, that being 3rd party applications.
If you have an application that uses the user data from your source board, it will no doubt be associated with the userid from the source board, if you wish to keep that, update the 3rd party application to use the importuserid in the vBulletin database. Though vBulletin will not update the importuserid only the userid for new users so its best to update the 3rd party software with the new userid's.
So with the exception of 3rd party applications there is no more use for the import id's.
They can be ignored for all purposes save Importing consecutive boards and general tidiness (also indexes are created that may slow down huge boards slightly).
You MUST remove the import id's before performing a 2nd import, this is because ImpEx will not know what is original imported data and what is just imported etc.
If you are importing boards that use the same user data, just use the auto-email associate to link up the userids automatically between board imports.
To remove the import id's use the clean database found at the top of the ImpEx page, as show in the attached images.
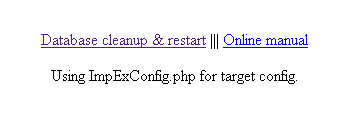
Terminology |
Importing into an empty vBulletin, i.e. a fresh install.
Merge import
Importing into a board that contains data and users that exists on both boards. Most systems will have the ability to merge users on email address so the users in the target board gain ownership of the imported data.
Differential import
This is just terminology and not supported.
A differential import is when the source board is left open when imported into the target, and the user wishes to do a 2nd import at a later date to get the new data from the source board that has been created since the first import. i.e. the difference in the data.
Internal link parsing
This is currently under review for development.
Internal links are links that exists in posts in the source board, to threads and posts in the original source board i.e.
Note:
Check this link out ...
www.example.com/phpBB/viewtopic_84050.html
www.example.com/phpBB/viewtopic_84050.html
Internal link parsing, is finding all the links in posts that point to other posts and threads in the board being imported and updating them with the correct URL and postid/threadid, its not just the URL to change the id changes as well.
Source system
The system being imported from.
Target system
The system being imported to, vBulletin.
Stand alone
Running ImpEx outside of the adminCP.
ImpEx installed
Running ImpEx inside the adminCP.
Core
The core files that are needed for ImpEx to run :
ImpExConfig.php, ImpExController.php, ImpExData.php, ImpExDatabase.php, ImpExDisplay.php, ImpExDisplayWrapper.php, ImpExFunction.php, ImpExModule.php, ImpExSession.php, cpnav_impex.xml, db_mysql.php, help.php, impex_language.php, index.php,
vbfields.php.
System
A group of files in a directory of the system name that you are using to import the source board from. i.e. phpBB/000.php, phpBB/001.php ... etc
Module
The individual file of a system, i.e. impex/systems/ipb2/004.php , The IPB 2 user module.
Userid mapping
When importing a source board that has a 3rd party application, for instance a gallery, the gallery will usually use data from the user table based on the userid.
When a board is imported the userid's are assigned depending on the auto_inc value of the database, the existing number of users in the database, etc.
Basically regardless of what a 3rd party vendor will tell you, that you must force the user id's into vBulletin and that it can be done and that's the ideal way to proceed, the reality is :
Warning:
YOU CANNOT FORCE THE USER ID'S INTO VBULLETIN WITH OUT BREAKING IT
This is a big reoccurring issue with 3rd party products, the ideal way is to be able to remap the userid's in the 3rd party product to the new vBulletin userid.
ImpEx systems |
Note : All MSSQL importers, or MSSQL within systems that also have MySQL support are all classed as 3rd tier
Tier 1
Tier one systems are fully supported by the support team and development, they are the most active and common imports that customers do.
These importers were either upgraded or have been recently developed as all new importers are tier one.
Tier 2
Systems in this tier are the less common imports and legacy systems. Tier 2 systems can be promoted to tier 1 if there is enough demand, or retired to tier 3 when the source system reaches end of life or demand falls below a level that makes their existence viable.
Tier 3
This is the graveyard of importers, these importers are not supported. There are three reasons imports make it here. Firstly is because their source system has reached it's end of life and the source data model isn't changing any more so there are going to be no future updates. Secondly, that demand for them is so low that it is not viable to offer support for them as it makes no business sense (though the importer is here for people who want to delve into it).
Thirdly, that the source system is such a challenge to import from that the time typically taken for each import far out weights any sensible decision to try to support each individual import that would take hours per client with customisations.
Tier systems list |
| Eve 1.3.4 / Groupee 4.0.3 | 1.3.4 - 4.0.3 |
| fusionBB 2 | 2.1 |
| Ikonboard (MySQL) | 3.x |
| Invision Board 3 | 3.0.3 |
| Invision Board 2 | 2.3.0 |
| Photopost | 5.1 |
| phpBB1 | 1.4.x |
| phpBB2 | 2.0.22 |
| phpBB3 | 3.0.5 |
| Simple Machines Forum | 1.9 |
| SMF | 2.0 |
| Snitz Mysql & MSSQL | 3.4.04 |
| Text file importer | 0.0 |
| Infopop UBB.threads | 6.5 |
| Infopop UBB.threads | 7.2 |
| vBulletin | 3.7.x |
| WoltLab Burning Board | 2.3.3 |
| wbb3 | 3.0.3 |
| YaBB 2 | 2.1 |
| YaBB SE | 1.5.5 |
| ASPPlayground | 2.5.5 |
| DCForum+ MySQL | 1.27 |
| InstantForum | 4.1.4 |
| Invision Community Blog | 1.2.4 |
| MyBulletinBoard (MyBB) | 1.4 |
| Allaire | 3.1 |
| ASP-DEV | 2.0 |
| ASP-DEV | 2.0 |
| bbpress | 0.9.0.1 |
| beehive | 0.5 |
| Community Server | 2.1 |
| CuteCast | 2.x |
| Discuz | 2.5 |
| dotnetBB | 2.42 |
| dotnetBB | 2.42 |
| dragonfly | 9.2.1 |
| Drupal | 4.7.0 |
| dzoic | 3.5 |
| eshare | 0.0 |
| ExpressionEngine | 1.6.2 |
| FUD Forum | 2.x |
| FuseTalk | 2.0 |
| fusion BB | 1.0.3 |
| JForum | 2.1.5 |
| Jive | 5.5 |
| Jive Forums | 4.0.0 |
| megaBBS | 1.69-2.2 |
| Phpwind | 3.3.1 |
| Simple Board | 1.0.4 |
| vBulletin | 3.0.* - 3.5.* |
| wowBB | 1.63 |
| YaBB Gold | 1.3.1 |
| CHC Forum | 0.0 |
| DiscusWare 4.x Pro tab file data | 4.x |
| MxBoard | 1.1.4 |
| Infopop Open Topic | 4.0 |
| PNphpBB2 (Post Nuke) | 2 |
| Advanced Electron Forum | 1.05 |
| w-Agora | 4.1.7 |
| BuildACommunity | 0.0 |
| bbBoard | 2 |
| CFBB | 1.3.1 |
| Deluxe Portal | 2.0 |
| DigiPost | 2.0 |
| DiscusWare (file based) | 4.00.6 |
| Discuz | 4.0.0 |
| e107 | 0.7.8 |
| Edge CMS | 13-11-2005 |
| EncoreII | 2 |
| fireboard | 1.0.4 |
| freethreads | 0.0 |
| Geeklog | 1.3.10 |
| Invision Power Board | 1.3 |
| Seditio (LDU) | 121 |
| Max Web Portal | 0 |
| mercuryboard | 1.1.4 |
| miniBB | 2.0.1 |
| mmforum | 0.1.5 |
| mvnforum | 1.0.2 |
| mysmartbb | 1.50 |
| MyTopix | 1.3.0 |
| openBB | 1.0.7 |
| Oxygen | 1.1.3 |
| Phorum 3 | 3.4.8 |
| Phorum 5 | 5.0.16 |
| phpMyForum | 4.0.1 |
| PHP Fusion | 6.00.301 |
| PunBB | 1.2.10 |
| SiteFrame | 3.1.8 |
| SiteNet BBS | 2.0.3 |
| ThWboard | 3.00 |
| Toast Forums | 1.6 |
| Tritanium BB2 | 2 Alpha 7 |
| trollix XForum | 2.0 |
| TruBB | 1.1 |
| ttCMS | 3.1 |
| Infopop UBB classic | 6.3 - 6.7 |
| Ultraboard | 2000 |
| versatile Bulletin Board | 1.0 RC 1 |
| vBJournal | 1.0.2 |
| vBulletin Forum 2 Blog | 3.6.8 |
| vBlogetin | 1.0 Beta 3 |
| vanilla | 1.1.4 |
| vBulletin 2 | 2.3.10 |
| vBulletin lite | 1.0 |
| vbzoom | 1.1 |
| webbbs | 5.30 |
| Webcrossing | 5.0 |
| Web Wiz Forums | 9.08 |
| WordPress | 2.3.1 |
| XMB forum | 1.9 |
| Xoops - Newbb | 2.0 |
| Xsorbit X5 | x5 |
| Yet Another Forum | 1.9.0 |
| Yahoo Groups access dB download | 0.0 |
| Yahoo groups (raw text) | 0.0 |
| zeroforum | 2.1.0 |
EVE & Groupee |
Users
Majority of profile.
(username, email, usergroup, icq, joindate, homepage,
Birthday, ipadress, lastvisit, usertitle, posts, display_name, first_name, gender, parent_email, Occupation, Location, Interests, Bio, signature)
Forums and Categories
Basic description information, parent ids and threading order. No display order title, you will have to put that in (this is due to the present changing database and may change in the future).
Threads
All are currently imported as visible and open.
Posts
All are currently imported as visible with threading order.
Polls
Attached to threads and with current vote values.
Private Messages
Currently all PM's are stored as sent for each user.
Attachments
Need to be downloaded from infopop.
Development :
N/A.
IPB 1.3 |
User groups
The IPB user groups and about 50% of the permissions setting, the users are still associated with the groups after import so just clean up the permissions after import.
Users
username, email, usergroup, password, icq, aim, joindate, homepage, ipadress, lastvisit, Birthday, posts, gender, parent_email, Occupation, Location, Interests, avatar, signature
Forums and Categories
Basic title and description information and layout.
Threads
Nearly all thread information.
note : Importing Parents id's was changed for 1.3
Posts
All are currently imported as visible.
Polls
Attached to threads and with current vote values.
Private Messages
Sent and recived are imported.
Buddy & Ignore Lists
For each user.
Moderators
Attached to forum and about 50% of permissions imported.
Attachments
Attachments are imported to the database and linked to the post.
Development :
N/A.
IPB 2 |
Usergroup
Name and partial permissions mapped.
Users
Majority of profile.
Not passwords
This would require modification of the vB database and would break the principles of an import. User can very easily reset their passwords.
Forums and Categories
Basic title and description information, with layout and parent ids.
Threads
All are currently imported with open/closed settings.
Posts
All are currently imported as visible with IP addresses.
Polls
Attached to threads and with current vote values.
Private Messages
Imports pm text with sent and to pm for each user.
Moderator
Attached to forum with majority
Attachments
Imported to post.
Smilies
Imported into custom smilie group.
Development
N/A..
phpBB 1 |
Users
Majority of profile.
(username, email, icq, aim, yahoo, homepage, msn, joindate, joindate, homepage, password)
Forums and Categories
All are currently imported as visible and open.
Threads
All are currently imported as visible with open state.
Posts
All are currently imported as visible with IP.
Polls
Attached to threads and with current vote values.
Private Messages
Currently all PM's are stored as sent and recived for each user.
Moderator
Attached to forums with default permissions.
phpBB2 |
Version supported : 2.0.4 - 2.0.21
Usergroups
Default and custom usergroups.
Users
Majority of profile and avatars.
(username, email, usergroup, password, aim, icq, joindate, homepage, lastactivity, yahoo, msn, posts, Occupation, Location, Interests)
Ban Lists
Userid, IP and email.
Forums and Categories
Basic title and description information, with layout and parent ids.
category hierarchy mod
Threads
All are currently imported as visible and open.
Smilies
Imported into the smilie group, concatenated if longer than 10 characters.
Posts
All are currently imported as visable with IP addresses.
Polls
Attached to threads and with current vote values.
Private Messages
Imports pm text with sent and to pm for each user.
Ranks
Imported as usergroups.
Attachments
Imported to post with current storage setting type (i.e. database or file system).
In Development
N/A.
phpBB 3 |
Usergroups
Default permissions.
Users
Majority of profile.
Not passwords
(username, email, joindate, ipaddress last activity, lastvisit)
Forums and Categories
All are currently imported as visible and open.
Threads
All are currently imported as visible with open & sticky state.
Posts
All are currently imported as visible with IP.
Private Messages
Currently all PM's are stored as sent and recived for each user.
Attachments
Imported and attached to posts.
Moderators
Imported and attached to forums.
SMF |
Usergroups
By name, no permissions.
Users
username, email, usergroup, aim, icq, joindate, homepage, yahoo, msn, ip address, birthday
Forums and Categories
Basic title and description information, with layout and parent ids.
Threads
All are currently imported as visible though with open settings.
Posts
All are currently imported as visable with IP addresses.
Polls
Attached to threads and without current vote values.
Private Messages
Imports pm text with sent and to pm for each user.
Moderators
Imported and attached to forums, though permissions will need to be reset.
Smilies
Imported to import smilie group.
Attachments
Imported to posts.
Development :
N/A.
Snitz |
Users
username, email, usergroup, aim, icq, joindate, homepage, lastactivity, yahoo, msn, posts.
Forums and Categories
Basic title and description information, with layout and parent ids.
Threads
All are currently imported as visible.
Smilies
Imported into the smilie group.
Posts
All are currently imported.
Polls
Attached to threads and with current vote values.
Private Messages
Imports pm text with sent and to pm for each user.
Moderators
Imported and attached to forums.
Development
N/A
ubb.threads 6.5 |
Usergroups
Title and users assocaited to group, reset details and permissions after import.
Users
username, email, usergroup, password, joindate, homepage, lastactivity, IP, postcount
Forums and Categories
Basic title and description information, with layout and parent ids.
Threads
All are currently with open settings, all visible.
Posts
All are currently imported as visable with IP addresses.
Polls
Attached to threads and with current vote values.
Private Messages
Imports pm text with sent and to pm for each user.
Moderators
Imported and linked to froum, reset permissions after import.
Attachments
Imported and linked to the post.
Development :
N/A.
ubb.threads 7 |
Usergroups
Title and default permissioins.
Users
username OR display name, email, usergroup, homepage, yahoo, aim, icq, usertitle, posts, avatar. birthday, signature, occupation, Locatioin, Intrests.
Forums and Categories
Basic title and description information, with layout and parent ids.
Threads
All are currently imported with open and visable set to true, sticky setting imported.
Posts
All are currently imported as visable with IP addresses.
Attachments
Imported and linked to the post.
Moderators
Imported and linked to froum, reset permissions after import.
vBulletin 2.3.11 |
Usergroups
Permissioins mapped.
Users
All information except avatars.
Forums and Categories
Most information and 75% of permissions, as always check after import.
Threads
All, rebuild after import as with forums.
Posts
All including attachments.
Polls
Imported to threads.
PM's
To and from.
Moderator's
To forum and with permissions.
Smilies
Text and image.
Development
Avatars.
Custom Avatars.
vBulletin 3.0.17 |
ImpEx can have 3.0.9 and 3.5.0 as either a target or a source.
A special case importer, the data that is currently imported is :
- Users
- Usergroups
- Ranks
- Avatars
- Custom Profile Pics
- Forums
- Threads
- Posts
- Polls
- PM's
- Moderators
- Smilies
- Attachments
None.
vBulletin 3.6.4 |
ImpEx can have 3.0.9 and 3.5.0 as either a target or a source.
A special case importer NOT to be used instead of an upgrade, the data that is currently imported is :
- Usergroups
- Users
- Forums
- Threads
- Posts
- Polls
- PM's
- Moderators
- Custom Profile Pics
- Attachments
- Subscription
- Smilies
- Avatars
WoltLab Burning Board 2.3.3 |
Usergroups
Title and default permissioins.
Users
username, email, usergroup, password, yahoo, aim, icq, homepage, joindate, last activity, lastvisit, usertitle, days prune, posts timezone offset, pmpopup avatarid, maxposts, birthday, avatar
Forums and Categories
Basic title and description information, with layout and parent ids.
Threads
All are currently imported with open and visable set to true, sticky setting imported.
Posts
All are currently imported as visable with IP addresses.
Polls
Attached to threads and with current vote values.
Private Messages
Imports pm text with sent and to pm for each user.
Moderators
Imported and linked to froum, reset permissions after import.
Attachments
Imported and linked to the post.
Ikonboard (MySQL) 3.x |
Usergroups
Title and default permissions.
Users
Majority of profile.
(username, email, usergroup, icq, joindate, homepage, password
Birthday, ipadress, lastvisit, usertitle, posts, display_name, gender, Occupation, Location, Interests, , signature)
Forums and Categories
All are currently imported as visible and open.
Threads
All are currently imported as visible with open & sticky state.
Posts
All are currently imported as visible with IP and signature permissions.
Polls
Attached to threads and with current vote values.
Private Messages
Currently all PM's are stored as sent for each user.
Moderator
Attached to forums with default permissions.
Attachments
Attached to posts.
List of all systems modules |
Tier 1 importers are supported and updated as needed.
Tier 2 importers are not supported and will be updated based on overall demand.
Tier 3 importers are no longer supported or updated.
ASPPlayground
Tier = 2
Source version support in ImpEx = 2.5.5
- Import Usergroup
- Import User
- Import Forum
- Import Thread
- Import Post
- Import Poll
- Import Private Mesages
Tier = 3
Source version support in ImpEx = 0.0
- Import usergroup
- Import user
- Import forum
- Import thread
- Import post
- Import Private messages
Tier = 2
Source version support in ImpEx = 1.27
- Import User Groups
- Import Users
- Import Forums
- Import Threads
- Import Posts
- Import Private Messages
- Import Polls
- Import Moderators
Tier = 3
Source version support in ImpEx = 4.x
- Import user
- Import forum
- Import thread
- Import post
Tier = 2
Source version support in ImpEx = 4.1.4
- Import usergroup
- Import user
- Import forum
- Import thread
- Import post
- Import Private messages
- Import attachment
Tier = 2
Source version support in ImpEx = 1.2.4
- Import blog user
- Import blog category
- Import blog
- Import blog comments
- Import blog attachment
- Import blog moderator
- Import blog rate
- Import blog trackback
Tier = 3
Source version support in ImpEx = 1.1.4
- Import user
- Import forum
- Import thread
- Import post
- Import poll
Tier = 2
Source version support in ImpEx = 1.4
- Import Usergroup
- Import User
- Import Forum
- Import Thread
- Import Post
- Import Poll
- Import Private Messages
- Import Moderator
- Import Attachment
- Import Smilie
Tier = 3
Source version support in ImpEx = 4.0
- Import Users
- Import Forums and Categories
- Import Posts
Tier = 3
Source version support in ImpEx = 2
- Import Usergroup
- Import User
- Import Forum
- Import Thread
- Import Smilie
- Import Post
- Import Private Messages
- Import Attachments
Tier = 3
Source version support in ImpEx = 1.05
- Import usergroup
- Import user
- Import forum
- Import thread
- Import post
- Import attachment
- Import moderator
Tier = 3
Source version support in ImpEx = 4.1.7
- Import User
- Import Forum
- Import Threads
- Import Post
- Import Attachments
Tier = 2
Source version support in ImpEx = 3.1
- Import User
- Import Forum
- Import Thread
- Import Post
Tier = 2
Source version support in ImpEx = 2.0
- Import user
- Import forum
- Import thread
- Import post
Tier = 2
Source version support in ImpEx = 2.0
- Import user
- Import forum
- Import thread
- Import post
Tier = 3
Source version support in ImpEx = 0.0
- Import user
- Import forum
- Import thread
- Import post
Tier = 3
Source version support in ImpEx = 2
- Import User
- Import Forum
- Import Thread
- Import Smilie
- Import Post
- Import Poll
- Import Private Messages
- Import Attachment
Tier = 2
Source version support in ImpEx = 0.9.0.1
- Import user
- Import forum
- Import thread
- Import post
Tier = 2
Source version support in ImpEx = 0.5
- Import Usergroup
- Import User
- Import Forum
- Import Thread
- Import Post
Tier = 3
Source version support in ImpEx = 1.3.1
- Import user
- Import forum
- Import thread
- Import post
- Import Private messages
Tier = 2
Source version support in ImpEx = 2.1
- Import user
- Import forum
- Import thread
- Import post
Tier = 2
Source version support in ImpEx = 2.x
- Import User
- Import Forum
- Import Thread
- Import Post
Tier = 3
Source version support in ImpEx = 2.0
- Import Usergroup
- Import User
- Import Forums and Categories
- Import Thread
- Import Post
- Import Poll
- Import Attachment
- Import Moderator
- Import Smilie
Tier = 3
Source version support in ImpEx = 2.0
- Import Usergroup
- Import User
- Import Forum
- Import Thread
- Import Post
Tier = 3
Source version support in ImpEx = 4.00.6
- Import Usergroup
- Import User
- Import Categories
- Import Threads
- Import Posts
Tier = 3
Source version support in ImpEx = 4.0.0
- Import Usergroup
- Import User
- Import Forum
- Import Thread
- Import Post
Tier = 2
Source version support in ImpEx = 2.5
- Import usergroup
- Import user
- Import forum
- Import thread
- Import post
- Import poll
- Import Private messages
- Import attachment
- Import smilie
Tier = 2
Source version support in ImpEx = 2.42
- Import Usergroup
- Import User
- Import Forum
- Import Thread
- Import Post
Tier = 2
Source version support in ImpEx = 2.42
- Import Usergroup
- Import User
- Import Forum
- Import Thread
- Import Post
- Import attachment
Tier = 2
Source version support in ImpEx = 9.2.1
- Import usergroup
- Import user
- Import forum
- Import thread
- Import post
- Import Private messages
Tier = 2
Source version support in ImpEx = 4.7.0
- Import user
- Import forum
- Import thread
- Import post
Tier = 2
Source version support in ImpEx = 3.5
- Import user
- Import forum
- Import thread
- Import post
Tier = 3
Source version support in ImpEx = 0.7.8
- Import User
- Import Forum
- Import Thread
- Import Post
- Import Poll
- Import Private messages
Tier = 3
Source version support in ImpEx = 13-11-2005
- Import user
- Import forum
- Import thread
- Import post
Tier = 3
Source version support in ImpEx = 2
- Import Usergroup
- Import User
- Import Forum
- Import Thread
- Import Post
Tier = 2
Source version support in ImpEx = 0.0
- Import user
- Import forum
- Import thread
- Import post
Tier = 1
Source version support in ImpEx = 1.3.4 - 4.0.3
- Import user
- Import forum
- Import thread
- Import post
- Import poll
- Import attachment
- Import Private messages
- Import Private Messages
- Import Attachment
Tier = 2
Source version support in ImpEx = 1.6.2
- Import usergroup
- Import user
- Import forum
- Import thread
- Import post
- Import poll
- Import attachment
Tier = 3
Source version support in ImpEx = 1.0.4
- Import usergroup
- Import user
- Import forum
- Import thread
- Import post
Tier = 3
Source version support in ImpEx = 0.0
- Import User
- Import Forum
- Import Thread
- Import Post
Tier = 2
Source version support in ImpEx = 2.x
- Import Usergroup
- Import User
- Import Forum
- Import Thread
- Import Post
- Import Smilie
- Import Poll
- Import Private Messages
- Import Moderator
- Import Attachment
Tier = 2
Source version support in ImpEx = 2.0
- Import User
- Import Forum
- Import Thread
- Import Post
- Import Poll
- Import Private Messages
- Import Attachment
Tier = 2
Source version support in ImpEx = 1.0.3
- Import usergroup
- Import user
- Import forum
- Import thread
- Import post
- Import attachment
- Import poll
- Import Moderator
Tier = 1
Source version support in ImpEx = 2.1
- Import usergroup
- Import user
- Import forum
- Import thread
- Import post
- Import Private messages
- Import attachment
- Import moderator
Tier = 3
Source version support in ImpEx = 1.3.10
- Import Usergroup
- Import User
- Import Forum
- Import Thread
- Import Post
- Import Moderator
Tier = 1
Source version support in ImpEx = 3.x
- Import Usergroup
- Import User
- Import Forum
- Import Thread
- Import Post
- Import Poll
- Import Private Messages
- Import Moderator
- Import Attachments
Tier = 3
Source version support in ImpEx = 1.3
- Import usergroup
- Import user
- Import forum
- Import thread
- Import post
- Import poll
- Import Private messages
- Import banlist
- Import moderator
- Import attachment
- Import Attachments
Tier = 1
Source version support in ImpEx = 2.3.0
- Import usergroup
- Import user
- Import forum
- Import thread
- Import post
- Import poll
- Import Private messages
- Import moderator
- Import attachment
- Import smilie
Tier = 1
Source version support in ImpEx = 3.0.x
- Import usergroup
- Import user
- Import forum
- Import thread
- Import post
- Import poll
- Import Private messages
- Import moderator
- Import attachment
- Import smilie
Tier = 2
Source version support in ImpEx = 2.1.5
- Import usergroup
- Import user
- Import forum
- Import thread
- Import post
- Import Private messages
- Import attachment
Tier = 2
Source version support in ImpEx = 5.5
- Import usergroup
- Import user
- Import forum
- Import thread
- Import post
- Import Private messages
Tier = 2
Source version support in ImpEx = 4.0.0
- Import User
- Import Forum
- Import Thread
- Import Post
Tier = 3
Source version support in ImpEx = 121
- Import usergroup
- Import user
- Import forum
- Import thread
- Import post
- Import Private messages
- Import poll
Tier = 3
Source version support in ImpEx = 0
- Import User
- Import Forum
- Import Thread
- Import Post
- Import Poll
- Import Private Message
- Import Moderator
Tier = 2
Source version support in ImpEx = 1.69-2.2
- Import Usergroup
- Import User
- Import Forums
- Import Thread
- Import Post
- Import Smilie
- Import Poll
- Import Private Message
- Import attachment
Tier = 3
Source version support in ImpEx = 1.1.4
- Import Usergroup
- Import User
- Import Forum
- Import Thread
- Import Post
- Import Private Messages
- Import Attachments
Tier = 3
Source version support in ImpEx = 2.0.1
- Import user
- Import forum
- Import thread
- Import post
Tier = 3
Source version support in ImpEx = 0.1.5
- Import usergroup
- Import user
- Import forum
- Import thread
- Import post
- Import Private messages
- Import poll
- Import attachment
Tier = 3
Source version support in ImpEx = 1.0.2
- Import usergroup
- Import user
- Import forum
- Import thread
- Import post
- Import Private messages
- Import attachment
Tier = 3
Source version support in ImpEx = 1.50
- Import usergroup
- Import user
- Import forum
- Import thread
- Import post
- Import Private messages
- Import poll
- Import attachment
- Import moderator
Tier = 3
Source version support in ImpEx = 1.3.0
- Import Usergroup
- Import User
- Import Forum
- Import Thread
- Import Post
- Import Poll
- Import Private message
- Import Attachment
Tier = 3
Source version support in ImpEx = 1.0.7
- Import Usergroup
- Import User
- Import Forum
- Import Thread
- Import Post
- Import Poll
- Import Private Messages
- Import Moderator
- Import Smilie
Tier = 3
Source version support in ImpEx = 1.1.3
- Import Usergroup
- Import User
- Import Forum
- Import Thread
- Import Post
- Import Smilie
- Import Private Message
- Import Attachment
Tier = 3
Source version support in ImpEx = 3.4.8
- Import User
- Import Forum
- Import Thread
- Import Post
- Import attachment
Tier = 3
Source version support in ImpEx = 5.0.16
- Import User
- Import Forum
- Import Thread
- Import Post
- Import Pm
Tier = 1
Source version support in ImpEx = 5.1
- Import usergroup
- Import user
- Import forum
- Import thread
- Import post
- Import attachment
Tier = 1
Source version support in ImpEx = 1.4.x
- Import User
- Import Forum
- Import Thread
- Import Post
- Import Smilie
- Import Poll
- Import Private messages
- Import Moderator
Tier = 1
Source version support in ImpEx = 2.0.22
- Import usergroup
- Import user
- Import banlist
- Import forum
- Import thread
- Import smilie
- Import post
- Import poll
- Import Private messages
- Import rank
- Import attachment
Tier = 1
Source version support in ImpEx = 3.0.3
- Import usergroup
- Import user
- Import forum
- Import thread
- Import smilie
- Import post
- Import Private messages
- Import attachment
- Import moderator
Tier = 3
Source version support in ImpEx = 4.0.1
- Import usergroup
- Import user
- Import forum
- Import thread
- Import post
- Import smilie
- Import poll
- Import Private messages
- Import attachment
Tier = 3
Source version support in ImpEx = 6.00.301
- Import usergroup
- Import user
- Import forum
- Import thread
- Import post
- Import poll
- Import Private messages
- Import attachment
Tier = 2
Source version support in ImpEx = 3.3.1
- Import usergroup
- Import user
- Import forum
- Import thread
- Import post
- Import smilie
- Import poll
- Import Private messages
Tier = 3
Source version support in ImpEx = 1.2.10
- Import usergroup
- Import User
- Import Forum
- Import Thread
- Import Post
- Import Moderator
Tier = 2
Source version support in ImpEx = 1.0.4
- Import User
- Import Forum
- Import Thread
- Import Post
- Import attachment
Tier = 3
Source version support in ImpEx = 3.1.8
- Import User
- Import Categories
Tier = 3
Source version support in ImpEx = 2.0.3
- Import User
- Import Forum
- Import Thread
- Import Post
Tier = 1
Source version support in ImpEx = 2.0
- Import usergroup
- Import user
- Import forum
- Import thread
- Import post
- Import Private messages
- Import poll
- Import attachment
- Import moderator
Tier = 1
Source version support in ImpEx = 3.4.04
- Import user
- Import forum
- Import thread
- Import post
- Import poll
- Import Private messages
- Import moderator
- Import smilie
Tier = 3
Source version support in ImpEx = 3.00
- Import Usergroup
- Import User
- Import Forum
- Import Thread
- Import Post
- Import Ranks
- Import Private messages
Tier = 3
Source version support in ImpEx = 1.6
- Import user
- Import forum
- Import thread
- Import post
Tier = 3
Source version support in ImpEx = 2 Alpha 7
- Import Usergroup
- Import Ranks
- Import User
- Import Forum
- Import Thread
- Import Post
- Import Poll
- Import Private Messages
- Import Smilie
Tier = 3
Source version support in ImpEx = 2.0
- Import User
- Import Forum
- Import Thread
- Import Post
- Import Smilie
Tier = 3
Source version support in ImpEx = 1.1
- Import Usergroup
- Import User
- Import Forum
- Import Thread
- Import Post
- Import Attachment
Tier = 3
Source version support in ImpEx = 3.1
- Import Usergroup
- Import User
- Import Forum
- Import Thread
- Import Post
Tier = 1
Source version support in ImpEx = 0.0
- Import User
Tier = 3
Source version support in ImpEx = 6.3 - 6.7
- Import Users
- Import Ban List
- Import Forums
- Import Threads
- Import Posts
- Import Buddy List
- Import Ignore List
- Import Private Messages
- Import Poll
- Import Moderators
Tier = 1
Source version support in ImpEx = 6.5
- Import usergroup
- Import user
- Import forum
- Import thread
- Import post
- Import poll
- Import Private messages
- Import moderator
- Import attachment
Tier = 1
Source version support in ImpEx = 7.2
- Import usergroup
- Import user
- Import forum
- Import thread
- Import post
- Import attachment
- Import moderator
- Import Private messages
Tier = 3
Source version support in ImpEx = 2000
- Import usergroup
- Import user
- Import forum
- Import thread
- Import post
- Import Private messages
Tier = 3
Source version support in ImpEx = 1.0 RC 1
- Import User
- Import Forum
- Import Thread
- Import Post
- Import Poll
- Import Smilie
- Import Private Messages
Tier = 3
Source version support in ImpEx = 1.0.2
- Import blog user
- Import blog text
- Import blog comments
Tier = 3
Source version support in ImpEx = 3.6.8
- Import blog user
- Import blog category
- Import blog
- Import blog text
Tier = 3
Source version support in ImpEx = 1.0 Beta 3
- Import blog user
- Import blog category
- Import blog
- Import blog comments
Tier = 3
Source version support in ImpEx = 1.1.4
- Import usergroup
- Import user
- Import forum
- Import thread
- Import post
Tier = 3
Source version support in ImpEx = 2.3.10
- Import usergroup
- Import user
- Import forum
- Import thread
- Import post
- Import poll
- Import Private messages
- Import moderator
- Import attachment
- Import smilie
Tier = 2
Source version support in ImpEx = 3.0.* - 3.5.*
- Import usergroup
- Import user
- Import avatar
- Import Custom pictures
- Import forum
- Import thread
- Import post
- Import poll
- Import Private messages
- Import moderator
- Import smilie
- Import attachment
Tier = 1
Source version support in ImpEx = 3.7.x
- Import usergroup
- Import user
- Import forum
- Import thread
- Import post
- Import poll
- Import Private messages
- Import phrase
- Import moderator
- Import Custom pictures
- Import attachment
- Import subscription
- Import smilie
- Import avatar
Tier = 3
Source version support in ImpEx = 1.0
- Import User
- Import Forum
- Import Thread
- Import Post
Tier = 3
Source version support in ImpEx = 1.1
- Import user
- Import forum
- Import thread
- Import post
Tier = 1
Source version support in ImpEx = 2.3.3
- Import User Groups
- Import Users
- Import Ban List
- Import Forums and Categories
- Import Threads
- Import Smilies
- Import Posts
- Import Polls
- Import Private Messages
- Import Moderators
- Import Attachment
Tier = 2
Source version support in ImpEx = 3.0.3
- Import usergroup
- Import user
- Import forum
- Import thread
- Import post
- Import Private messages
- Import attachment
Tier = 3
Source version support in ImpEx = 5.30
- Import forum
Tier = 3
Source version support in ImpEx = 5.0
- Import Forum
Tier = 3
Source version support in ImpEx = 9.08
- Import Usergroup
- Import User
- Import Forum
- Import Thread
- Import Post
- Import Poll
- Import Private message
Tier = 3
Source version support in ImpEx = 2.3.1
- Import blog user
- Import blog category
- Import blog
- Import blog comments
Tier = 2
Source version support in ImpEx = 1.63
- Import Usergroup
- Import User
- Import Forum
- Import Thread
- Import Post
- Import Poll
- Import Private message
- Import Moderators
- Import Attachment
Tier = 3
Source version support in ImpEx = 1.9
- Import User
- Import Forum
- Import Thread
- Import Post
- Import Smilie
- Import Ranks
- Import Pm's
- Import attachment
Tier = 3
Source version support in ImpEx = 2.0
- Import User
- Import Forum
- Import Thread
- Import Post
Tier = 3
Source version support in ImpEx = x5
- Import usergroup
- Import user
- Import forum
- Import thread
- Import post
- Import smilie
- Import poll
- Import attachment
- Import Private messages
Tier = 1
Source version support in ImpEx = 2.1
- Import user
- Import forum
- Import thread
- Import post
- Import Private messages
- Import attachment
Tier = 2
Source version support in ImpEx = 1.3.1
- Import Usergroup
- Import User
- Import Forum
- Import Thread
- Import Post
- Import Private Messages
- Import Attachments
Tier = 1
Source version support in ImpEx = 1.5.5
- Import Usergroup
- Import User
- Import Forum
- Import Thread
- Import Post
- Import Poll
- Import Pm
- Import Attachments
Tier = 3
Source version support in ImpEx = 1.9.0
- Import usergroup
- Import user
- Import forum
- Import thread
- Import post
- Import Private messages
- Import attachment
Tier = 3
Source version support in ImpEx = 0.0
- Import user
- Import forum
- Import thread
- Import post
Tier = 3
Source version support in ImpEx = 0.0
- Import User
- Import Forum
- Import Thread
- Import Post
Tier = 3
Source version support in ImpEx = 2.1.0
- Import User
- Import Forums
CMS Importers |
Drupal - CMS (6)
Joomla - CMS (1.5)
Wordpress - CMS (2.9.1)
Each system currently imports the users into a default usergroup, then bulk loads the source data types as articles.
ImpEx FAQ |
Import Export.
The search function is only working on new thread, or not working at all.
After any import you need to rebuild the search index.
AdminCP > Maintenance > Update Counters > Rebuild Search Index
All my post dates are 12-31-1969, how do i fix this ?
After most imports you need to rebuild the thread info and forum info as well.
AdminCP > Maintenance > Update Counters > Rebuild Thread Information (this process could take a while)
AdminCP > Maintenance > Update Counters > Rebuild Forum Information
My member list says 1
Make sure you have move the users to the correct group. Adding and removing a temporary user will force the members list to rebuild.
Can ninjas do my import any better ?
Probably, though they are too busy flipping out to do imports.
What is the green percentage number during the import ?
It's mostly unimportant as it's just a reflection of the closeness of the source data to the target.
It's a measure of how much of the source data was available and selected when populating the ImpEx data object (user/thread/post/etc).
If a data object has 10 variables for data being imported and 3 of them are mandatory we can use that for an example.
If 5 of the variables are filled, 3 of which are the mandatory fields, then the object is 50% full and valid (green percentage number and imported).
If 9 of them are filled though only two of the mandatory ones, then it's 90% full though a fail.
The missing % that isn't imported is typically filled by defaults (within ImpEx just before the object is saved) or rebuilt when the admin runs the update counters and profile rebuild etc.
The % is an observation of what is being selected from the source and not is being saved.