| 1 | Login to your CCBill account. |
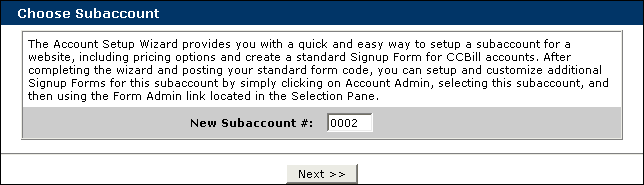
| 2 | Go to CCBill Admin > Account Setup > Choose Subaccount
|
| 3 | CCBill Admin > Account Setup > Website Info
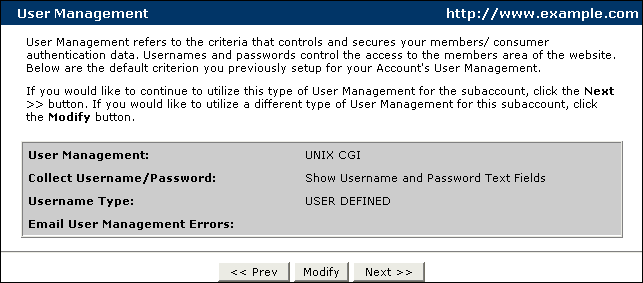
|
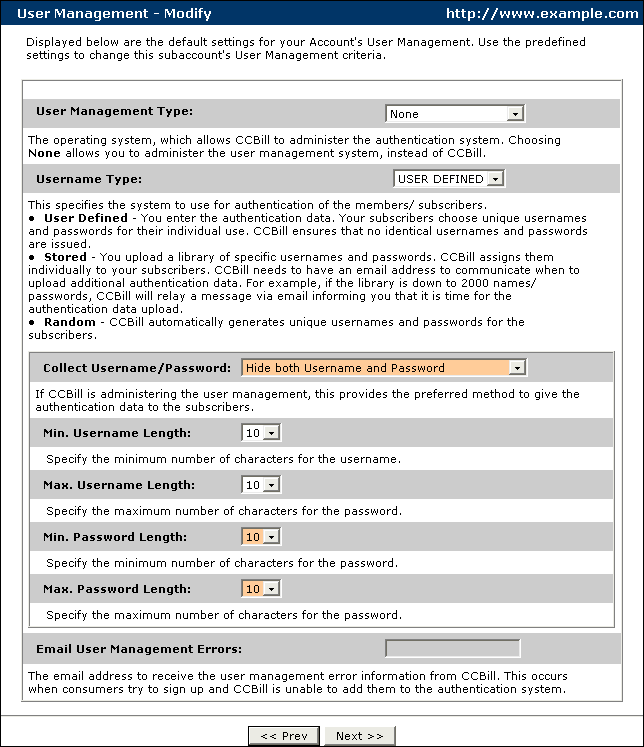
| 4 | CCBill Admin > Account Setup > User Management
|
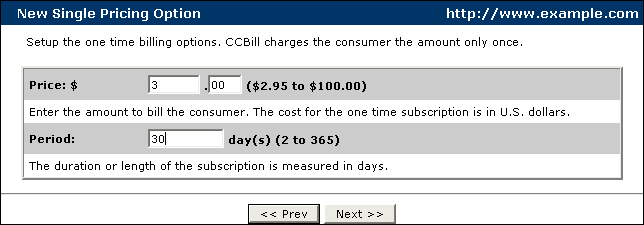
| 5 | CCBill Admin > Account Setup > User Management - Modify
Collect Username/Password - Select Hide both Username and Password Min. Username Length - Change to 10 Max. Username Length - Change to 10 Min. Password Length - Change to 10 Max. Password Length - Change to 10 Complete the other options to your liking and then click . |
| 6 | CCBill Admin > Account Setup > Server Info As alluded to previously, CCBill was designed to manage the user accounts of your members. Since you will not be using CCBill in this capacity, choose Other for the SystemType option. CCBill will not need to have access to your server as nothing will be installed on it. You will need to complete the non FTP options so that CCBill support can verify your website is acceptable. Press . |
| 7 | CCBill Admin > Account Setup > Pricing Options Only one time billing is supported by CCBill with vBulletin. For the Select Pricing Option Type option, select Single Billing Type. CCBill does not support the necessary callback routines to notify vBulletin when a recurring billing type is re billed. Press . |
| 8 | CCBill Admin > Account Setup > New Single Pricing Option
|
| 9 | CCBill Admin > Account Setup > Pricing Options Overview This screen will display the subscription that you just created. Next to the subscription will be a number under the label of ID. Write this number down next to the payment and length of this subscription. You may choose to add more subscriptions at this point by selecting Create New Pricing Option. Ensure that you write down the ID number for each subscription that you create. Note: You may also retrieve these numbers later if you forget. |
| 10 | CCBill Admin > Account Setup > Standard Form Layout You must now choose the style of form that will be shown to your members when they are paying for your CCBill subscriptions. Choose the form that appeals to you and click . |
| 11 | CCBill Admin > Account Setup > Standard Form Theme You must now choose a theme for your form. Choose the theme that appeals to you and click . Note: You may customize your form in greater detail later |
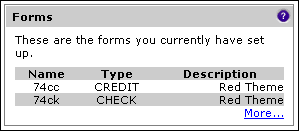
| 12 | CCBill Admin > Account Setup > Standard Index Page This page is not used by vBulletin so click . |
| 13 | CCBill Admin > Account Setup > Final Instructions Click . |
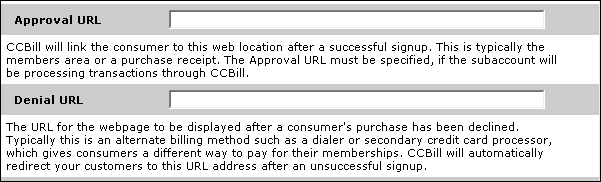
| 14 | CCBill Admin > Modify Subaccount > Advanced > Background Post Information Your sub account and at least one subscription has now been completed. On the left side of the screen click on Advanced.
Denial Post URL- Enter https://www.example.com/vb3/payment_gateway.php?method=ccbill You may increase the security of your CCBill transactions by including a secret word. If you wish to do this, instead of the above enter: Approval Post URL - Enter https://www.example.com/vb3/payment_gateway.php?method=ccbill&secretword=ABCDEF Denial Post URL- Enter https://www.example.com/vb3/payment_gateway.php?method=ccbill&secretword=ABCDEF Replace ABCDEF with your own secret word. Make note of this secret word as you will need to enter it into the vBulletin Subscription Manager later. Press . |
| 15 | Click View Subaccount Info on the left side of the menu. |
| 16 | CCBill Admin > Subaccount On the right side of the screen, find the box that contains your form. It will appear similar to
|
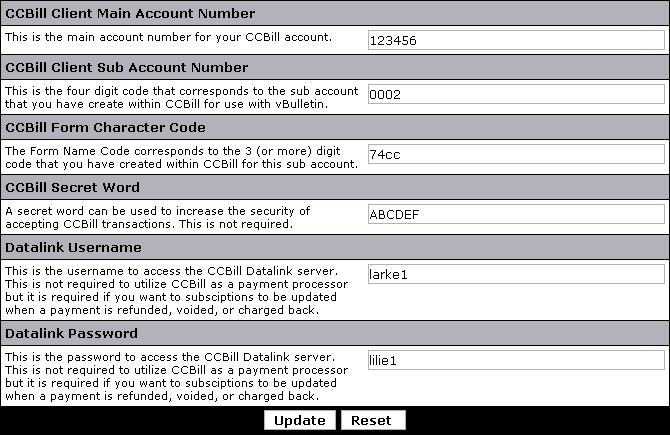
| 17 | At this point vBulletin is ready to accept your CCBill options. Log into your vBulletin Admin Control Panel and go to Paid Subscriptions > Payment API Manager. Edit the CCBill API.
CCBill Client Main Account Number - This is your main CCBill account number. It is used to login to your account. CCBill Client Sub Account Number - You wrote this number down in Step 2 and it was 0002 in our example. Make sure to include any leading zeroes that are included as the number should be four digits. CCBill Form Character Code - You wrote this down in the previous step, 16. It was 74cc in our example. CCBill Secret Word - This is optional but if you chose a secret word in step 14 then enter it here exactly the same. Our example was ABCDEF. Datalink Username - This is a 6-8 character alphanumeric name. It must contain at least one number and one letter. Choose an username now for usage later when Datalink is configured. Datalink Password - This is a 6-8 character alphanumeric password. It must contain at least 1 number and one letter. Choose a password now for usage later when Datalink is configured. Press . |
| 18 | Next you need to associate the subscriptions that you created in the CCBill admin with your vBulletin subscriptions. Go to Paid Subscriptions > Subscription Manager. Choose an existing subscription or create a new one. You must enter the subscription ID from Step 9 into the CCBill SubID field. If you create multiple CCBill subscriptions you can enter them all into one vBulletin subscription or you can create multiple vBulletin subscriptions for each CCBill subscription. You should match the U.S. Dollars amount and the Subscription Length to the values you chose for your CCBill subscription(s). CCBill only accepts payments in US Dollars.
|


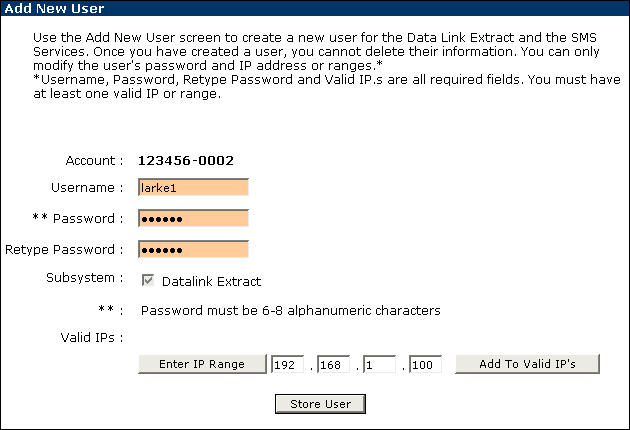
CCBill offers their Data Link Services Suite to facilitate this interaction. You should have already chosen an username and password for Data Link in step 17. Now you must go back to your CCBill Admin so that an accompanying account can be created to allow vBulletin access.
Note:
CCBill requires the connection to Data Link to be done via SSL (https) which means that your PHP installation will require openSSL suuport to be included. Please contact your host if you need openSSL support installed
| 1 | CCBill Admin Click on the Premium Features link at the top of the CCBill Admin screen |
| 2 | CCBill Admin > Premium Features Click on Value Added Features link on the upper left side of the screen. |
| 3 | CCBill Admin > Value Added Features Click on Data Link Services Suite at the bottom of the page. |
| 4 | CCBill Admin > Value Added Features > Data Link Services Suite
|
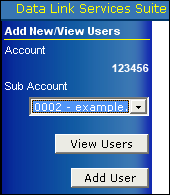
| 5 | CCBill Admin > Value Added Features > Data Link Services Suite > Add New User
|