 Tweet
Tweet
I just tested this and I would like to create an 'How to' for this 
Requirements
First, you need the program called 'TortoiseSVN' (or similar). I'm using this program with my Subversion installation, but I'll not post anything about this, TortoiseSVN will help us to patch files between them.
You can download it here: http://tortoisesvn.tigris.org/
Utilisation
Once you have installed it, you can browse Project Tools for searching any .diff file like here: http://www.vbulletin.com/forum/proje...?issueid=22829
Download the patch file and save it in any location on your hard drive.
Before to use this file, you must to edit it to follow your directories architecture. Open this file with your favorite text editor and look for the lines 1, 3 & 4. You have these lines:
You must to change these lines to match your vBulletin files in your computer. My package is extracted here:
For me, I'm editing the patch file like this:
Save the edited patch file.
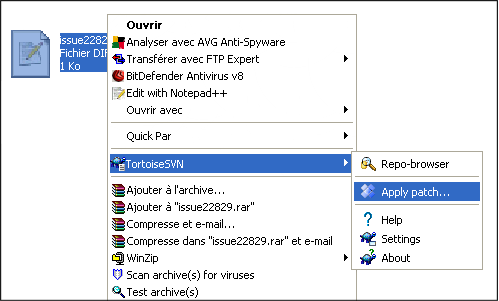
Now the file is okay with your configuration, you can do a right click on the patch file and select 'Apply patch...'.
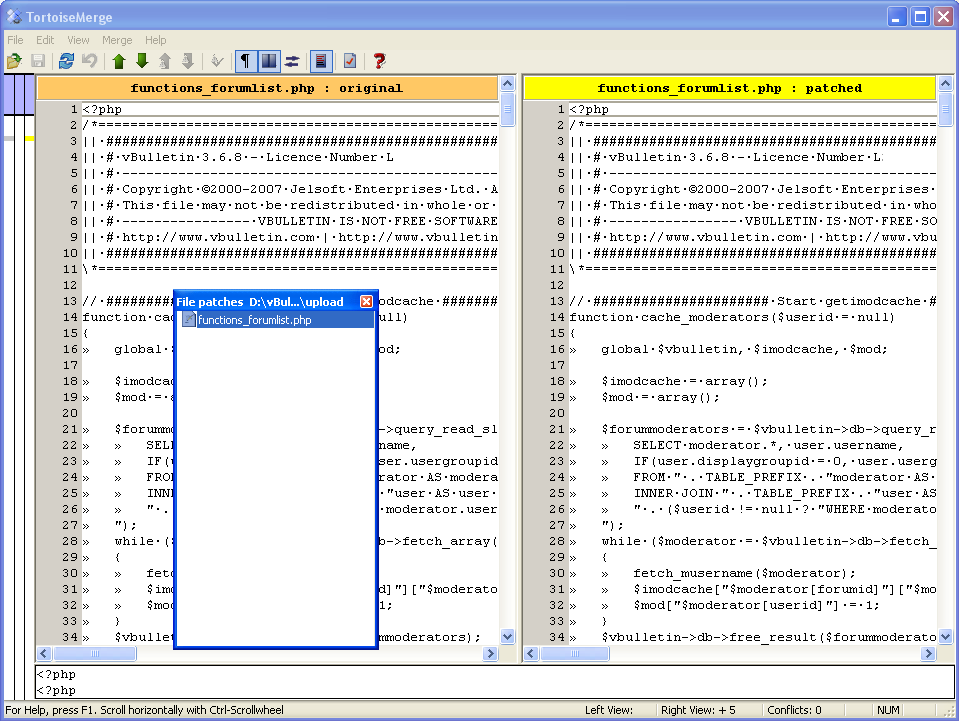
A new window appears and you must to select where is located your vBulletin files (the 'upload' directory).
Once the directory is selected, validate and you will see a list of files. Double-click on any file and you will see 2 parts in TortoiseMerge with the original file and the patched file.
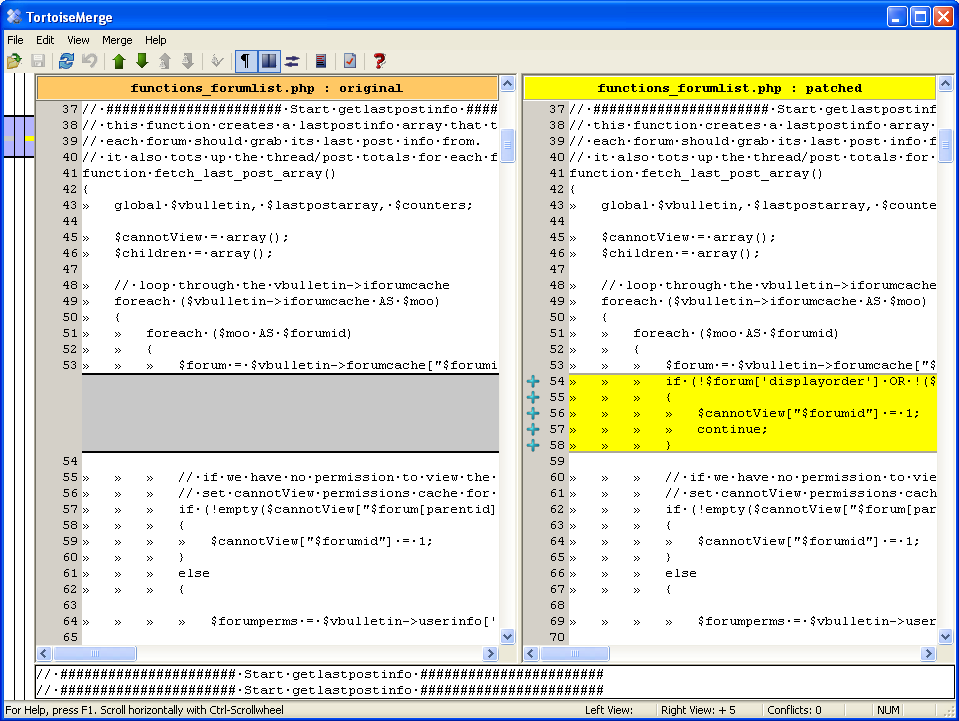
Go down the files and you can see some modifications between them.
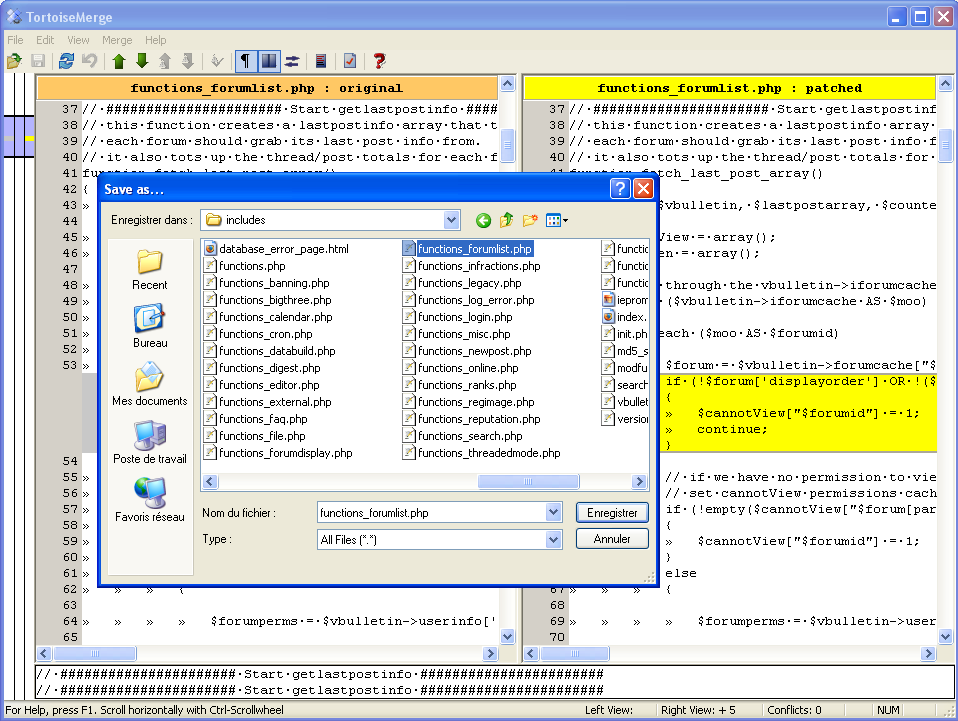
Now the edit are made, you can save the patched file. Go to the menus in File > Save As... and select the file to replace.
Once the file is saved, you can upload it and see the new effects
I hope this 'how-to' will help everybody for patching files for any vBulletin installation
Enjoy
PS: my installation is in French (as you can see in screenshots), but for the purpose of this 'how-to', the commands are in English
Requirements
First, you need the program called 'TortoiseSVN' (or similar). I'm using this program with my Subversion installation, but I'll not post anything about this, TortoiseSVN will help us to patch files between them.
You can download it here: http://tortoisesvn.tigris.org/
Utilisation
Once you have installed it, you can browse Project Tools for searching any .diff file like here: http://www.vbulletin.com/forum/proje...?issueid=22829
Download the patch file and save it in any location on your hard drive.
Before to use this file, you must to edit it to follow your directories architecture. Open this file with your favorite text editor and look for the lines 1, 3 & 4. You have these lines:
Code:
Index: V:/www/vb3/includes/functions_forumlist.php
===================================================================
--- V:/www/vb3/includes/functions_forumlist.php    (revision 17839)
+++ V:/www/vb3/includes/functions_forumlist.php    (working copy)
Code:
D:\vBulletin\Forums\3.6.x\3.6.8\vbulletin_3-6-8_L*******\upload
HTML Code:
Index: D:\vBulletin\Forums\3.6.x\3.6.8\vbulletin_3-6-8_L*******\upload\includes\functions_forumlist.php
===================================================================
--- D:\vBulletin\Forums\3.6.x\3.6.8\vbulletin_3-6-8_L*******\upload\includes\functions_forumlist.php    (revision 17839)
+++ D:\vBulletin\Forums\3.6.x\3.6.8\vbulletin_3-6-8_L*******\upload\includes\functions_forumlist.php    (working copy)
Now the file is okay with your configuration, you can do a right click on the patch file and select 'Apply patch...'.
A new window appears and you must to select where is located your vBulletin files (the 'upload' directory).
Once the directory is selected, validate and you will see a list of files. Double-click on any file and you will see 2 parts in TortoiseMerge with the original file and the patched file.
Go down the files and you can see some modifications between them.
Now the edit are made, you can save the patched file. Go to the menus in File > Save As... and select the file to replace.
Once the file is saved, you can upload it and see the new effects
I hope this 'how-to' will help everybody for patching files for any vBulletin installation
Enjoy
PS: my installation is in French (as you can see in screenshots), but for the purpose of this 'how-to', the commands are in English